
Creating cascading dropdowns with the Filter by Field setting
Cascading dropdowns (also called dependent dropdowns) are fields whose choices change based on an earlier answer on the same form: a visitor picks a category, and the next dropdown shows only the items in that category. Gravity Forms Dynamic Lookup makes this possible with the Filter by Field setting on the Lookup field. This article walks through a complete example.
Note: Filter by Field requires Dynamic Lookup 1.7 or newer. It’s available when the Lookup field’s source type is Gravity Forms and its input type is Dropdown.
How Filter by Field works #
A Lookup field fills its own choices from the entries of another Gravity Forms form. By default, it lists all of them. Filter by Field links the choice list to a field on the same form the visitor is filling out: only source entries whose matching field equals that value appear as choices.
You choose which value links the two. It can be a category, an email address, a customer ID, or any other field the source form stores. Choices load once the visitor enters a value in the linked field.
Our example #
We’ll build a product inquiry form where the Product dropdown only shows products from the selected category. Two forms are involved:
- Products (the source form) – One entry per product, with a Product name field and a Category field
- Product inquiry (the form visitors fill out) – A Category dropdown, followed by a Product Lookup field
1. Prepare the source form #
The source form holds the data your Lookup field will draw from. In our example, the Products form has two fields:
- Product name (Single Line Text) – what visitors will see as choices
- Category (Drop Down) – the value the filter will match against
Each product is an entry on this form, for example “Cordless Drill” in the “Power Tools” category. You can add entries manually, or import them from a spreadsheet with GravityImport.
2. Add the field that drives the filter #
On the form visitors fill out, add the field whose value will filter the Lookup choices. In our example, it’s a Category Drop Down with the choices “Power Tools”, “Hand Tools”, and “Safety Gear”.
Note: The filter compares values exactly. The choices on this field must match the values stored by the source form’s Category field, including capitalization.
3. Add and configure the Lookup field #
- Add a Lookup field to the form (you’ll find it under Advanced Fields).
- In the field settings, select Gravity Forms as the source type.
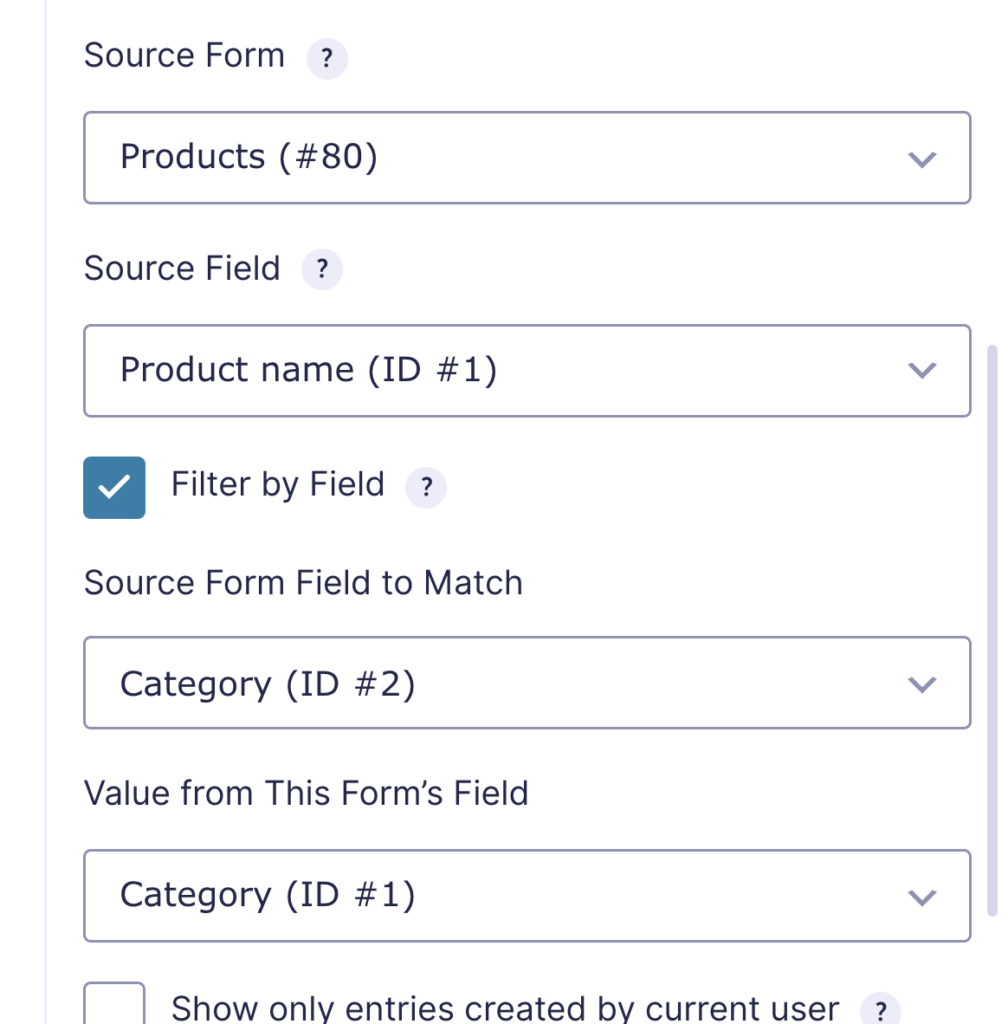
- Set Source Form to the form holding your data (Products, in our example).
- Set Source Field to the field visitors should see as choices (Product name).
4. Enable Filter by Field #
Still in the Lookup field’s settings:
- Check Filter by Field.
- Set Source Form Field to Match to the field on the source form that holds the linking value (Category on the Products form).
- Set Value from This Form’s Field to the field on this form that provides the value (the Category dropdown you added in step 2).
- Save the form.
What visitors see #
On the published form, the Product dropdown starts out empty. As soon as the visitor picks a category, it loads only the products in that category. If they change the category, the product choices update to match.
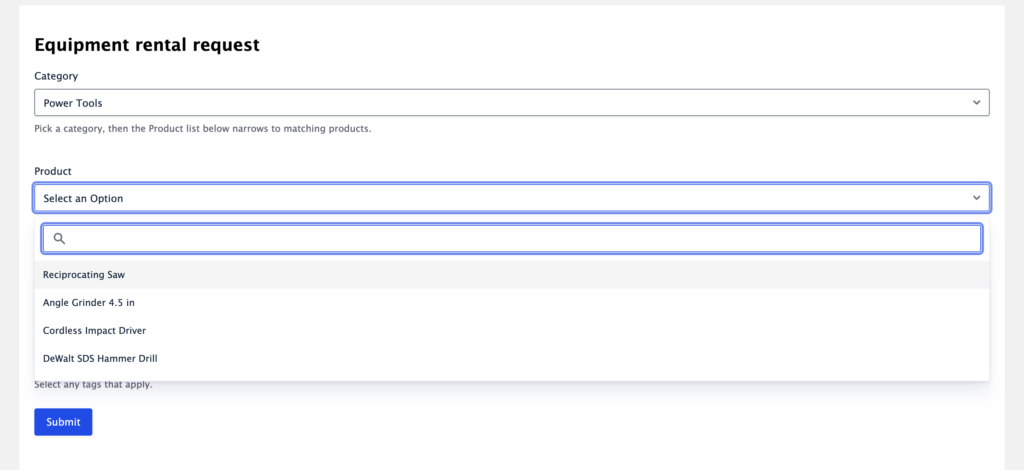
The filtered list shows up to 100 matching choices by default. Developers can change this limit (see the developer notes below).
Making long lists searchable #
For source forms with many entries, enable the Enable enhanced user interface setting on the Lookup field. The dropdown becomes searchable, so visitors can type to narrow the filtered choices instead of scrolling.
Developer notes #
Three filters modify the Filter by Field behavior:
gk/lookup/filter/value– Modify the value used to filter lookup choices.gk/lookup/filter/max-results– Change the maximum number of filtered choices (default: 100).gk/lookup/filter/allow-public– Disable filtered choice lookups for logged-out visitors.

