Published
•
Updated
How to build an application review system for grants, research proposals, jobs, contests, and more
Build a custom application review system on WordPress for grants, jobs, or research proposals. Gravity Forms collects submissions and GravityView manages the review workflow.

Whether you’re overseeing grant applications, evaluating research papers, or managing job applications, having a defined workflow and review system is key.
While dedicated software platforms and SaaS solutions exist to address this need, they are often overly expensive and limited in functionality.
In this tutorial, we’re going to show you how to build your own application review system on WordPress using Gravity Forms and GravityView. we’ll explore how this approach can lead to efficiency, cost-savings, transparency, and empowerment for your organization.
Check out a live demo of the finished application review system, and download the entire setup for importing to your own website!
Download the free grant application form template now!
Import the template into Gravity Forms and customize as necessary.
Sneak peek
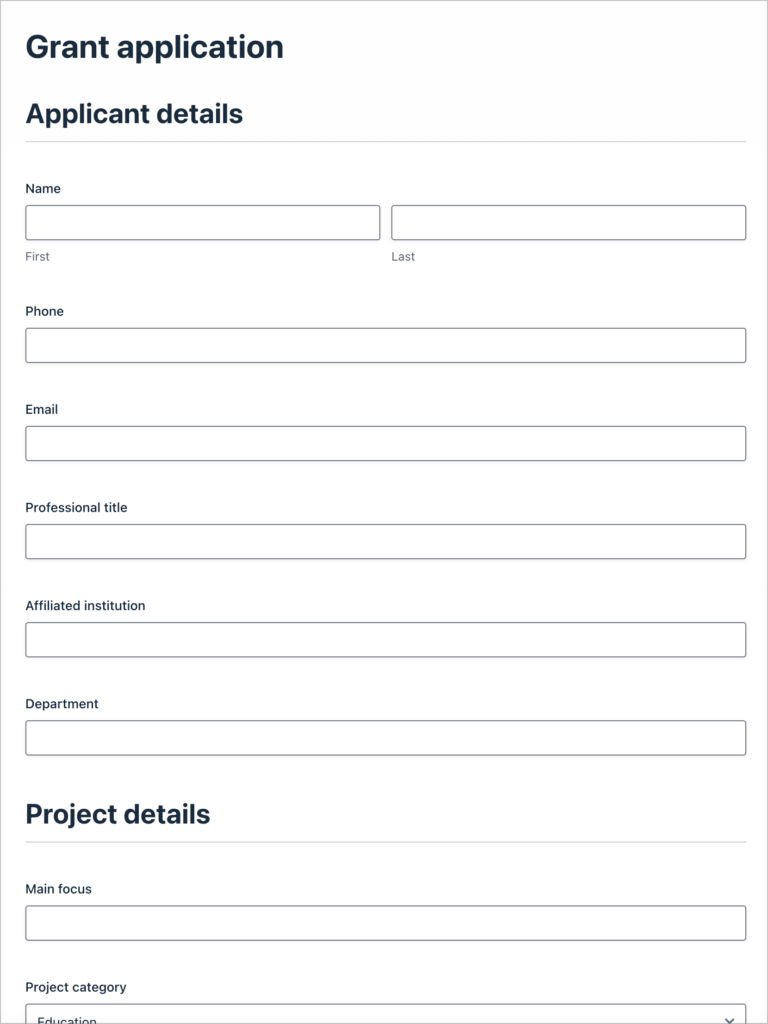
In this example, we’re going to build a system for collecting and reviewing grant proposals. Here is the grant application form that users submit.

When users submit grant applications, staff can vet them from a custom dashboard.
Reviewers can then add ratings and comments to individual applications as part of the review process.

Finally, after reviewers have added their ratings/comments, board members can approve or deny the application from their own dashboard.
Pretty neat, isn’t it?
What you’ll need
Here are the plugins you will need to create the system in this tutorial:
- Gravity Forms (any license tier)
- GravityView (GravityView + Extensions license or higher)
- GravityView Advanced Filtering Extension
Building an application review system without any code
Many nonprofit organizations and educational institutions have limited resources and therefore aren’t able to hire developers, or pay agencies for custom development work. WordPress is the ideal platform for such organizations as it’s 100% free to use.
Furthermore, there are thousands of plugins available that add features and functionality to the platform. Two such plugins—Gravity Forms and GravityView—work in combination, allowing users to create complex information systems, and front-end interfaces, without any technical knowledge!
In this guide, we’ll show you how to leverage these powerful tools to create your own custom application review system that you can enhance and maintain without any coding skills.
Why build an application review system on WordPress?
Building an application review system is not just about making your workflow more efficient; it’s about fostering transparency, collaboration, and data-driven decision-making.
By taking advantage of WordPress with Gravity Forms and GravityView, you can create a system that aligns with your organization’s goals and enhances the overall application review experience for all users.
Let’s take a look at some specific benefits of this approach:
Better accountability and transparency
With an application review system, you can maintain a comprehensive record of all submissions, reviewer feedback, and decisions. This level of transparency not only fosters trust among applicants but also helps your organization adhere to ethical standards and guidelines. It also makes it easier to trace the evaluation process, making it fair and unbiased.
Efficiency and time savings
An application review system helps streamline the entire application process, reducing manual administrative work. Applications are collected electronically, eliminating the need for paper submissions or endless email threads! This efficiency saves significant time for both applicants and reviewers, allowing them to focus on the quality of the applications rather than the logistics of submission and tracking.
Customization and flexibility
Every organization has unique requirements for its application review process. Building a custom system using Gravity Forms and GravityView on WordPress allows you to tailor the system to your specific needs.
You can create custom forms, set up unique scoring criteria, and design a review workflow that aligns with your organization’s goals and values. This level of customization ensures that the system adapts to your requirements, not the other way around!
Cost-efficiency compared to existing solutions
Existing software solutions for similar purposes can often be prohibitively expensive. Many commercial application review platforms charge hefty licensing fees, subscription costs, and maintenance expenses.
Building your custom application review system on WordPress with Gravity Forms and GravityView can be a much more affordable option. By investing time and effort into building your system, you can avoid the ongoing financial burden of expensive software licenses, saving your organization valuable resources in the long term.
Overview of the system: Features and workflow
Before we dive into how we built the system, let’s go over how it works, its different components, and the various features it supports. Remember that GravityView is highly customizable, so you’ll be able to customize this system depending on the unique needs of your project!
We built this solution for a fictional nonprofit organization. In this organization, the grant review process is split into two stages. First, staff members vet applications before passing them on to board members who have the final say as to whether they get approved or not. Here’s how it works:
- As with most of our tutorials, everything begins with a form! The application form allows logged-in users to submit grant applications. They then have access to a dashboard that displays all their submitted applications, along with the status of each one. From here, students can also view and edit their applications.
- There is a separate dashboard for staff where they can view, filter and sort through all applications. They also have the ability to add notes and comments to these applications that are only visible to other reviewers. Once a consensus has been reached as to whether the application should proceed to the final review stage, the staff will update its status.
- Finally, board members can see all applications, along with the staff’s notes and comments. They are then able to approve or deny an application using a special field that only they have access to.
Now let’s start building the application review system, step by step.
Create your user roles
If you intend applications to go through multiple review stages, you may need to set up multiple user roles on your site. In this example, we have two user roles—one for regular staff, and one for Board members. To create or edit user roles in WordPress, you can use the free Members plugin.
Creating the grant application form
The first thing we need to do is create the grant application form. To do this, we’ll hover over “Forms” and click “New Form”. Now we can start building our form using the Gravity Forms drag-and-drop builder.
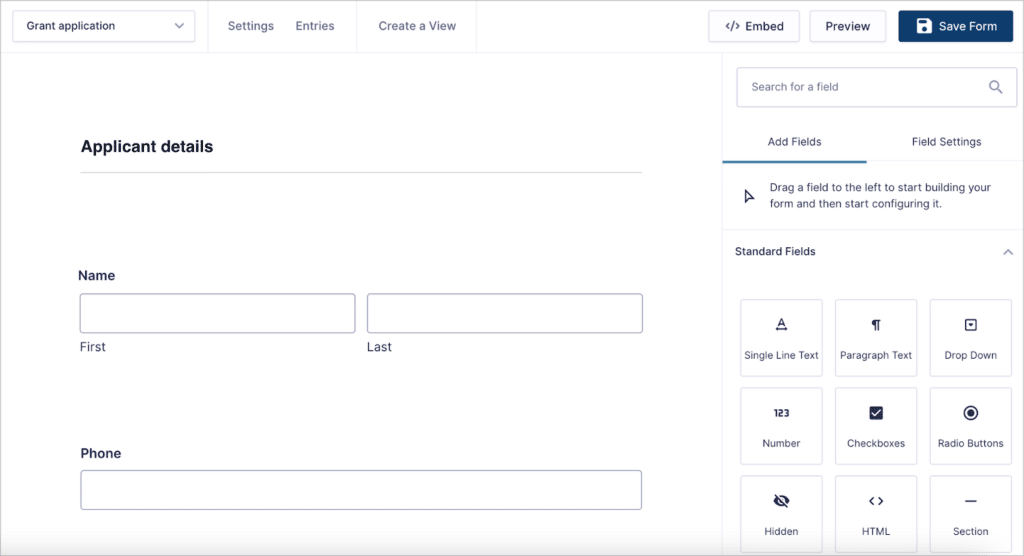
Feel free to add any fields you feel are necessary here. If your form is quite lengthy, consider grouping similar fields under new “Sections” to make it easier to fill out. You could also consider building a multi-page form.
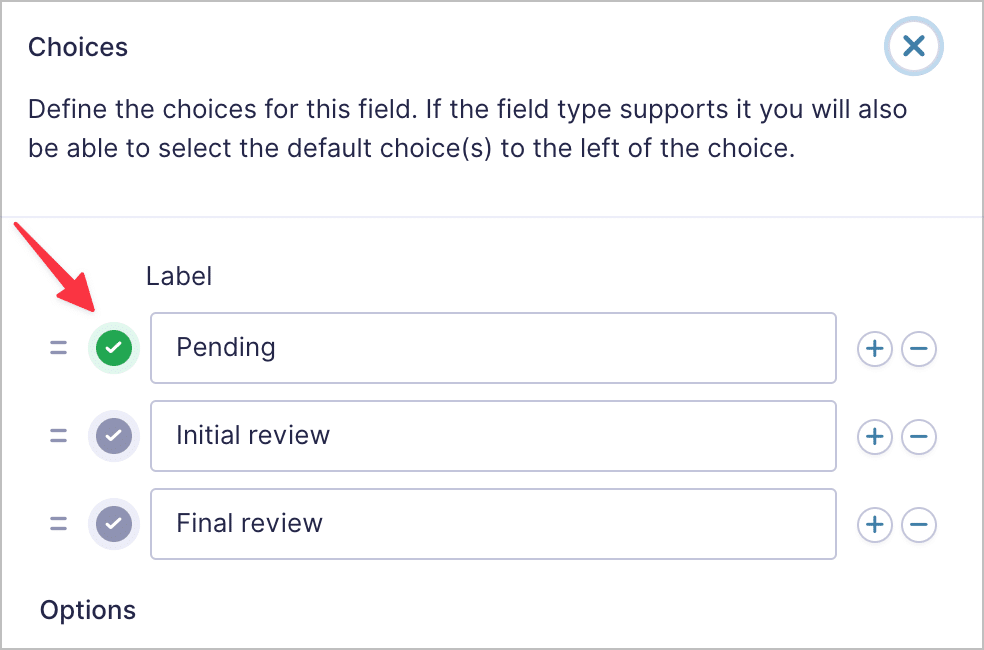
When you’re finished adding your fields, the final thing you’ll need is a hidden Drop Down field for the application’s status. The reason it’s hidden is because we don’t want applicants to see this field when filling out the form. Only the grant reviewers will have the ability to update this field.

This dropdown field will have three choices—“Pending”, “Initial review”, and “Final review”. When an application is submitted we want its status to automatically be set to “Pending”. To achieve this, we’ll click on the checkmark to the left of the choice label so that it turns green.
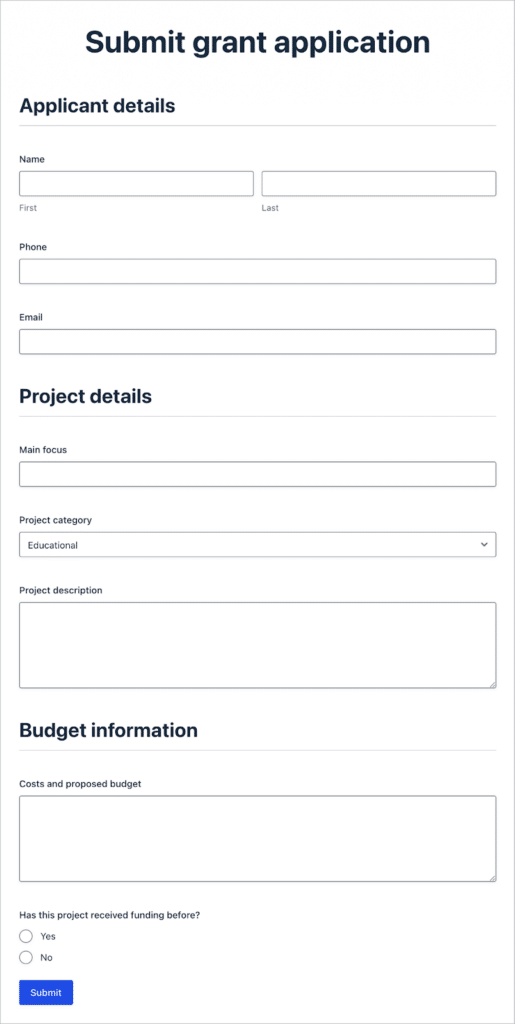
Here’s what our completed grant application form looks like on the front end:
Save time by downloading our grant application form template now!
The next step is to create the dashboard that applicants see after submitting their application.
Creating the applicant dashboard
The dashboard we’re going to build will be a View that displays details about an applicant’s application(s), along with links to view and edit them on the front end, should they wish to do so.
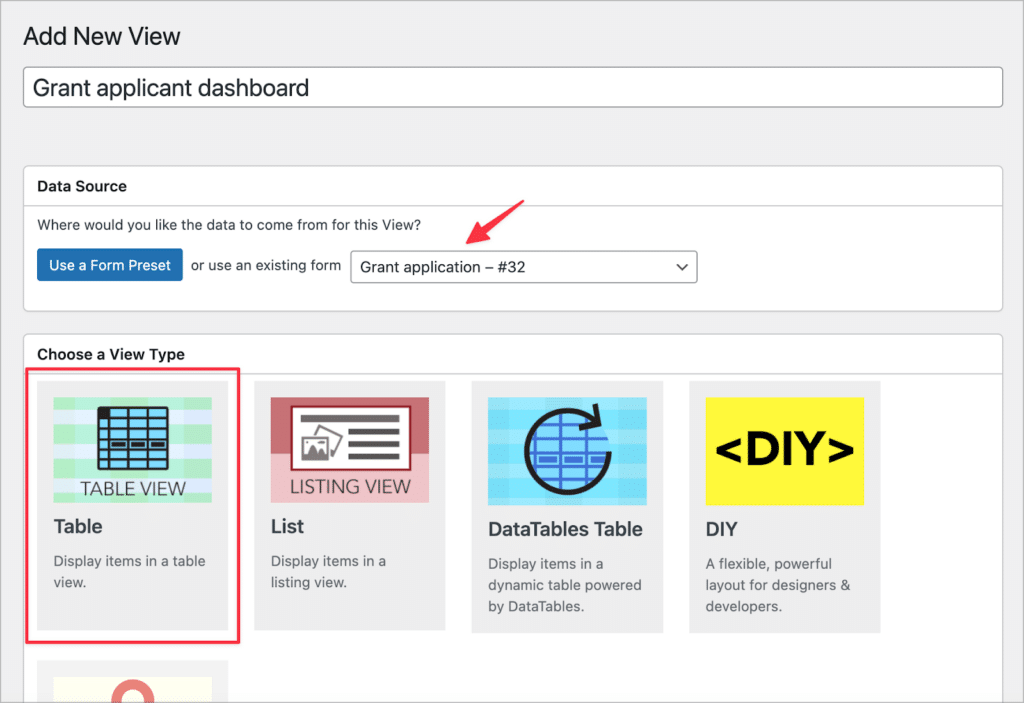
To create a new View, we’ll hover over “GravityKit” and click “New View”. After giving our View a name, we’ll go ahead and select our grant application form as the data source, and choose the Table layout as our View Type.
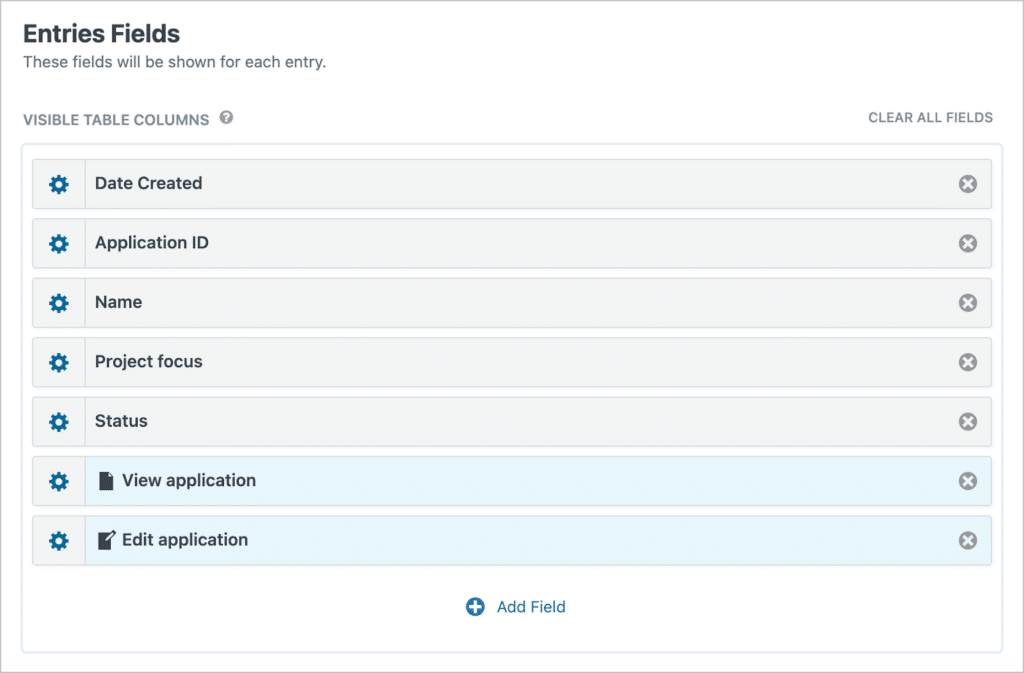
Now we can start configuring the View using GravityView’s powerful drag and drop editor. On the Multiple Entries layout, we’ll add the following fields:
- Date Created
- Entry ID (rename this to “Application ID”)
- Name
- Project focus
- Status
- Link to Single Entry (rename this to “View application”)
- Link to Edit Entry (rename this to “Edit application”)
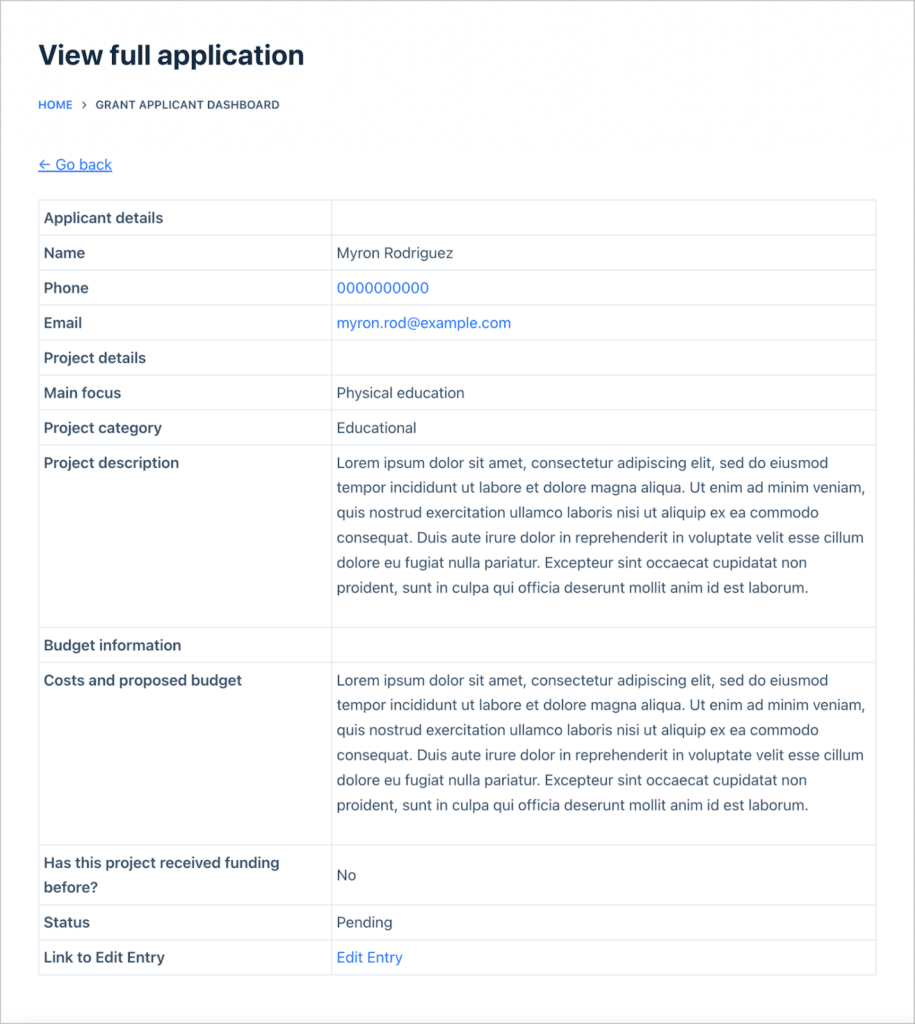
Now click on the “Single Entry Layout” tab to configure this page. The Single Entry page allows users to view their full application. If there are any fields you don’t want users to see here, simply don’t include them in the configuration.
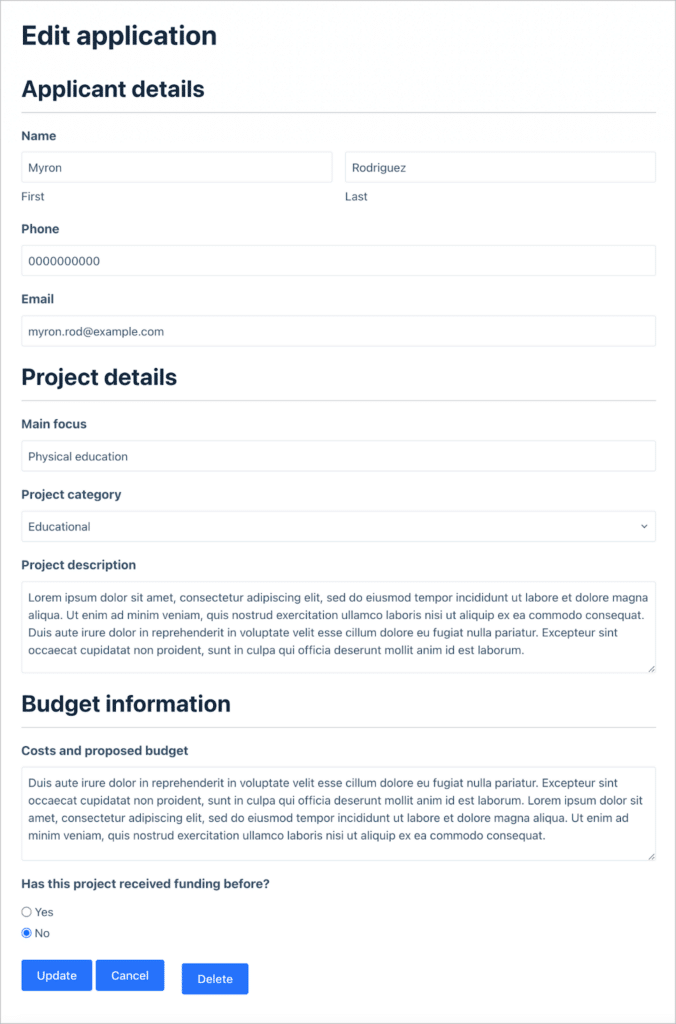
We want to give users the ability to edit their applications after they have already been submitted, so we’ll go ahead and configure the Edit Entry Layout as well. Okay, now that our View has been fully configured, there’s one more thing we need to do.
We’re going to add an advanced filtering condition that restricts entries in a View to those created by the currently logged-in user. This means that users will only be able to see the applications that they submitted!
To add this condition, we’ll scroll down to the View settings, click on the “Filter & Sort” tab and then click “Add Condition”.
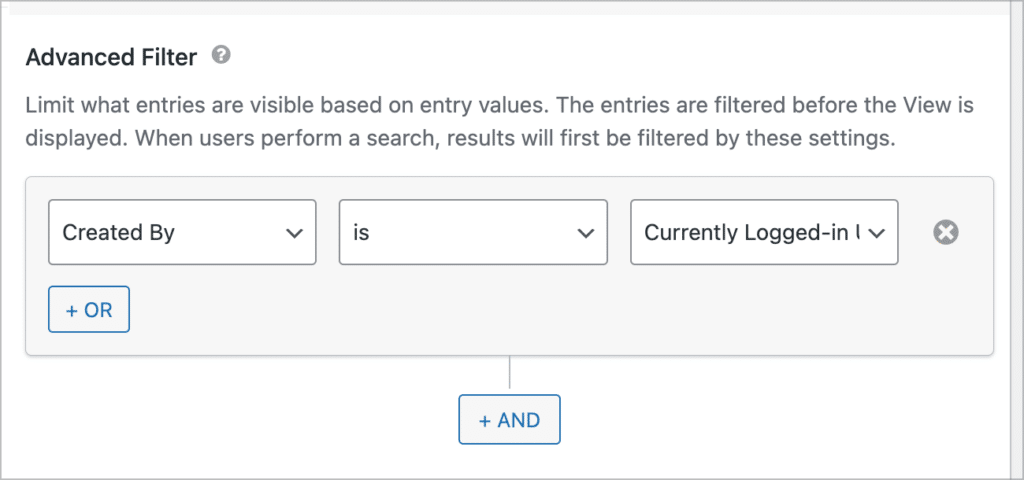
Pro tipTo filter Views based on conditional logic, you’ll need the GravityView Advanced Filtering Extension.
Here’s what our applicant dashboard looks like on the front end. As you can see, the logged-in user can View all of their present and past applications.
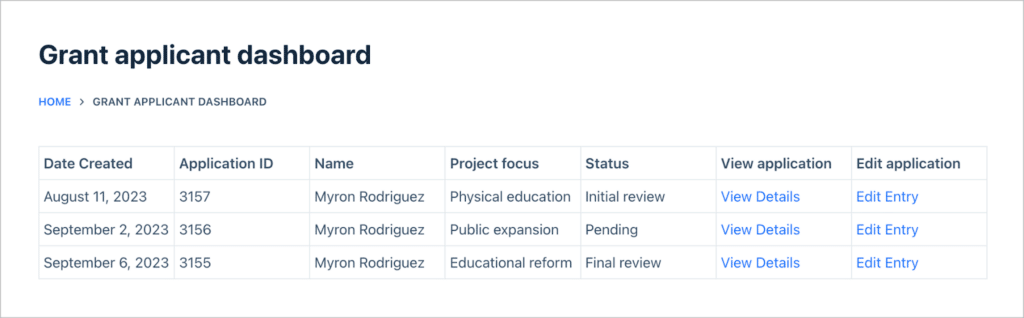
When they click on the “View Details” link, they are taken through to the Single Entry page where they can view the application in full.
If they click on the “Edit Entry” link, they are able to edit their application on the front end!
After configuring the dashboard View, you may want to embed it on a page on your website. You can do this using either the GravityView WordPress block or the embed shortcode.
Creating the grant reviewer dashboard
Now that we have built the applicant dashboard, we can turn our attention to building out the grant reviewer dashboard. This is what grant reviewers can see when reviewing new applications.
This dashboard will also be a table View linked to our grant application form. However, the fields we add here will be different from those added to the applicant dashboard.
Let’s start by configuring the Multiple Entries layout. Here, we’ll add the “Date Created” and “Date Updated” fields, the name of the applicant, and the Project focus. Next, we’ll add an “Approval” field at the top (we’ll explain this more in the next section). And finally, we’ll add links to the Single Entry and Edit Entry layouts.

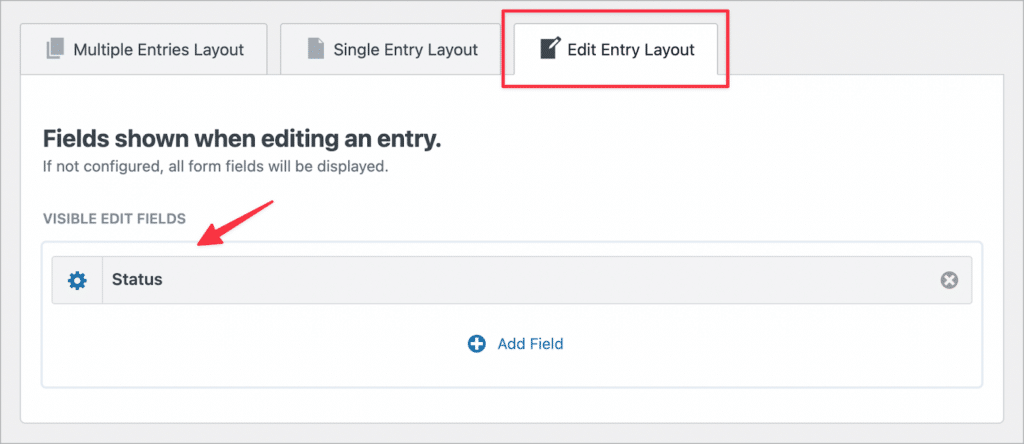
We want reviewers to have the ability to update the status of an application, but they shouldn’t be able to edit anything else. To set this up, we’ll only add the “Status” field to the Edit Entry Layout.
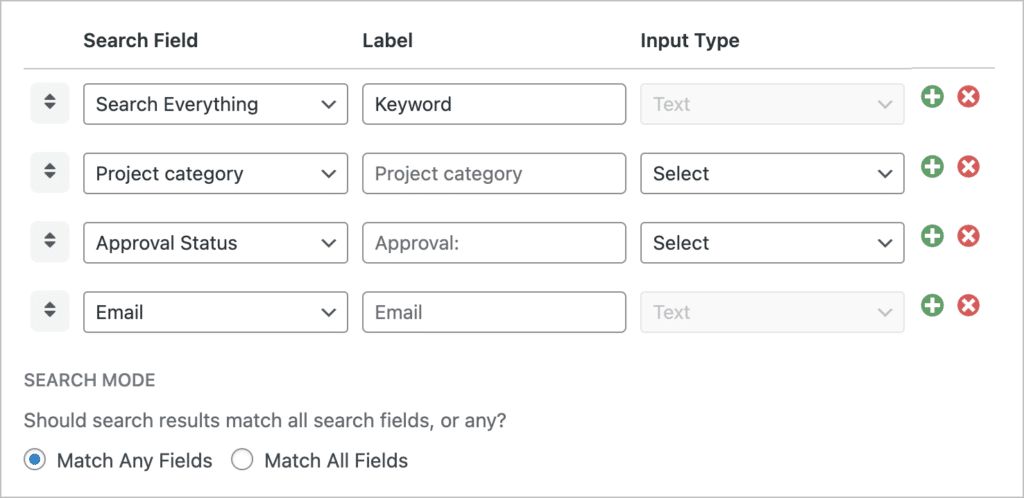
Finally, as we’re expecting to receive a large number of applications, we need a way for reviewers to filter and sort through them. To achieve this, we’ll add a Search Bar widget to our View.
GravityView’s search bar is highly configurable, allowing us to select which fields to include, modify field input types, and more. For this example, we’ll add search inputs for the Project category, Application Approval Status, and Email Address fields.
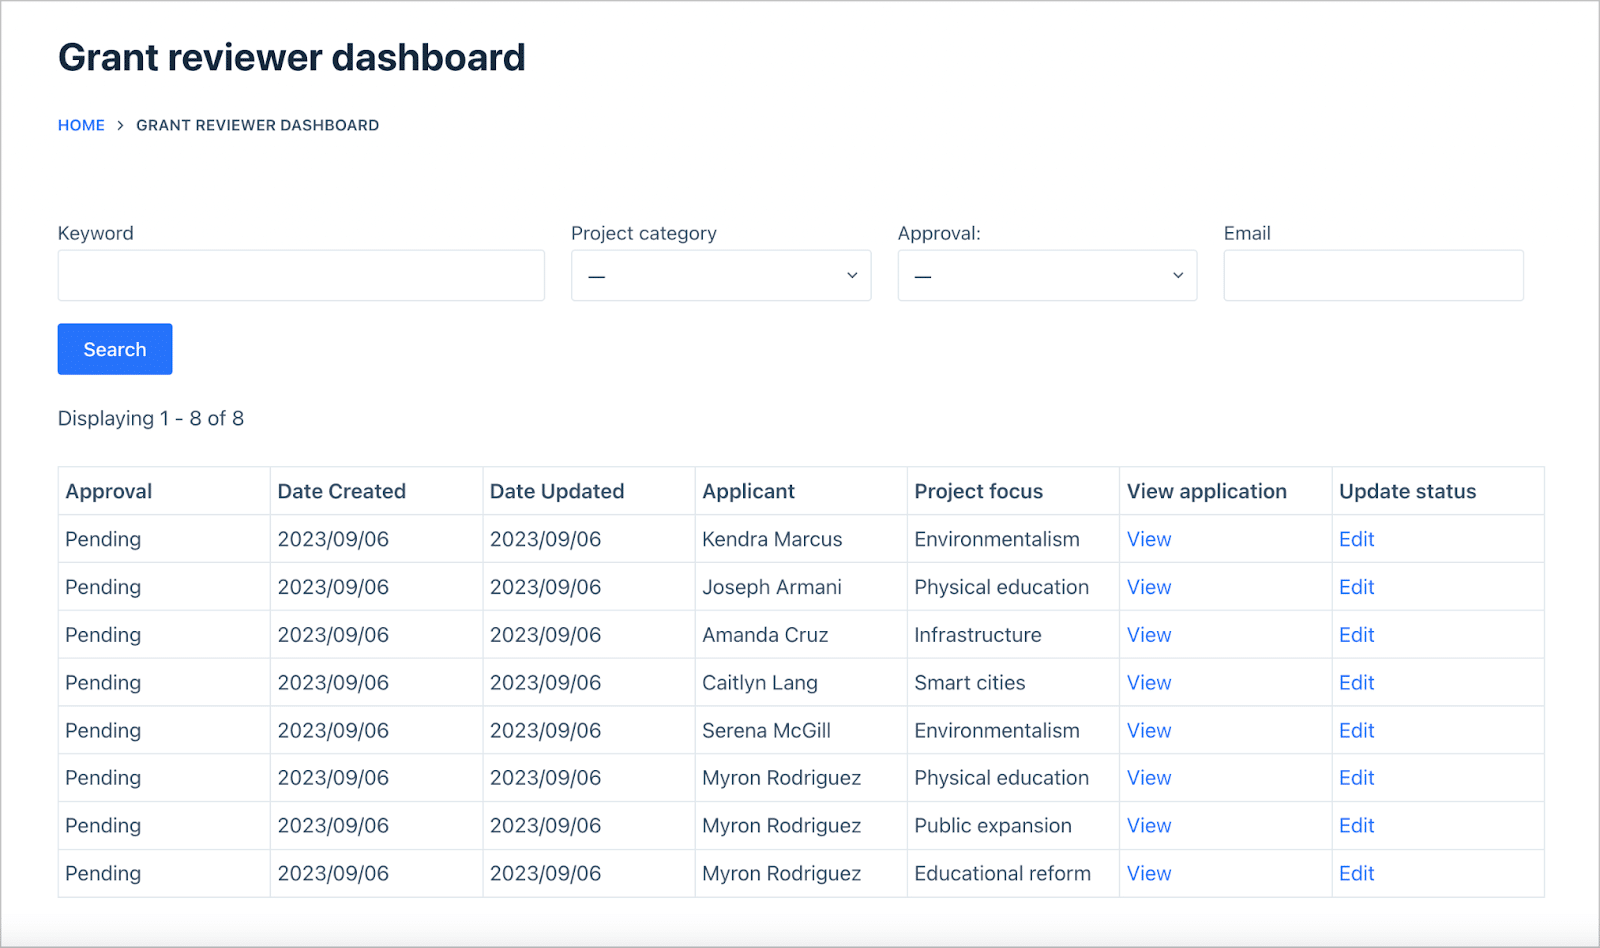
Here’s what our grant reviewer dashboard looks like on the front end:

When a reviewer clicks on the “Edit” link, they will have the ability to change the status of an application by selecting a new option from the “Status” drop down menu.
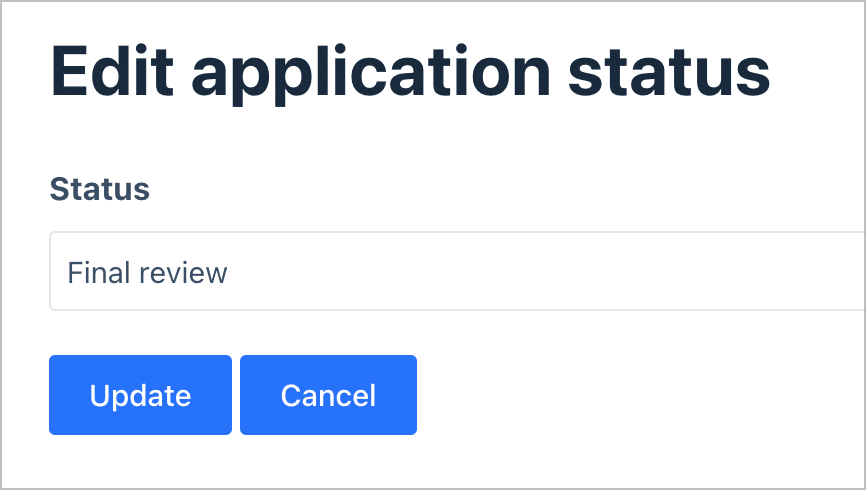
This will update the status of the application, which will also reflect in the applicant dashboard to give users an idea of where they are in the process.
Pro tipYou’ll need to ensure that only grant reviewers can access this View. Learn how to restrict a View by login status or user role.
Allowing reviewers to rate and comment on applications
Grant reviewers will be in charge of reviewing new applications as they come in, so it’s important that they have a way to add notes and ratings. There are two ways to accomplish this—either by adding entry notes, or by using a separate form and View.
In this tutorial, we’re going to show you how to do this using entry notes (as this is the easier and less complicated way). If you want to find out more about the other way to accomplish this, read this article on our docs site.
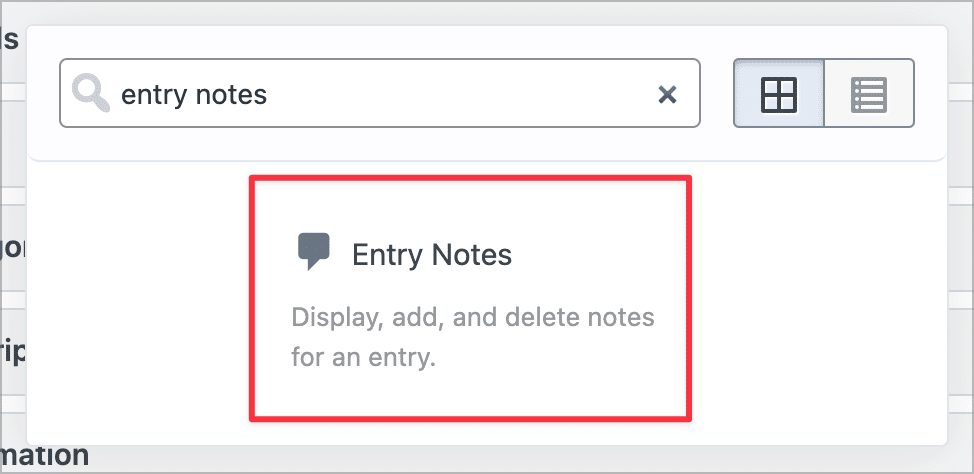
Entry notes allow users to add notes and comments to Gravity Forms entries. To enable this functionality on the front end, we’ll simply add the “Entry Notes” field to our View’s Single Entry layout.
Here’s what it looks like on the front end:
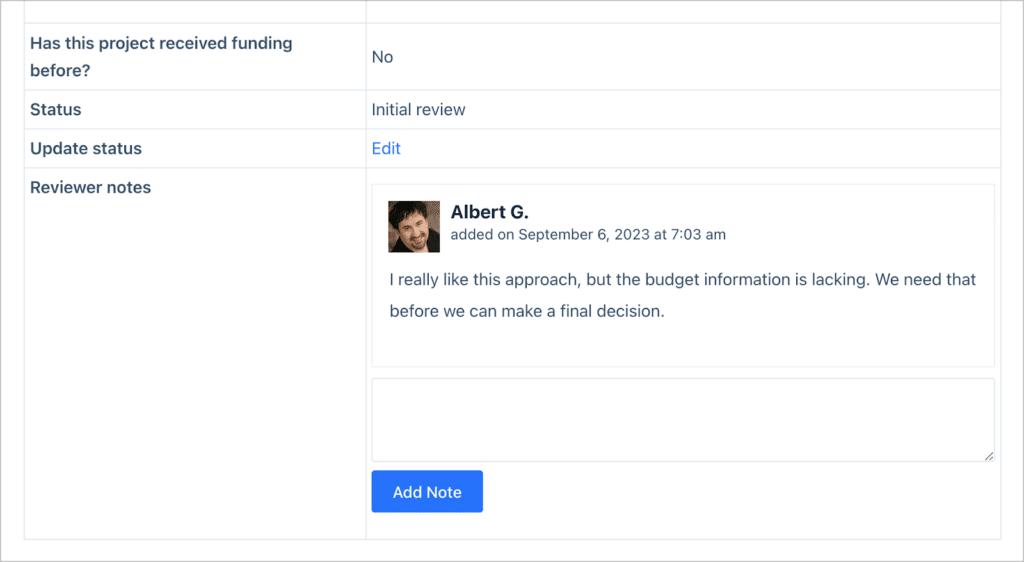
As you can see, there’s a simple input field allowing grant reviewers to write comments and notes. After clicking “Submit” the note will be added to the application and include the reviewer’s name and the date and time it was added. These notes will also be visible to other reviewers.
Okay, we’ve made great progress! We’ve built out the applicant dashboard and the grant reviewer dashboard. Now we need to ensure that board members have the final say as to whether an application gets approved.
Final approval
For this, we could create a third dashboard for board members, but we don’t necessarily need to do that! Instead, we can give board members access to the same dashboard as grant reviewers, with an extra field allowing them to approve/reject applications.
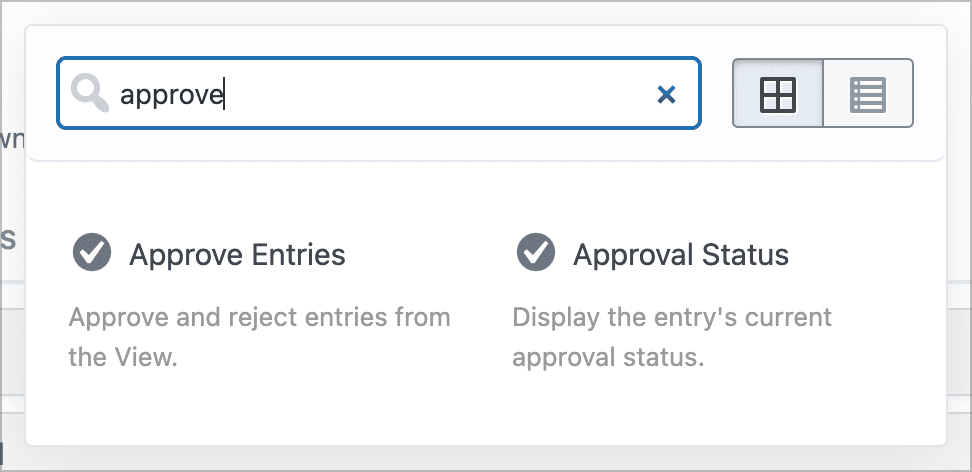
To do this, we’ll use GravityView’s powerful, in-built approval system. To allow board members to approve/reject applications from the front end, we’ll add the “Approve Entries” field to our dashboard View.
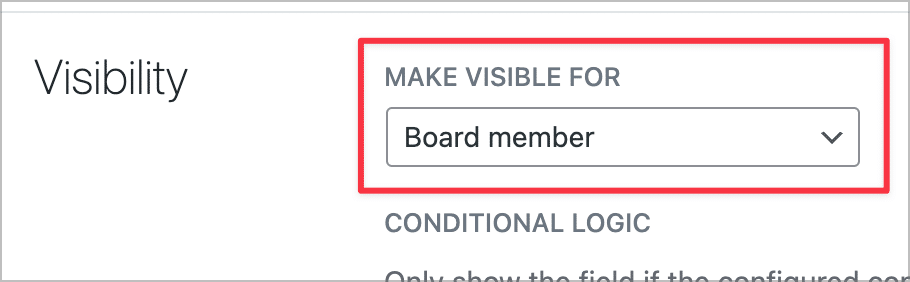
We only want board members to be able to approve/reject applications, so we’ll open the field settings and adjust the visibility settings. GravityView’s visibility controls allow us to restrict fields to certain user roles, so we’ll only make this field visible to users with the “Board member” role.
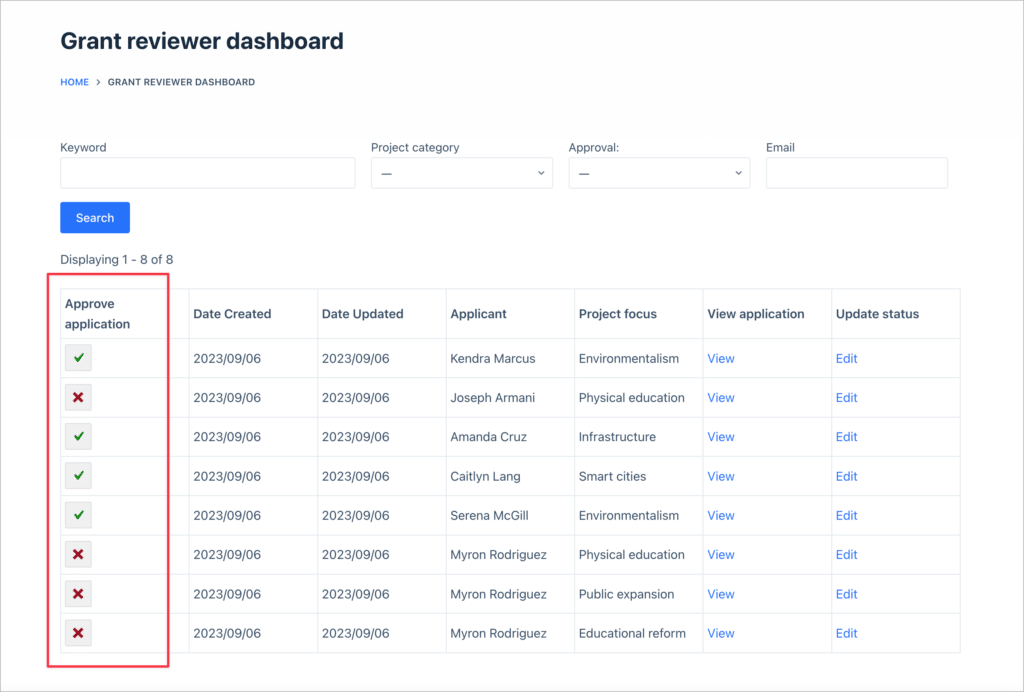
Here’s the new “Approve” column only visible to board members during the final approval stage. To approve/deny an application, they can simply hover over the circle icon and click either the green check mark or the red cross.
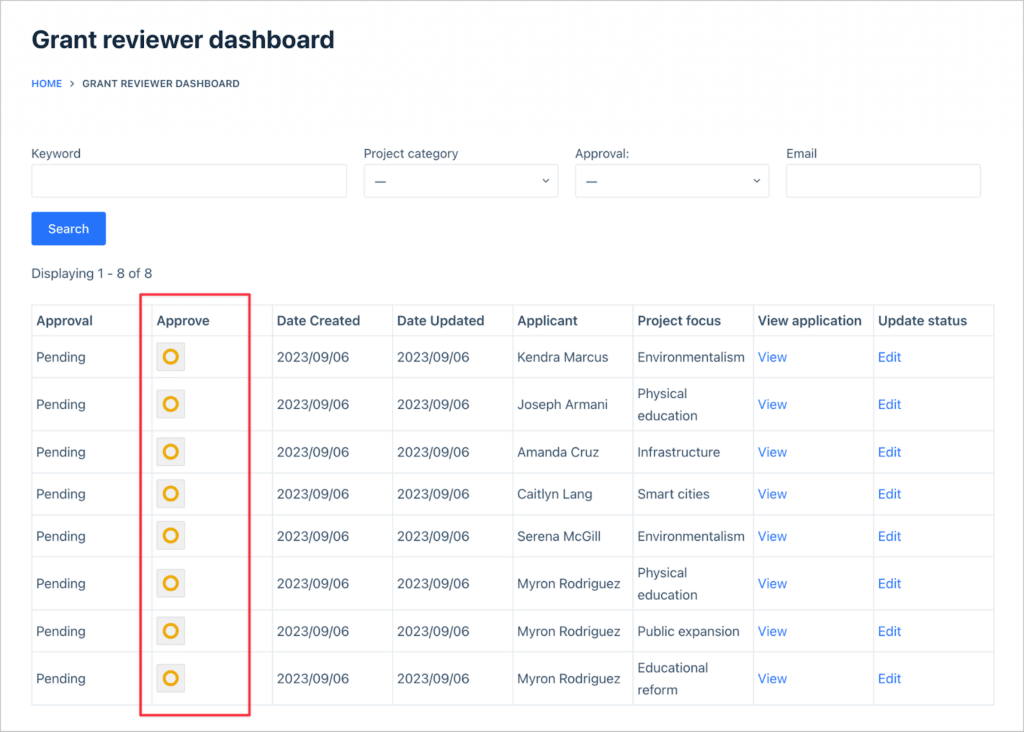
It’s important to know that this field is different from the “Status” drop down field. This field is used for board members to approve/reject applications, while the “Status” field is for applicants to see where they are in the application process.
You don’t necessarily need both fields, it just depends on your workflow! Again, this is an example of how to use GravityView for application review, but it’s certainly not the only way to do so!
Bonus: Export applications to PDF
For some workflows, especially grant applications, it’s important for users to have the ability to export their applications to PDF. This can be achieved using the new PDF for GravityView Extension developed by Gravity PDF.

PDF for GravityView allows you to export customizable PDFs that match your View’s Single Entry Layout.
Build an application review system with no code
In this post, we showed you how to build your own application review system for grant applications, job applications, or research paper submissions.
First, we used Gravity Forms to create an application form. Then we created powerful dashboards for both users and grant reviewers using GravityView. We also added a way for board members to approve submissions using GravityView’s in-built approval system.
If you found this post valuable, check out our tutorial on hosting a photography contest next!

Helpful tips right in your inbox.
Subscribe to get the latest articles, information on releases and helpful Gravity Forms tips!
More articles

How to build a searchable directory on Gravity Forms by chatting with AI
Build a searchable directory from your Gravity Forms entries by chatting with AI. See how the free GravityKit MCP creates a GravityView directory in minutes.

10 things you can ask AI to do with Gravity Forms (using the free GravityKit MCP)
See 10 practical things you can ask AI to do with Gravity Forms using the free GravityKit MCP: create forms, manage entries, build Views, and more.

Launch Log: theme template editing in Block MCP, Shield silentCAPTCHA for Zero Spam, and GravityView fixes
Block MCP adds safe theme template editing, Gravity Forms Zero Spam gains Shield silentCAPTCHA support, and GravityView fixes lightbox and notice bugs.