Published
•
Updated
Using Gravity Flow to add a feedback and review loop for new directory submissions
Add an approval and feedback workflow to any GravityView directory using Gravity Flow. Review new submissions before they go live and notify submitters of their review status.
GravityView is a powerful tool, allowing you to create sophisticated web applications using your Gravity Forms data.
One of GravityView’s main use cases is building directories. But when you create a directory, you may need a way to add an approval and review process for newly created listings.
This is easy to set up using Gravity Flow!
In a previous tutorial, we showed you how to add “claim entry” functionality to your directory using Gravity Flow. In this tutorial, we’re going to show you how to create a feedback and review workflow for new directory submissions.
Keep reading to find out more!
Wanna try it?
Spin up a demo
See what you can build with GravityView — explore the live demo.

What you’ll need
Here’s what you’ll need if you want to follow along with this tutorial:
- Gravity Forms
- GravityView
- GravityView Advanced Filtering extension (included in the Core + Extensions license)
- Gravity Flow
Creating a directory using GravityView
GravityView is a powerful tool for creating directories using data collected via Gravity Forms. In this tutorial, we’re going to combine the power of GravityView with Gravity Flow to show you how to add approval workflows for new directory listings.
Here’s a simple business directory that we set up using GravityView’s DataTables layout. As you can see, it’s a table displaying information about businesses in different industries, including their address and contact details.
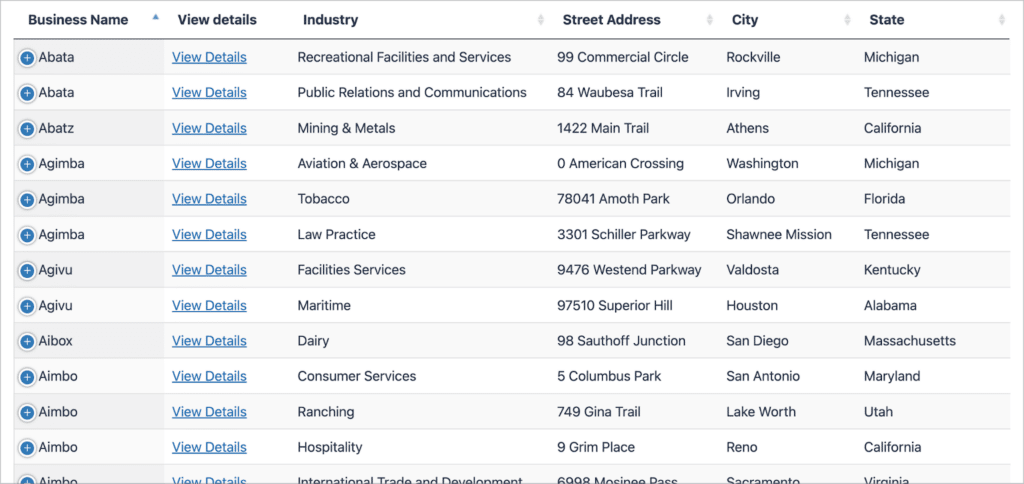
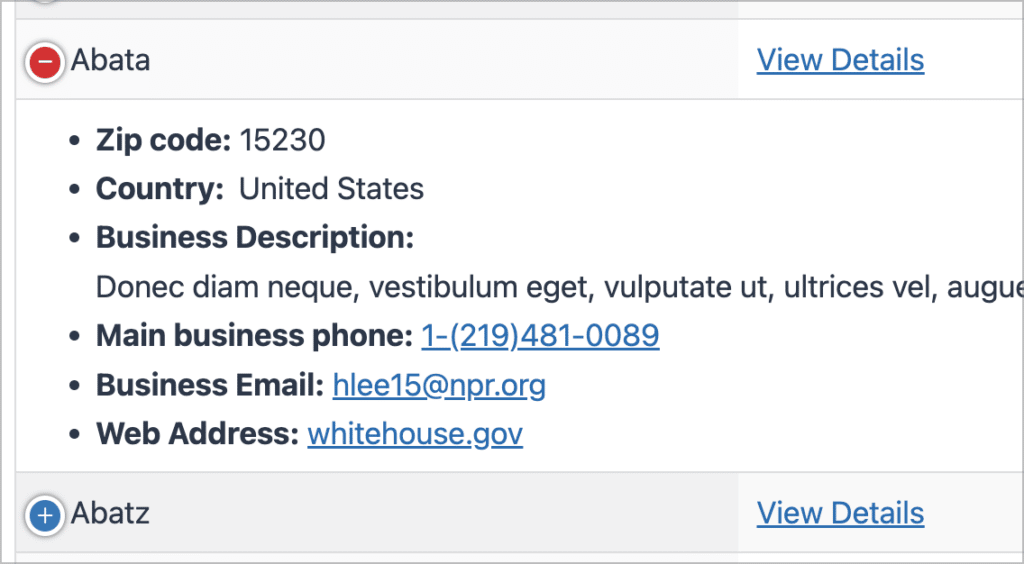
Clicking on the ‘+’ icon expands the entry and shows additional information such as the business description and web address. When users submit their businesses for listing in the directory, they will have to fill out all of this information.
Currently, when users submit a new listing, it must be approved in the backend by an Admin using GravityView’s built-in approval system. Although GravityView’s approval system works well for accepting and rejecting new entries, it doesn’t allow for anything more complex than that (such as sending entries back for edits).
That’s where Gravity Flow comes in!
Pro tipLearn more about building web apps on WordPress using Gravity Forms and GravityView.
What is Gravity Flow?
Gravity Flow is an add-on for Gravity Forms that allows you to create complex business processes and automations for your forms. Using Gravity Flow, you can set up workflows with multiple “steps”, allowing entries to pass through different stages or be sent to different team members for review and approval.
An overview of the feedback and review process
In this tutorial, we’re going to build a simple feedback and review loop for new entries submitted to our business directory. Here’s how it will work:
- The user submits a new entry to the directory
- The entry is sent to an administrator who is notified about the new entry
- The administrator can either approve the entry, allowing it to be displayed in the directory, or they can send it back for edits
- If the entry is sent back to the user for edits, the user can update the entry by following the admin’s guidelines
- The entry is then sent back to the administrator for approval. This loop continues until the entry has been approved.
Now let’s start building the workflow!
Creating the feedback and review workflow
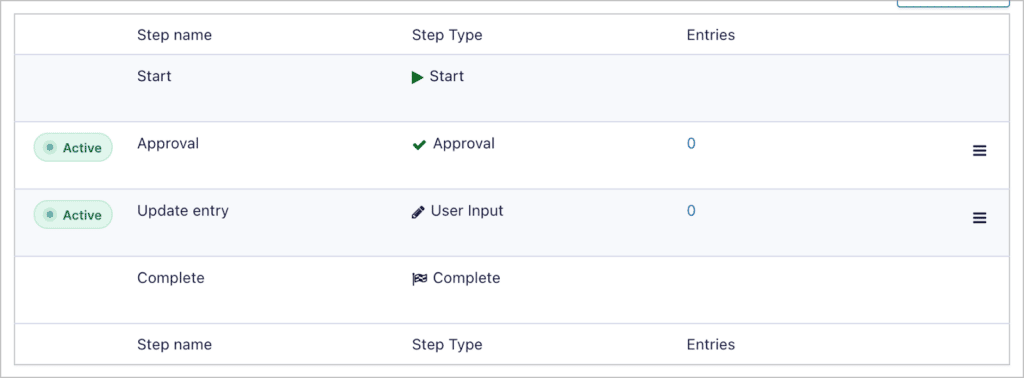
Here’s what our finished workflow looks like. As you can see, there are only two steps – an Approval step and a User Input step.
For this process to work properly, users need to be logged in before they can submit an entry. To set this up, simply open the form settings and check the box that says “Require user to be logged in”. Enabling this setting will ensure that non-logged-in users don’t see the listing form.
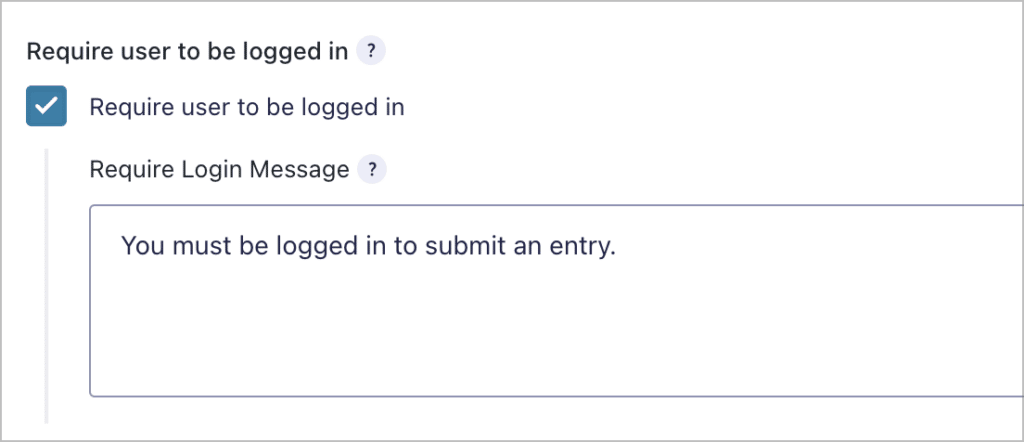
Pro tipIf you don’t want to hide the listing form from non-logged-in users, you can use the Gravity Forms User Registration add-on to register new users after they fill out the form.
Now let’s configure the initial workflow step.
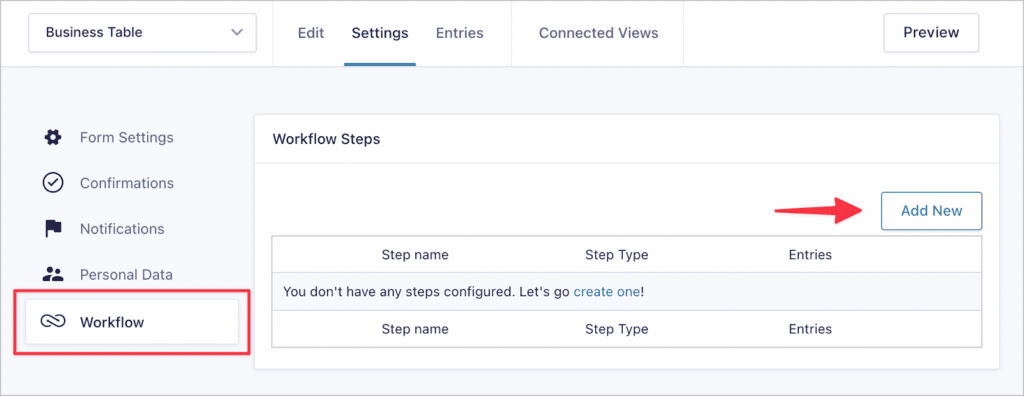
Configuring the approval step
We’ll start by configuring the first step of our workflow – the approval step. To create a new workflow step, open the form settings, click on “Workflow” on the left and then click “Add New”.
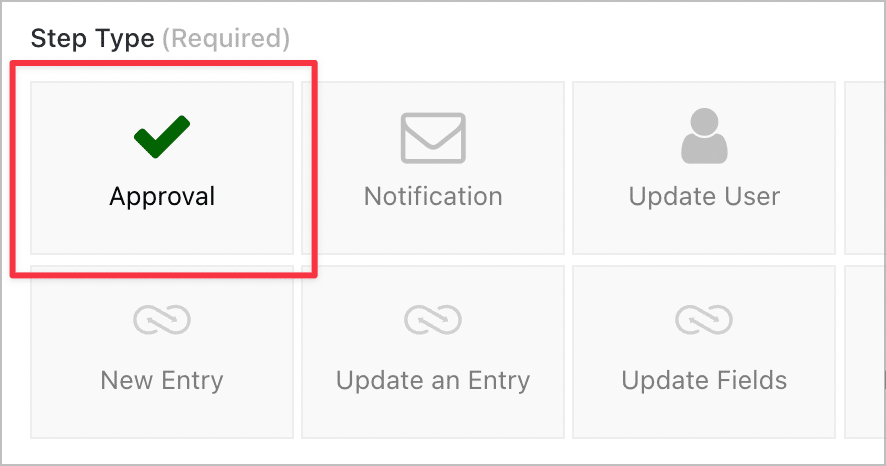
After giving the step a name, select “Approval” as the step type.
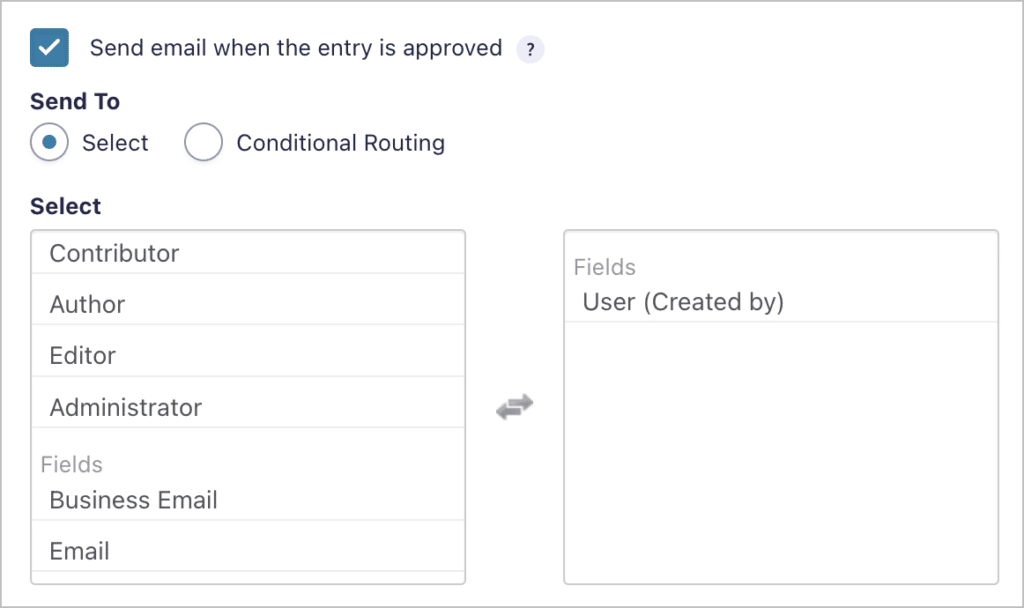
Now you need to choose a user to assign the step to. This should be the user (or user role) responsible for reviewing new directory submissions.
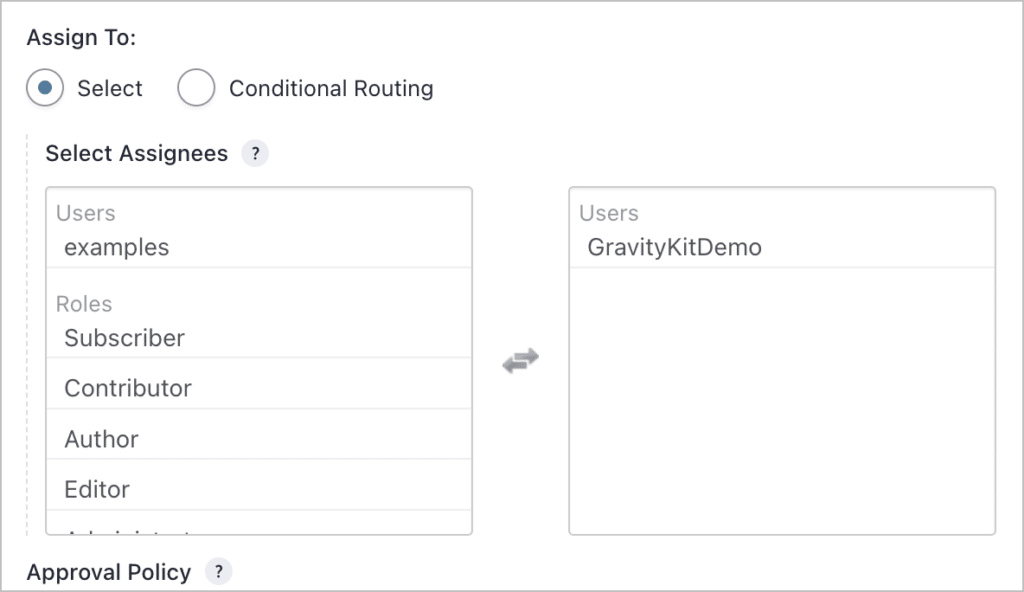
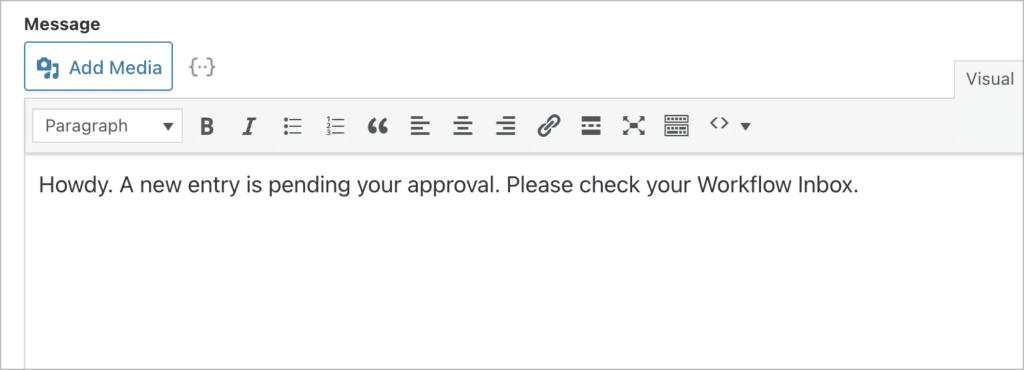
To ensure the admin user sees the new entry come in for approval, enable the assignee email and add a short message reminding them to check their workflow inbox.
You can also add an approval email, notifying the entry creator when their submission has been approved.
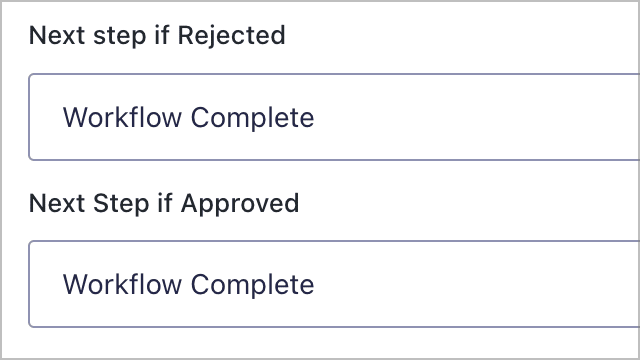
Finally, select the ‘next step if rejected’ and ‘next step if approved’. These should both be set to “Workflow Complete”.
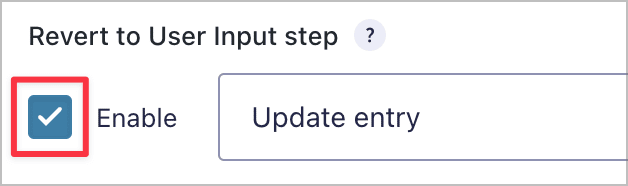
We’ll need to return to this step to enable the revert functionality, but we can only do that after configuring the next step in the workflow.
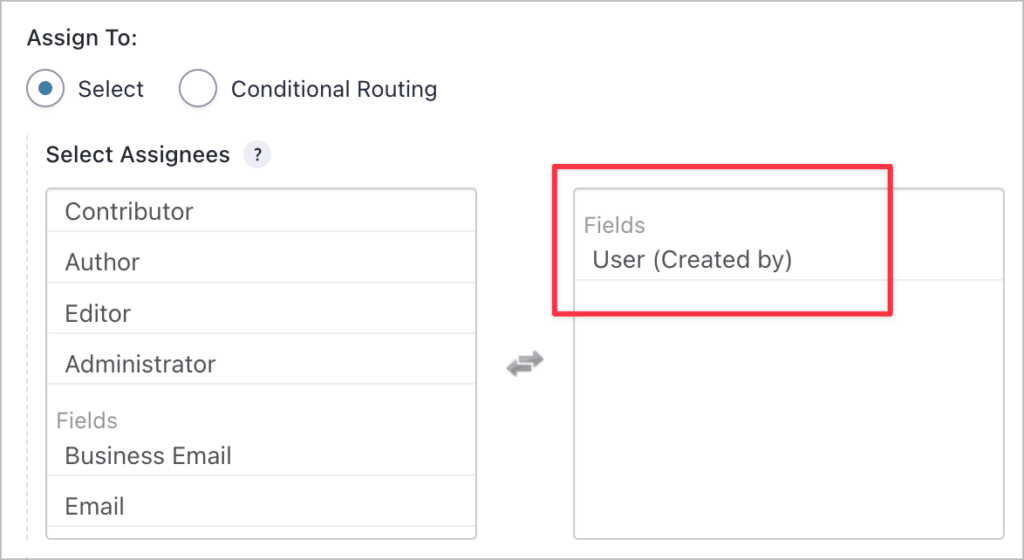
Configuring the User Input step
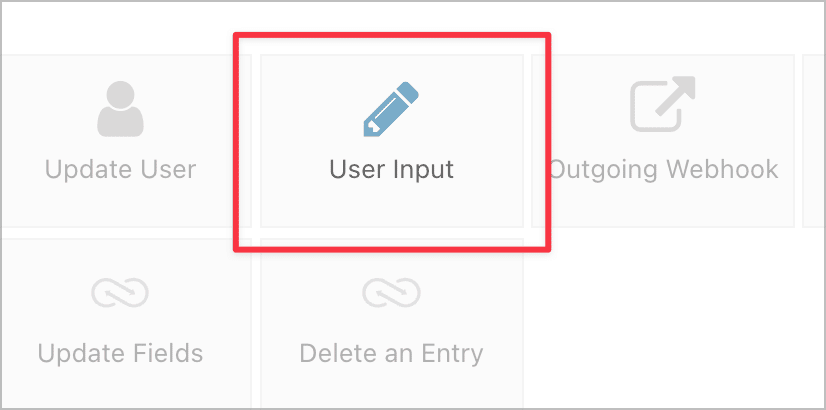
Add a new step to your workflow and select “User Input” as the step type. This will allow the user to edit their submission.
You’ll need to assign this step to the user who created the entry. To do this, select “User (Created by)” as the assignee.
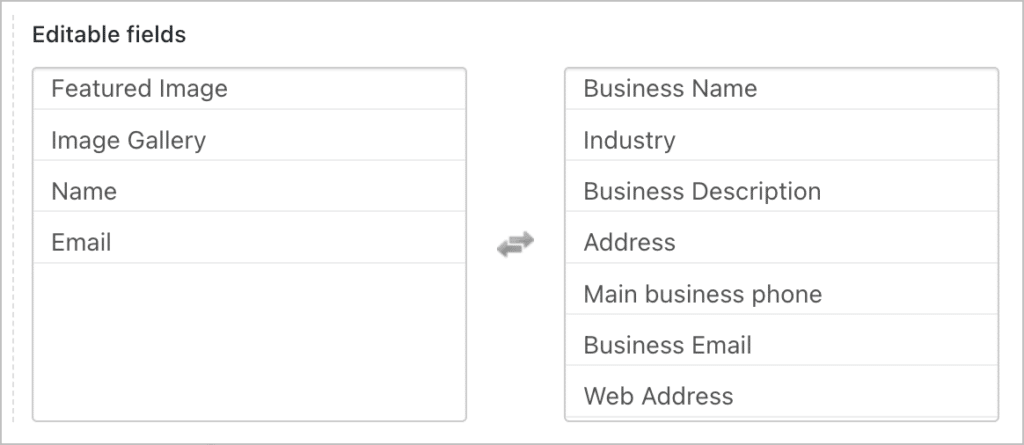
Now you’ll need to select which fields are editable by the user. If you’re not sure, select all the fields.
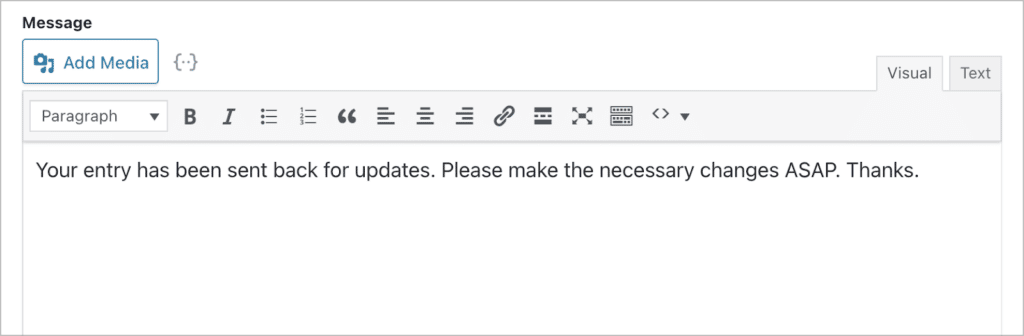
You can also add an assignee email for this step. Enable the email so that the user is notified when they need to update their submission.
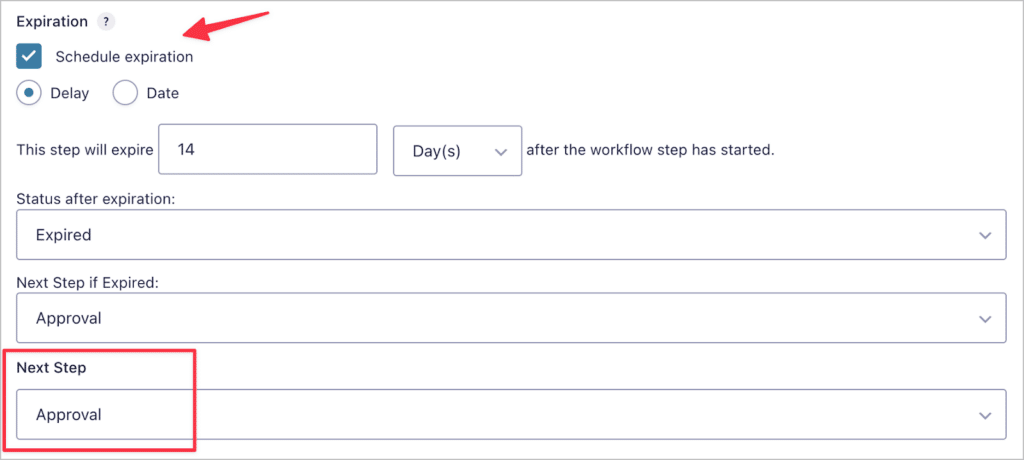
Finally, you have the option to schedule an expiration time for the step. In this case, we’ve set the step to expire in 14 days if the user does not make the necessary changes. You should also set the next step to ‘Approval’ to ensure the entry is sent back to the administrator for review.
That’s it for the User Input step! You can also allow users to complete this step in GravityView by enabling the integration in the Gravity Flow settings.
The final thing we need to do is head back to the Approval step and enable the revert option. This will give the reviewer three options when reviewing a new entry – approve, reject or revert. Selecting revert will return the entry to the entry creator for edits.
Pro tipFor more flexibility with email notifications, configure a Notification step.
Adding the advanced filtering condition
Now that you have finished configuring the feedback and review workflow, you will need to add a filter to your directory View, ensuring that only approved entries are displayed. You can do this using the GravityView Advanced Filtering extension.
After installing the extension, open the View editor, scroll down to the settings and click on the “Filter & Sort” tab. Now add the following advanced filter condition:
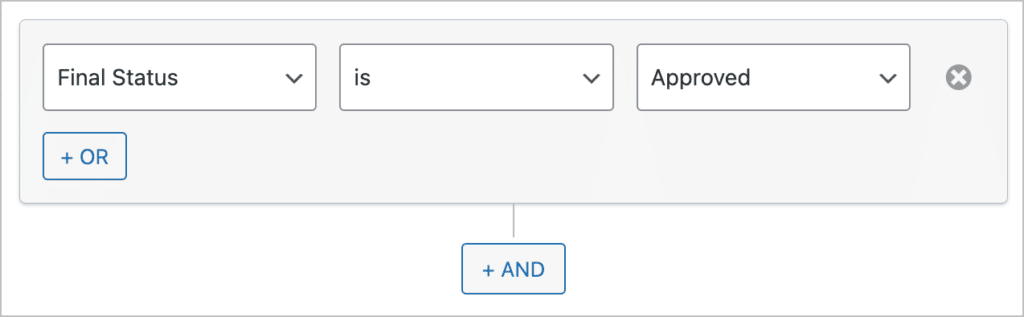
As you can see, this condition ensures that only entries with a final status of “approved” will be displayed in the directory.
The workflow inbox
The Gravity Flow workflow inbox is where users can see entries that require their attention. When a new user submits a directory listing, the admin user will be notified. They can then open their inbox and review the entry.
After reviewing the entry, the Admin must decide whether to approve, reject or revert the entry.
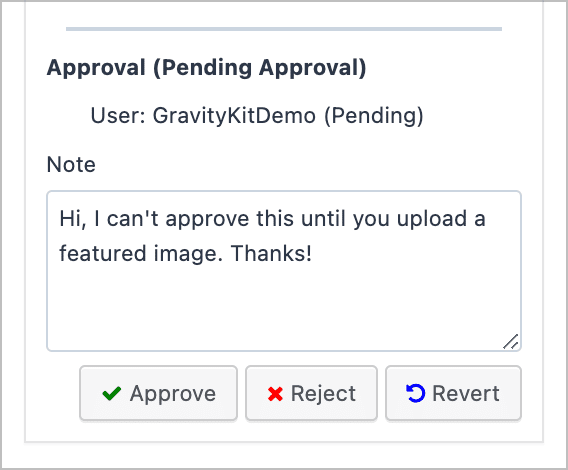
When an entry is reverted, it is sent back to the entry creator for updating. That user can then open their inbox to update the entry as requested by the admin.

Pro tipYou can display the workflow inbox on a page using the [gravityflow page="inbox"] shortcode.
Get started with Gravity Flow workflows for GravityView apps!
GravityView allows you to build powerful directories using Gravity Forms. Sometimes, you may wish to enhance your directories by adding automated workflows for new entries.
By combining GravityView with Gravity Flow, you can extend your Gravity Forms applications by adding complex automations and approval processes.
In this post, we showed you how to add a review and feedback workflow for your GravityView directory. If you found this post interesting, and you want to learn more about how GravityView works with Gravity Flow, check out this article about building a content publishing pipeline!

Helpful tips right in your inbox.
Subscribe to get the latest articles, information on releases and helpful Gravity Forms tips!
More articles

WordPress page builder market share 2026: Elementor leads at 32.67%
Elementor reaches 32.7% of WordPress sites. WordPress Block Editor 20.6%, wpBakery 8.5%, Divi 5.7%. Latest HTTP Archive crawl, share-of-WordPress basis throughout.

Launch Log: GravityView 3.0, plus upgrades to Block MCP and GravityKit MCP
GravityView 3.0 lands with the new Vantage theme, frontend bulk actions, and AI-assisted View creation. This launch log also covers updates to GravityKit MCP, Block MCP, and Dashboard Views.

Announcing GravityView 3.0: a fresh new look, AI View creation, and native page builder support
GravityView 3.0 is here: restyle Views with the new Vantage theme, build them with AI, embed them in any page builder, and run bulk actions on the front end.