Published
•
Updated
How to display Gravity Forms field values after submission
Display submitted Gravity Forms field values in confirmation messages, email notifications, and regular pages using merge tags. No plugin or custom code required.

Gravity Forms is a powerful tool for collecting data, but what about displaying that data after it’s been submitted?
In this post, I’ll show you how to utilize merge tags to display field values in form confirmations and notifications. I’ll also show you how to show user-submitted field values on regular pages or posts!
How to display form field values after a form has been submitted
Sometimes, you may want to display submitted field values after a user submits your form. You can do this by adding Gravity Forms merge tags inside the form confirmation or notification message.
Displaying all field values from a Gravity Forms submission
Merge tags in Gravity Forms allow you to dynamically display submitted field values in confirmations, notifications or post content templates. If you want to display the full form submission, you can use the {all_fields} merge tag.
Go to the form settings and click on “Confirmations” or “Notifications” on the left. Now, scroll down to the message box and add your chosen text along with the {all_fields} merge tag.
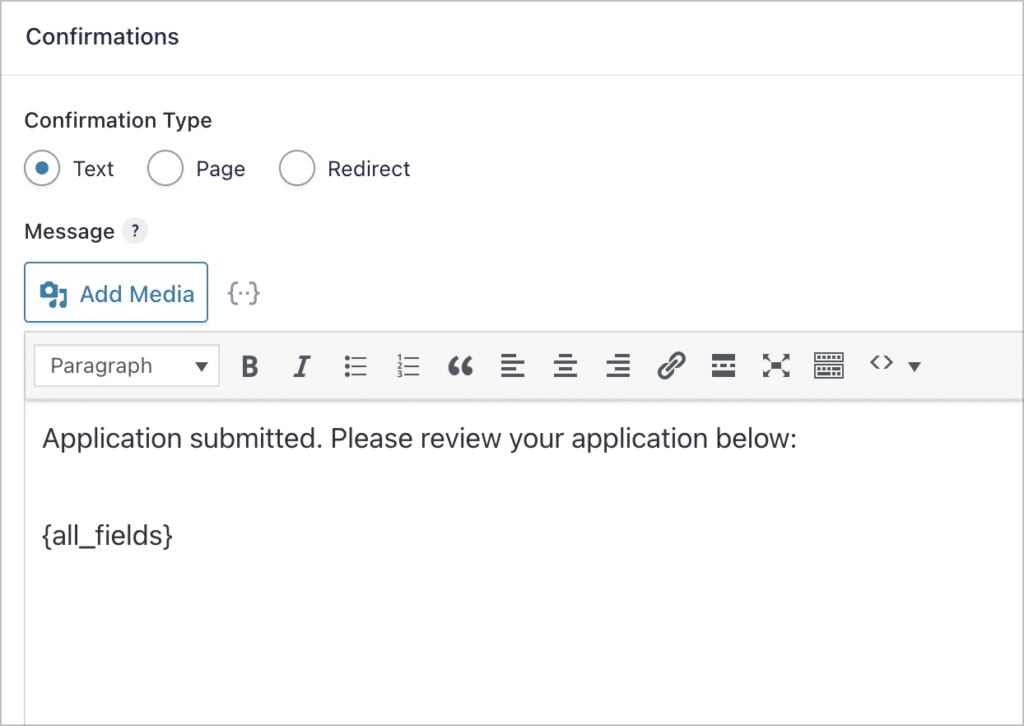
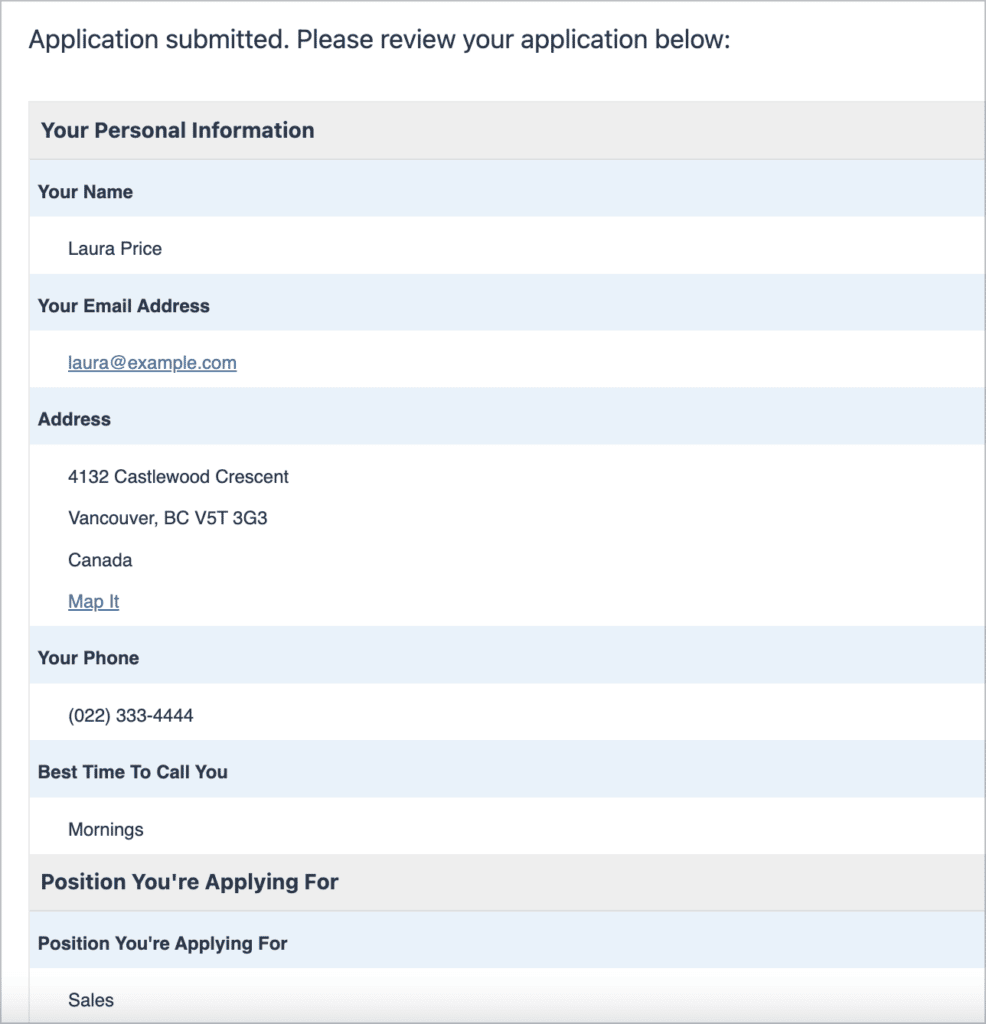
The {all_fields} merge tag will be replaced with a preformatted HTML table containing all the submitted values! Here’s what it looks like when a user submits our employment application form:
Adding the {all_fields} merge tag to a notification message will output the same HTML table inside the email body.
Pro tipTo learn more about Gravity Forms merge tags, read our ultimate guide!
Adding individual field values using field merge tags
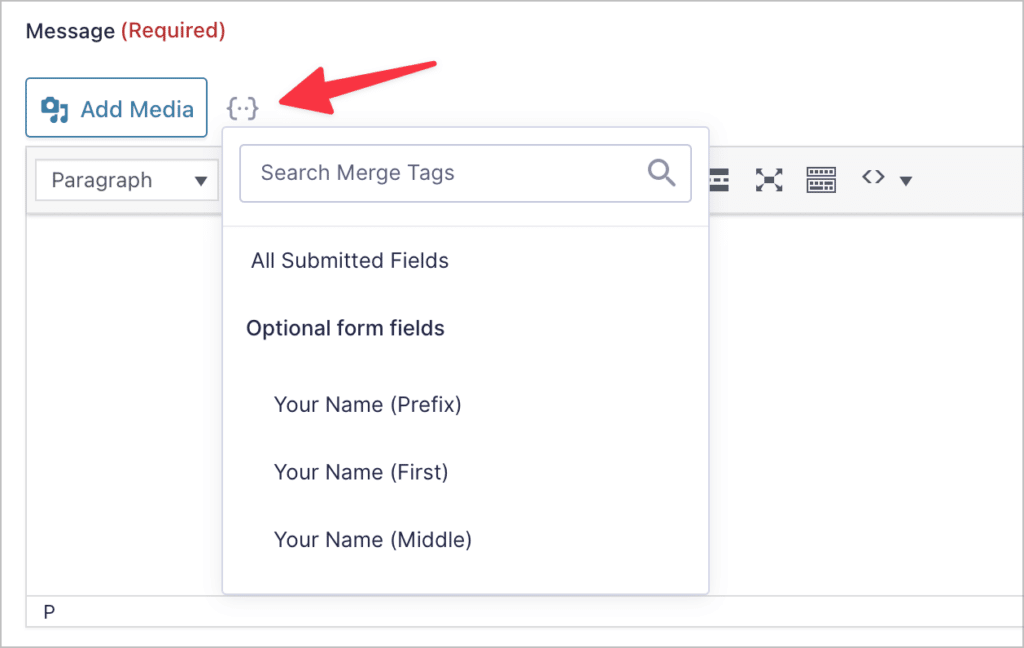
There may be times when you only want to display certain field values, rather than the entire form submission. You can do this by using field merge tags. Every field in your form has an associated merge tag, which you can use to dynamically display the field’s value.
To bring up a list of merge tags, simply click on the {..} icon next to the “Add Media” button. Clicking on a field name will automatically add that merge tag to the message.
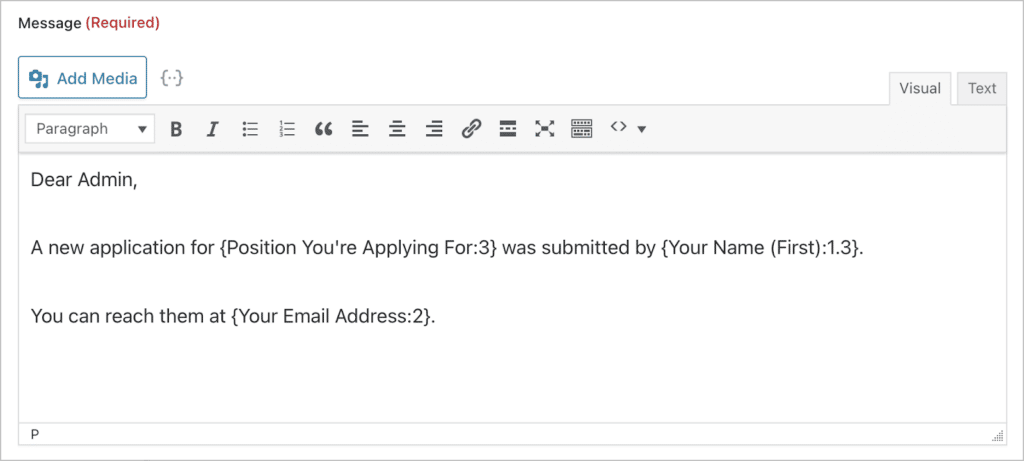
Here’s an example notification message that we’re sending to site Admins when a new user submits an employment application. The merge tags will be replaced with the actual field values from the user’s submission.
Now you know how to display form field values from a user’s submission in confirmation messages or notification emails!
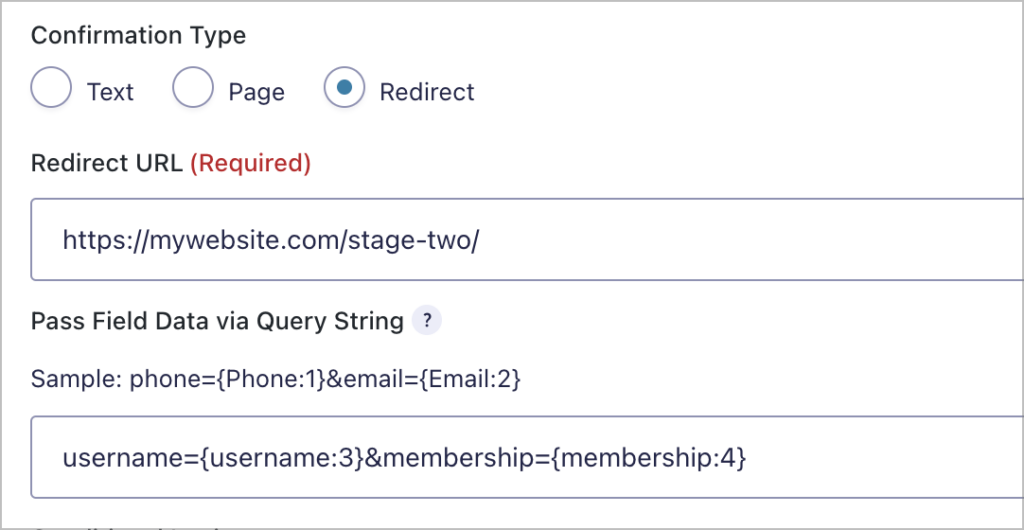
How to pass field values from one form to another
Let’s say you have two separate forms on your website. You may need a way to prepopulate one of the forms with values submitted in the first form. You can do this by passing field values as query strings in the URL.
Pro tipIf you want to learn more, read our ultimate guide to dynamic field population in Gravity Forms.
How to display Gravity Forms field values on pages or posts
While you can use merge tags to display Gravity Forms field values in confirmations or notifications, you can’t use them on pages or posts. If you want to display form entries, or specific field values on a page or post, you’ll need GravityView.
GravityView is a certified add-on for Gravity Forms that allows you to display your form entries on the front end and build powerful web applications using preset layouts.
Using GravityView to display Gravity Forms field values on pages or posts
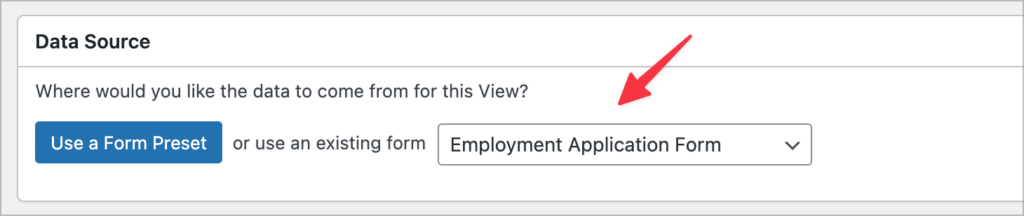
Everything in GravityView begins with a “View”. To create a new View, hover over “GravityKit” in your WordPress menu and click “New View”. After giving your View a name, you’ll need to select a Gravity Forms with the data you want to display.
The next step is to select a View type (i.e., a layout for displaying Gravity Forms entries). GravityView supports 5 different View types – Table, List, Map, DataTables and DIY.
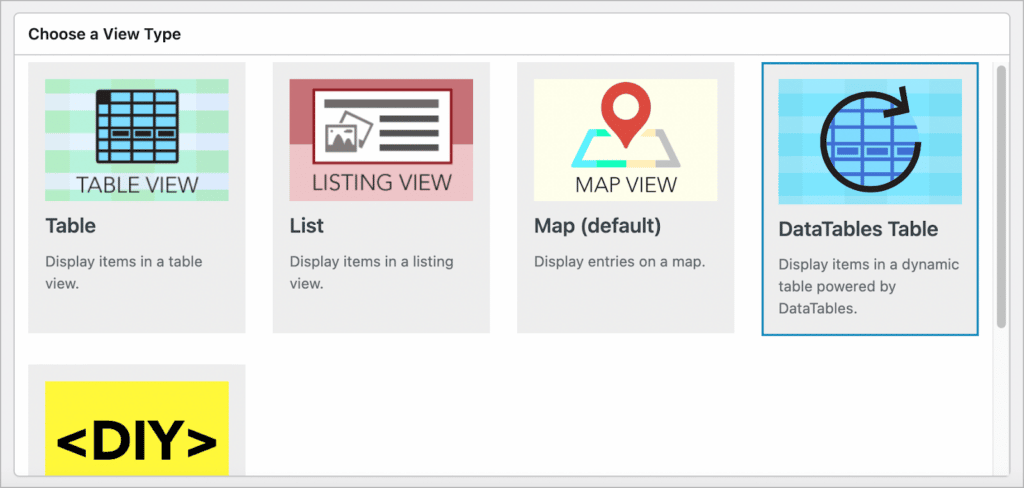
For this example, we’ll select the DataTables layout. After choosing a View Type, we can start configuring the View using GravityView’s intuitive drag and drop editor!
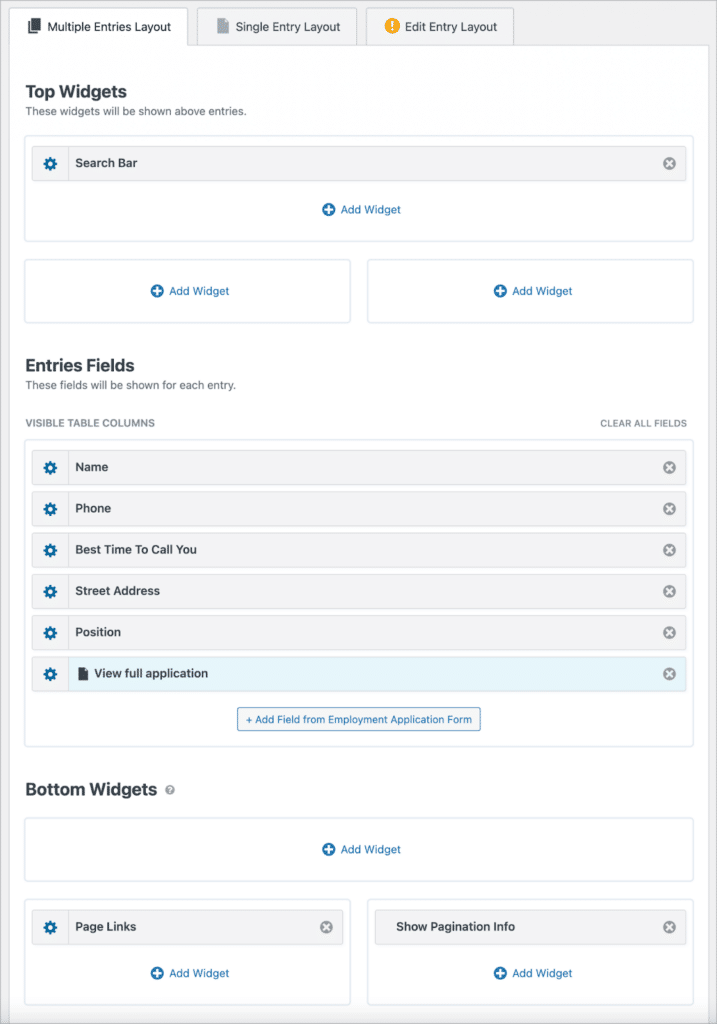
To add form field values, all you need to do is click on the “Add Field” button and select the form field that you want to display. You can then drag and drop the fields to reorder them or move them to different areas in the View.
There are also two widget areas at the top and bottom of the View. Widgets include search bars, pagination info, and much more. All widgets and fields are configurable by clicking on the gear icon next to their labels.
After configuring your View, you can embed it on a page or post using a shortcode or WordPress block.
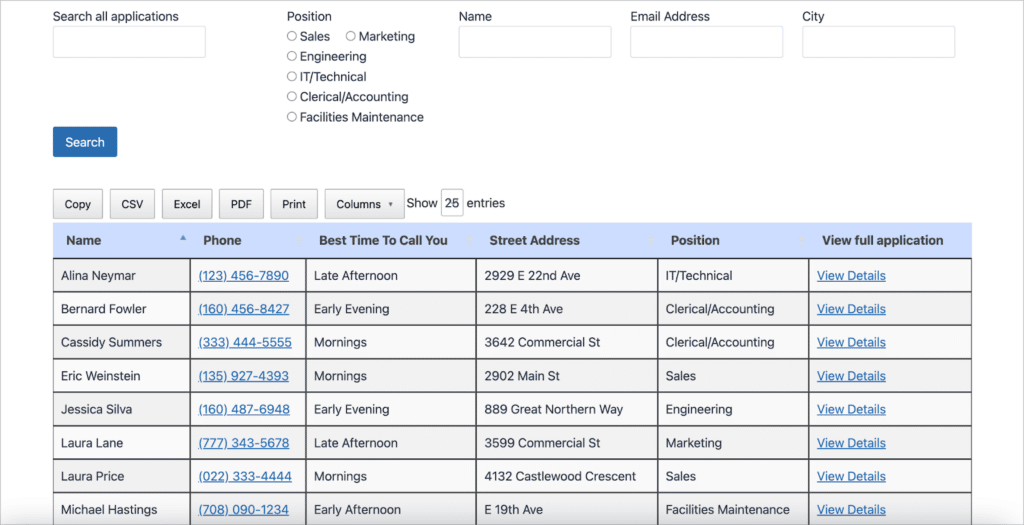
Here’s what our View looks like on the front end. As you can see, there are several search inputs at the top. Below that is a table with all of the employment applications, including a “View Details” link to read the full submission. And because we’re using the DataTables layout, there are buttons for exporting entries to CSV, Excel, and PDF!
GravityView also allows users to edit their form entries on the front end. That’s what we’re going to look at next!
Pro tipCheck out our live demos and try out GravityView for yourself (free for 7 days)!
Allowing users to edit their form submissions
By configuring GravityView’s Edit Entry layout, you can make certain field values editable front the front end of your website! If you want users to be able to edit entries they create, enable the “Allow User Edit” option in the View settings.
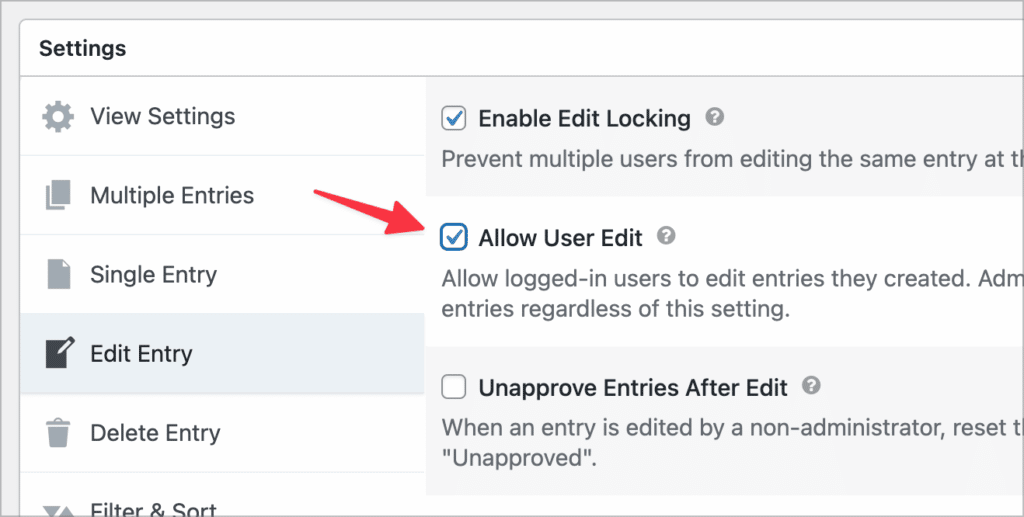
Logged-in users will now be able to edit entries that they create, right from the front end of your site!
GravityView is a powerful tool for displaying Gravity Forms field values on pages or posts using different layouts. You can learn more about GravityView on our website.
Why use GravityView?
GravityView gives you the ability to harness your form data for use in powerful, front end web apps. Here are some examples of what you can do using GravityView:
- Build directories
- Create a job board
- Manage your entries without seeing the backend of the site
- Create tables that are filterable and searchable
- Build other form-based CRUD applications
Now let’s take a look at using GravityView to display Gravity Forms entries on pages and posts.
Start displaying Gravity Forms field values
In this post, we showed you how to display Gravity Forms field values in confirmations and notifications using merge tags. We also showed you how to display field values on pages or posts using GravityView.
If you’re looking to display Gravity Forms data on your site and start building powerful form-based web applications, get GravityView today!

Helpful tips right in your inbox.
Subscribe to get the latest articles, information on releases and helpful Gravity Forms tips!
More articles

Launch Log: theme template editing in Block MCP, Shield silentCAPTCHA for Zero Spam, and GravityView fixes
Block MCP adds safe theme template editing, Gravity Forms Zero Spam gains Shield silentCAPTCHA support, and GravityView fixes lightbox and notice bugs.

GravityKit turns 12: a year in review, and 30% off Lifetime All Access
GravityKit turns 12. A look back at a year of GravityView 3.0, GravitySearch, and AI-assisted building, plus a birthday sale on the Lifetime All Access Pass.

Launch Log: Row headers for screen readers, smarter conditional logic, and multi-View fixes
GravityView 3.1 adds row headers for screen readers, plus smarter conditional logic in GravityCalendar and fixes for DataTables, Maps, and Dynamic Lookup.
