Published
•
Updated
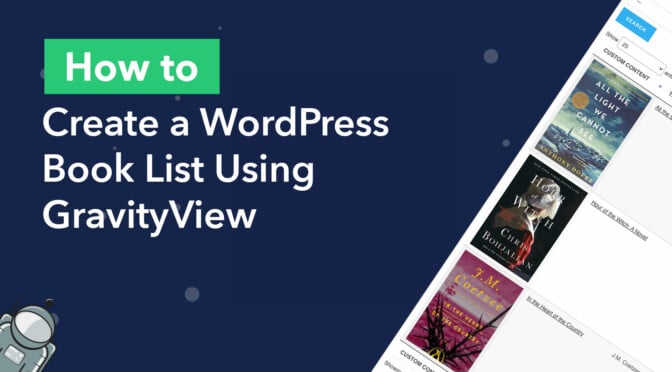
How to create a book list on WordPress (without code)
Did you know that reading increases emotional intelligence, improves decision-making and reduces mental decline in old age? Reading books is a healthy hobby enjoyed by many people around the world. But with so many books out there to choose from, how do you keep track of all the ones you want to read? You create…
Did you know that reading increases emotional intelligence, improves decision-making and reduces mental decline in old age?
Reading books is a healthy hobby enjoyed by many people around the world.
But with so many books out there to choose from, how do you keep track of all the ones you want to read? You create a book list, of course!
In this post, we’ll show you how to create your own WordPress book list using GravityView DataTables.
Keep reading (no pun intended) to find out more!
Check out a live demo of the finished book list and get your own free trial site preloaded with all GravityKit add-ons!
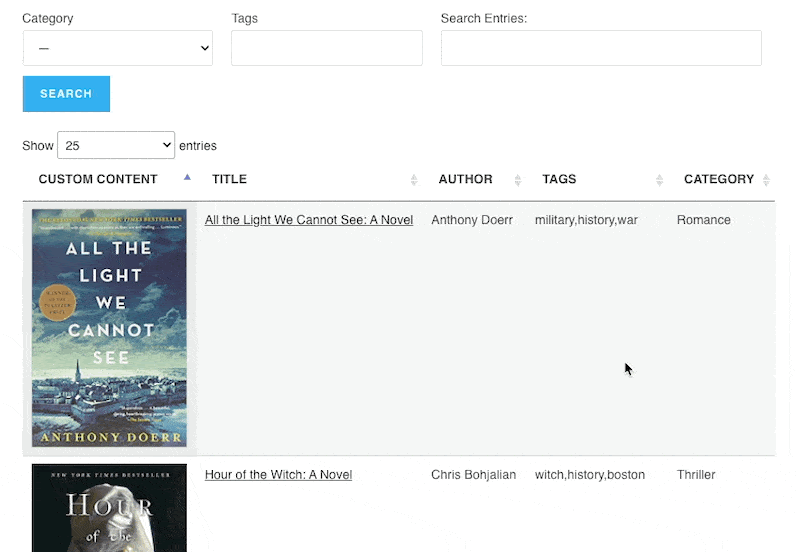
Sneak Peek
Here’s a preview of the book list that we’re going to build in this tutorial:
What is a WordPress reading list?
A book list or reading list is a collection of all the books that you plan to read.
When your friend tells you about a book they think you’d like, you can quickly add it to your list before you forget the title.
And when you’re browsing through Amazon and see a title that piques your interest, instead of adding the web page to your bookmarks (where you’ll never find it again), you can add the book to your reading list.
Let’s face it, there are millions of books out there! And among those there are probably tens of thousands that would take your fancy.
If you’re a serious reader, keeping a book list is essential. This helps you prioritize the books you most want to read and keep track of your reading habits.
Why GravityView is the best plugin for creating a WordPress book list
Building a book list on WordPress isn’t easy. You may be able to code something using custom post types but that takes time, development skills and a lot of patience.
A better solution is to use GravityView’s DataTables layout. GravityView is an add-on for Gravity Forms that allows you to display form entries on the front end of your website and build powerful applications.
GravityView includes powerful search capabilities, the ability to embed images and much more! These powerful features make GravityView the perfect WordPress book list plugin!
Building your WordPress reading list
So, how do you actually build a reading list using GravityView? That’s what we’re going to cover below.
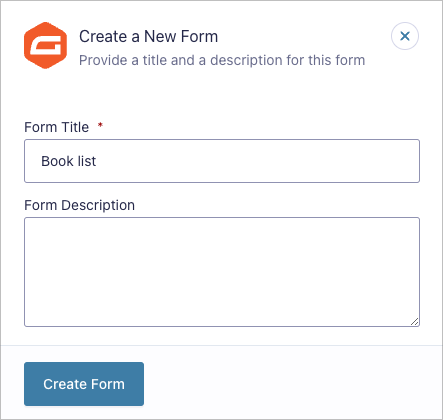
1. Create the submission form
The first step is to create a “book submission” form where you can enter titles that you plan to read. These will then be added to your searchable reading list.
To create a new form in Gravity Forms, hover over Forms and click Add New. Now give your form a name and click Create Form.
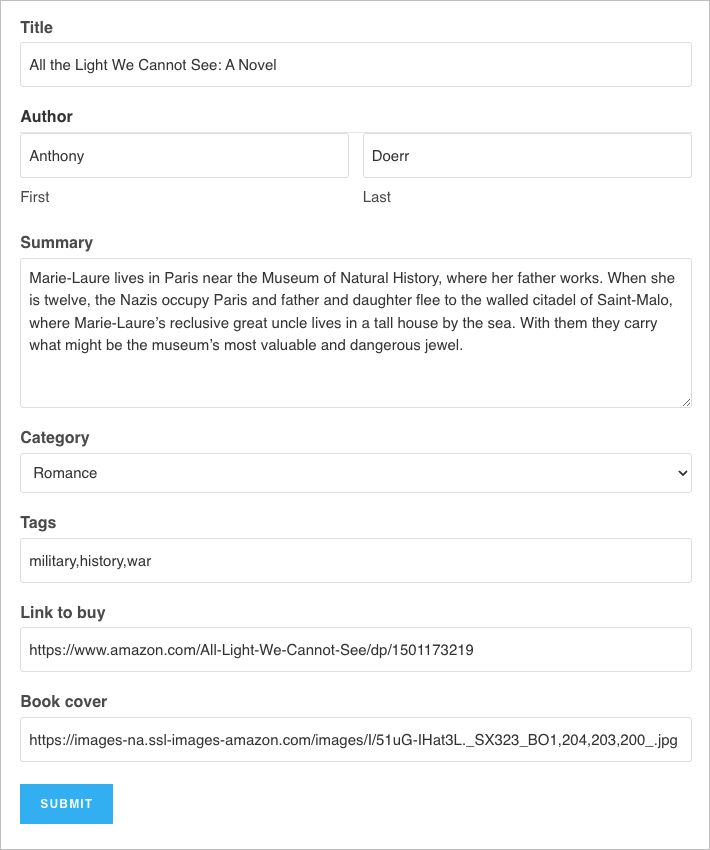
Now, you can construct your book list form using the Gravity Forms drag-and-drop form editor. For this example, we’ll add the following fields to our book list form:
- Title (Single Line Text field)
- Author (Name field)
- Summary (Paragraph Text field)
- Category (Drop Down field)
- Tags (Single Line Text field)
- Link to buy (Website field)
- Book cover (Website field)
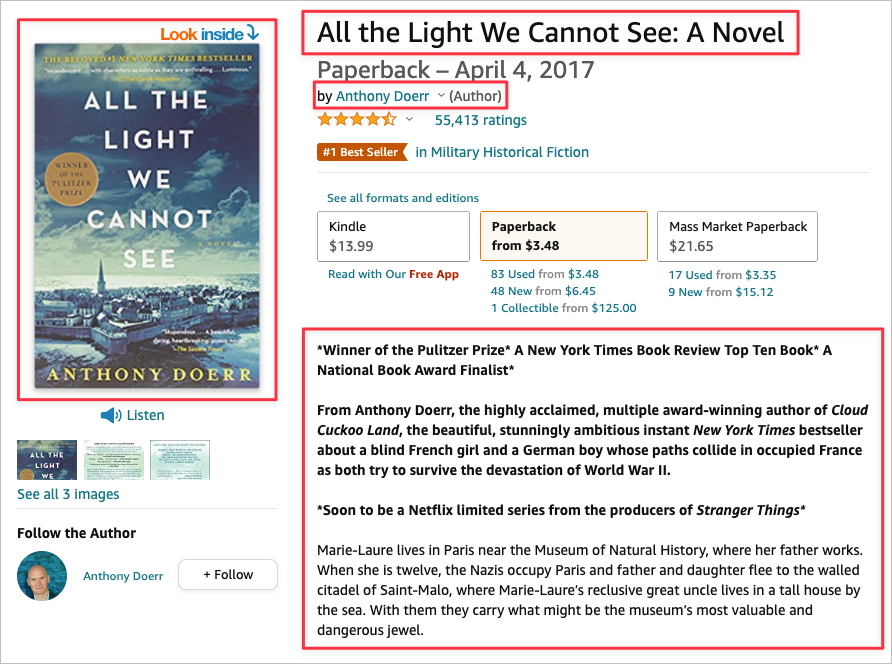
As you can see, most of this information is easy to find on a given book’s Amazon page.
Pro tipThe Category and Tags fields are optional, but including those on your form will make it easier to search and filter your book list.
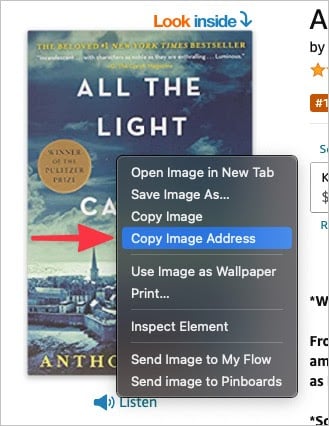
You may have noticed that our form contains a Website field called “Book cover”. In this field, we’re going to add the URL to the cover page of the book from Amazon.com. To get this URL, right-click on the book cover and select “Copy Image Address”.
When we build our reading list, we’ll use the image URL to embed the actual book cover into the page.
Now all that’s left to do is embed your book list form on a page or post. You can do this using the Gravity Forms Gutenberg block or the embed shortcode.
Pro tipLearn more about embedding Gravity Forms on your website.
Here’s what our form looks like on the front end:
The next step is to build a View to display our books on the front end.
2. Create a View using the DataTables Layout
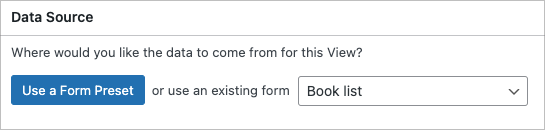
After installing GravityView, create a new View by hovering over Views and clicking New View. Now select your book list form as the data source.
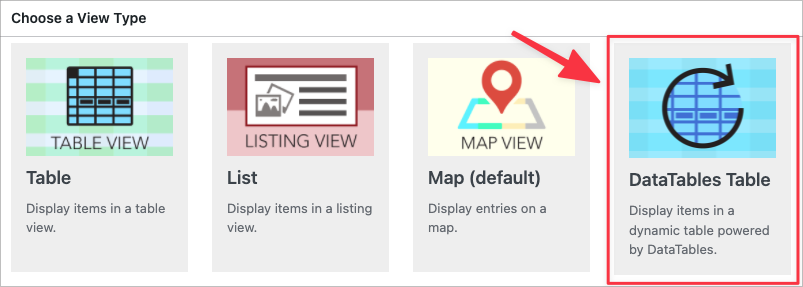
Under “Choose a View Type”, select “DataTables Table”.
Now you can start constructing your View Layout using GravityView’s intuitive drag and drop builder.
3. Configure your reading list
A View is made up of three layouts – the Multiple Entries Layout, the Single Entry Layout and the Edit Entry Layout.
The Multiple Entries Layout page is where each of your books will be displayed one after the other. The Single Entry Layout page allows you to showcase extra information about each book, and the Edit Entry Layout page is where you can edit entries on the front end.

Let’s start by Configuring the Multiple Entries layout.
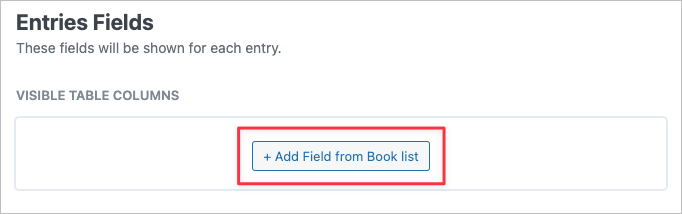
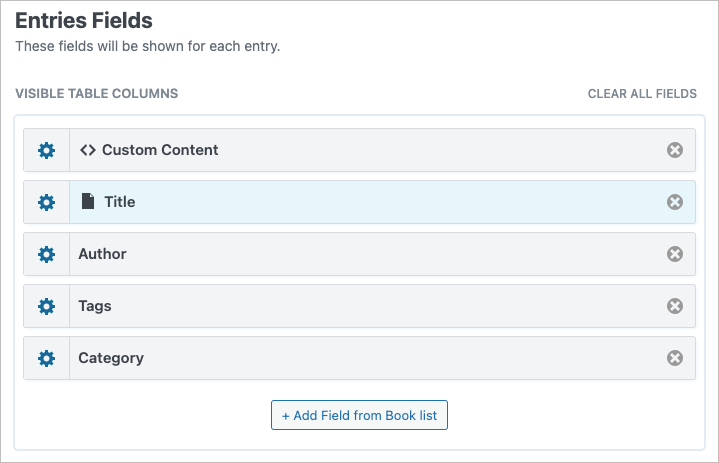
To start off, we’ll scroll down to the Entries Fields section and click on the ‘+ Add Field’ button to add a column to our table.
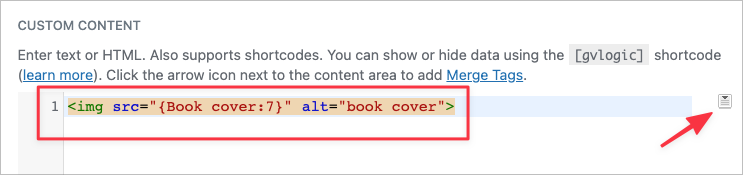
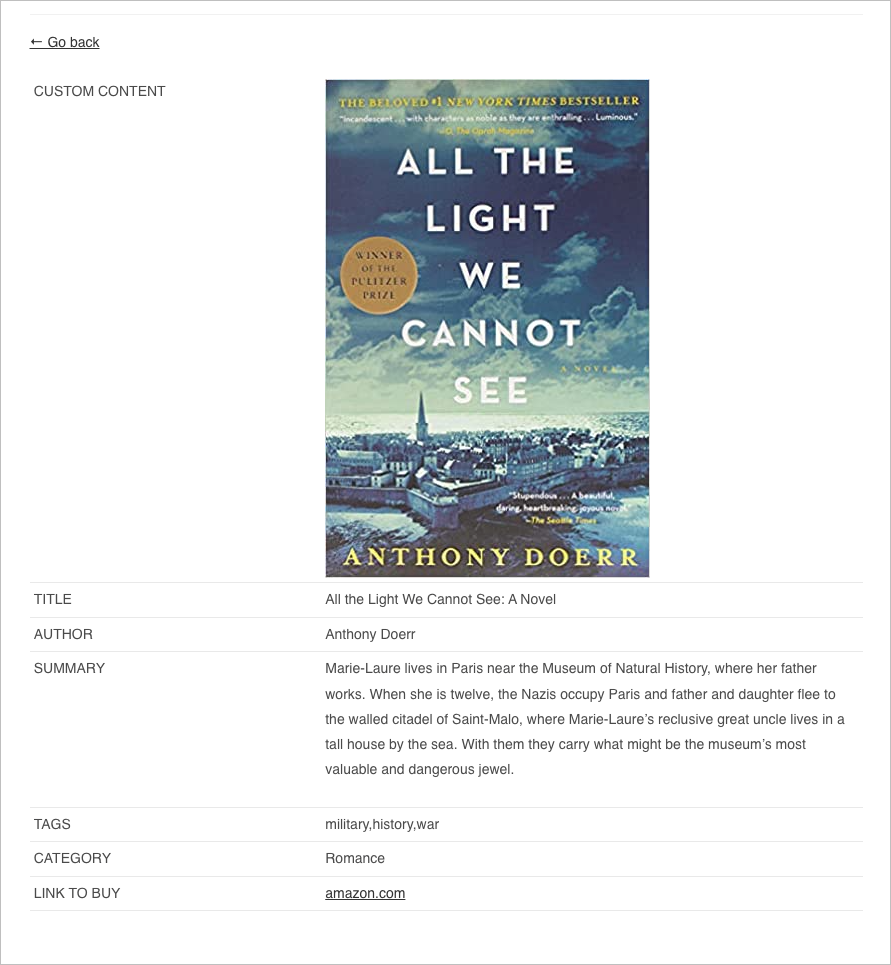
The first field we’ll add is a Custom Content field. Inside the Custom Content field, we’ll add an HTML <img> element with the src attribute pointing to the URL of the book cover image from Amazon.
We’ll do this by using the book cover merge tag in place of the src URL. To add merge tags inside the custom content editor, click on the button to the right.
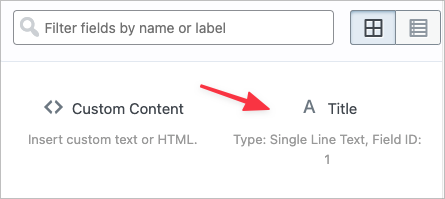
Next, we’ll add the book title. To do this, we’ll click on the ‘+ Add Field’ button again and select the Title field.
After adding the field, we’ll click on the gear icon to open up the field settings window.
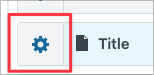
Now we’ll check the option that says “Link to single entry”.
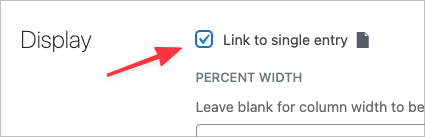
This will turn the book title into a clickable link that takes us through to the Single Entry Layout page. Finally, we’ll add the Author, Category and Tags fields.
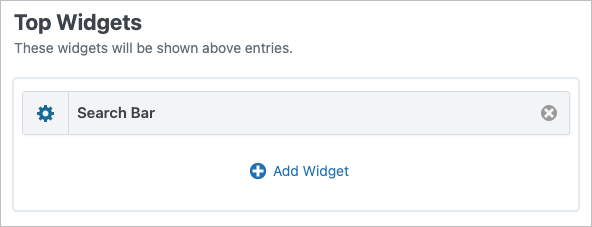
The final step in configuring the Multiple Entries Layout is to add a search widget.
4. Add a search bar
Before moving on to the Single Entry layout, we’ll add a search bar to the top of our book list by clicking on the ‘+ Add Widget’ button and selecting the Search Bar widget.
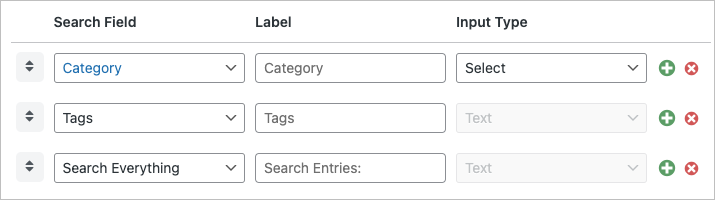
In the search settings we’ll add three search inputs allowing us to search for books based on the Category, Tags or general keywords.
Now let’s turn our attention to the Single Entry Layout!
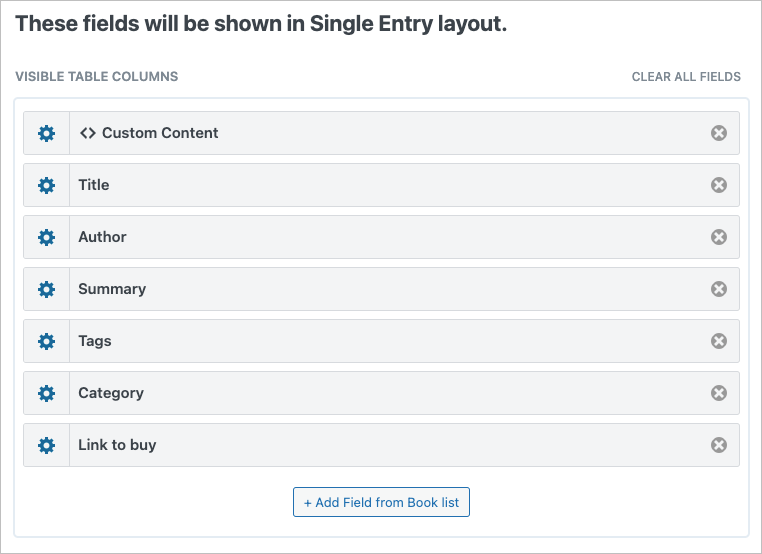
5. Configuring the Single Entry Layout
To add fields to the Single Entry layout, click on the Single Entry Layout tab at the top of the View editor.
Here we’ll add additional information about each book, including the author, summary and the link to buy it on Amazon.
6. Configure the View Settings
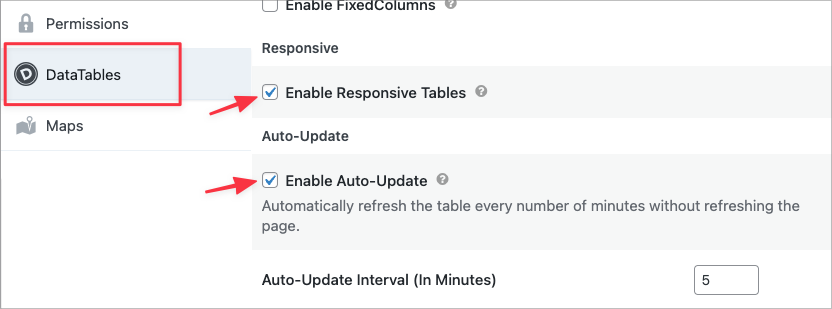
To configure the DataTables settings, scroll down to the View Settings and click on the DataTables tab on the left. Here you’ll find a range of options for customizing your View.
Checking the “Enable Responsive tables” option will ensure that your reading list looks good on any screen size. If you want your list to update in real-time, enable “Auto-Update” and set a time interval in minutes.
Learn more about the GravityView DataTables layout.
When you’re done, make sure to publish your View!
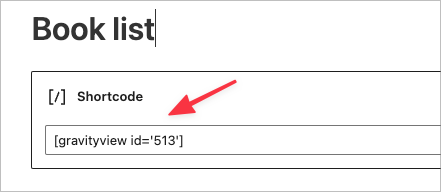
7. Embed your WordPress book list on the frontend
The final step is to embed your book list on a page or post. You can do this by copying and pasting the GravityView embed shortcode into a WordPress Shortcode module.
Okay, let’s check out our book list on the front end.
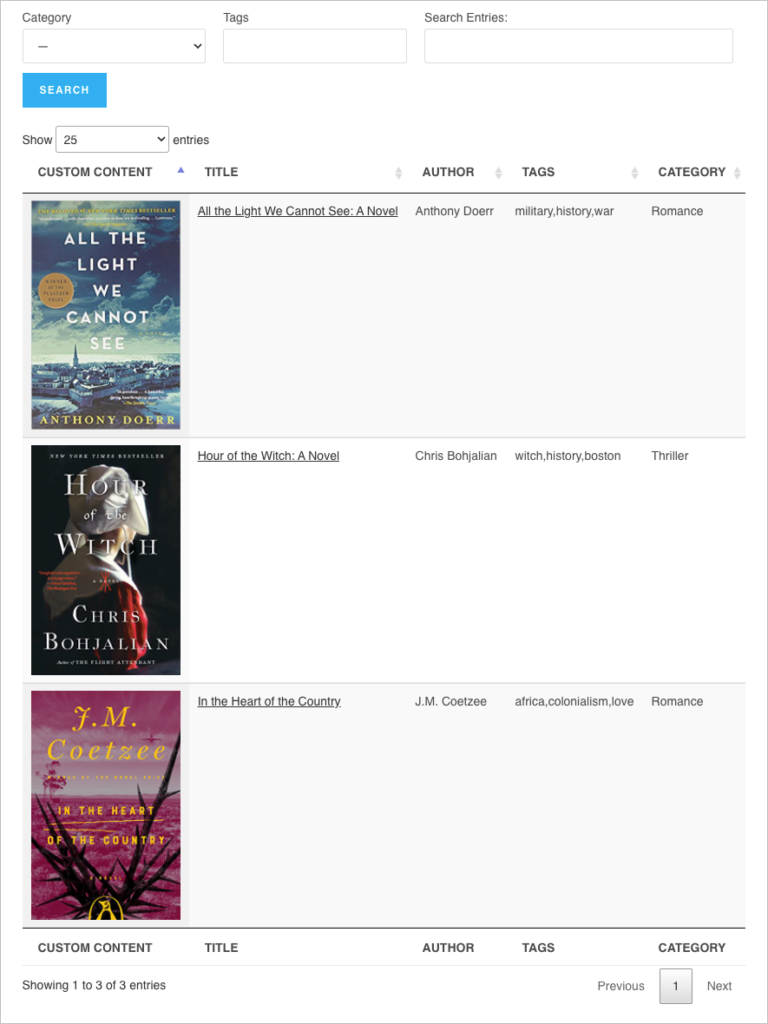
By clicking on a book title, we’re taken to the Single Entry page where we can view more information about the book, including a link to buy it on Amazon.
That’s it! Now we’ll show you a few neat ways to extend your book list application.
Filtering books by status
If you want to filter the books in your book list by status you can do so by adding another Drop Down field to your form with various options (e.g. “Next up”, “Reading”, “Completed”).
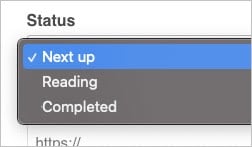
Using the Advanced Filter Extension, you can then filter your book list to exclude those you have completed or only show those marked as “Next up”.
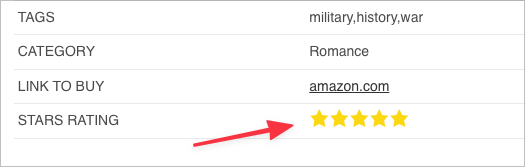
Bonus: Add book ratings and reviews
Using the GravityView Ratings & Reviews extension, you can allow users to rate and review books on your list. This is helpful if you’re building a book review site, or you’re creating a website for your local book club.
Create your WordPress reading list using GravityView DataTables
If you don’t make a habit out of reading regularly, now is the perfect time to start! Reading is a great way to acquire new knowledge and improve your cognitive abilities.
In this post, we showed you how to create a book list using the GravityView DataTables layout. A book list allows you to save and categorize books that you want to read. It’s also an easy way to share new books with friends.
Did you find this post helpful? Build your new WordPress book list today and get reading!

Helpful tips right in your inbox.
Subscribe to get the latest articles, information on releases and helpful Gravity Forms tips!
More articles

10 things you can ask AI to do with Gravity Forms (using the free GravityKit MCP)
See 10 practical things you can ask AI to do with Gravity Forms using the free GravityKit MCP: create forms, manage entries, build Views, and more.

Launch Log: theme template editing in Block MCP, Shield silentCAPTCHA for Zero Spam, and GravityView fixes
Block MCP adds safe theme template editing, Gravity Forms Zero Spam gains Shield silentCAPTCHA support, and GravityView fixes lightbox and notice bugs.

GravityKit turns 12: a year in review, and 30% off Lifetime All Access
GravityKit turns 12. A look back at a year of GravityView 3.0, GravitySearch, and AI-assisted building, plus a birthday sale on the Lifetime All Access Pass.
