Published
•
Updated
How to easily migrate from Kali Forms to Gravity Forms
Virtually all websites have one thing in common: forms! Choosing the right form plugin for your WordPress website is crucial. However, many people just install the first plugin they find without considering all of its features and functionality. Migrating to a new form plugin can seem like a daunting task. What do you do with…

Virtually all websites have one thing in common: forms!
Choosing the right form plugin for your WordPress website is crucial. However, many people just install the first plugin they find without considering all of its features and functionality.
Migrating to a new form plugin can seem like a daunting task. What do you do with all your existing entries? How do you recreate your old forms?
In this post, we’ll show you how to migrate your forms and submissions from Kali Forms to Gravity Forms in a few simple steps!
While Kali Forms is a powerful form builder, Gravity Forms is the best form solution for larger websites and fast-growing businesses.
Wanna try it?
Spin up a demo
See GravityImport in action on its live demo site.

What is Kali Forms?
Kali Forms is a WordPress form plugin built for usability. Kali Forms ships with a range of prebuilt templates, allowing you to create a new form with only a few clicks.
According to Kali Forms, their plugin allows you to “easily create powerful contact forms, payment forms, feedback forms and more for your website without the hassle.”
Kali Forms currently has over 30,000 installs and a 5-star rating on WordPress.org. However, Kali Forms may not be the ideal WordPress form plugin for your website.
Kali Forms review: Is it a good form builder?
If you’re looking to create a simple contact form for your website, Kali Forms may be a good choice for you. Kali Forms is easy to configure and it includes some powerful features that are easy to tweak.
There is a free version of Kali Forms available on WordPress.org, but most of its features are in the Pro version.
Kinsta.com ranks Kali Forms 17th in their list of “best WordPress contact form plugins”. Number 1 on the list is Gravity Forms!
Why use Gravity Forms instead of Kali Forms?
Gravity Forms is the ultimate all-in-one form plugin for WordPress. While Kali Forms works well for creating simple contact forms, Gravity Forms provides a suite of powerful features and top class support that’s difficult to find anywhere else.
For bigger websites seeking a reliable form solution, Gravity Forms is the ideal plugin. Here are some reasons to switch from Kali Forms to Gravity Forms.
Infinitely extendable
Gravity Forms offers a wide range of extensions, allowing you to integrate your forms with other third-party applications. Having this functionality is crucial for businesses that utilize multiple software platforms.
For example, Gravity Forms integrates with email service providers, CRM systems, payment gateways, accounting systems and more! Having all of these integrations at your fingertips makes Gravity Forms the go-to form plugin for small to medium-sized businesses.
Impeccable support and helpful community
Gravity Forms has been around a while. In fact, it’s one of the oldest and most trusted WordPress form plugins on the market. One of the reasons for this is the excellent support offered by the Gravity Forms team.
There is also a thriving community of users and developers that you can tap into for advice, custom dev work and general inspiration. This is a powerful resource for anyone using Gravity Forms.
Certified Developers
The Gravity Forms Certified Developer program recognizes companies that build high-quality add-ons for the Gravity Forms plugin. Certified developer add-ons allow you to extend Gravity Forms in a variety of ways, from displaying your entries on the front end to scheduling notifications and reports.
Migrating your Forms and submissions from Kali Forms to Gravity Forms
Here’s how you can migrate your forms and submissions from Kali Forms to Gravity Forms in 5 simple steps 😎
Step #1: Install the GravityImport add-on
Start off by installing the GravityImport add-on for Gravity Forms. This allows you to import form data from a CSV file and create new forms automatically during the import process. With GravityImport, you can migrate your form data from popular form plugins (like Formstack, Caldera Forms and others) to Gravity Forms!
You can purchase GravityImport from our website. If you’re a GravityView All Access license holder, you already have access to the plugin! To install GravityImport, follow the steps below:
- Go to your Account page and download GravityImport
- Go to the Plugins page in WordPress and click Add New
- Click Choose file and select the GravityImport plugin ZIP file
- Click Install Now. When the plugin has finished installing, click Activate.
When that’s done, move on to step #2! 👇
Step #2: Export your form submissions from Kali Forms
To export data from Kali Forms, you’ll need Kali Forms Pro (as this functionality is not available in the free version of the plugin). Once you’ve upgraded to the Pro version, hover over Kali Forms in your WordPress sidebar and click Extensions.
Next, scroll down to “Kali Forms Submissions” and install the extension.

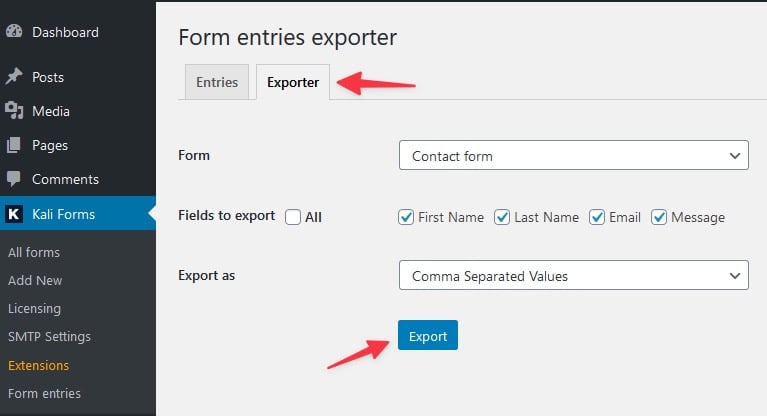
When that’s finished, hover over Kali Forms and click Form Entries. Now click on the tab at the top that says “Exporter”. Here you can choose a form and fields to export.
When you’re done, click the Export button. Your form entries will now download as a CSV file.
Now that you have a CSV file containing your Kali Forms entries, you can import them into Gravity Forms!
Step #3: Import your form submissions to Gravity Forms
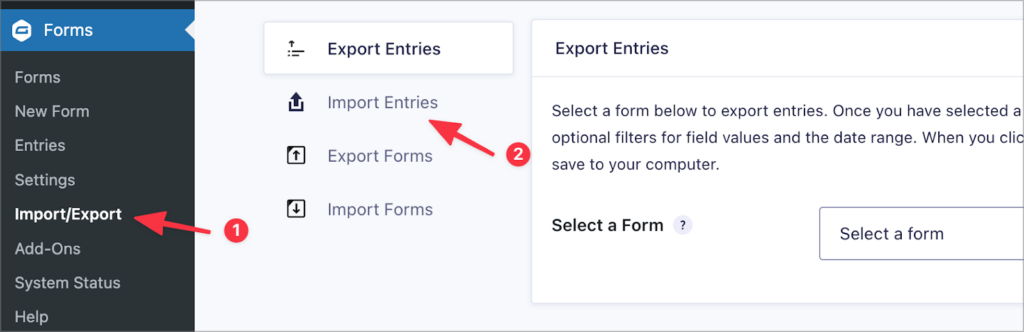
First, make sure you’ve got Gravity Forms installed and activated on your website. Now, hover over Forms, click Import/Export and select the Import Entries tab on the left.
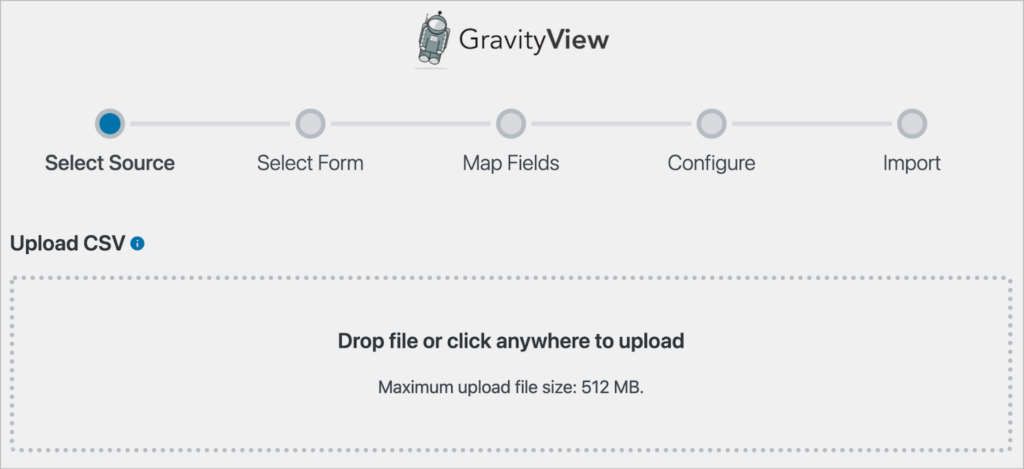
The import entries screen will now load, prompting you to upload a CSV file containing your form entries. Simply click inside the upload box and select the CSV file you downloaded from Kali Forms in the previous step.
When your CSV file has finished uploading, you’ll need to decide where you want to import the entries. GravityImport gives you two options: import to an existing form or create a new form.
If you don’t already have a form set up in Gravity Forms, click Create a New Form, and give your new form a name.
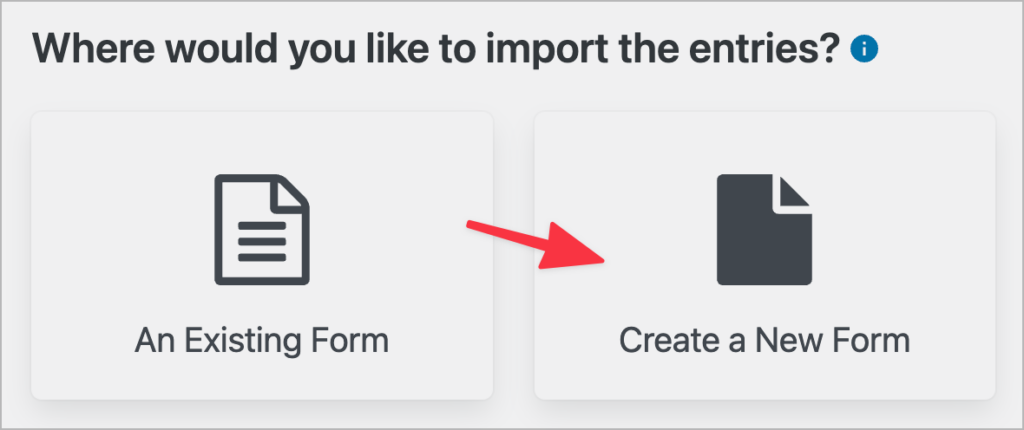
By selecting this option, GravityImport will automatically create a suitable form for you based on the data in your CSV file!
Step #4: Map your fields and configure the import options
The next step is to map the columns in your CSV file to the correct field types in Gravity Forms. The importer will attempt to detect the correct field types, but you can manually override these selections by choosing a new field type from the dropdown menu.
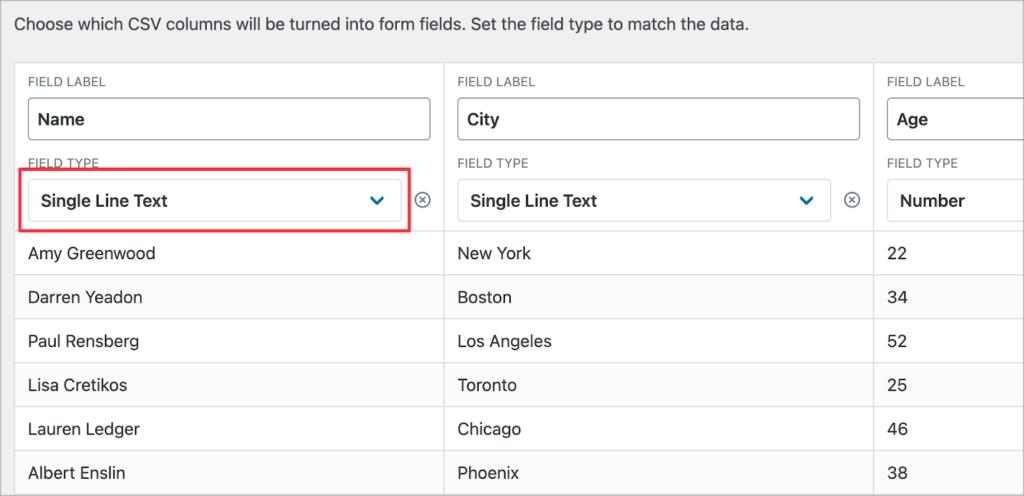
If there’s a field in your CSV file that you don’t want to import to Gravity Forms, simply click on the ‘x’ icon to exclude it. When you’re done, scroll down and click Continue With Import.
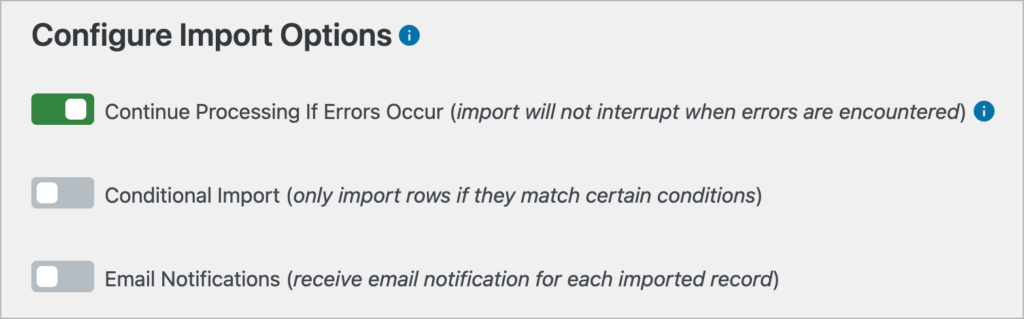
The final step of the import process is to configure the import options. You’ll see three options to configure here:
- Continue Processing If Errors Occur
Enable this to ensure an uninterrupted import process.
- Conditional Import
Enabling this displays the conditional logic filtering settings, allowing you to limit your import to rows that match certain criteria.
- Email Notifications
Enabling this option ensures that your email notifications are sent for each imported record.
When you’re finished configuring the import options, click Create Form and Continue With Import.

When the import has finished, click View Imported Records to see your new form and entries in Gravity Forms.
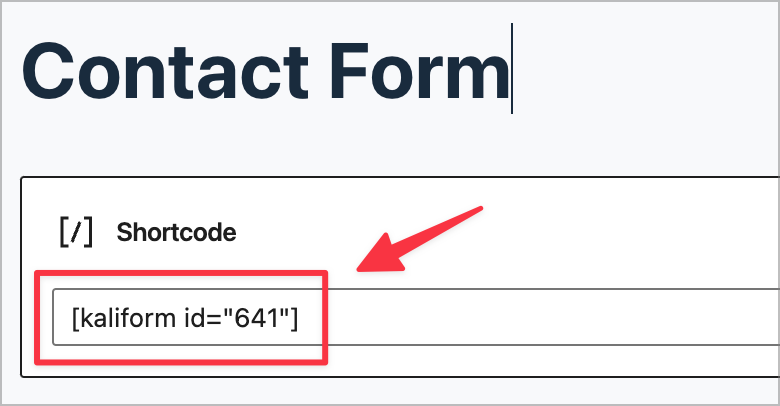
Step #5: Replace your Kali Form with your new Gravity Form
The final step of the migration process is to replace your old Kali form with your new Gravity Form!
To do this, edit the page where your Kali form in embedded and remove the [kaliform] shortcode.
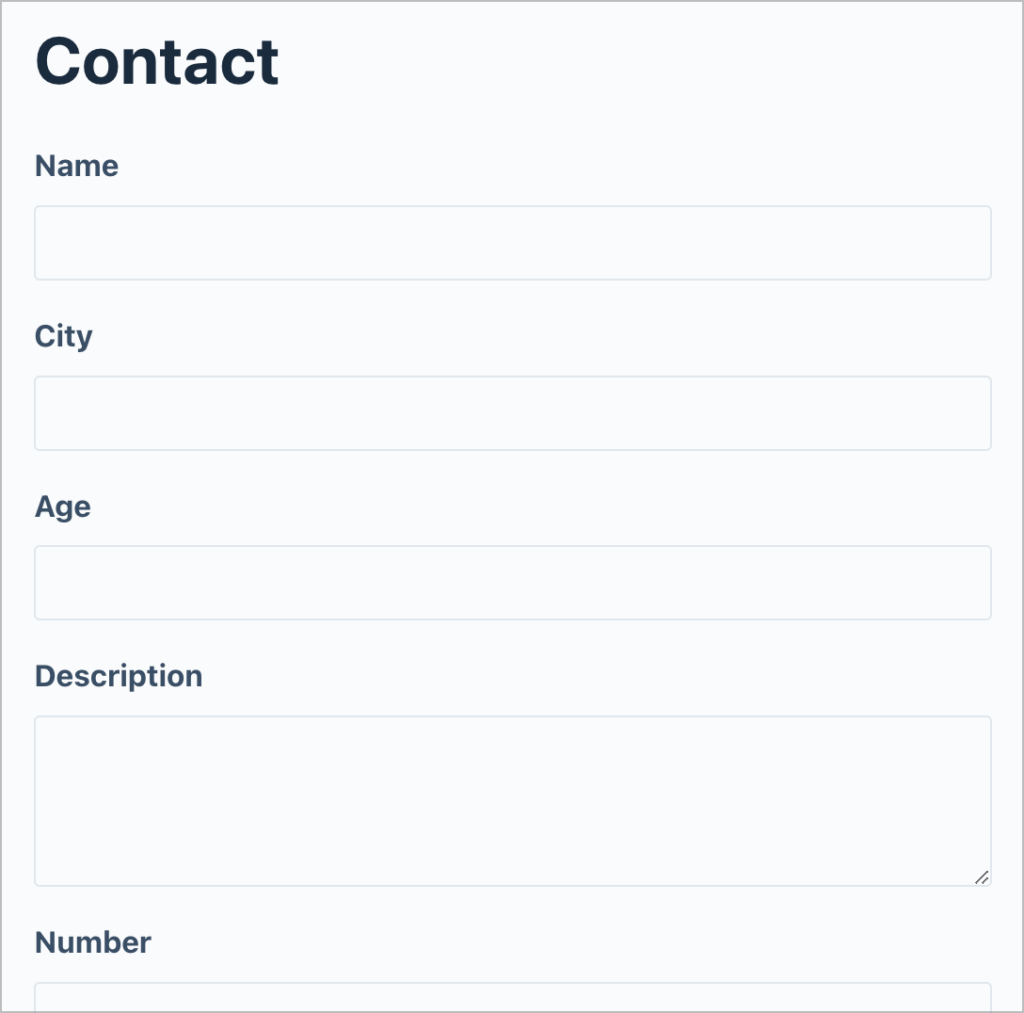
Next, click the plus (‘+’) icon and search for “Gravity Forms” to add a Gravity Forms block to your page. After selecting your new form from the dropdown menu, you’ll see a preview of the form load inside your page editor.
In the block settings, you can choose to show the form title/description, and enable/disable AJAX submit.
When you’re done, save your page and check out your new form on the front end.
That’s it!
Migrate from Kali Forms to Gravity Forms today!
Kali Forms is a powerful form builder for WordPress, but it’s limited when it comes to features and functionality.
As your business grows, you may need a more flexible solution that supports integrations with your existing applications. That’s where Gravity Forms comes in!
In this post, we showed you how to migrate your forms and entries from Kali Forms to Gravity Forms using or GravityImport plugin. So what are you waiting for? Get GravityImport today!

Helpful tips right in your inbox.
Subscribe to get the latest articles, information on releases and helpful Gravity Forms tips!
More articles

Launch Log: Drag-to-copy in the View editor, Gravity Forms 3.0 fixes
This week’s GravityKit releases add drag-to-copy and accessibility upgrades to the GravityView View editor, fix Gravity Forms 3.0 compatibility issues, and tighten security in the DataTables Layout.

How to build a searchable directory on Gravity Forms by chatting with AI
Build a searchable directory from your Gravity Forms entries by chatting with AI. See how the free GravityKit MCP creates a GravityView directory in minutes.

10 things you can ask AI to do with Gravity Forms (using the free GravityKit MCP)
See 10 practical things you can ask AI to do with Gravity Forms using the free GravityKit MCP: create forms, manage entries, build Views, and more.