Published
•
Updated
How to migrate from Fluent Forms to Gravity Forms
Migrate from Fluent Forms to Gravity Forms in 5 steps using GravityImport. Transfer your forms and entries without copy-pasting or rebuilding anything from scratch.

Are you looking for an easy way to migrate from Fluent Forms to Gravity Forms?
Gravity Forms has been a mainstay in the WordPress plugin scene for many years, and for good reason: It’s robust, flexible and well-supported.
The thought of migrating to a new form plugin probably gives you a headache, but don’t worry, it’s easier than you think.
In this post, we’ll show you how to migrate your forms and your entries from Fluent Forms to Gravity Forms in only 5 simple steps! There’s no copy/pasting involved and no need to manually rebuild your old forms.
Let’s get started!
Wanna try it?
Spin up a demo
See GravityImport in action on its live demo site.

What you need
To migrate your forms and entries from Fluent Forms to Gravity Forms, you will need the powerful GravityImport plugin.
Why move from Fluent Forms to Gravity Forms?
The reasons to move from Fluent Forms to Gravity Forms depend on you and your website! While Fluent Forms is a powerful solution for many website owners, many people prefer Gravity Forms due to its expansive range of integrations and enthusiastic community of third-party developers.
Pro tipLearn how to get set up with Gravity Forms.
1. Export your form data from Fluent Forms
The first step is to export your form entries from Fluent Forms as a CSV file.
To do this, hover over Fluent Forms in the left-hand menu and click on All Forms. Now hover over your form and click on Entries.

On the Entries page, use the bulk selector to select all of the entries. Next, hover over the Export button at the top right and select Export as CSV.
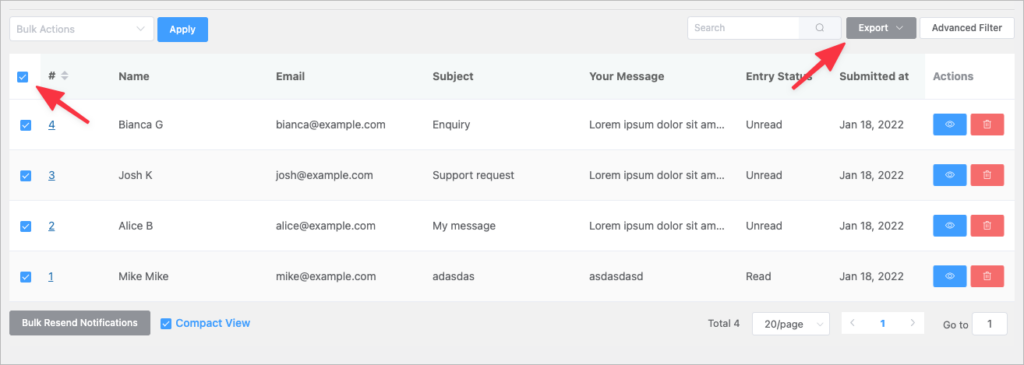
As you can see, Fluent Forms gives you the option to export as CSV, Excel, ODS or JSON data. Make sure you choose CSV.

Your form entries will now be downloaded to your computer as a single CSV file. Make sure to save this file somewhere you’ll remember.
2. Install GravityImport
The next step is to install the GravityImport add-on for Gravity Forms. This will allow you to import your entries into Gravity Forms and create a new form in the process!
The GravityImport add-on allows you to migrate your forms and entries from any form plugin to Gravity Forms (this includes Ninja Forms, Formstack, Caldera Forms, Contact Form 7, WPForms, Kali Forms and more! ).
Pro tipImport Entries also allows you to migrate users to Gravity Forms.
3. Upload your CSV file to Gravity Forms
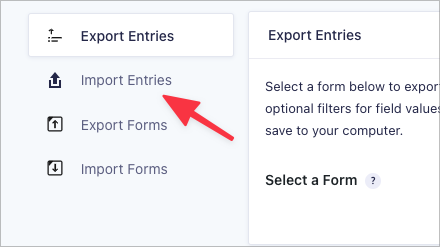
The next step is to upload the CSV file containing your form entries to Gravity Forms. Hover over “Forms”, select “Import/Export” and then click on the “Import Entries” tab.
Next, upload the CSV file containing your Fluent Forms entries. To do this, drag and drop the file into the upload box.

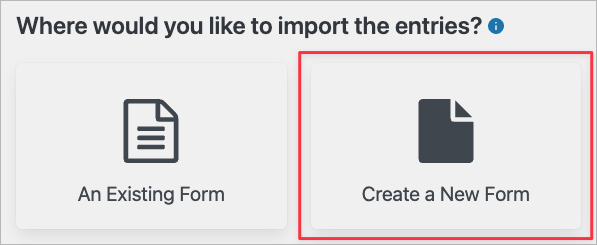
After your CSV file is finished uploading, scroll down to where it says “Where would you like to import the entries?” and select “Create a New Form”.
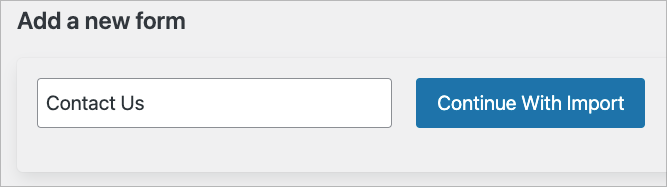
After giving your new form a name, click “Continue With Import”.
The penultimate step is to map the columns in your CSV file to the correct field types in Gravity Forms.
4. Map your fields and configure the import options
Depending on the data in your CSV file, GravityImport will detect the most suitable field type. However, you can manually overwrite this by selecting a new field type from the dropdown menu.
You can also update the existing field labels by entering a new label in the Field Label input box.
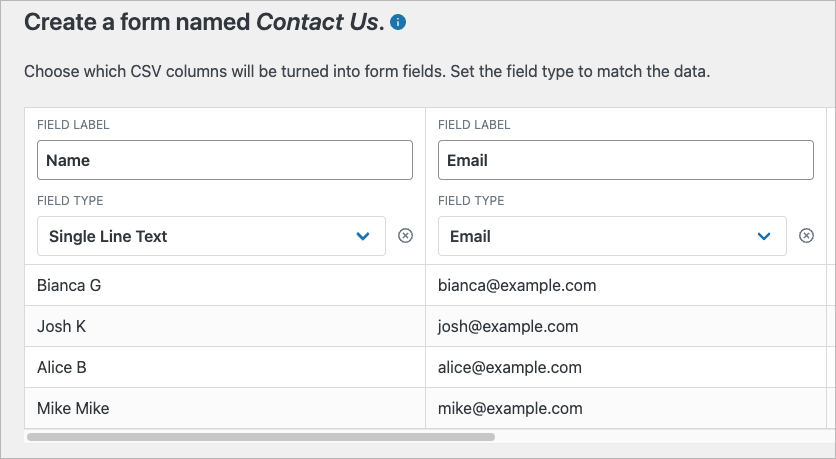
When you’re finished mapping your fields, scroll down and click “Continue With Import”.
The final step of the import process is to configure the import options. There are three options available when creating a new form.
- Continue Processing If Errors Occur (do not interrupt the import when errors are found)
- Conditional Import (import entries based on conditional logic)
- Email Notifications (enable notifications for each entry)
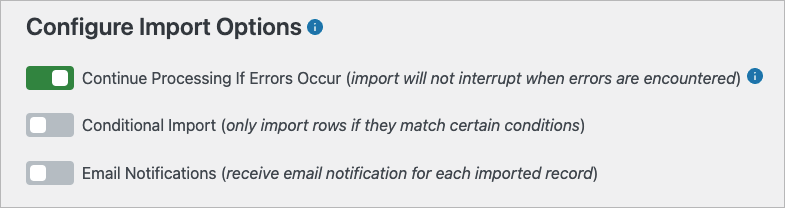
After configuring the import options, click “Create New Form and Continue With Import”. The Importer will now:
- Import your Fluent Forms entries to Gravity Forms and;
- Automatically create a new form based on the entry data
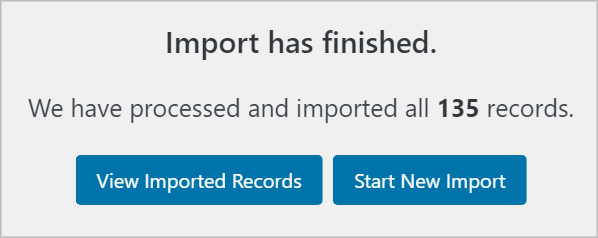
We’re almost there! The final step is to replace your old Fluent Form with your new Gravity Form!
5. Replace your old Fluent Form with your new Gravity Form
After successfully importing your form entries to Gravity Forms, the final step is to replace your old Fluent Form with your new Gravity Form.
Edit the page where your form is embedded, click on the Fluent Forms block and remove it from your page layout.
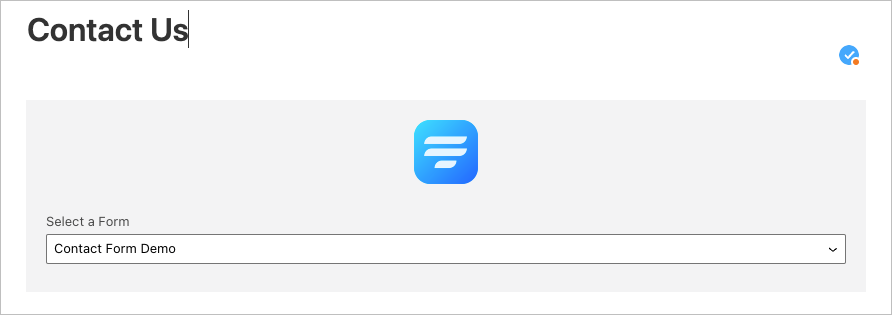
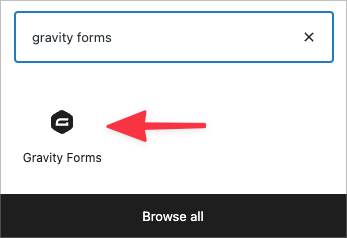
Now click on the ‘+’ icon to add a new block to your page. Search for “Gravity Forms” and select the Gravity Forms block.
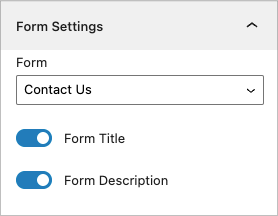
Select your form from the dropdown menu and configure the remaining settings (i.e. choose whether you want to show the Form Title/Description, enable AJAX, etc).
Finally, update your page. That’s it, you’re done!
Migrate from Fluent Forms to Gravity Forms today
Gravity Forms is the most powerful form plugin for WordPress. In this post, we showed you how to migrate your forms and entries from Fluent Forms to Gravity Forms using GravityImport.
GravityImport simplifies the migration process by enabling you to import a CSV file containing your form entries to Gravity Forms and automatically create a new form in the process.
If you found this post helpful, subscribe to our email list below!

Helpful tips right in your inbox.
Subscribe to get the latest articles, information on releases and helpful Gravity Forms tips!
More articles

Launch Log: GravityView 3.0, plus upgrades to Block MCP and GravityKit MCP
GravityView 3.0 lands with the new Vantage theme, frontend bulk actions, and AI-assisted View creation. This launch log also covers updates to GravityKit MCP, Block MCP, and Dashboard Views.

Announcing GravityView 3.0: a fresh new look, AI View creation, and native page builder support
GravityView 3.0 is here: restyle Views with the new Vantage theme, build them with AI, embed them in any page builder, and run bulk actions on the front end.

Launch Log: GravitySearch arrives, plus AI spam review and GravityView fixes
This week, releases are anchored by a brand-new product! GravitySearch joins the GravityKit suite with cross-form entry search for Gravity Forms. Alongside it, Gravity Forms Zero Spam picks up an AI-powered review step, and GravityView sees fixes for Enhanced Security, Edit Entry, and Entry…