Published
•
Updated
How to build a knowledge base on WordPress (without code)
Build a searchable knowledge base on WordPress using Gravity Forms and GravityView. Add categories, a search bar, and front-end article submission without writing any code.

Building a knowledge base for your organization not only enhances the customer experience but also establishes your website as a valuable resource hub!
In this step-by-step tutorial, we’re going to show you how to build a knowledge base using Gravity Forms and GravityView. Using this powerful combo, you can build a customized solution that meets the unique needs of your business.
Keep reading to find out more!
Sneak peek
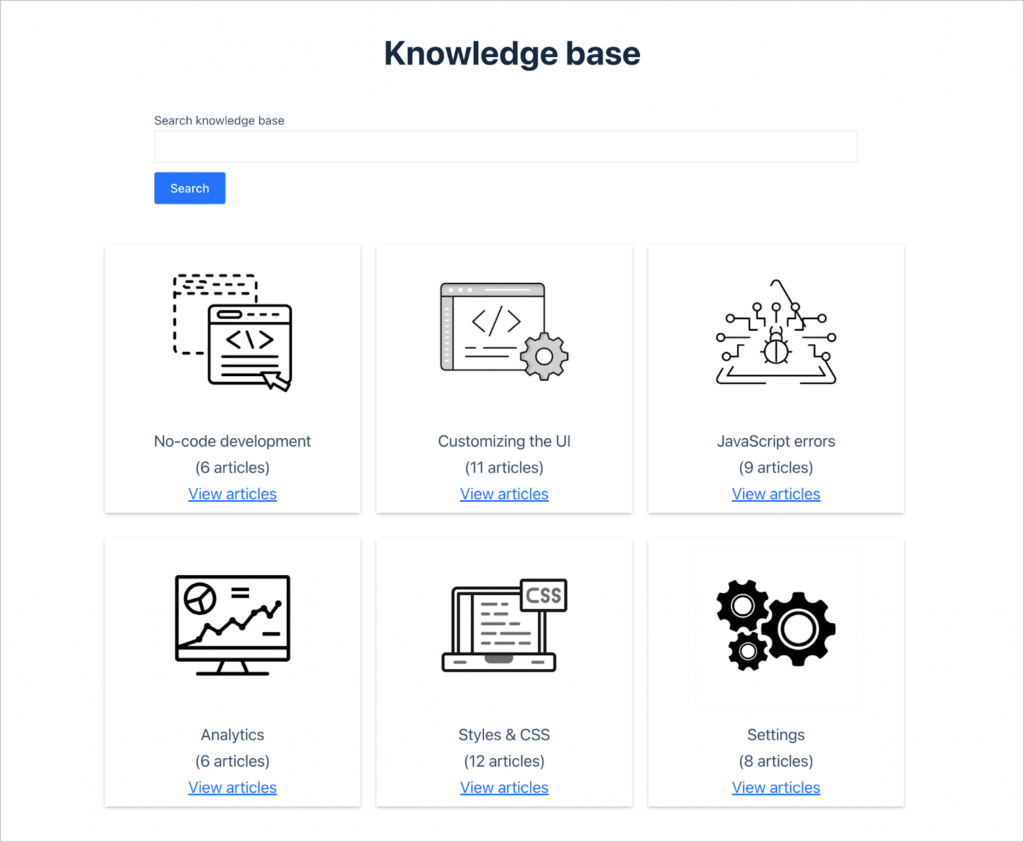
Here’s a look at our finished knowledge base. The main page features a search bar with a grid of different categories.

Clicking on one of the categories takes you to a page where you can view all the articles for that specific topic.
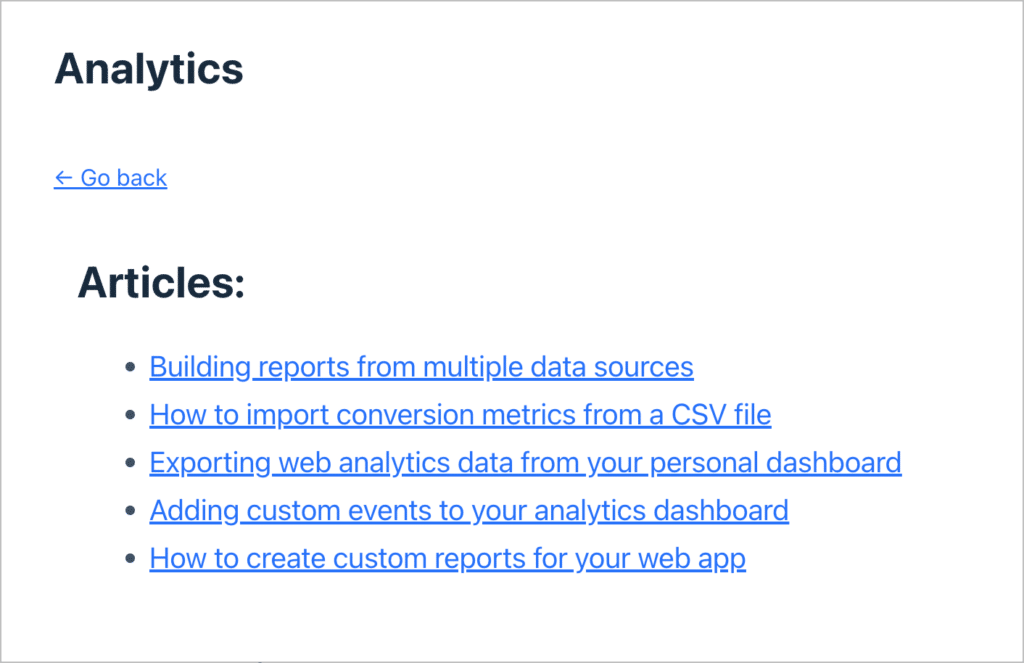
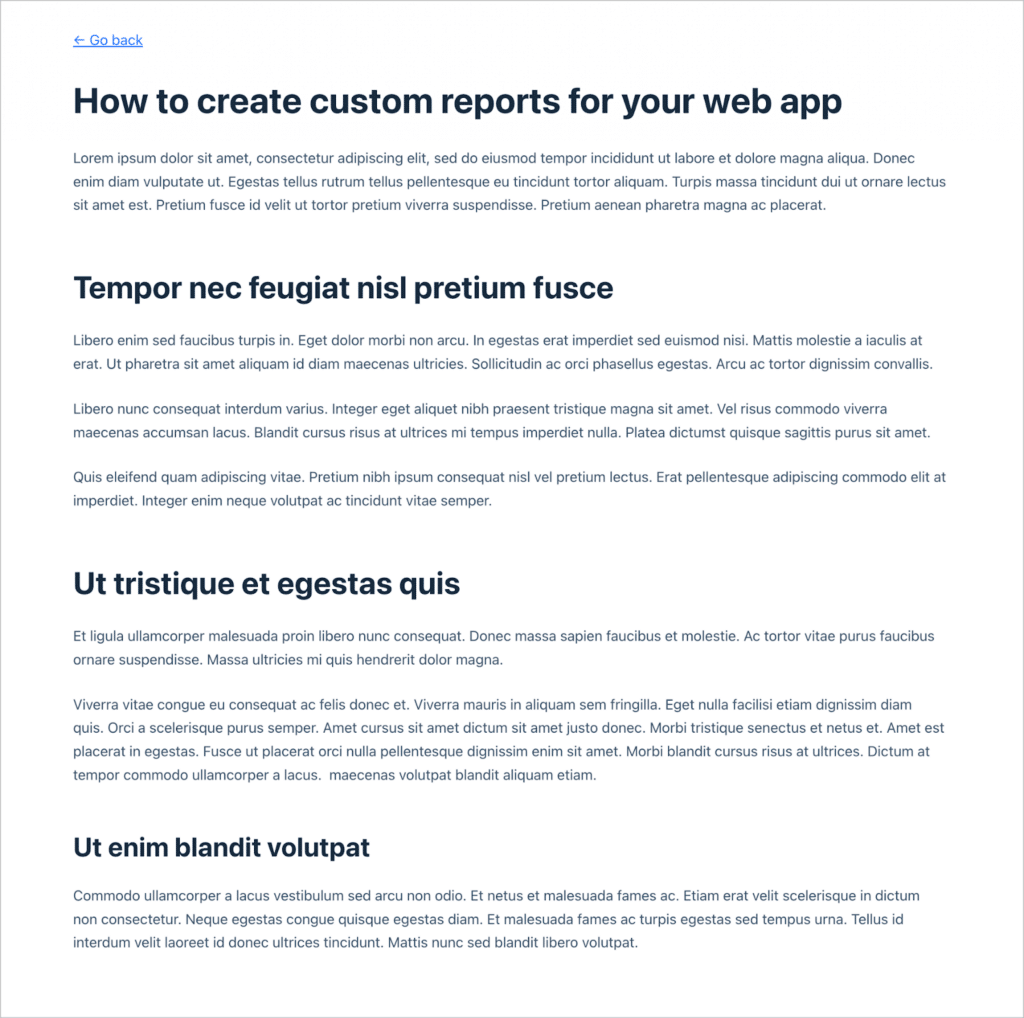
Clicking on one of the articles allows you to view it in full.

And finally, Admins and Editors can add new articles from the front end using a Gravity Form with a rich text editor field.

Neat, isn’t it? This is a simple example of a knowledge base system built on GravityView. The advantage of this system is that users never need to access the WordPress dashboard—they can add, edit and remove articles (and categories) directly from the front end!

Pro Tip
Like what you see? Get your own free trial site preloaded with all GravityKit add-ons!
What you’ll need
Here are the plugins you will need to build a knowledge base like the one we created above.
- Gravity Forms
- GravityView
- GravityMath (optional)
- Gravity Forms Dynamic Lookup (free / optional)
What is a knowledge base?
A knowledge base serves as a centralized repository of information, offering users a go-to source for answers and insights. It’s a curated collection of articles and guides, designed to empower users with the information they seek.
Many software companies maintain a knowledge base, consisting of technical documentation, guides and other resources. This helps customers find answers to questions they have, and empowers them to explore the software more deeply.
Why your organization needs a knowledge base
Having a knowledge base can offer numerous benefits for organizations, enhancing efficiency, communication, and customer satisfaction. Here are several key advantages:
- Accessible information: A knowledge base provides a centralized repository for information, making it easily accessible to employees, customers, and other stakeholders. This accessibility streamlines information retrieval and reduces the need for constant inquiries.
- Self-service support: Users can find answers to common questions and issues independently, reducing the reliance on customer support teams. This empowers users to resolve problems quickly, leading to increased customer satisfaction and a more efficient support process.
- Consistent information: A knowledge base ensures that information is standardized and consistently presented. This helps maintain a unified and accurate understanding of products, services, policies, and procedures across the organization.
- Employee training and onboarding: A knowledge base serves as a valuable resource for employee training and onboarding. New hires can access training materials, manuals, and guidelines, accelerating the learning curve and promoting a smoother onboarding process.
- Enhanced customer experience: Customers appreciate having quick access to accurate information. A knowledge base contributes to a positive customer experience by offering a reliable source of information, reducing frustration, and improving overall satisfaction.
Now let’s take a look at how to build this, step by step.
Building a knowledge base using Gravity Forms and GravityView
Let’s take a look at the process for building a knowledge base using Gravity Forms and GravityView.
Our system is going to have two forms: one for creating categories and one for creating articles. We will then link these forms together using Dynamic Lookup (though this is optional, and we’ll explain why).
The front end of our system will consist of two Views. One for displaying the categories and one displaying the articles. We will link these two Views together using a dynamic filtering condition.
This system ensures that users never see the backend of your site. Even Admins and editors can add new articles to the knowledge base using a front end form!
Creating the category form
The first step is to create a form that allows site Admins and Editors to create new categories in the knowledge base.
To create a new form, we’ll hover over “Forms” and click “New Form”. Now, we can add fields to our form using the Gravity Forms visual editor.
For this example, we’re going to keep things simple by adding the following two fields:
- Category title (Single Line Text field)
- Image (File Upload field)
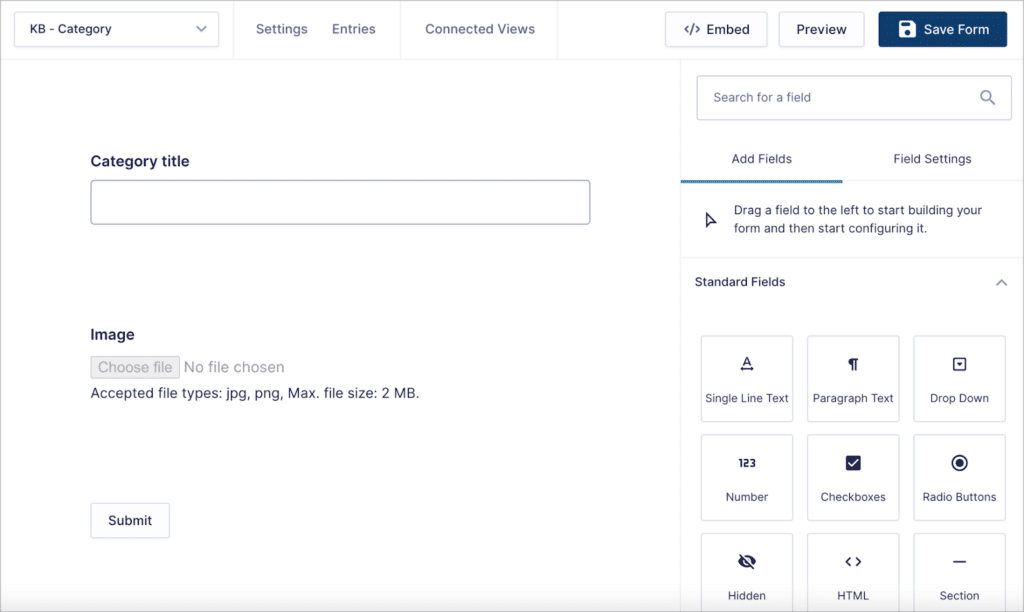
That’s it! After creating our category form, we can add various categories unique to the needs of our knowledge base.
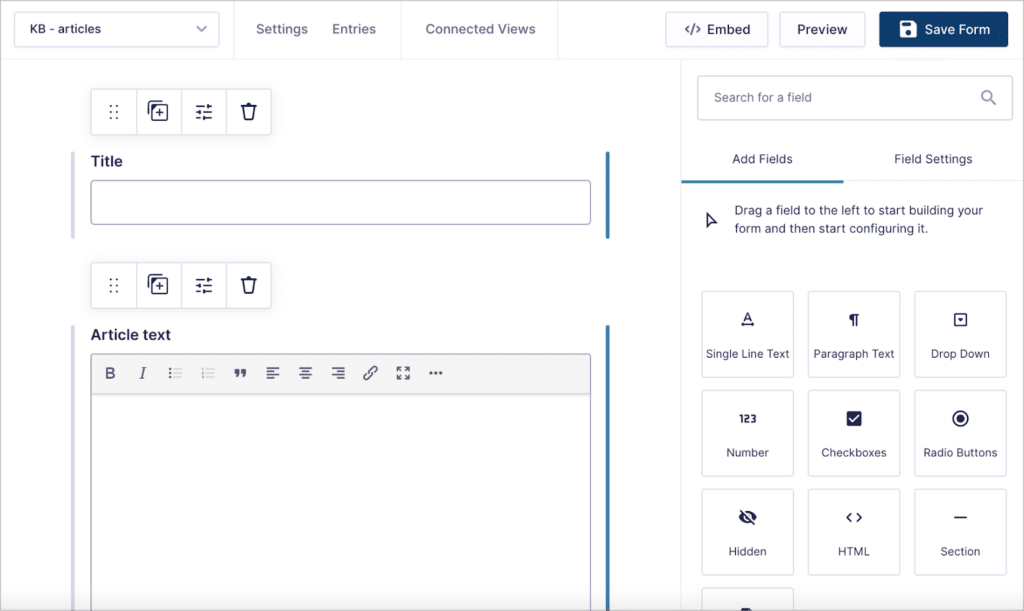
Creating the article submission form
The next step is to create a form for submitting new articles to the knowledge base. This time, we’re going to add the following 3 fields to our form:
- Title (“Single Line Text” field)
- Article text (“Paragraph” field)
- Category (“Drop Down” field)
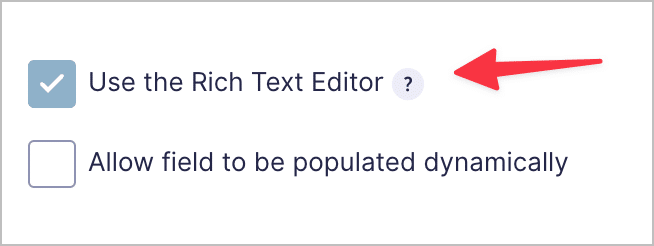
After adding the “Article text” field to our form, we’ll open the “Advanced” field settings and check the box labeled “Use the Rich Text Editor”. This will allow Admins and Editors to format articles using proper titles and text styles!
Next, we need to ensure that our “Category” Drop Down field populates with categories that have already been created through our first form. We can do this using the free Gravity Forms Dynamic Lookup add-on. This powerful add-on enables you to populate field choices with entries from another form!
To start we’ll add a “Lookup” field to our form, choose Dropdown as our input type and then select Gravity Forms as the source.
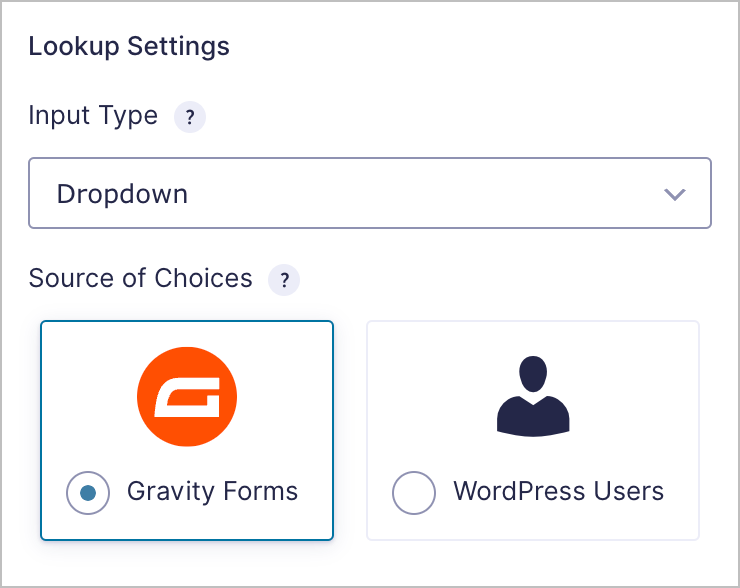
Next, we’ll select choose our Category form as the source form and the Category title as the source field.
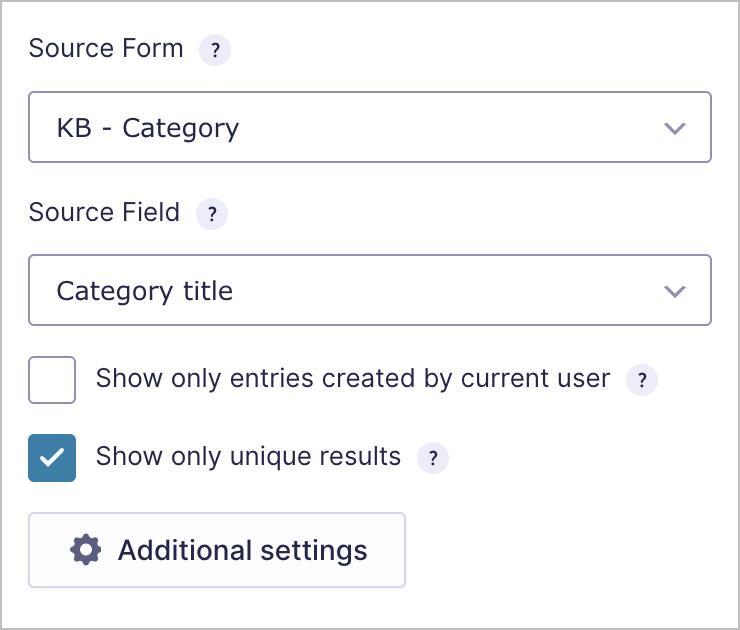
That’s it! Now, the “Category” dropdown field will be dynamically populated with the categories submitted through our category form.
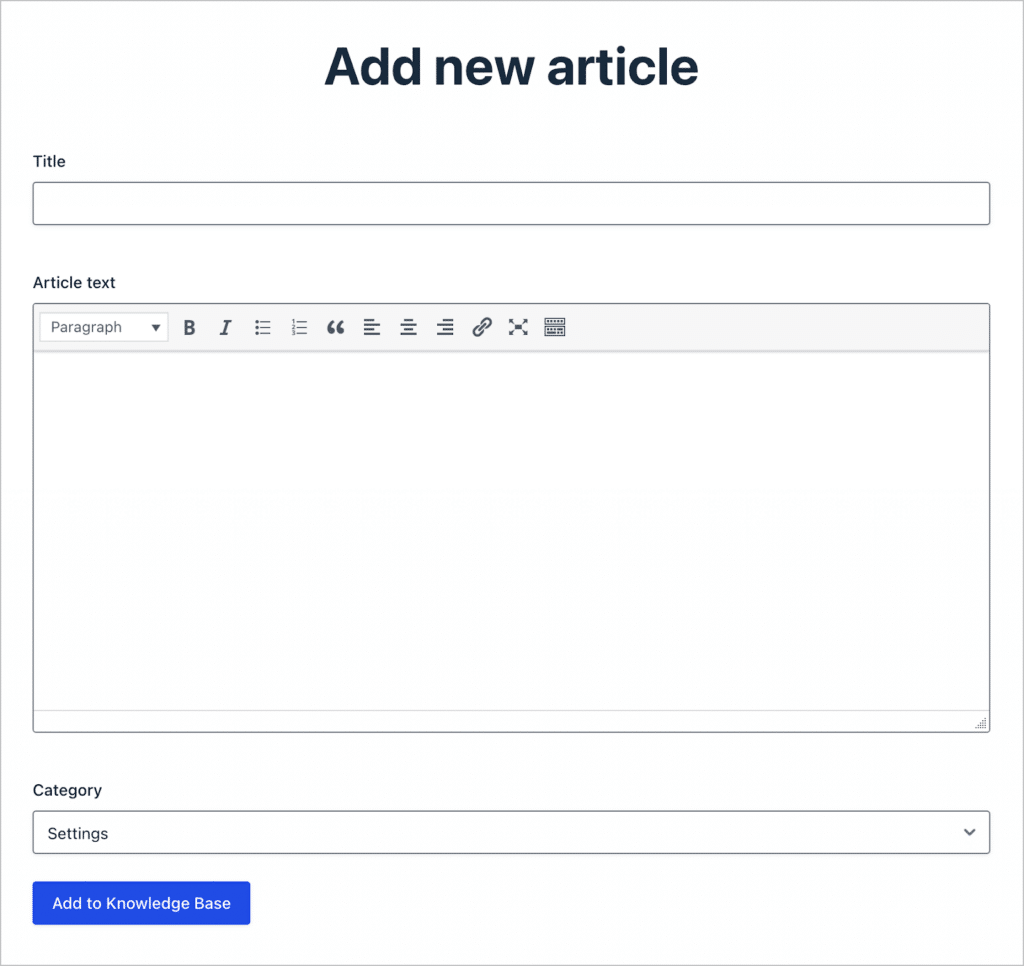
Here’s what our article submission form looks like on the front end:
Now that our forms are ready, we can turn our attention to building out the Views that we need.
Creating a View to display articles
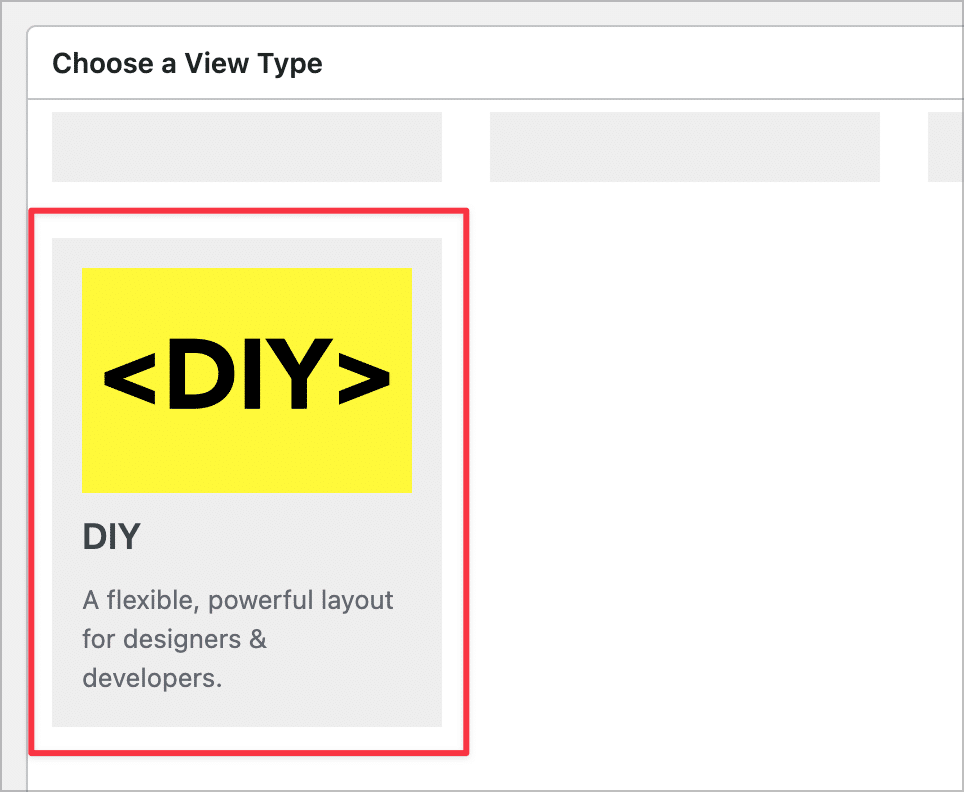
We’ll start by creating a View to display articles on the front end. To create a new View, we’ll hover over “GravityKit” and click “New View”. After giving our View a name, we’ll select “DIY” as our View Type.
The DIY option gives us additional flexibility when creating a layout, but you can select any View Type that works for your design!
After choosing a View Type, we can start constructing our View. We’ll begin by adding the “Title” field to the “Entries Fields” section on the Multiple Entries Layout.
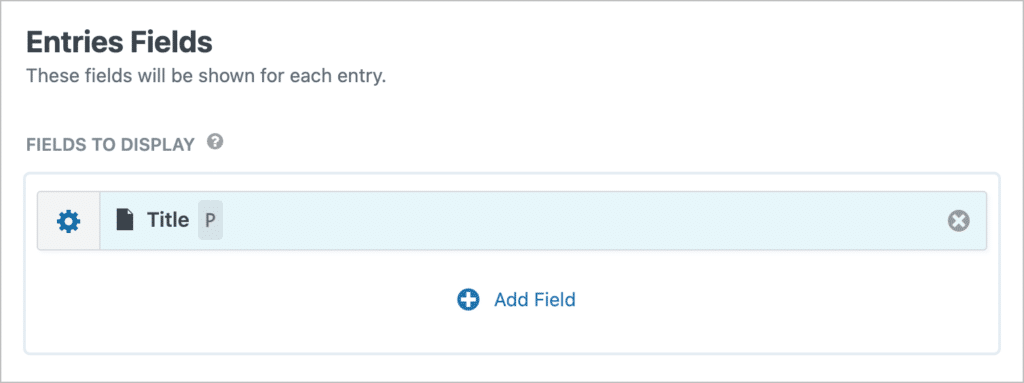
Next, we’ll open the field settings and wrap the field in an HTML list tag. This will ensure that articles in each category show up in a list. The power of the DIY layout is that we can customize things easily using HTML.

Finally, we’ll configure the Single Entry Layout. This is the page where users will be able to view an article in its entirety. Here we’ll add the Title as an H1, the Article text, and a link to edit the entry.
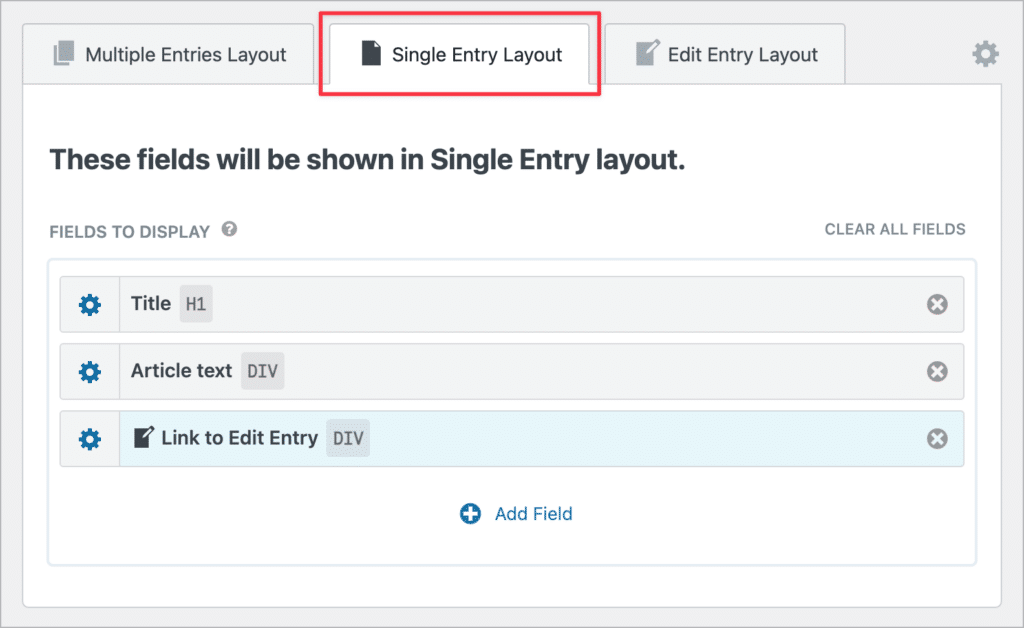
The Link to Edit Entry field will allow logged-in users to update or delete existing articles directly from the font end!
Building the knowledge base front end
The final step is for us to tie everything together by creating a View that displays categories and the articles associated with them. This will serve as our knowledge base front end, making it easy for users to navigate through different resources and find the articles they need.
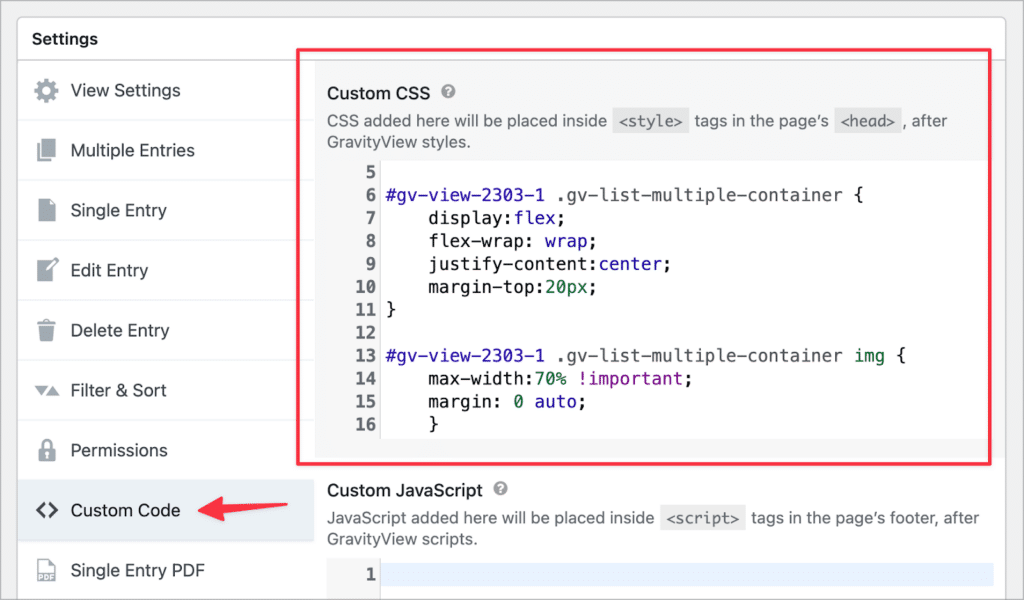
Changing our list View to a grid View
We’ll start by creating a new View and selecting “List” as our View Type. To change our View from a list style to a grid style, we’ll need to add the following CSS snippet to our View.
(If you want to copy this snippet, be sure to replace 2303-1 with your View’s unique ID!).
To add custom code to our View, well scroll down to the View settings, click on the “Custom Code” panel and add our CSS in the “Custom CSS” box.
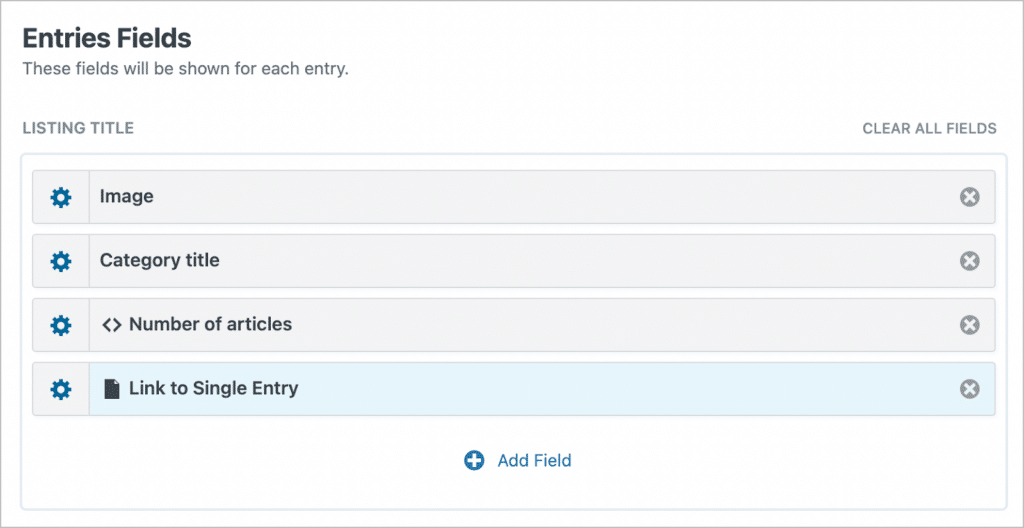
Adding fields to the Multiple Entries Layout
Next, we’ll add the “Image”, and “Category title” fields to the “Listing Title” section of the View editor. After that, we’re going to add two more fields:
- A Custom Content field: This is where we’re going to place the GravityMath shortcode that will calculate how many articles are assigned to each category.
- A “Link to Single Entry” field: Clicking this link will open the Single Entry page where users can see relevant articles and resources.
Let’s configure the custom content field first.
Displaying the number of articles per category
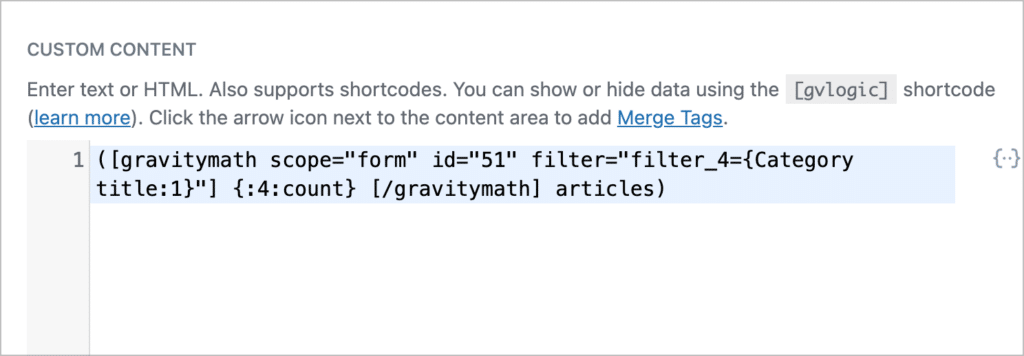
To display the number of articles in each category, we’re going to create a summary using the GravityMath shortcode.
To do this, we’re going to use the below shortcode.
[gravitymath scope="form" id="51" filter="filter_4={Category title:1}"] {:4:count} [/gravitymath]Let’s break it down:
scope: We set the scope to “form” as we’re working with entries added to an external Gravity Form.id: This refers to the ID of the form containing our article entries.filter_4: The number “4” here refers to the ID of the specific field that we want to filter by. This should be equal to the category name. Here, we’re using a merge tag to ensure that the category is dynamic.{:4:count}: We use “count” here to output the number of articles per category. The “4” refers to the ID of the field we want to count (in this case, the category field).
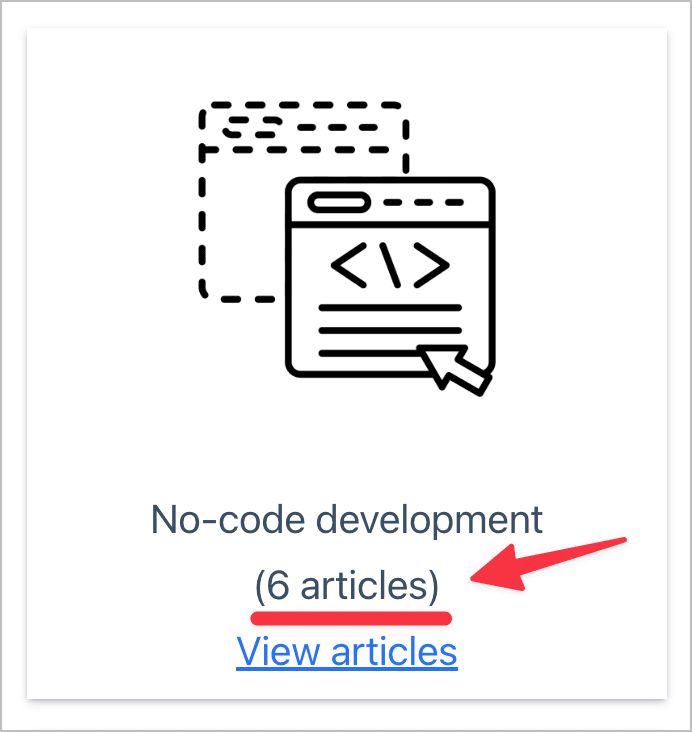
Here’s the output of the shortcode on the front end:
Phew! Okay, if you’re having trouble wrapping your head around how this works, check out this handy article on our docs site!
Configuring the Single Entry Layout
Let’s turn our attention to the Single Entry Layout. This is where users can view a list of articles under a certain category.
All we need to do here is embed the first View that we created previously. To do this, we’ll click “Add Field” and select the “GravityView View” field.
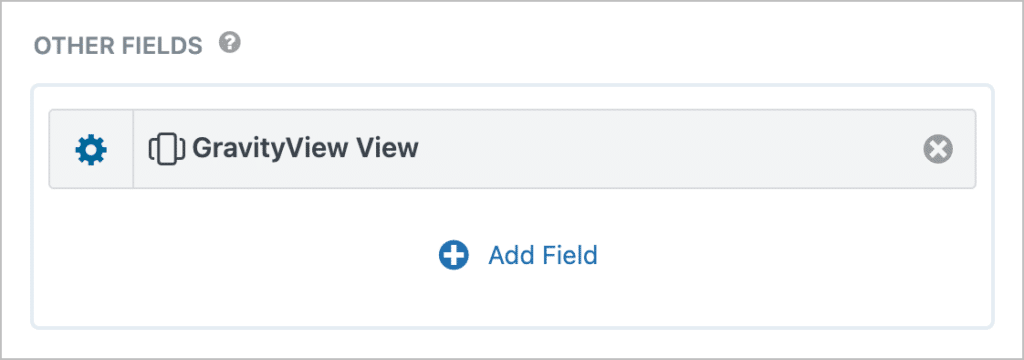
Next, we’ll click on the gear icon to open the field settings. First, we need to choose which View to embed. We’ll go ahead and select our “article list” View.

Next, we need to add a dynamic filter to ensure that the View only displays articles related to the category being viewed by the user.
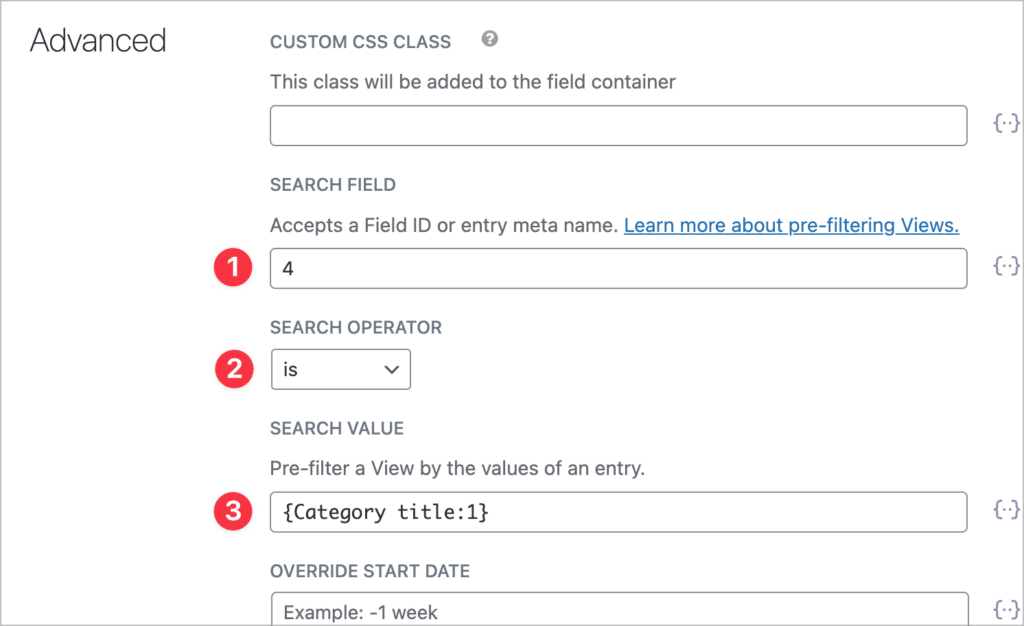
The filter consists of three parameters:
- Search field: The ID of the field that you want to filter by. In this case, this should be set to the ID of the “Category” field in your article submission form.
- Search operator: Set this to “is”.
- Search value: To ensure the filter updates dynamically, set this to the merge tag for the “Category title” field in your category form.
Pro tipTo learn more about merge tags, read our ultimate guide.
Alternative: Embed a form and a View
As we mentioned before, there is an alternative way to set this up without the need for Populate Anything. Essentially, you can embed the article View and form together on the Single Entry page.

Then, in the advanced field setting for the View, set the gk_parent_entry_id meta field equal to the entry ID of the current View entry using the {entry_id} merge tag.
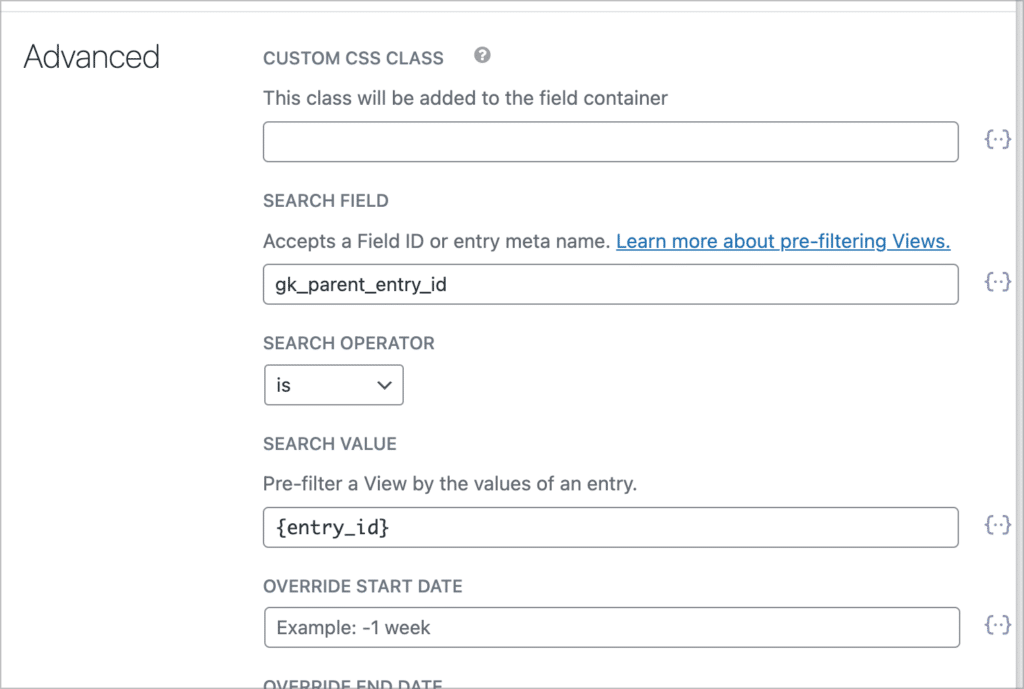
This method does not require Populate Anything. However, you will need to submit new articles from the form embedded on the single entry page to ensure that they are assigned to the correct category. If you want to hide the form from regular users, you can use GravityView’s visibility settings to do so.
For this particular use case (building a knowledge base), we recommend using Populate Anything.
Viewing the finished knowledge base
That’s it! Let’s take a look at our finished knowledge base:
Clicking on a category opens the Single Entry page, where users can see a list of articles under that category. Each article title is a link.

When a user clicks on an article, they are able to view it in full.
This is a simple yet powerful example of how you can use Gravity Forms and GravityKit to create a customizable knowledgebase, resource hub, or documentation portal.
Build your knowledge base using GravityView
A knowledge base acts as a central portal where users can access helpful resources and documentation. Many companies maintain knowledge bases, empowering their customers to find the information they need without needing to contact customer support.
In this post, we showed you how to create a knowledge base using Gravity Forms and GravityView. If you found this guide helpful, learn more about GravityKit today!

Helpful tips right in your inbox.
Subscribe to get the latest articles, information on releases and helpful Gravity Forms tips!
More articles

How to build a WordPress CRM without code (a contact database you own)
Build a simple WordPress CRM with GravityView. Turn the Gravity Forms entries you already collect into a no-code contact database you own, with no monthly fees.

Launch Log: Distance sorting for radius searches, DataTables search improvements, and import reliability fixes
The latest GravityKit releases add distance sorting to map searches, bring built-in search to DataTables, and fix GravityCharts and GravityImport edge cases.

WordPress page builder market share 2026: Elementor leads at 32.67%
Elementor reaches 32.7% of WordPress sites. WordPress Block Editor 20.6%, wpBakery 8.5%, Divi 5.7%. Latest HTTP Archive crawl, share-of-WordPress basis throughout.