Published
•
Updated
How to build an online library on WordPress with no code
Build a searchable online library for books or academic journals on WordPress using Gravity Forms and GravityView. Includes filtering, front-end submissions, and no code needed.
Looking to create an online library for a school, university or private organization?
The flexibility of WordPress means you can mold it into anything you need! Its content and user management capabilities make it perfect for creating an eLibrary for books, academic journals, or other publications.
In this tutorial, we’re going to show you how to create a customizable resource library that meets the needs of your organization. And we’ll be using the powerful duo of Gravity Forms and GravityView to do it!
Keep reading to find out more.
Sneak peek
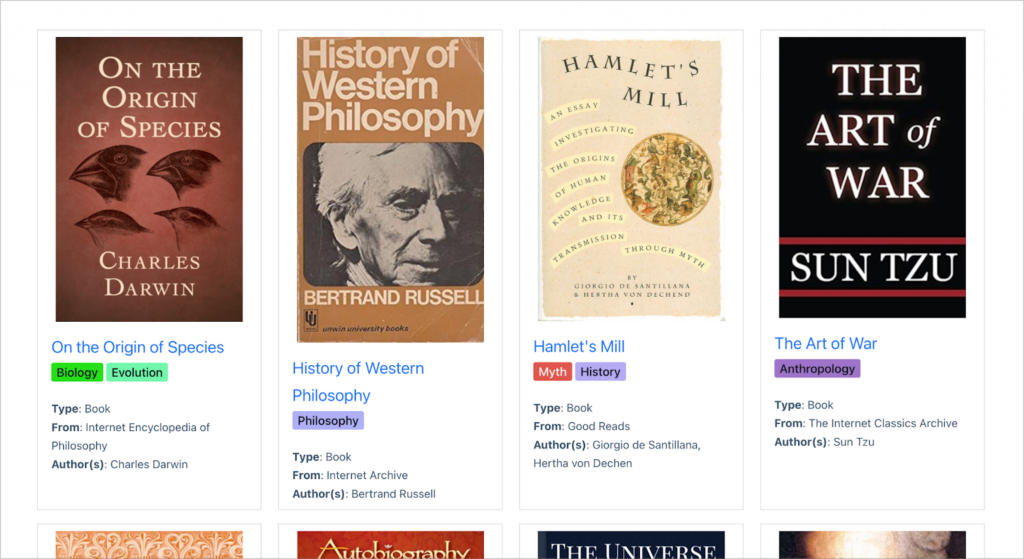
Here’s a sneak peek at our finished online library, built on WordPress using the Gravity Forms and GravityView plugins:
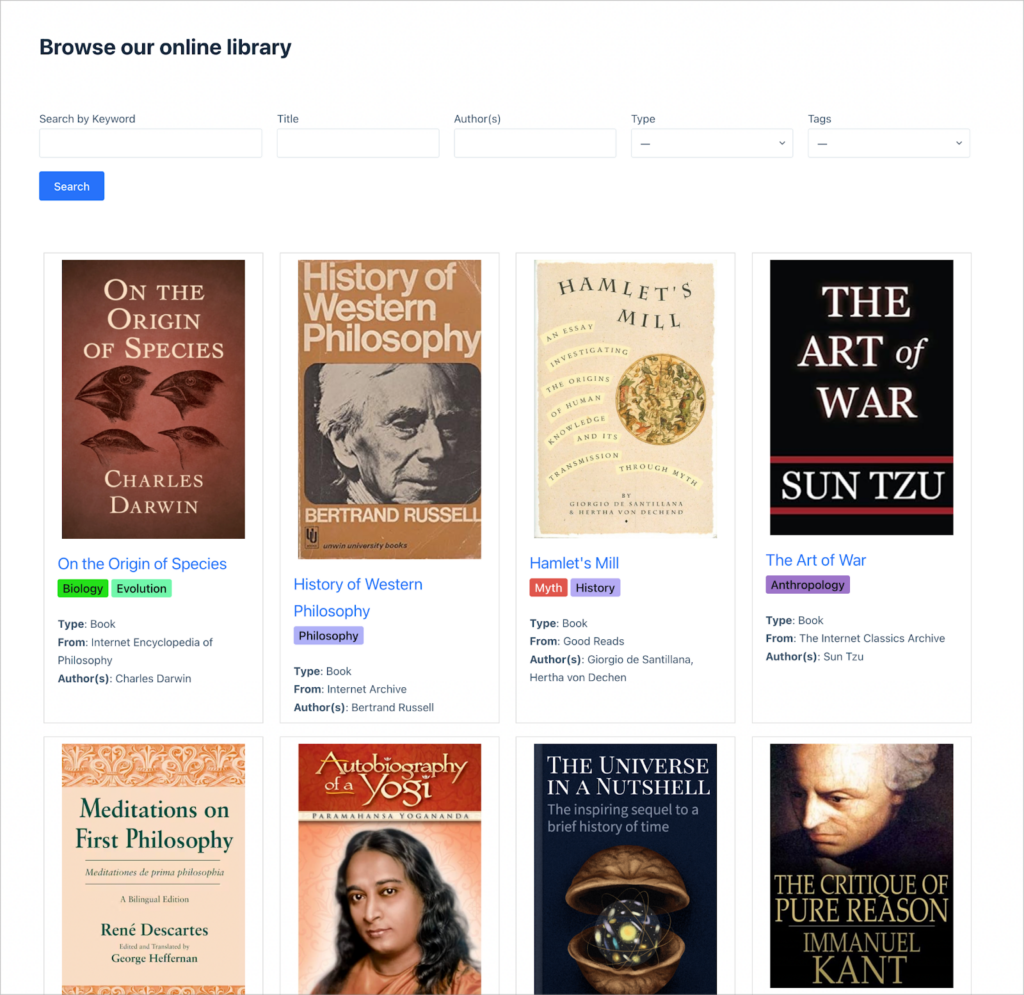
As you can see, there’s a handy search bar at the top enabling users to search for library entries according to specific criteria. All the library books and resources are then displayed below in a grid. For each resource, the user can view relevant information, such as the subject, type (e.g. book, eBook, journal article, etc), source, and author(s).

Clicking on the title of a book takes the user to a page where they can view more information about that specific book, including a description of its contents. There are also buttons to read it online or download it directly to their computer.
Each part of this online library is fully customizable. Keep reading to find out how we built it, and how you can do the same!
Wanna try it?
Spin up a demo
See a live online library built with GravityView — explore the demo.

What you’ll need
Here are the plugins you’ll need to build an online library on WordPress like the one in this tutorial:
- Gravity Forms (any license level)
- GravityView
- Gravity Forms Entry Tags (free!)
- GravityImport (optional)
What is an online library system?
An online library system, also called a digital or electronic library system, is a web platform that enables users to access a wide range of library resources over the internet.
Key features of an online library system include:
- Catalog search: Users can search for books, journals, articles, and other materials using an online search interface. The system allows for keyword, title, author, and subject searches.
- Ability to read online: Library resources can typically be read or viewed directly on a computer, tablet, or e-reader.
- Online resources: In addition to books, online library systems often provide access to electronic resources such as e-journals, databases, audio, and video content.
- Enhanced accessibility: An online library makes library resources available to users at any time and from any location (provided they have internet connectivity)!
Now that we know what features we need, let’s start building our online WordPress library system!
Creating the library submission form
The first thing we need to do is create a form that allows admins to submit new resources to the library. Using Gravity Forms for this means we can build a custom form, with any fields we feel are necessary for our library!
To create a new form, we’ll hover over “Forms” and select “New Form”. Now we can start constructing our form by adding fields using the Gravity Forms editor.
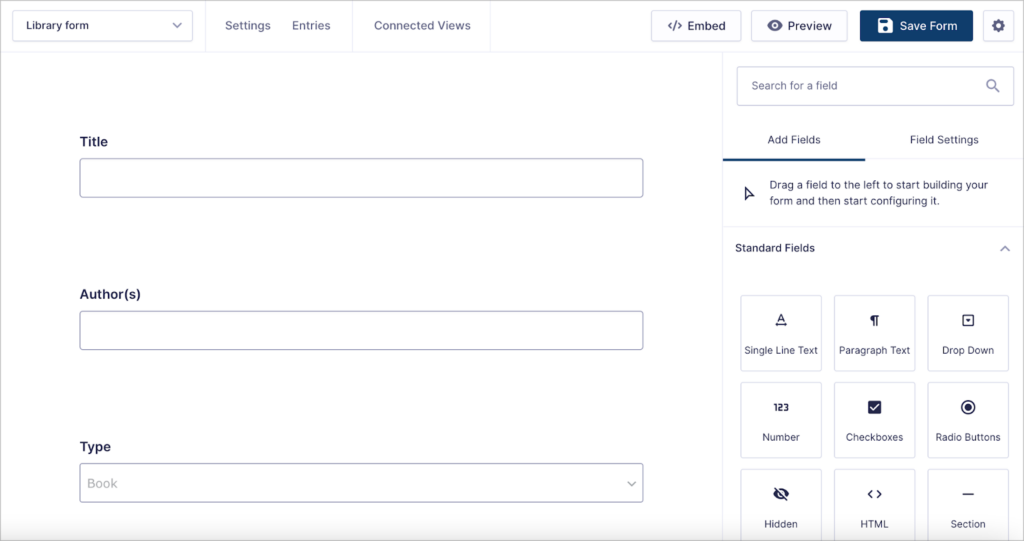
To keep things simple, we’ll create a form with the following fields:
- Title (Single Line Text field)
- Author(s) (Single Line Text field)
- Type (Dropdown field)
- From (Single Line Text field)
- Description (Paragraph Text field)
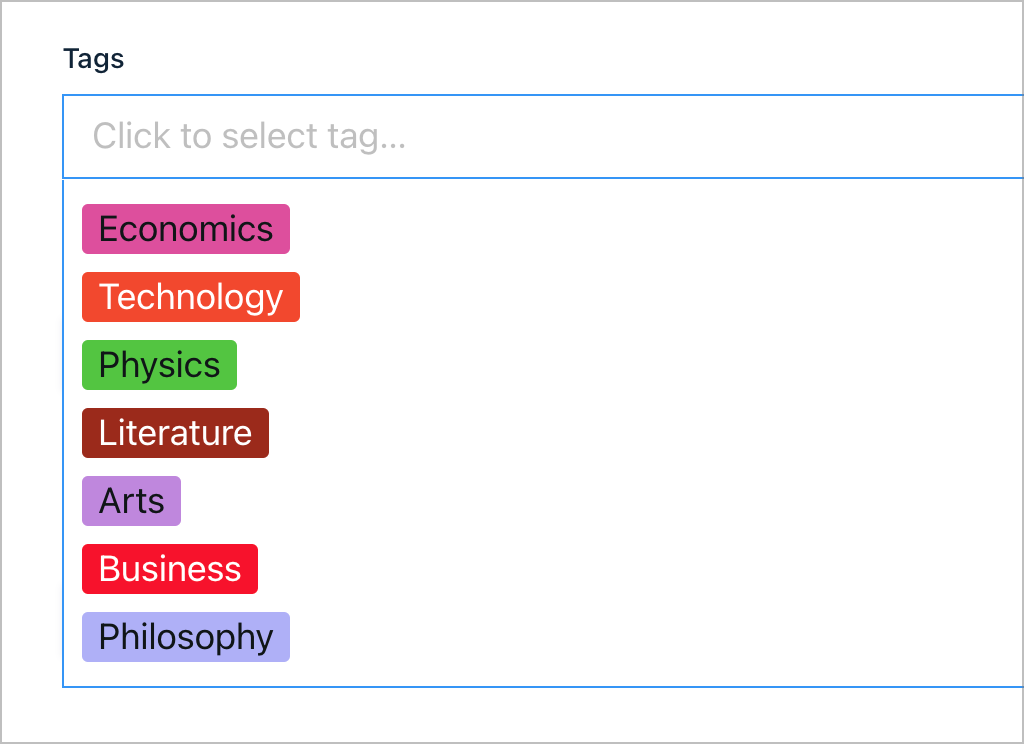
- Tags (Entry Tags field)
- Image (File Upload field)
- Link to resource (Website field)
- Upload file (File Upload field)
The “Type” field is a dropdown field with several options. In our library we’re going to have books, journal articles and research reports, so we’ll add these three options.

The “Tags” field will enable Admins to label library resources depending on the topic they are related to. These tags are also searchable when clicked! For access to this field type, you’ll need to install the free Gravity Forms Entry Tags plugin.
Here’s what our finished form looks like on the front end:
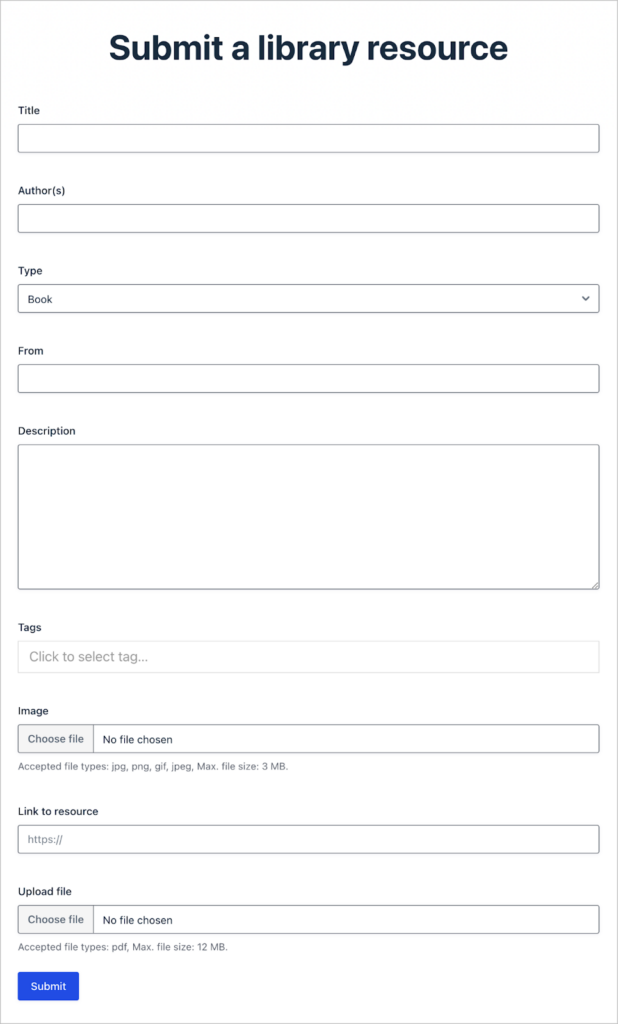
Using this form, we can easily add new resources to our online library. We can also mass import books, articles, and other resources! Let’s take a look at how to do this below.
Optional: Import your library materials
If you already have a large collection of library resources, you may want to import them all in one go instead creating new entries one by one. To do this, you’ll need to install GravityImport.
GravityImport is an add-on for Gravity Forms that enables you to mass import entries from a CSV file.
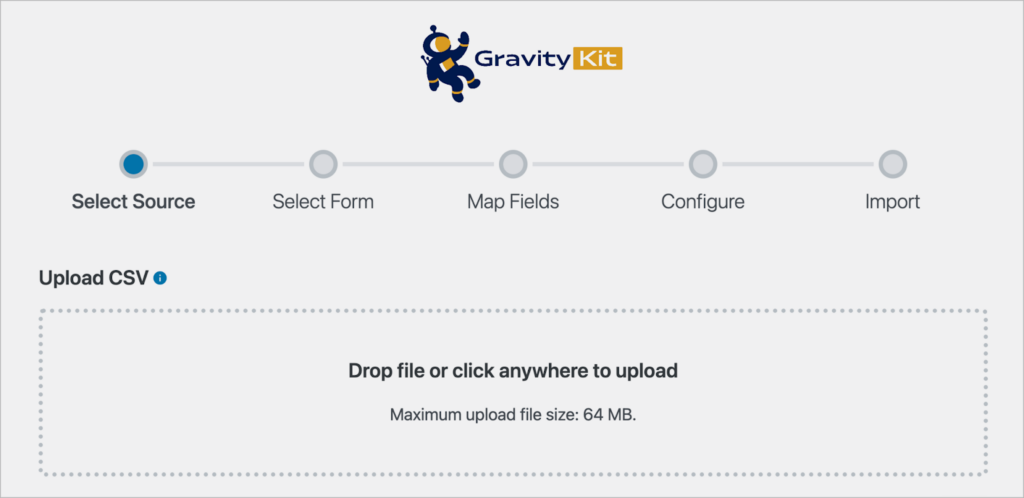
Follow these steps to mass import library entries to your new form:
- Use a spreadsheet program to ensure all of your library resources are saved to a CSV file
- Install GravityImport on your website
- Hover over “Forms”, click on “Import/Export” and then select “Import Entries”
- Upload your CSV file and select your new library form as the input destination
- Follow the remaining steps to import your library resources to your website!
Again, this step is optional, but it will definitely save you time if you already have a database of library resources that you want to import!
Building a View to display library resources
After setting up our library submission form, the next step is to build a front-end View for displaying books and other library resources. This is what our users will see when they come to search and download books from our library.
To do this, we’re going to use GravityView. While Gravity Forms enables us to store data about each library book/resource, GravityView enables us to display that information in a searchable interface using customized layouts!
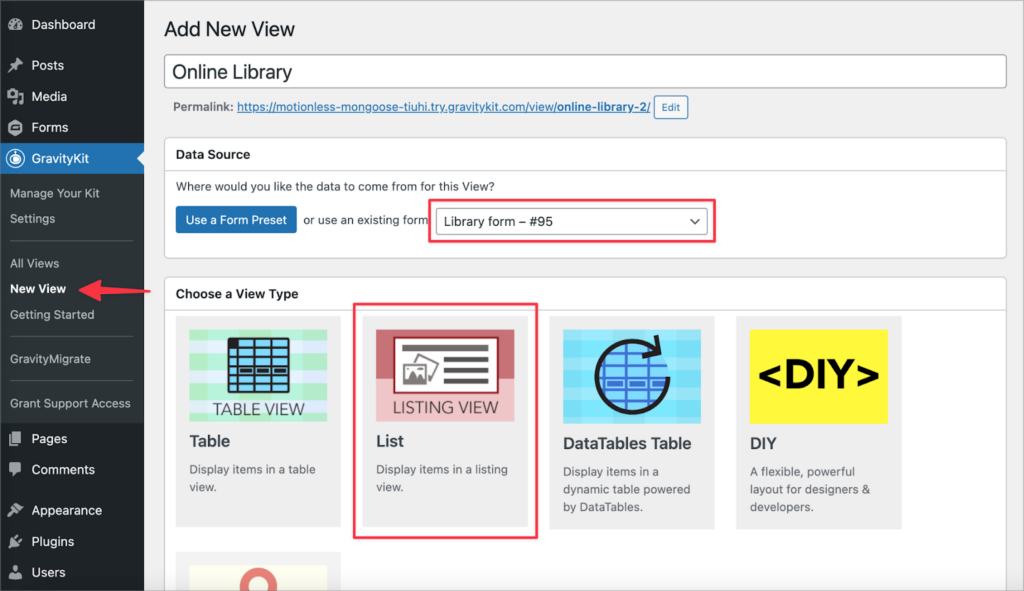
To get started, we’ll hover over “GravityKit” and click “New View”. Next, we’ll give our View a name and select a data source. The data source will be our library submission form that we created in the previous step. Finally, we need to choose a View Type!
View Types are layout templates that determine how our entries will be displayed on the front end. Feel free to select the View Type that makes the most sense to you. For this example, we’ll select the “List” type.
Now we can start constructing our View using GravityView’s drag-and-drop editor.
Configuring the Multiple Entries layout
We’ll start by configuring the Multiple Entries Layout. This is our main library page where all our resources will be displayed on the front end.

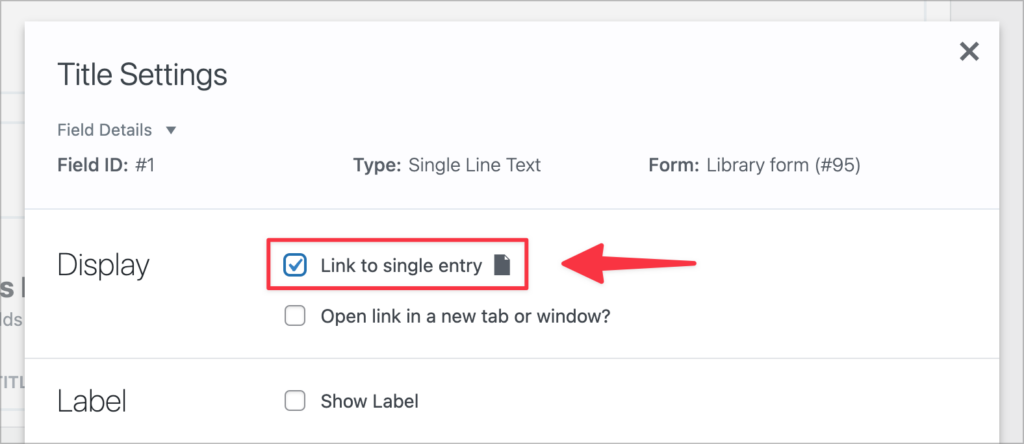
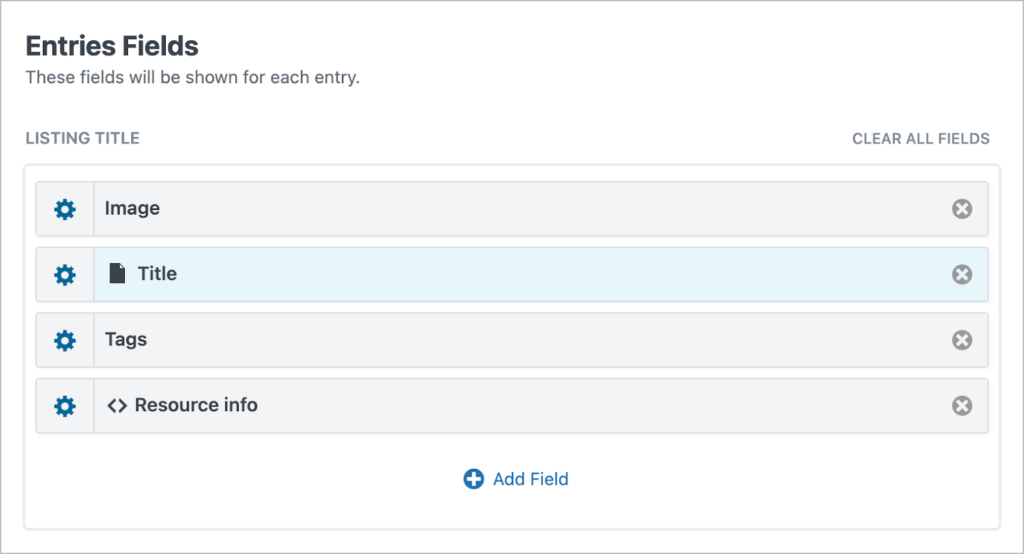
Let’s start by adding fields to the “Entries Fields” section of the editor. We’ll go ahead and add the “Image”, “Title”, and “Tags” fields to the “Listing Title” section. Next, we’ll open the field settings for the “Title” field and check the box labeled “Link to single entry”.
This will turn the book title into a clickable link that takes the user to a page with more details about that specific resource (we’ll configure this screen in the next section!).
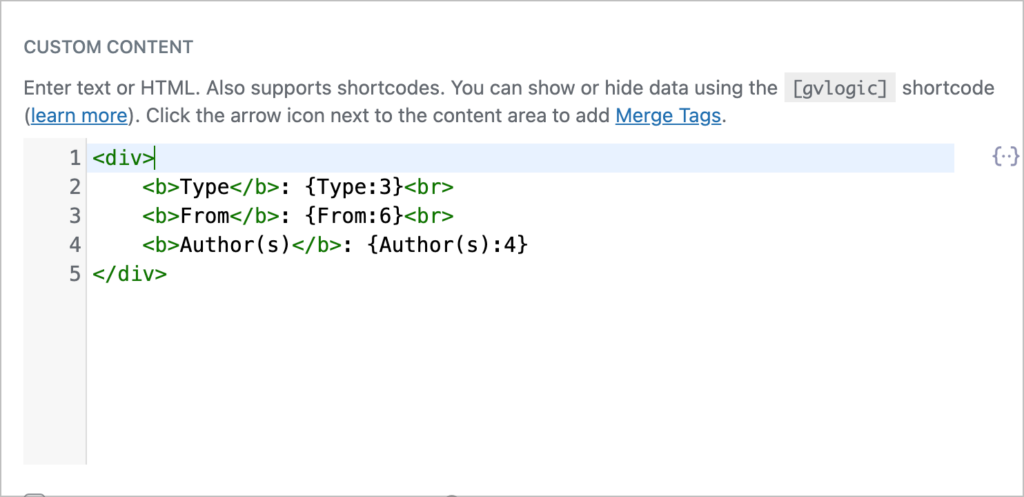
Finally, we’ll add a Custom Content field (labeled “Resource info”). Here, we’re going to use some simple HTML together with Gravity Forms merge tags to include important information about each book.
As you can see, we’ve added the “Type”, “From” and “Author(s)” fields here using merge tags.
Here’s what the “Listing Title” section of the View editor looks like after adding all our fields:
Now that we’ve added all the required fields, we need to tweak some options in the View settings.
Configuring the View settings
GravityView includes a range of settings for customizing various aspects of a View. For example, we can change the sort direction, add filters, enable data exporting, and much more!
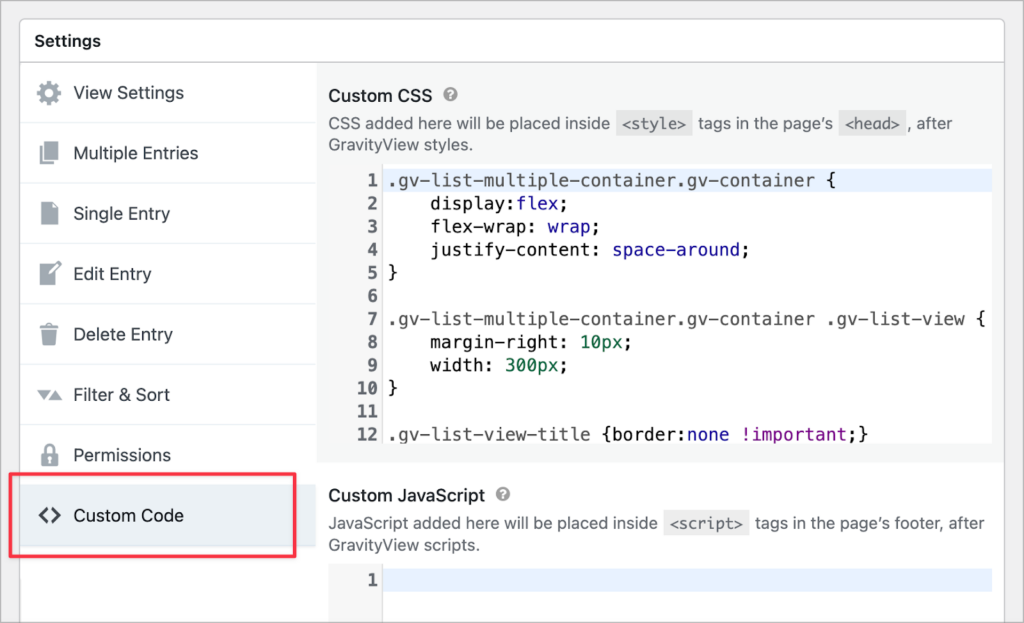
But first, we’re going to add a short CSS snippet to the “Custom Code” panel, turning our list View into a grid view.
Feel free to tinker with the sort and filter options if you want your online library books to appear in a certain order.
Now let’s save our View as a draft and check it out on the front end:
It’s looking good! However, we’re still missing a few things. For example, we need a search bar!
Adding a search bar
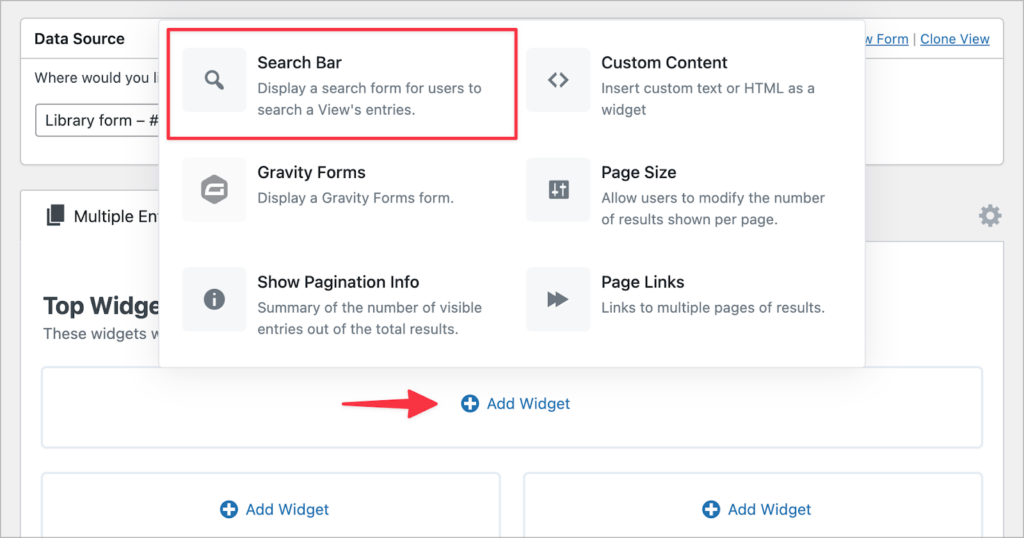
Let’s add a search bar to our library. We can do this by clicking on the “Add Widget” button and selecting the “Search Bar” widget.
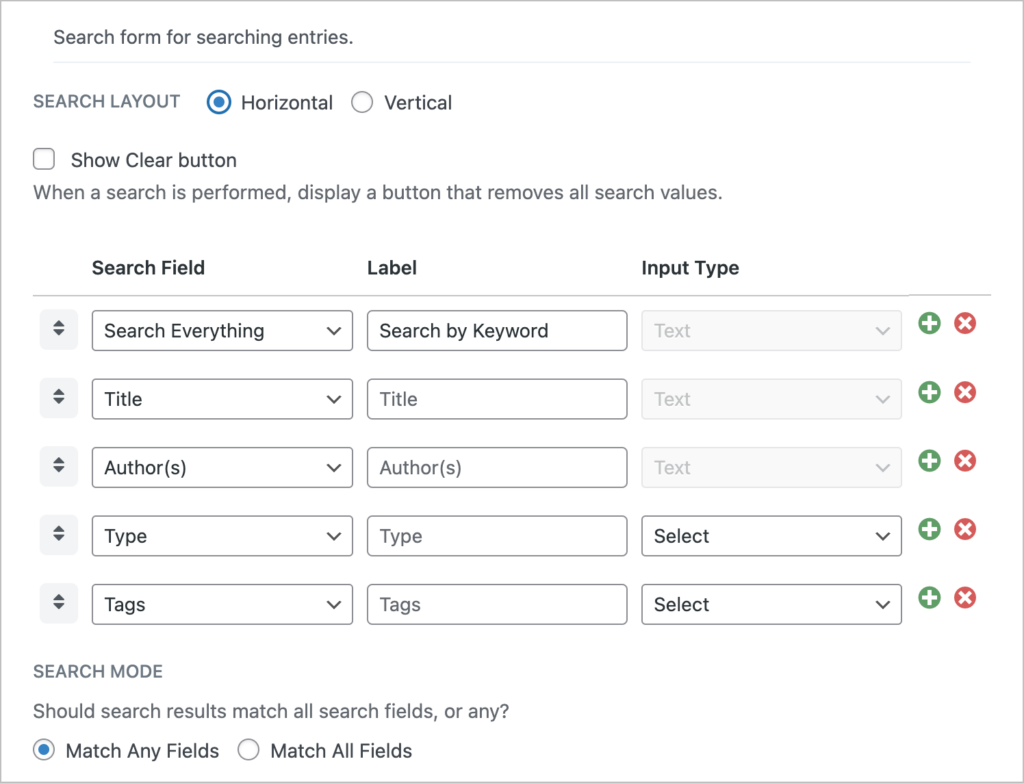
After adding the widget to our layout we’ll click on the gear icon to open the widget settings. Here we can configure the search inputs. Let’s add search input fields for keyword, title, authors, type and tags.
Here’s what our search bar looks like on the front end:
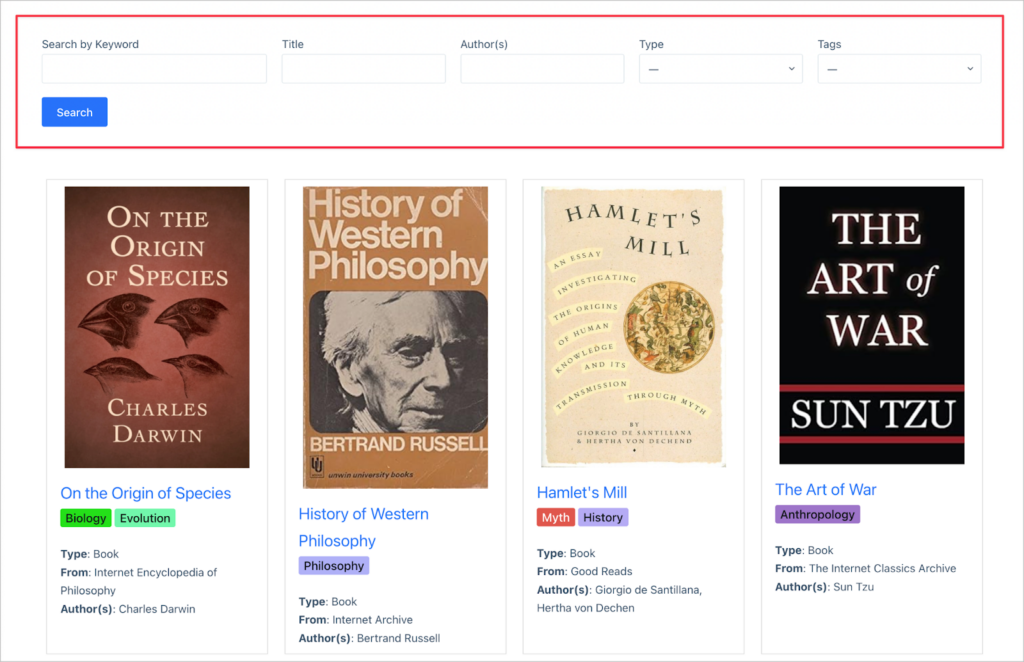
As you can see, this makes it easy for users to search for library books and other resources! The GravityView search bar widget is fully customizable, enabling you to add search fields for any of the fields in your form.
Configuring the Single Entry Layout
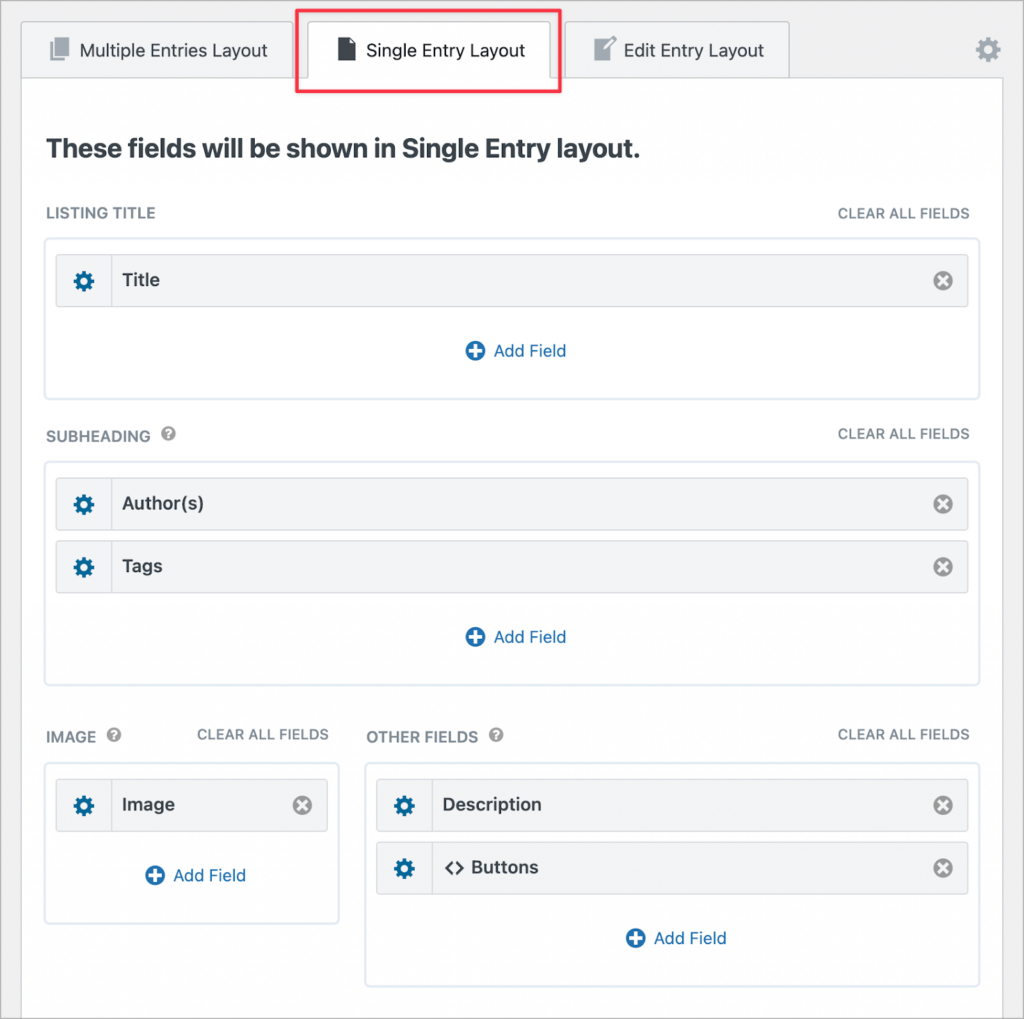
Now let’s turn our attention to the Single Entry Layout. To configure this layout, we’ll simply click on the tab at the top.
Here we’re going to add the “Title” field to the “Listing Title” section, and the “Author(s)” and “Tags” fields to the “Subheading” section.
Next, we’ll add the “Image” to the “Image” section, and the “Description” to the “Other Fields” section. Finally, we’ll add a Custom Content field here, too. We’ll use this to create custom buttons for reading books online and downloading library resources.
We can use the Custom Content field to create buttons using simple HTML anchor tags and Gravity Forms merge tags.
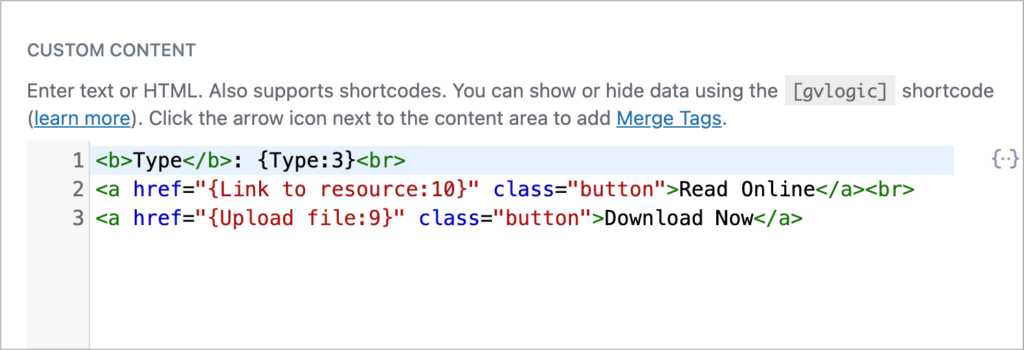
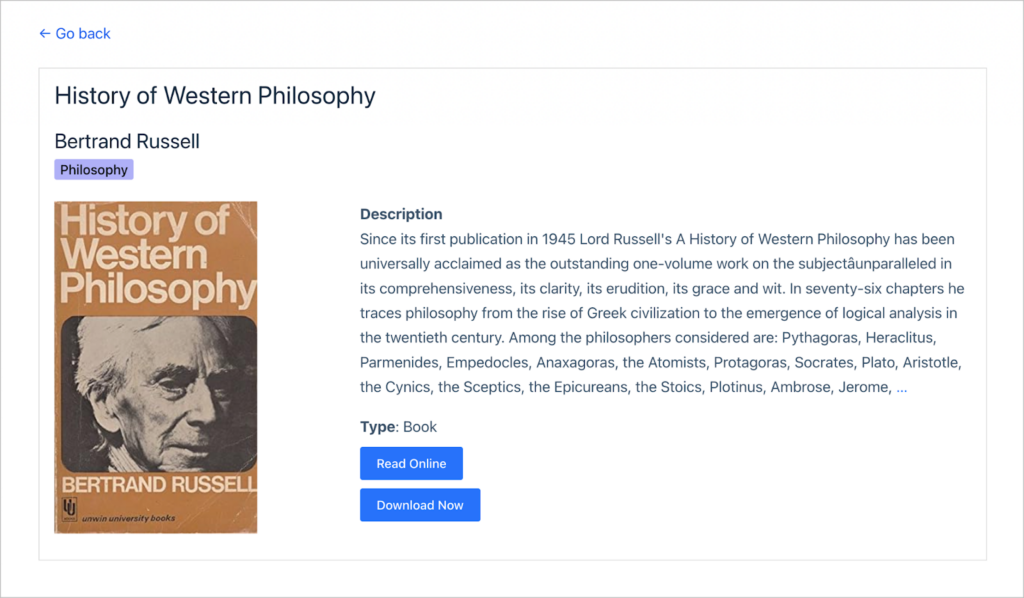
Here’s what our Single Entry page looks like on the front end. As you can see, there are two buttons at the bottom enabling the user to read online or download the resource.
That’s it! We successfully built an online library using WordPress.
Create your WordPress book library now
In this comprehensive tutorial, we showed you, step-by-step, how to create a dynamic and customizable online library on WordPress using Gravity Forms and GravityView.
From setting up your initial library submission form to importing a vast database of resources and constructing user-friendly, searchable layouts, we’ve covered the essentials to help you get your digital library up and running.
We hope this guide inspires you to leverage the flexibility of Gravity Forms and GravityView to meet the specific needs of your educational organization. Learn more about GravityView.

Helpful tips right in your inbox.
Subscribe to get the latest articles, information on releases and helpful Gravity Forms tips!
More articles

10 things you can ask AI to do with Gravity Forms (using the free GravityKit MCP)
See 10 practical things you can ask AI to do with Gravity Forms using the free GravityKit MCP: create forms, manage entries, build Views, and more.

Launch Log: theme template editing in Block MCP, Shield silentCAPTCHA for Zero Spam, and GravityView fixes
Block MCP adds safe theme template editing, Gravity Forms Zero Spam gains Shield silentCAPTCHA support, and GravityView fixes lightbox and notice bugs.

GravityKit turns 12: a year in review, and 30% off Lifetime All Access
GravityKit turns 12. A look back at a year of GravityView 3.0, GravitySearch, and AI-assisted building, plus a birthday sale on the Lifetime All Access Pass.
