Published
•
Updated
How to easily display WordPress form submissions on your website (3 simple steps)
Display Gravity Forms submissions on the front end of your WordPress site in three steps. Covers multiple layouts and form plugins, with a full walkthrough using GravityView.

Are you looking for a way to display form submissions on the front end of your WordPress website?
WordPress is a powerful content management system with many different, well-integrated contact form plugins to choose from. If you’re looking for a way to access your form submission data, it can be difficult to know where to start.
Have no fear! In this post, we’ll show you exactly how to access your form data and display it on your website using different layouts. We’ll break down how this works with popular form plugins and then take a deep dive into our favorite form plugin—Gravity Forms.
Keep reading to find out how to display form submissions in WordPress!
Wanna try it?
Spin up a demo
See what you can build with GravityView — explore the live demo.

New to WordPress? What you need to know
If you’re new to WordPress, let us first clear up any questions you may have about forms and form submissions! The first thing to know is that WordPress does not include a way to create contact forms by default.
In order to create forms in WordPress, you will need to install a contact form plugin. There are several to choose from, but we always recommend Gravity Forms. Not only is it the most trusted form solution in the space, it also boasts an impressive array of features!
How do I see form submission data in WordPress?
This will depend on what form plugin you’re using! Most popular form plugins for WordPress include a dashboard in the WordPress admin area where you can view submissions. However, some form plugins don’t have this functionality, so be sure to check the features of the plugin you’re using.
If you’re using Gravity Forms, you can see form submission data by hovering over “Forms” and clicking “Entries”.
How do I display WordPress form submissions on the front end of my site?
Again, it depends on which contact form plugin you’re using. Some popular form plugins offer add-ons that allow you to display entries in a table or a list on a WordPress post or page. If you’re using Gravity Forms, you can use GravityView to display your form data and build powerful, dynamic web apps.
Choosing a form plugin to display submissions
Different WordPress form plugins have different ways of displaying submissions:
- Gravity Forms: If you’re using Gravity Forms as your contact form plugin, you can easily display WordPress form data using the powerful GravityView add-on! Keep reading for more information.
- Formidable Forms: If you’re using Formidable Forms, you can display form submissions on your site using the Formidable Views add-on.
- Contact Form 7: If your site uses the Contact Form 7 plugin, you can showcase form submissions on your site using the Contact Form 7 Views add-on.
- WPForms: You can display WPForms submissions on your site using the Views for WPForms add-on.
- Ninja Forms: You can show your Ninja Forms entry data using the Ninja Forms Views plugin.
Reasons to display form submissions on your site
There are several reasons why you might want to display form submissions on your WordPress website.
Build directories
One of the compelling reasons to showcase form submissions on your website is the ability to build directories. By presenting user-generated data in an organized and accessible format, you create a valuable resource for your audience.
Whether it’s a business directory, member list, or a curated collection of resources, directories help provide users with the information they need in a searchable format.
Through displaying form submissions, you can transform your site into a dynamic platform that not only captures information but also shares it meaningfully!
Enhanced user engagement
Harnessing your form data for displaying on the front end gives you an easy way to showcase testimonials, guest posts, and other user-generated content. This helps to automate manual processes and gives your users a direct way to contribute to your website.

(Trust us, users appreciate seeing their contributions acknowledged, which helps to create a more interactive and user-friendly environment!).
Other front-end web applications
With a powerful add-on like GravityView, you can build powerful CRUD applications on WordPress. CRUD stands for Create, Read, Update, Delete and refers to the four basic functions underlying most web applications. With a drag-and-drop framework like GravityView, there’s nothing you can’t build.
How to display form submissions in WordPress (3 simple steps)
In this 3-step guide, we’re going to show you how to display your Gravity Forms submission data on a WordPress page or post using GravityView.
1. Create a form to collect user submissions
Install Gravity Forms and create a new form. If you already have a form, you can skip this step!
To add a new form, hover over “Forms” and click “New Form”. After giving your form a name, you can add fields to it using the Gravity Forms drag-and-drop editor.
Gravity Forms includes a host of different field types, allowing you to build powerful forms for a range of use-cases. This includes contact forms, event registration forms, application forms, anything!
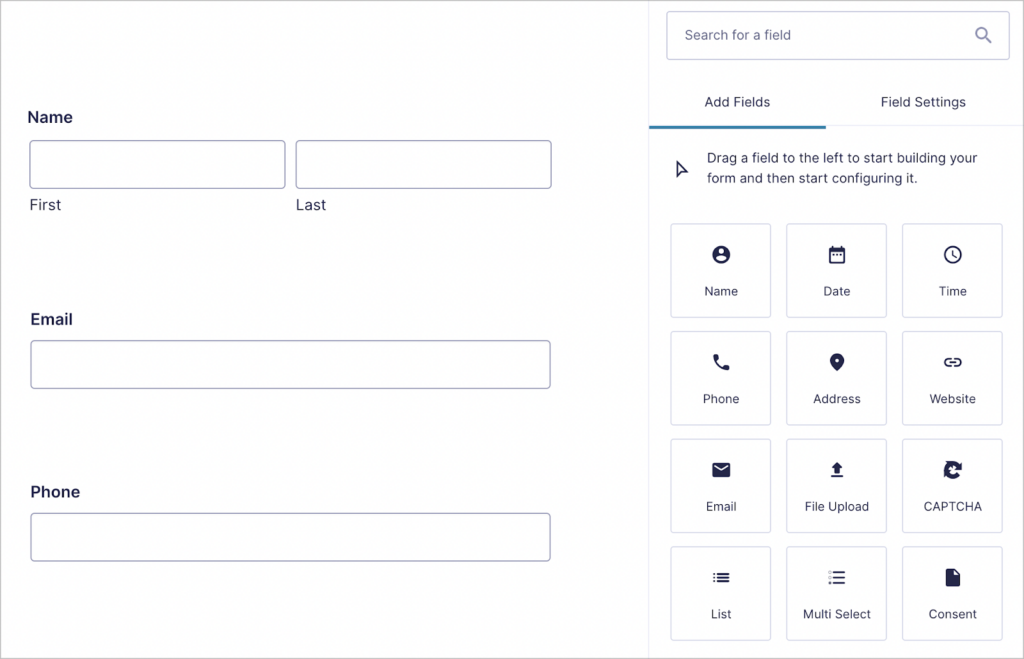
When you’re finished constructing your form, make sure to save it by clicking “Save Form”.
2. Create a View to display entries
The next step is to create a View and choose the layout you want to use to display form entries on the front end. To create a new View, hover over “GravityKit” and click “New View”.
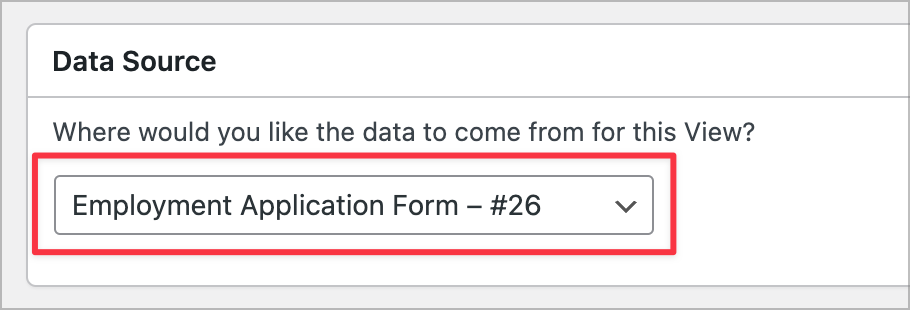
After giving your View a name, you’ll need to select a data source. The data source refers to the form containing the information you want to display on the front end.
Go ahead and select your new form as the data source.
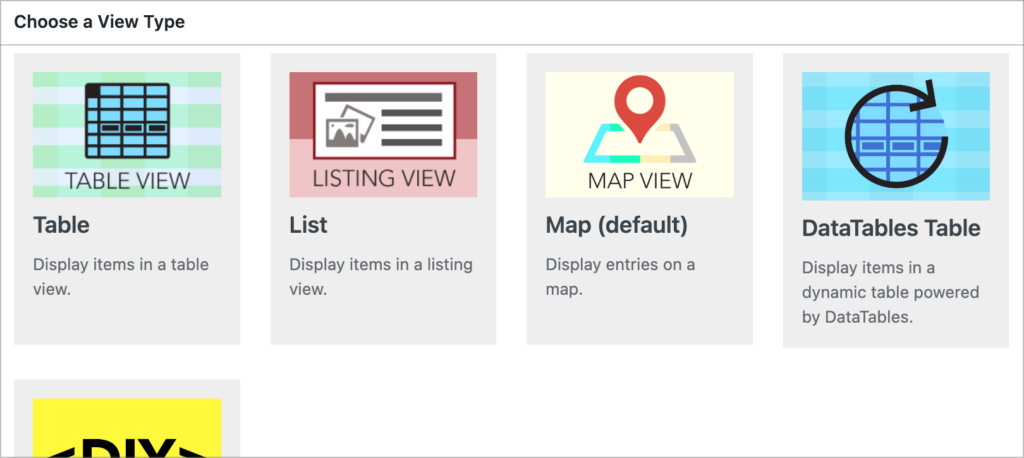
After selecting a data source, the next step is to choose a View type. GravityView allows you to display form entries in a variety of ways using preset layouts. Display your form data in a table, a list, on a map, or build your own custom layout!
When you’ve selected a layout option, you can start configuring your View using GravityView’s intuitive drag-and-drop interface. Add content by clicking the “Add Field” button. You can also add a search bar or other widgets!
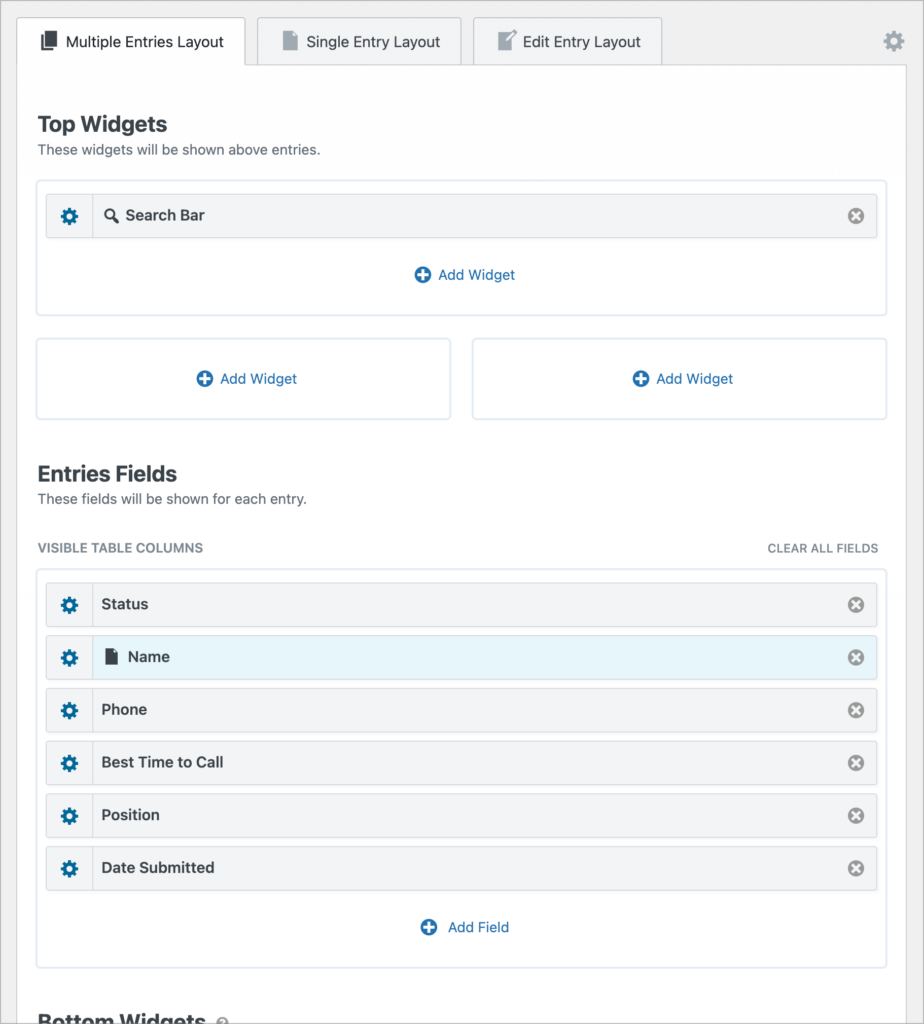
After adding content and widgets to your View, scroll down to configure the View settings. Here, you’ll find several options for enabling additional functionality such as entry approval, entry editing and much more.
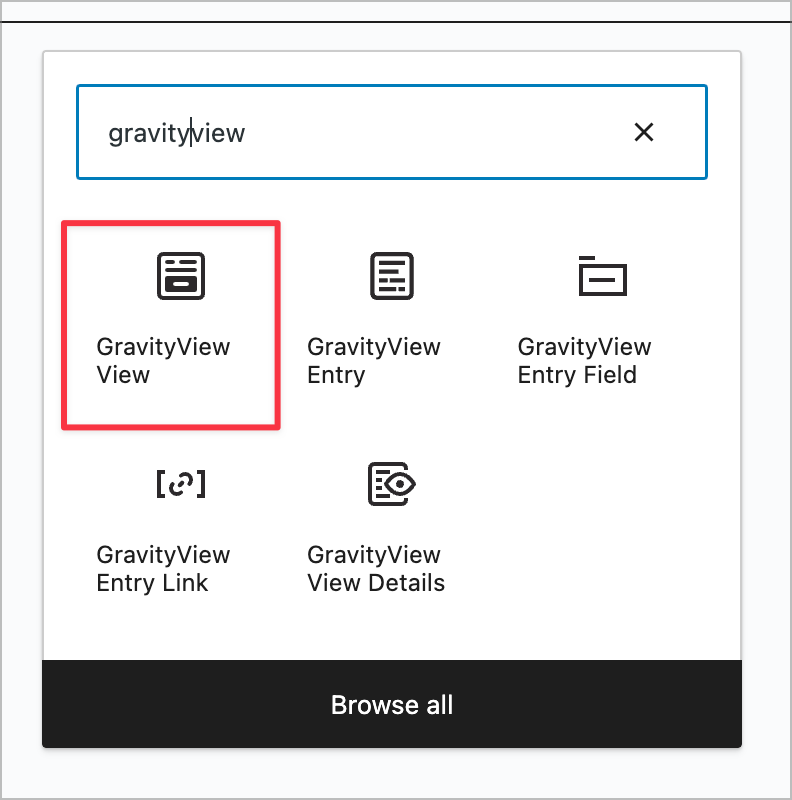
3. Publish and embed your View
After configuring your View, you’re ready to publish it! GravityView integrates with the WordPress block editor, making it easy to embed Views on posts or pages.
Start by creating a new page or post. Next, add a new block and search for “GravityView”. Add the “GravityView View” block to your page and choose the View you want to embed from the dropdown menu.
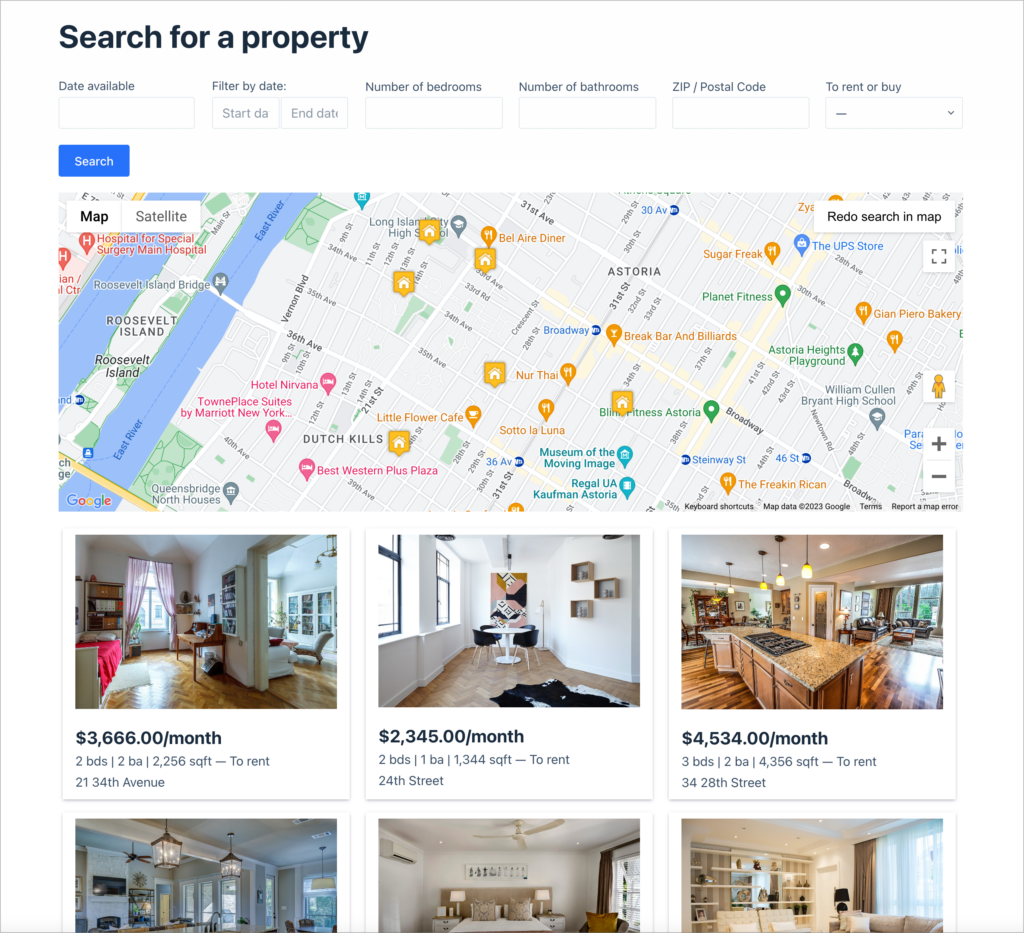
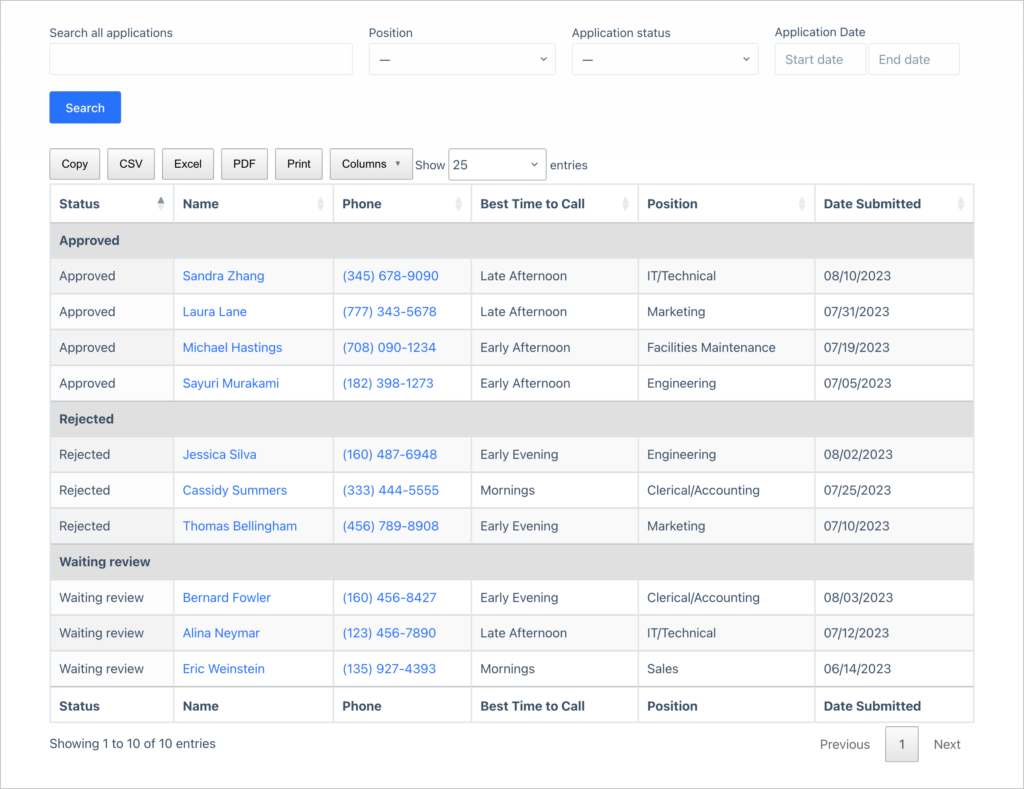
Here’s what our View looks like on the front end:
That’s it!
Display your WordPress form data today
Turning user submitted information into content for your WordPress site is useful for a number of reasons. Displaying form entries in WordPress allows you to build directories, databases and other front-end CRUD applications.
In this post, we showed you how to display WordPress form submissions on your website using Gravity Forms and GravityView.
To learn more about displaying Gravity Forms submissions in WordPress, check out GravityView today!

Helpful tips right in your inbox.
Subscribe to get the latest articles, information on releases and helpful Gravity Forms tips!
More articles

Launch Log: Distance sorting for radius searches, DataTables search improvements, and import reliability fixes
The latest GravityKit releases add distance sorting to map searches, bring built-in search to DataTables, and fix GravityCharts and GravityImport edge cases.

WordPress page builder market share 2026: Elementor leads at 32.67%
Elementor reaches 32.7% of WordPress sites. WordPress Block Editor 20.6%, wpBakery 8.5%, Divi 5.7%. Latest HTTP Archive crawl, share-of-WordPress basis throughout.

Launch Log: GravityView 3.0, plus upgrades to Block MCP and GravityKit MCP
GravityView 3.0 lands with the new Vantage theme, frontend bulk actions, and AI-assisted View creation. This launch log also covers updates to GravityKit MCP, Block MCP, and Dashboard Views.