Published
•
Updated
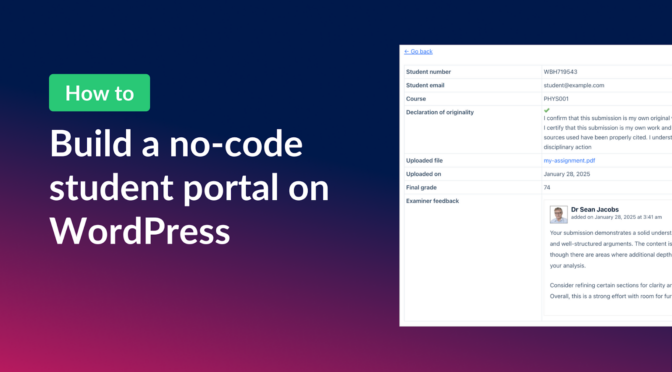
How to build a student portal for assignment submissions on WordPress (without code!)
Build a student portal on WordPress where learners submit assignments, check grades, and receive feedback. Step-by-step tutorial using Gravity Forms and GravityView.
Managing student assignments can be a challenge, especially when it comes to tracking submissions, organizing feedback, and keeping everything accessible for both students and examiners.
With Gravity Forms and GravityView, you can build a fully functional student portal that streamlines the entire process—allowing students to submit assignments, check their grades, and receive feedback, all in one place.
In this tutorial, I walk you through the process of setting up a student portal on WordPress, step by step.
Download the free assignment submission form template now!
Import the template into Gravity Forms and customize as necessary.
Sneak peek
Here’s a sneak peek at the finished student portal! Students can log in here to submit assignments, see the status of their submitted assignments, including their final grade and any feedback offered by the examiner.
Clicking on the “View Feedback” link will take the student to a page where they can view the full submission including the examiner’s feedback.

Meanwhile, examiners have their own portal where they can view assignment submissions, assign grades, and provide feedback.
Wanna try it?
Spin up a demo
See what you can build with GravityView — explore the live demo.

What you’ll need
Here are the plugins you’ll need to build a student portal like the one in this example:
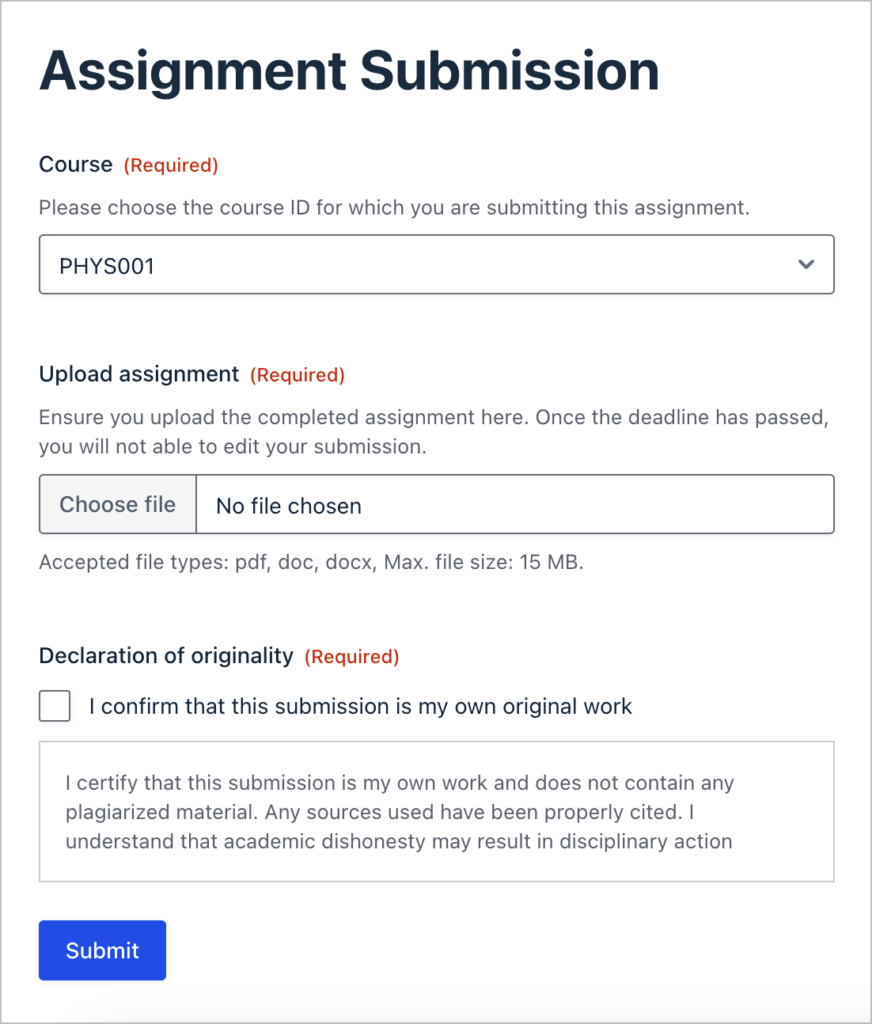
1. Creating the assignment upload form
The first step is to create a form that students can use to upload their assignments. To create a new form in Gravity Forms, we’ll hover “Forms”, click “New Form” and select a blank template to start from.
Now we can start constructing our form using drag and drop. Feel free to customize your form depending on your needs. For our example, we’ll keep things simple by adding the following fields:
- Course (“Drop Down” field)
- Upload assignment (“File Upload” field)
- Declaration of originality (“Consent” field)
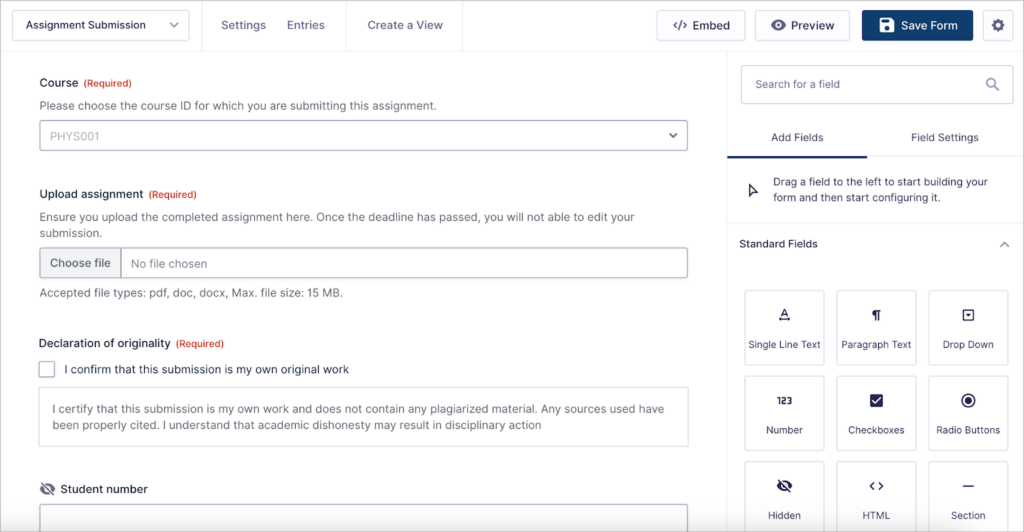
We also need to add a couple of hidden fields to the form for capturing key information. These won’t be visible to the student when submitting their assignments.
- Student number (“Single Line Text” field)
- Student email (“Single Line Text” field)
To hide a field from the form, simply open the advanced tab in the field settings and select “Hidden” under visibility.
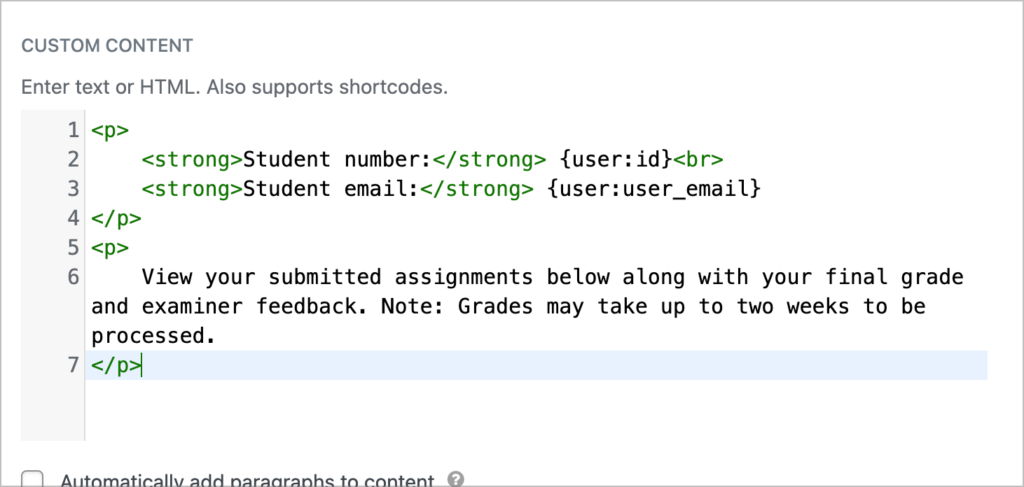
Gravity Forms enables us to pre-populate fields by adding a default value. We can add a merge tag here to dynamically populate the hidden fields with the student’s number and email address. We’ll need this information when we create the examiner portal and configure email notifications!
For the student number, we’ll use the WordPress user ID and dynamically add it using the {user:ID} merge tag. For the Student’s email address, we’ll use the {user:user_email} merge tag.
(Note that this will only work if your students have been added to the site as WordPress users and are logged in when submitting the form.)
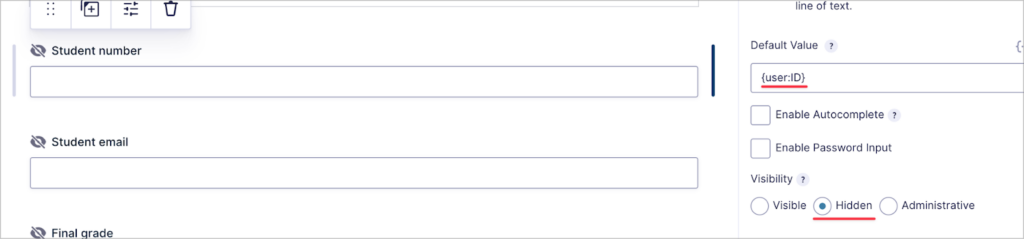
And finally, we’ll add a single administrative “Number” field labeled “Final grade”. Why use an administrative field instead of a hidden field? Administrative fields are not merely hidden from the form, they are absent from the form entirely! This ensures that only examiners have access to this field, enhancing the integrity of our system.

We’re going to leave this field blank because this will be updated by the examiner when they review the assignment and assign a grade.
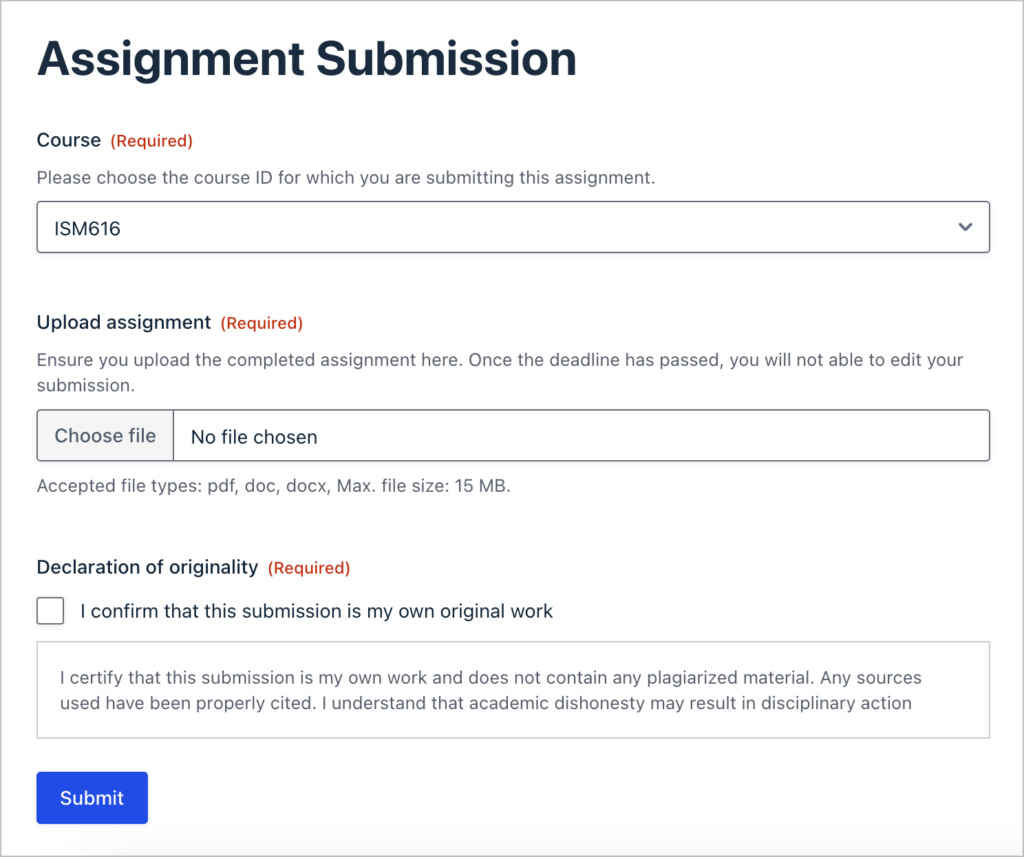
Here’s what our completed assignment submission form looks like on the front end:
Pro tipRead our ultimate guide to learn more about managing uploaded files in Gravity Forms.
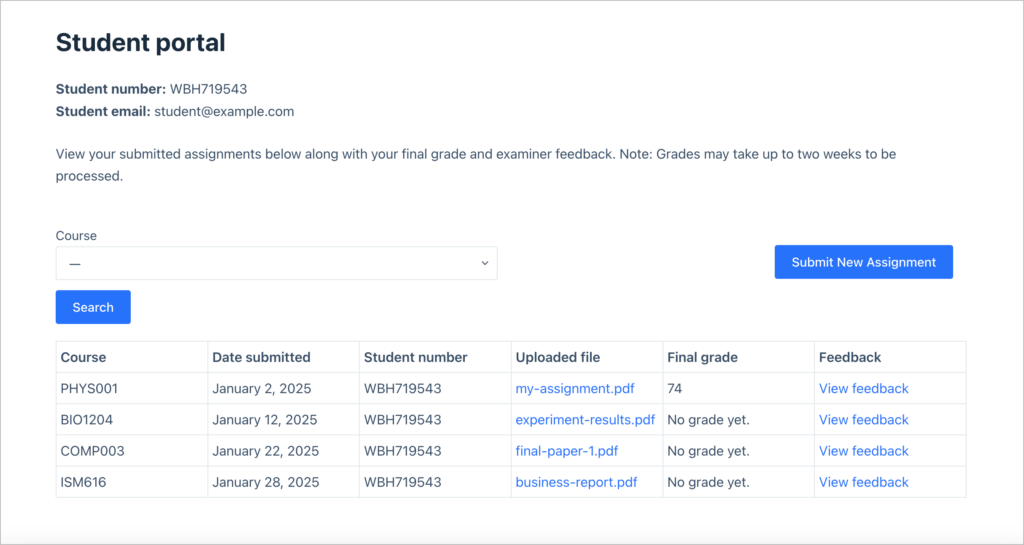
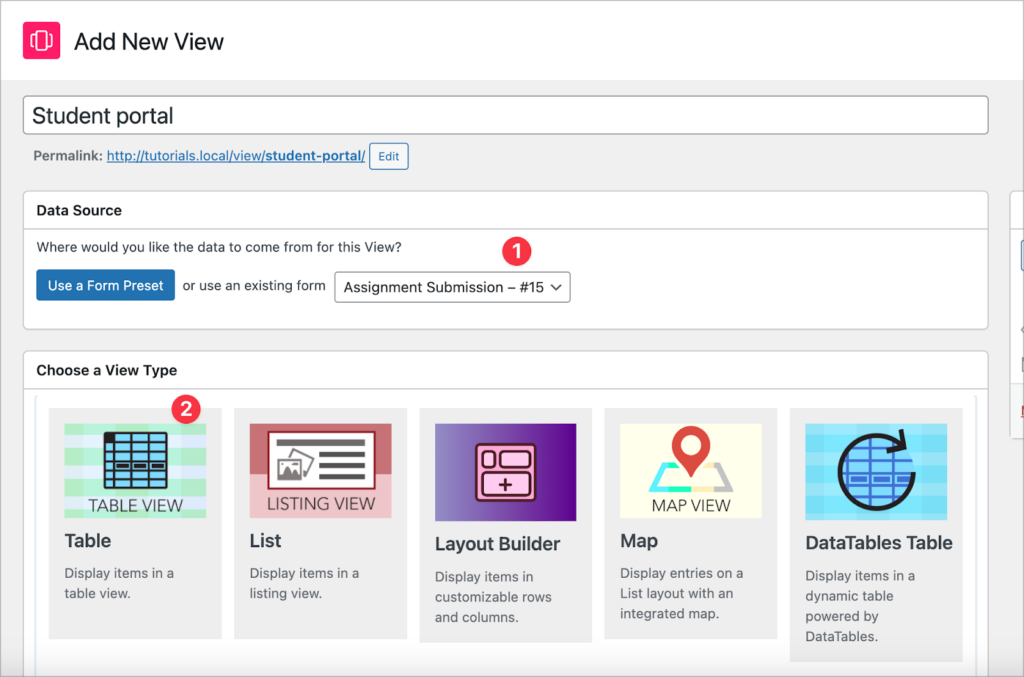
2. Building the student portal
The next step is to build the student portal using GravityView. This will enable students to see the status of their assignment submissions, along with their final grade and the examiner’s feedback.
To create a new View, we’ll hover over “GravityKit” and click “New View”. After giving our View a name, we’ll 1) select our assignment submission form as the data source and 2) choose “Table” as our View Type.
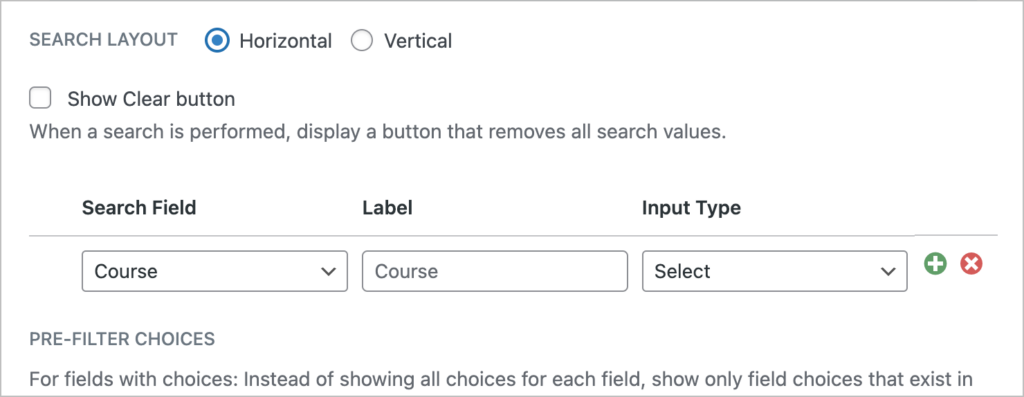
Now we can use GravityView’s drag and drop builder to construct the portal. Let’s start by adding a search bar widget and a custom content widget to the top widgets area.

Next, we’ll open the search bar settings and add the “Course” field as a searchable input box. This will enable students to filter assignments by course code.
After that, we’ll open the custom content widget settings and add some text that we want to display to the user. GravityView supports custom content such as shortcodes, HTML, merge tags and more!
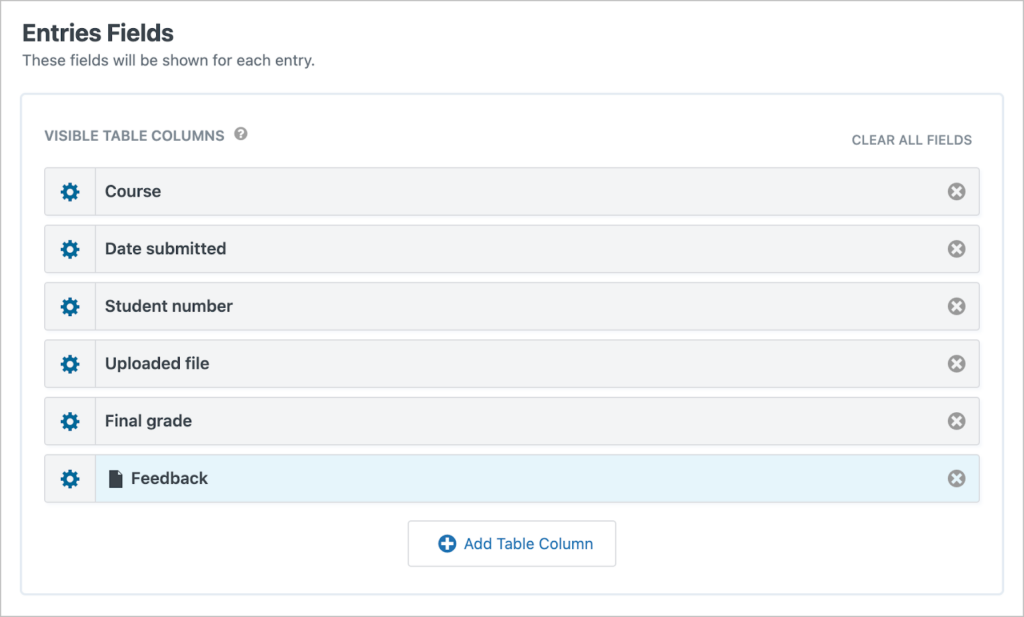
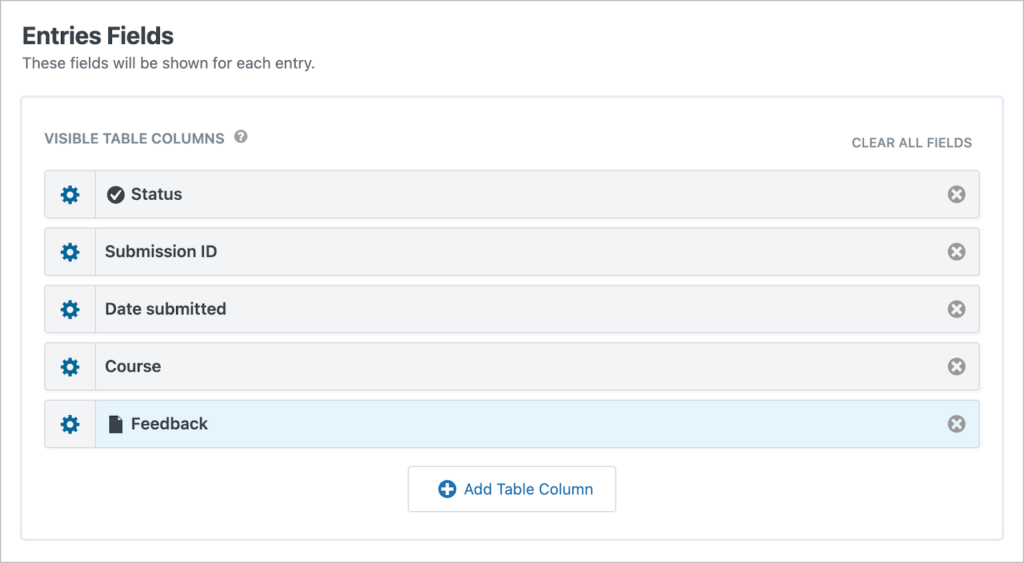
Now that our widgets are set up, we can scroll down to the “Entries Fields” section of the editor and add our table columns. Here, we’ll add the following fields:
- Course
- Entry Date (renamed to “Date submitted”)
- Student number
- Upload assignment (renamed to “Uploaded file”)
- Final grade
- Link to Single Entry (renamed to “Feedback”)
The “Link to Single Entry” field will output a URL that takes users to the Single Entry page where they can view feedback on their assignment. We’ll configure this page in the next section.
Next, we’re going to open the field settings for the “Final grade” field. Here we’ll add a conditional logic rule so we can display a message (“No grade yet.”) to the user if they haven’t received a grade yet.
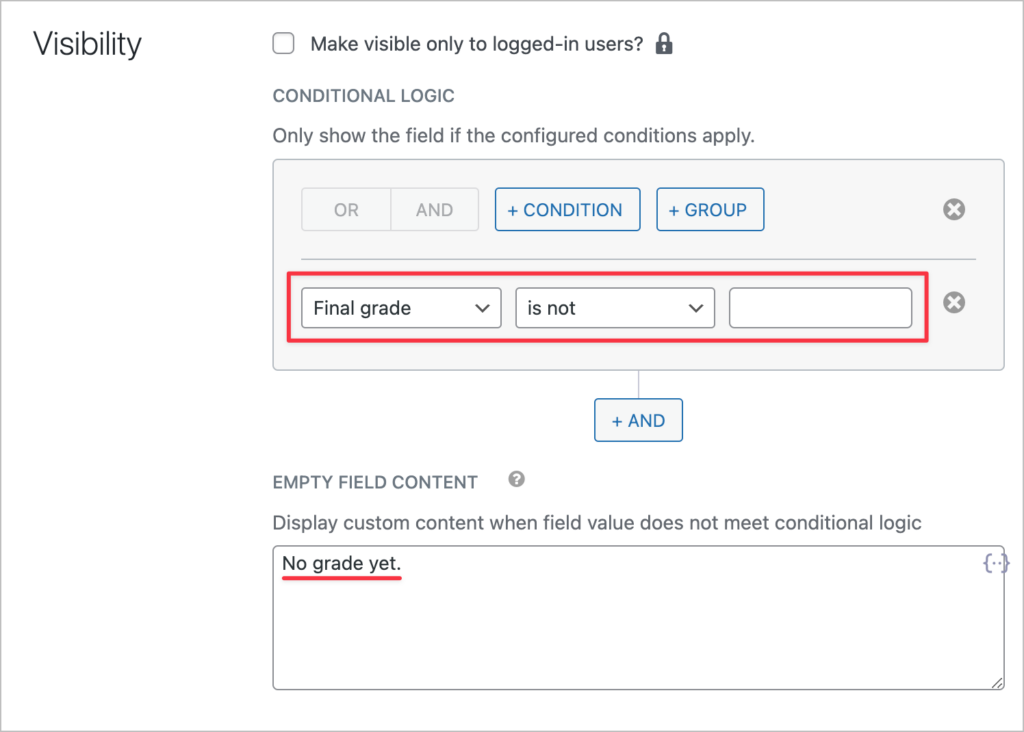
Pro tipTo learn more about showing/hiding fields in a View, read our full guide to field conditional logic in GravityView.
Here’s what the student portal page looks like on the front end:
Configuring the Single Entry page
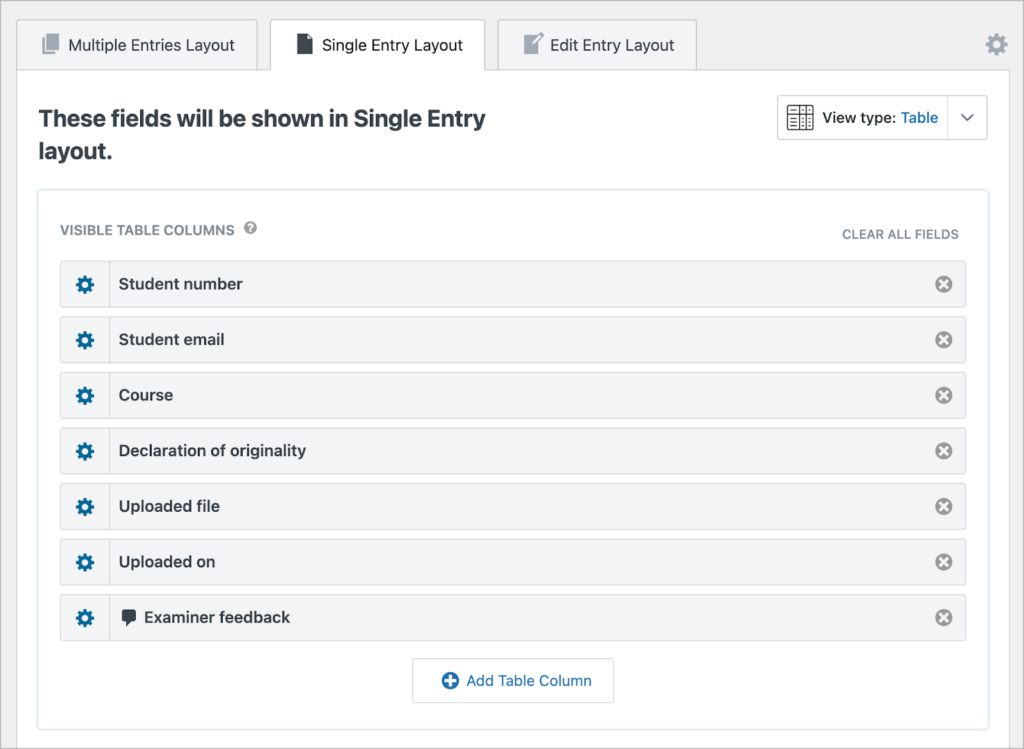
To configure the Single Entry page, we’ll click on the “Single Entry Layout” tab at the top of the View editor. Here we’re going to add additional fields, enabling the student to see more information about their submission, along with examiner feedback.
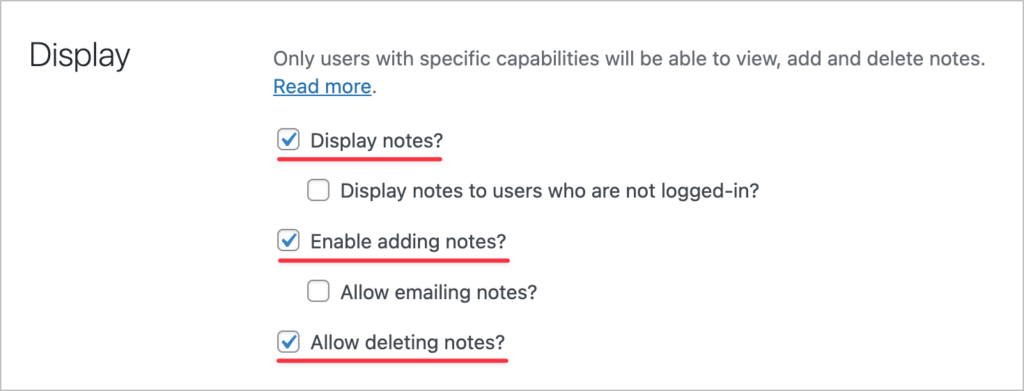
We’re going to display examiner feedback using Gravity Forms’ Entry Notes functionality which lets users attach comments to form entries.
We’ll add this field in the View editor and rename it to “Examiner feedback”.
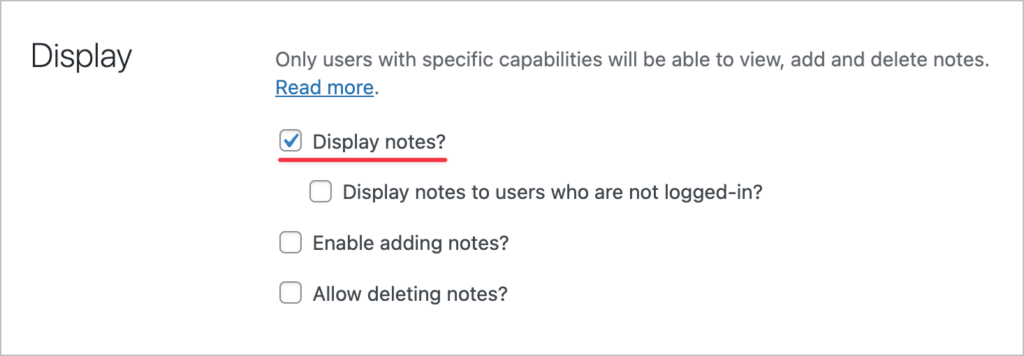
In the field settings, we’ll ensure that notes are displayed to students but that they can’t add or delete notes themselves. This is important, as we only want examiners to have the ability to leave feedback on assignments.
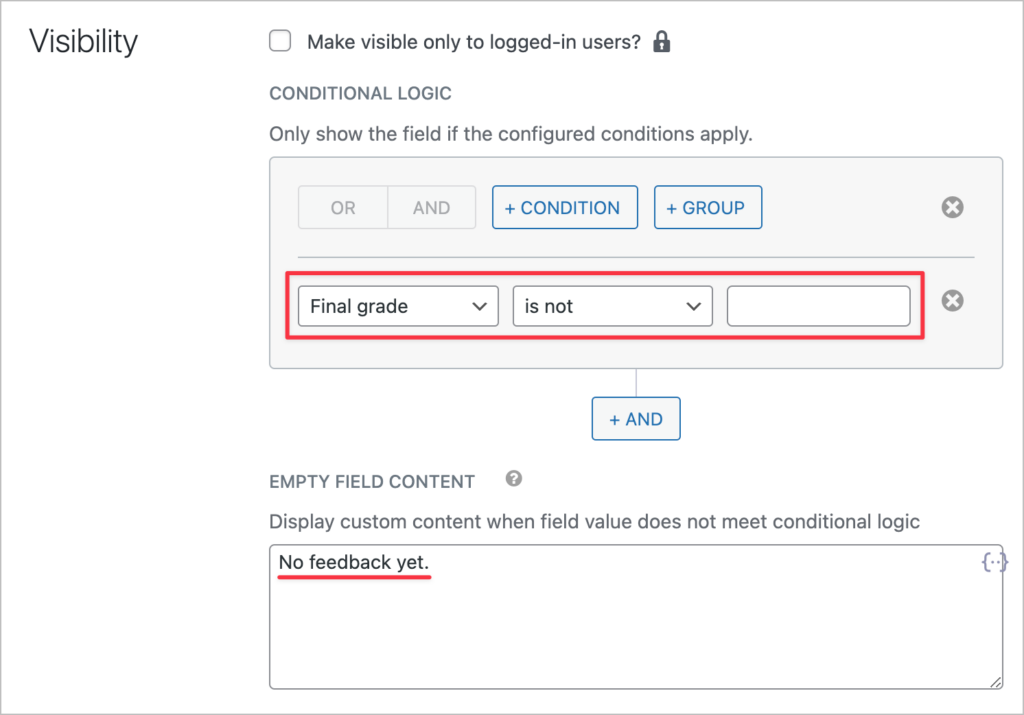
Next, we’ll add a conditional logic filter to only display the notes when a final grade has been given. When the field is empty, we’ll show the student a message that says “No feedback yet”.
Here’s an example of what the Single Entry page looks like on the front end:

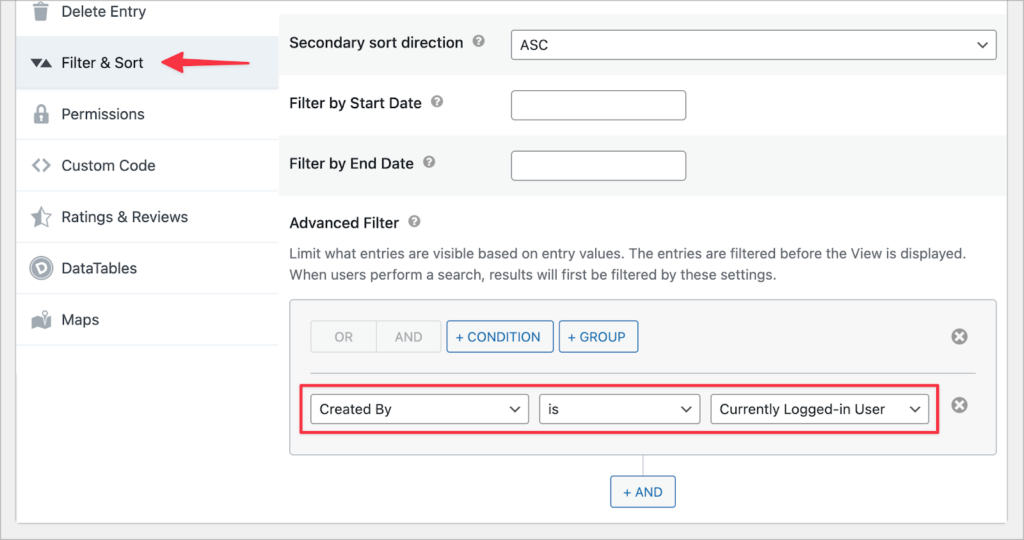
All that’s left for us to do is add a conditional logic filter to the View itself, ensuring the students only see the assignments that they have submitted. This is important as we don’t want student to see other students assignments!
We can do this by scrolling down to the View settings, clicking on the “Filter & Sort” tab and adding the following advanced filter condition: Created By – Is – Currently Logged-in User.
That’s it! Now we can turn our attention to the examiner portal.
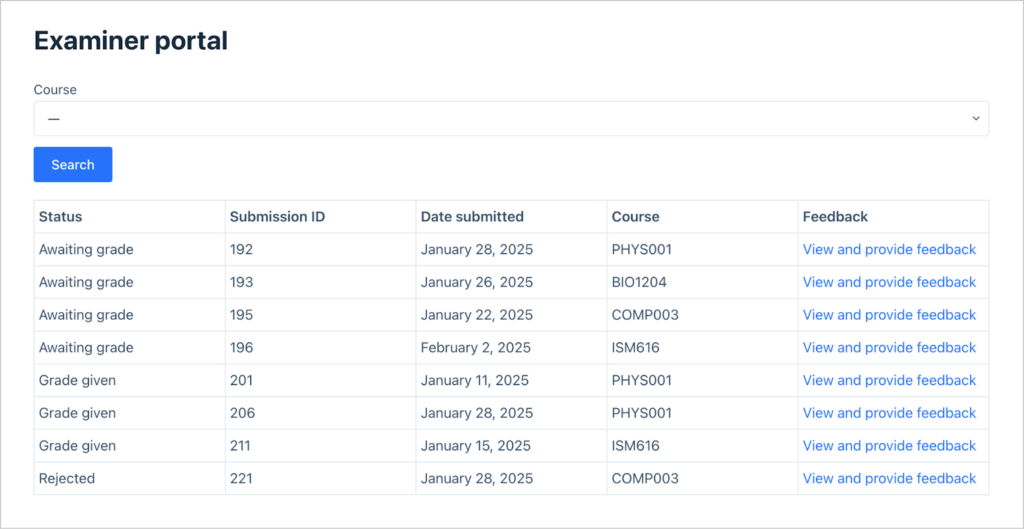
3. Building the examiner portal
To build the examiner portal, we’ll start by creating a new table View like we did for the student portal. However, the examiner portal will be different from the student portal because examiners will see all assignments and have the ability to give grades and feedback.
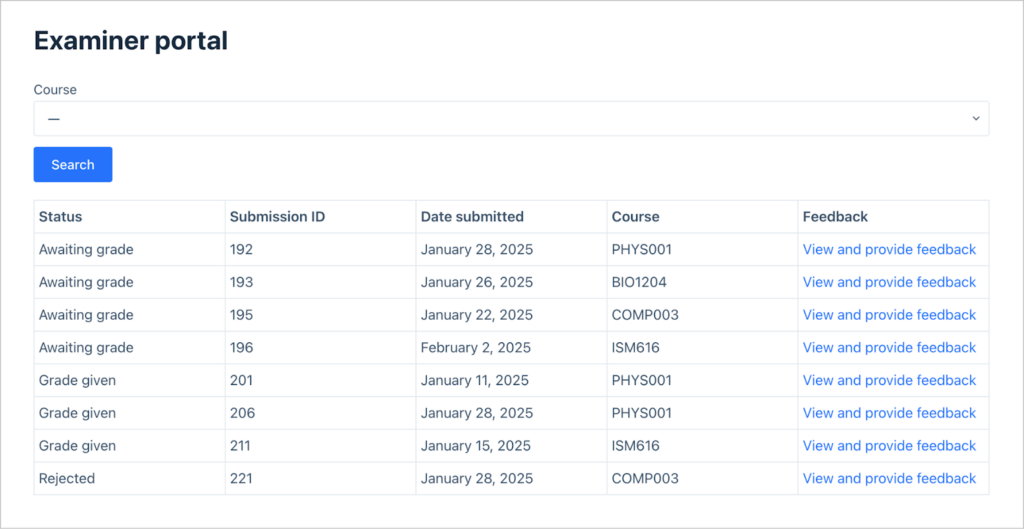
So, with that in mind, we’ll add the following fields to our table:
- Approval status (renamed to “Status”)
- Entry ID (renamed to “Submission ID”)
- Entry date (renamed to “Date submitted”)
- Course
- Link to Single Entry (rename to “Feedback”)
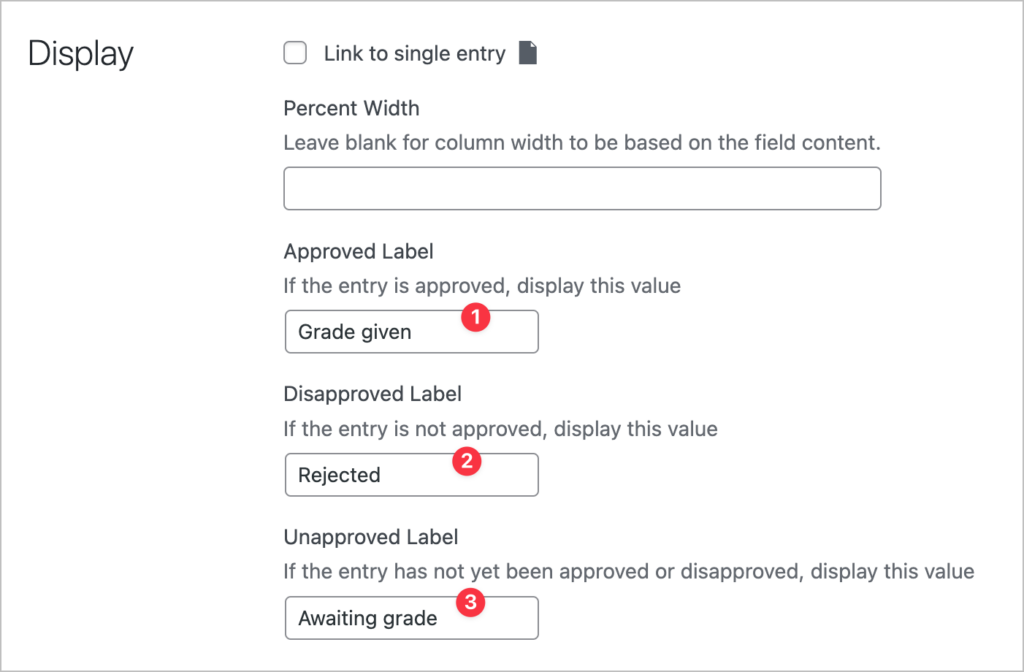
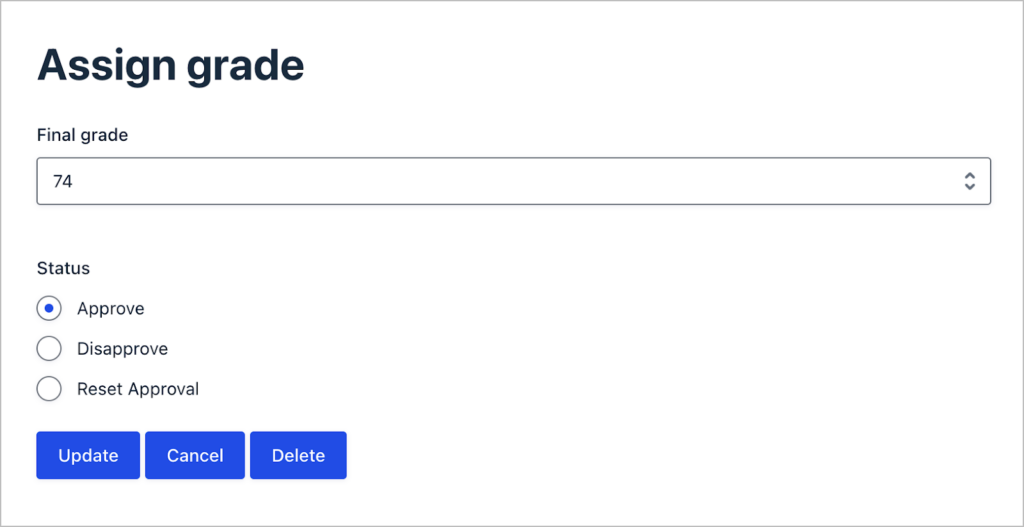
The “Approval Status” field enables admins to approve or reject entries. We can use this functionality to update the status of an assignment. After adding the field to our View, we’ll open the field settings and edit the three status labels, changing them to—“Grade given”, “Rejected” and “Awaiting grade”.
Here’s what the examiner portal looks like on the front end:
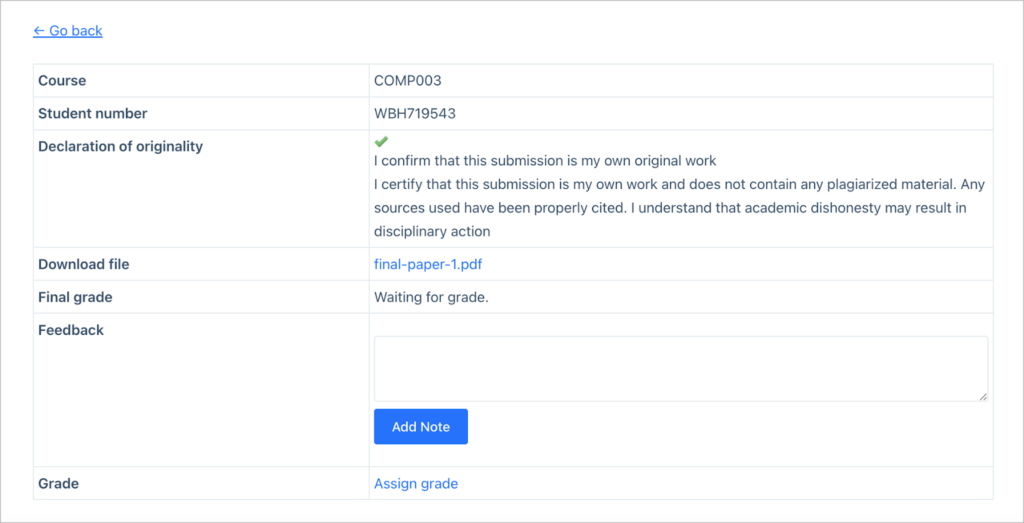
When examiners click on the link that says “View and provide feedback”, they will be taken to the Single Entry page where they can download the assignment submission, assign a grade, and offer their feedback. Let’s configure that now.
Configuring the Single Entry page
On the Single Entry page, we’ll add additional fields, including the actual assignment file for examiners to download. We’ll also add the “Entry Notes” field (renamed to “Feedback”), enabling examiners to offer feedback to students.
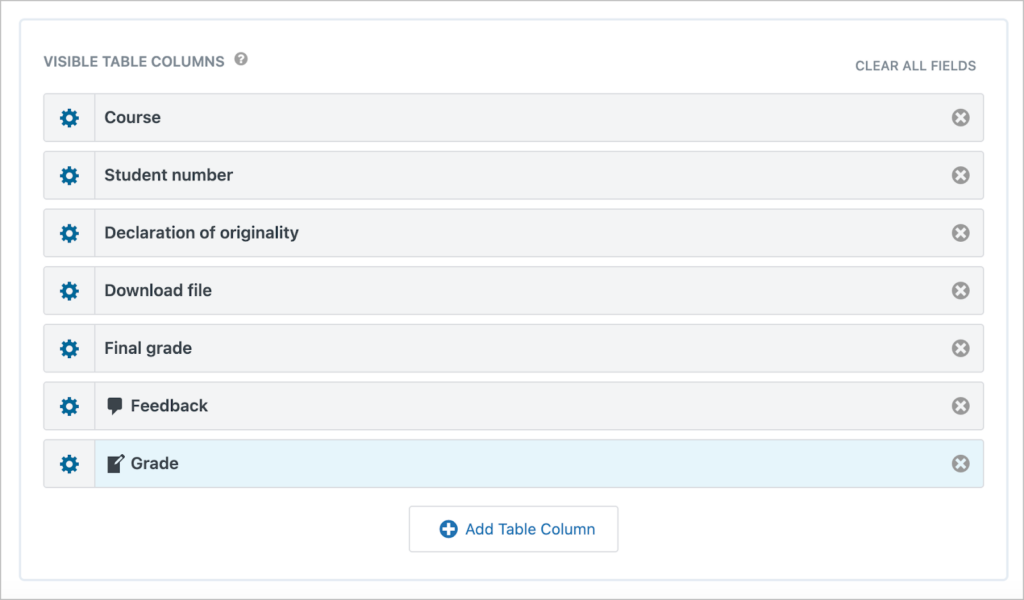
After adding the “Entry Notes” field, we’ll configure the field settings to ensure examiners can both add and delete notes.
The final field is the “Link to Edit Entry” field (renamed to “Grade”). This field outputs a link that takes examiners to the Edit Entry page where they can assign a grade to the assignment. We’ll configure this page in the next section!
Here’s what the Single Entry page looks like for examiners:
Configuring the Edit Entry page
GravityView’s “Edit Entry” layout enables users to update form submissions from the front-end. We can use this to allow examiners to update grades for assignments.
Let’s add both the “Final grade” and “Approval Status” (renamed to “Update status”) fields here.
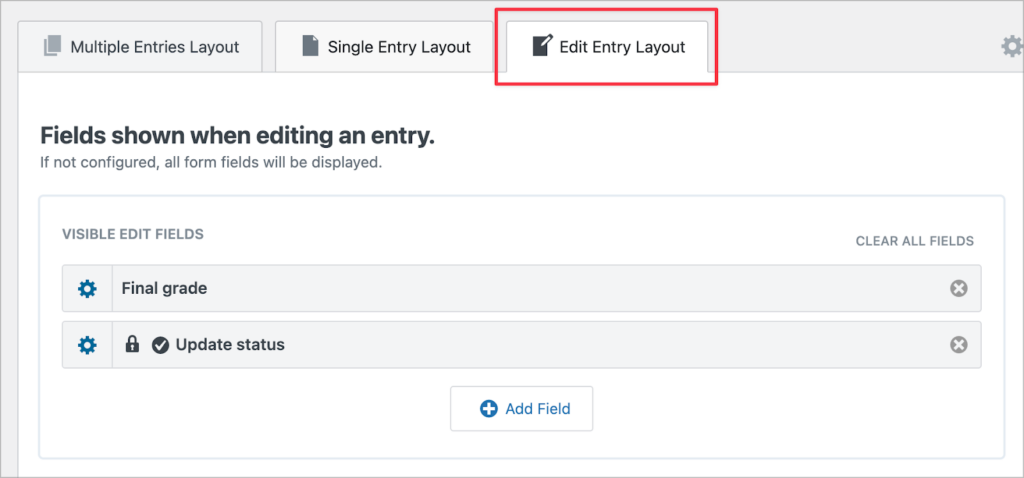
Now when examiners click the “Assign grade” link, they will be able to assign a grade and update the assignment’s status directly from the front end, without leaving the portal.
We’re almost done! We’ve created the student portal and the examiner portal—the final step is to configure email notifications.
4. Adding email notifications
Gravity Forms enables you to add email notifications that are triggered when certain actions have been completed. To add a new notification, we’ll go to the form settings page and click on “Notifications”.
We’re going to add two notifications: one that notifies the student when their assignment has been uploaded, and one that notifies the student when they have received a new grade.
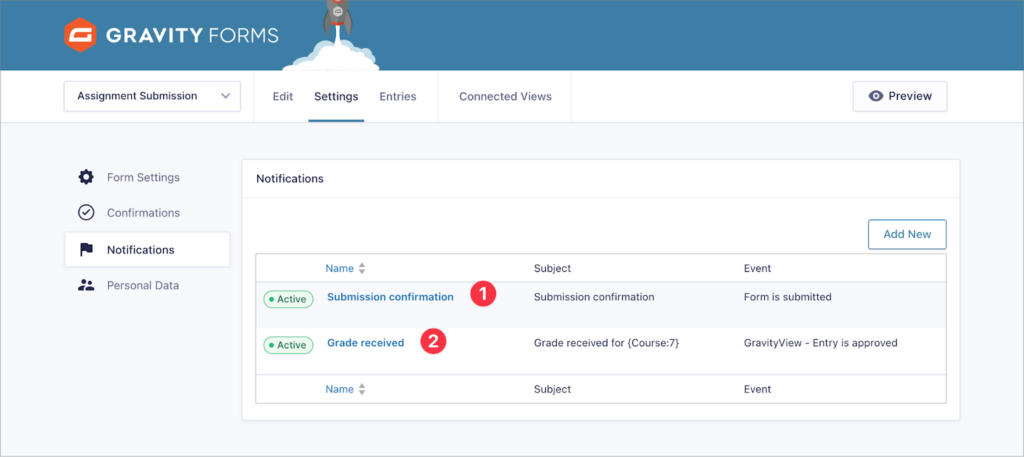
Configuring the notification emails is straightforward—simply select an “Event” that triggers the notification, and then configure the send-to email address, subject line and body.
Examiners will update the approval status of an assignment when they grade it, so we can use this event to trigger the second notification email.

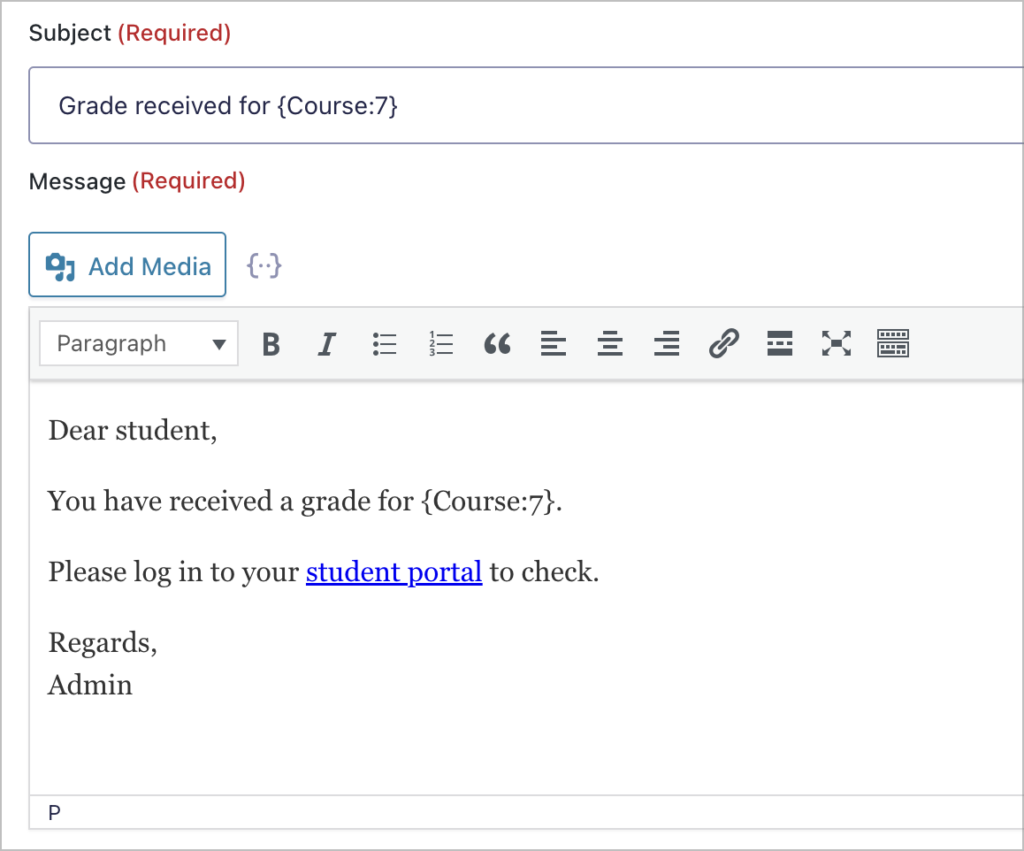
We can also use merge tags to add dynamic content in the email subject line and body! Here’s an example:
That’s it!
Bonus: Add additional elements to the student portal
Creating a student portal to manage assignment submissions is powerful, but why stop there?
For example, here’s a dynamic calendar—powered by GravityCalendar—showing upcoming live webinars that students may want to attend!

We can incorporate this into the portal by embedding it on the same page as our table View!
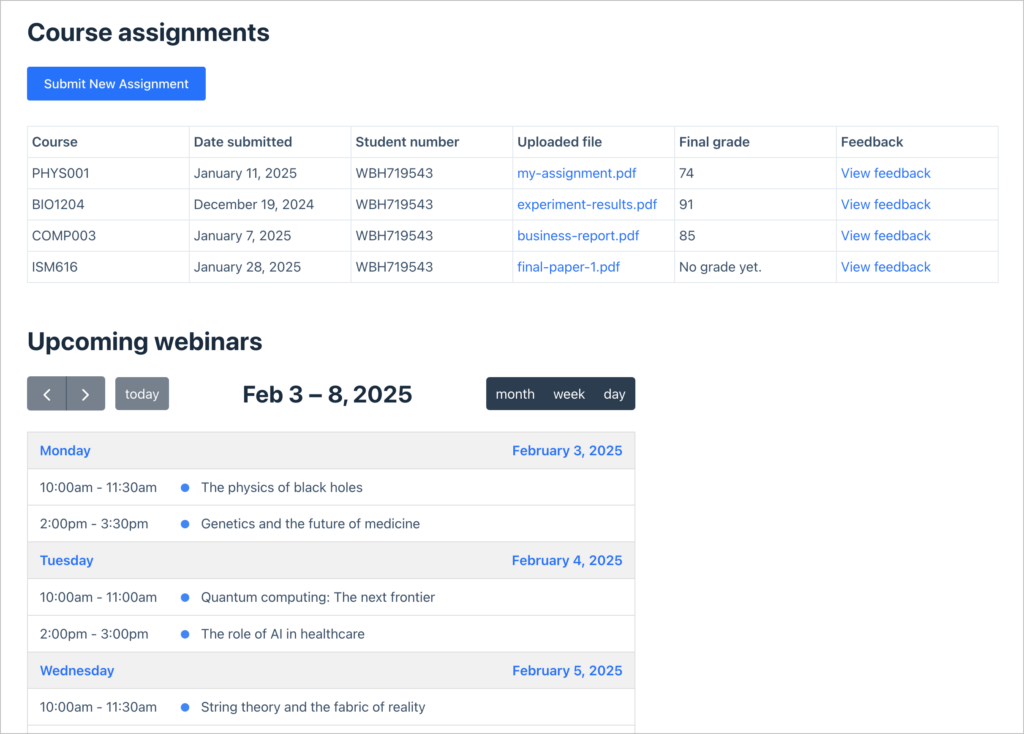
This is just a simple example of how to create robust applications with multiple, interconnected elements—all using Gravity Forms and GravityKit!
Start building your student portal
With Gravity Forms and GravityView, you can create a portal for managing student assignments, ensuring that submissions, grading, and feedback are all easily accessible in one place.
So what are you waiting for? Learn more about GravityView today.

Helpful tips right in your inbox.
Subscribe to get the latest articles, information on releases and helpful Gravity Forms tips!
More articles

Launch Log: Distance sorting for radius searches, DataTables search improvements, and import reliability fixes
The latest GravityKit releases add distance sorting to map searches, bring built-in search to DataTables, and fix GravityCharts and GravityImport edge cases.

WordPress page builder market share 2026: Elementor leads at 32.67%
Elementor reaches 32.7% of WordPress sites. WordPress Block Editor 20.6%, wpBakery 8.5%, Divi 5.7%. Latest HTTP Archive crawl, share-of-WordPress basis throughout.

Launch Log: GravityView 3.0, plus upgrades to Block MCP and GravityKit MCP
GravityView 3.0 lands with the new Vantage theme, frontend bulk actions, and AI-assisted View creation. This launch log also covers updates to GravityKit MCP, Block MCP, and Dashboard Views.