Published
•
Updated
How to build a product review site on WordPress using GravityView
Build a product review website on WordPress using Gravity Forms and GravityView. Create searchable listings, single-entry review pages, and affiliate showcases without code.

Are you looking to create a product review site on WordPress?
Nowadays, buying every day items isn’t a trivial decision anymore. There are so many products and options available thanks to the rise of eCommerce giants like Amazon. That’s why product review sites, like Wirecutter, are some of the most viewed websites on the internet.
In this post, we’re going to show you how to build a product review showcase for a fictitious Amazon affiliate website. And we’ll be using the powerful combo of Gravity Forms and GravityView to do it.
Let’s get started!
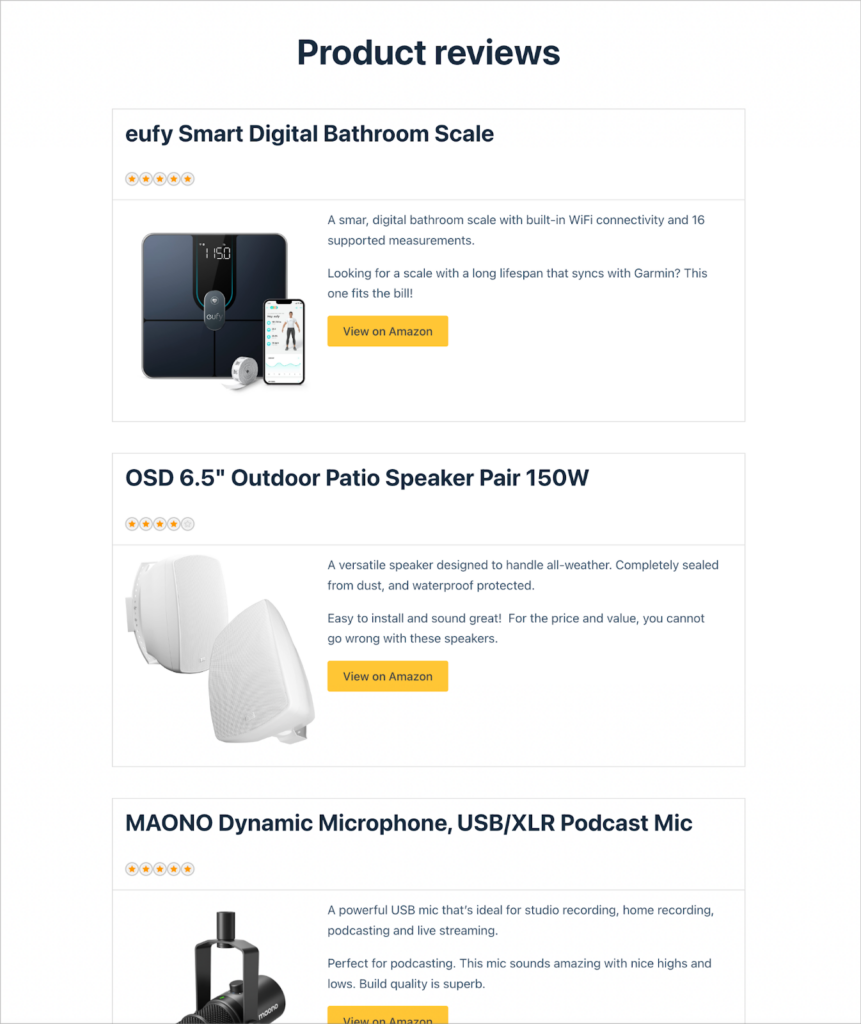
Sneak peek
Here’s a sneak peek at the finished product review site:

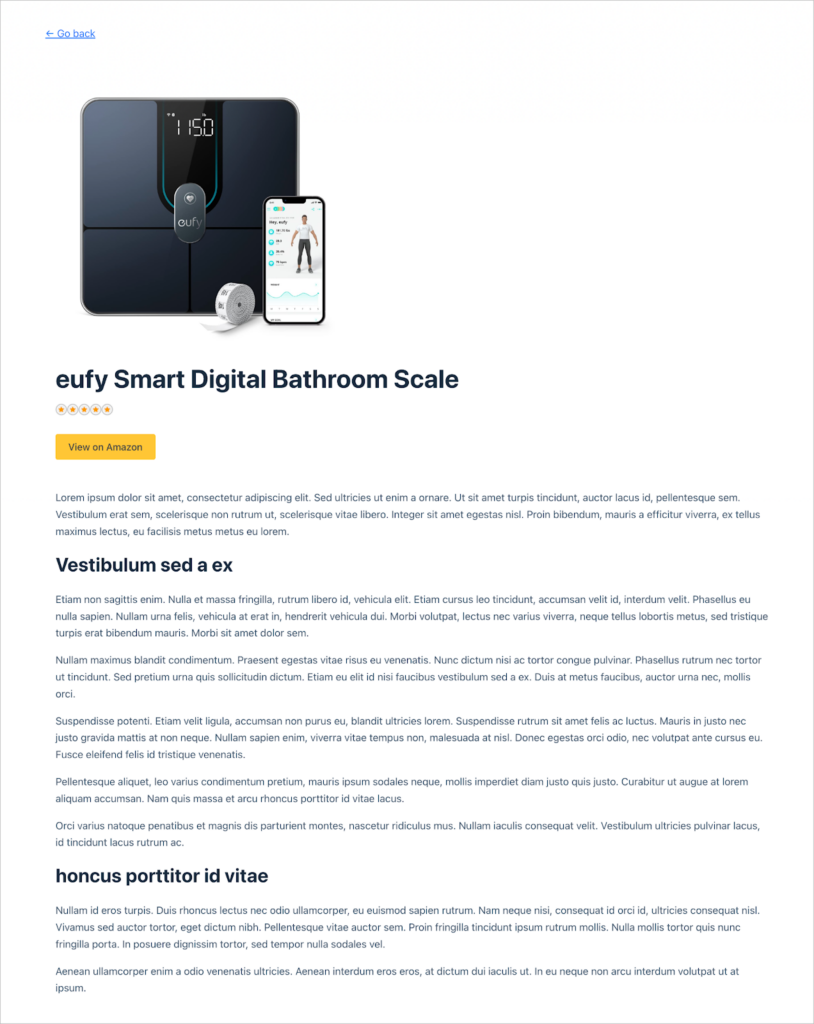
And when a user clicks on a specific product, they are taken to the Single Entry page where they can read the full-length product review:

Ready to find out how we built it? Keep reading!
Wanna try it?
Spin up a demo
See a live product review site built with GravityView — explore the demo.

What you’ll need
Here are the plugins you’ll need to build a review site like the one in this tutorial:
- Gravity Forms
- Gravity Forms Survey Add-On (included in the Elite license)
- GravityView
Why build a product review site?
Creating a product review site can be a profitable business venture. By writing in-depth product reviews that include affiliate links, you can earn a small commission each time one of your readers purchases a product.
It’s important to write trustworthy reviews so that you build up an audience of shoppers that see you as the go-to source for product advice!
Creating the product review form
The first thing we need to do is create a form that allows us to submit product reviews.
To create a new form, we’ll hover over “Forms” and click “New Form”. Now we can start building the form by adding the fields that we need using Gravity Forms’ simple drag and drop builder.
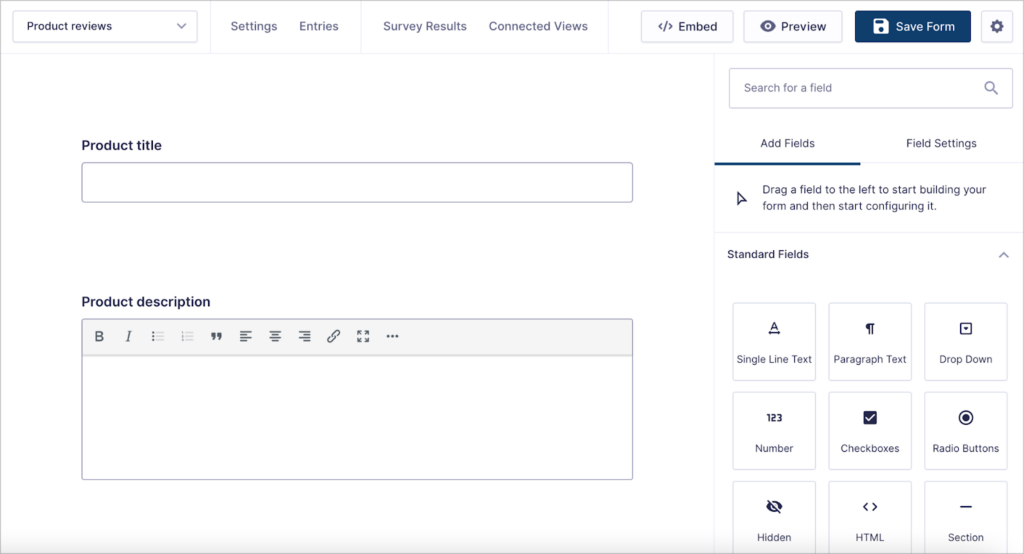
For this example, we’ll create a product review form with the following fields:
- Product title (Single Line Text field)
- Product description (Paragraph Text field)
- Product URL (Website field)
- Product image (File Upload field)
- Our verdict (Paragraph Text field)
- Full length review (Paragraph Text field)
- Rating (Survey field)
For each of our Paragraph Text fields, we’re going to enable the rich text editor option in the field settings. This will allow reviewers to use basic text formatting when writing their reviews.
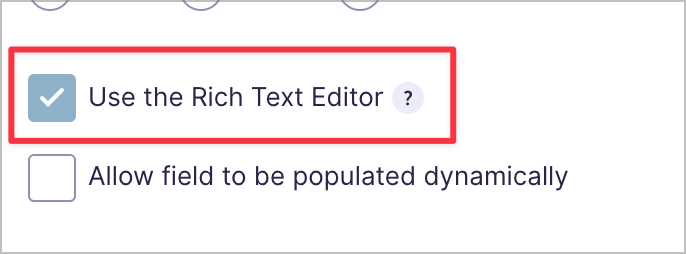
For the Survey field, we’re going to set the field type to “Rating”. This will allow reviewers to rate products using a star rating (from 1-5).

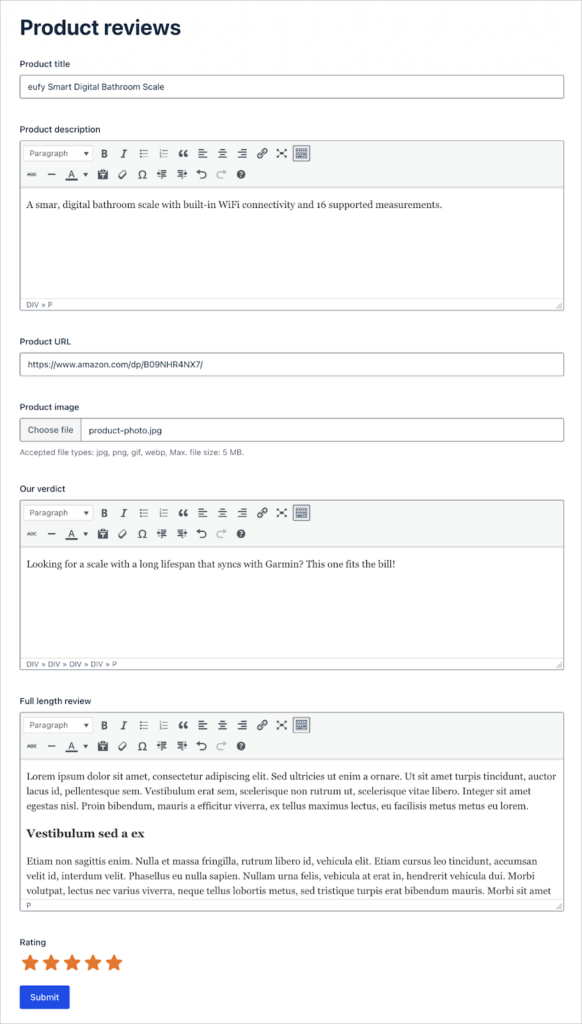
Here’s what our finished form looks like on the front end:
Feel free to customize your form as you see fit. When you’re happy with it, remember to embed it on a page on your site.
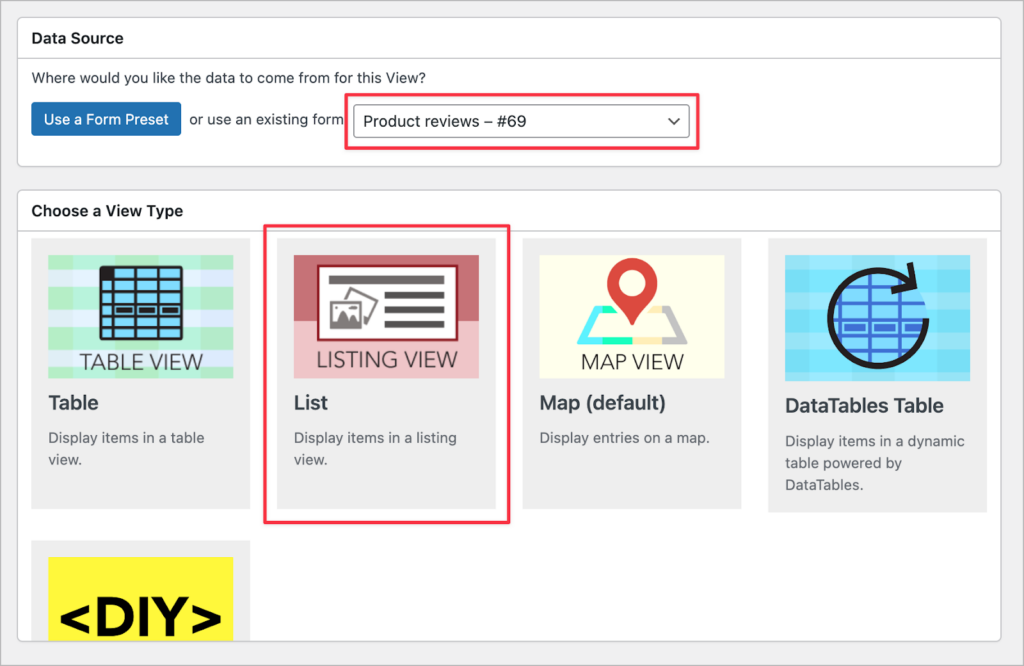
Creating a View to display product reviews
The next step is to create a View for displaying product reviews on the front end of our site where users can see them.
To create a new View, we’ll hover over “GravityKit” and click “New View”. After giving our View a name, we’ll need to select a data source and a View Type.
- Data source: The form with the data we want to display in our View.
- View type: The layout we want to use to display the data.
We’ll set the data source to the “Product reviews” form we created in the previous step, and we’ll choose “List” as our View type.
Now we can start building our View using GravityView’s drag and drop builder.
Configuring the Multiple Entries Layout
Let’s start with the Multiple Entries Layout. This is the page where each of our product reviews will be displayed.

We’re going to add the “Product title” field to the “Listing Title” section, and add the “Rating” field to the “Subheading” section.
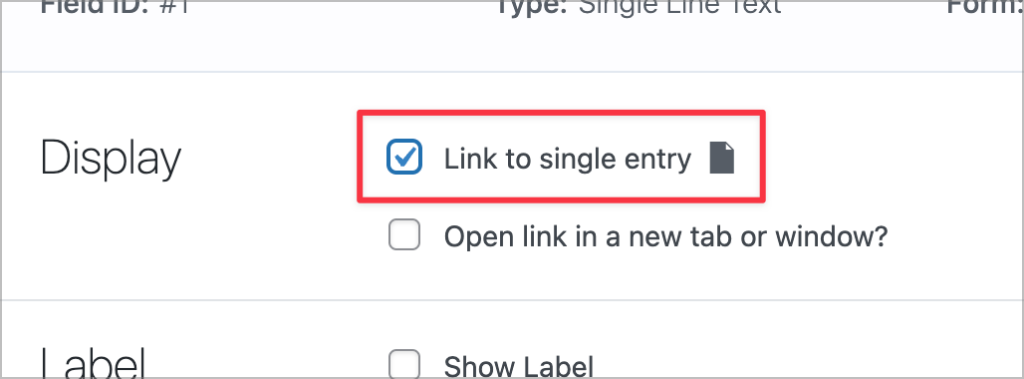
After adding the “Product title” field, we’ll click on the gear icon to open the field settings and check the box titled “Link to single entry”. This will turn the product title into a link that takes the user through to the Single Entry page (which we will configure later).
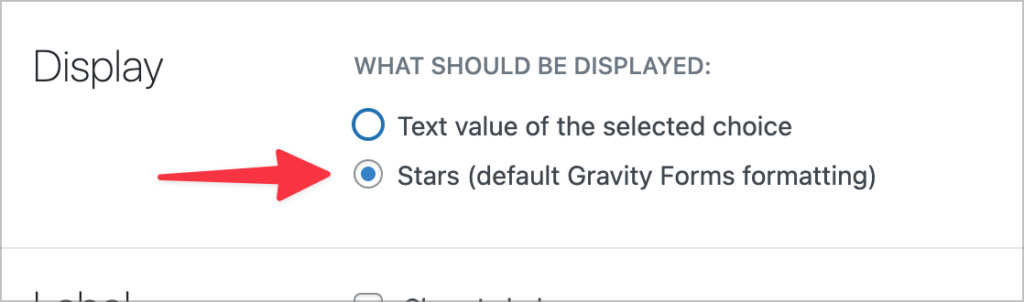
We’ll also open the field settings for the “Rating” field and ensure that we display the number of stars, not the text value.
Next, we’ll add the “Product image” field to the “Image” section, and the “Product description” and “our verdict” fields to the “Other fields” section.
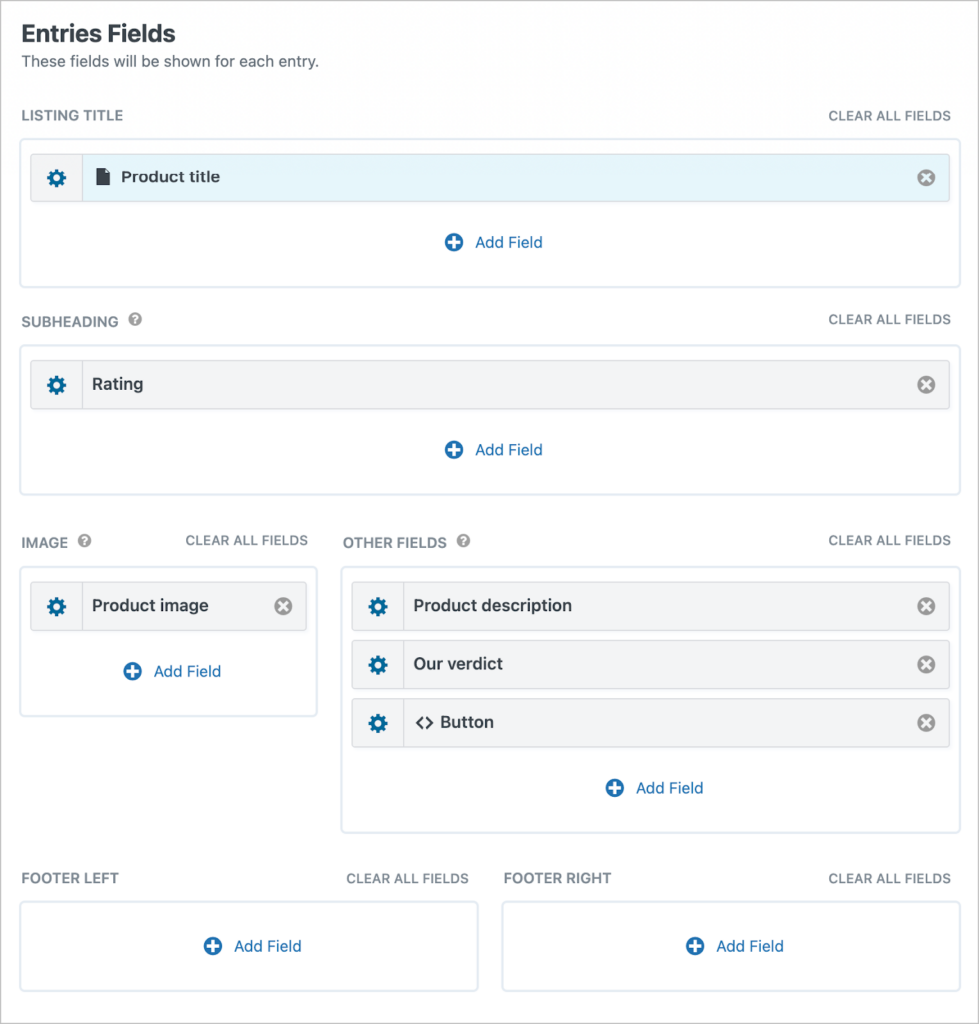
Finally, we’re going to create a button using a Custom Content field. The button will take users through to the product page on Amazon.
After adding a Custom Content field to our View, we’ll click the gear icon to open the text editor. Here, we can use custom HTML and CSS code to create a button. All we need to do is add an HTML anchor tag and set the href attribute equal to the product URL using a merge tag.
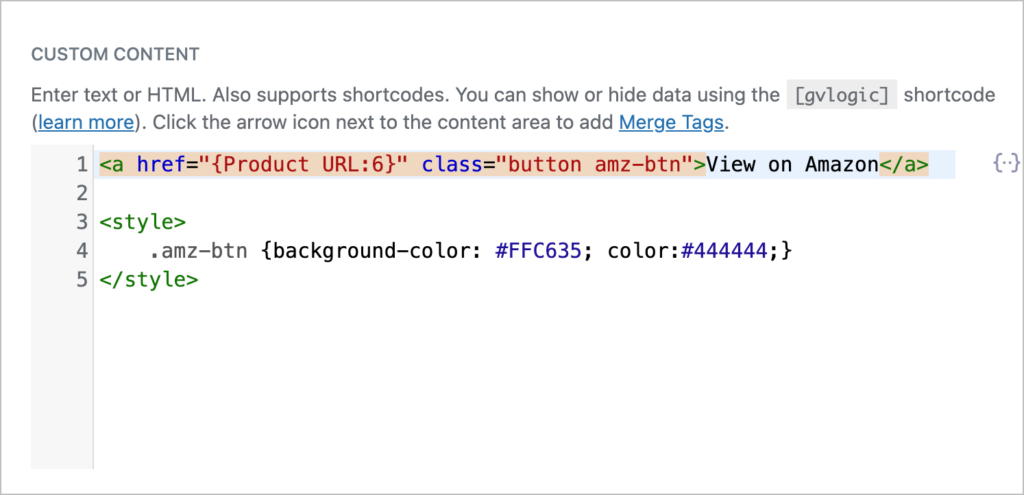
(If you’re using an affiliate link, you could append it to the end of the URL here!)
Okay, let’s see what our View looks like now:
As you can see, each of our product reviews is displayed one after the other in a list. This is the default list layout style. However, we can change this to a grid layout by adding a few lines of custom CSS code.
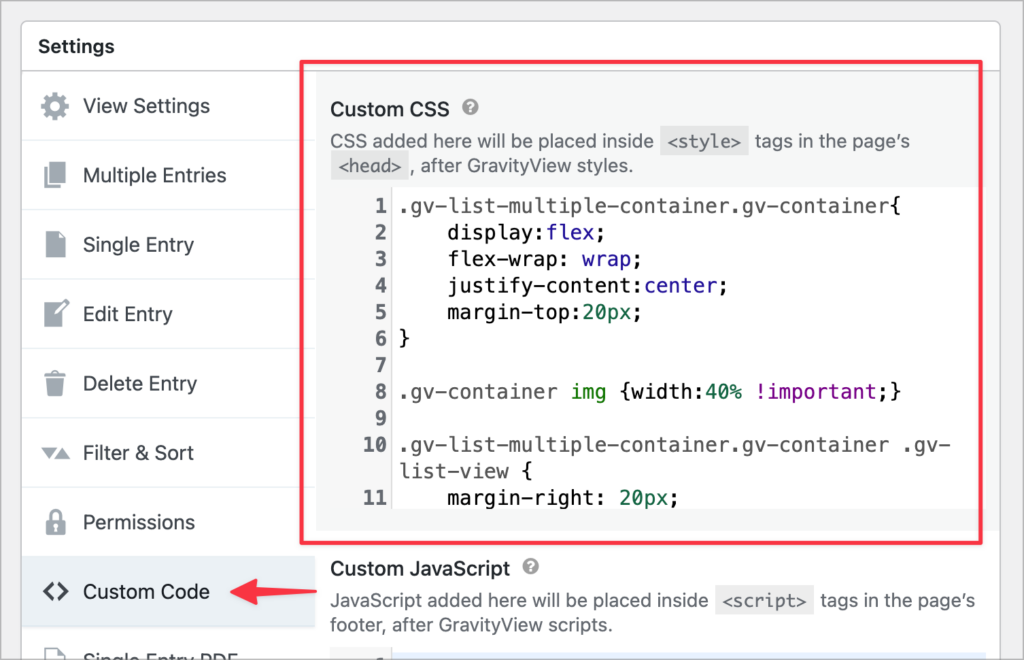
To add CSS code, we’ll scroll down to the View settings, and click on the “Custom Code” panel. Here, we can add custom CSS and JS code to the View. You can see this code on our docs site.
Here’s what our View looks like after transforming our list View into a grid View:

Things are looking good! The next step is to configure the Single Entry layout.
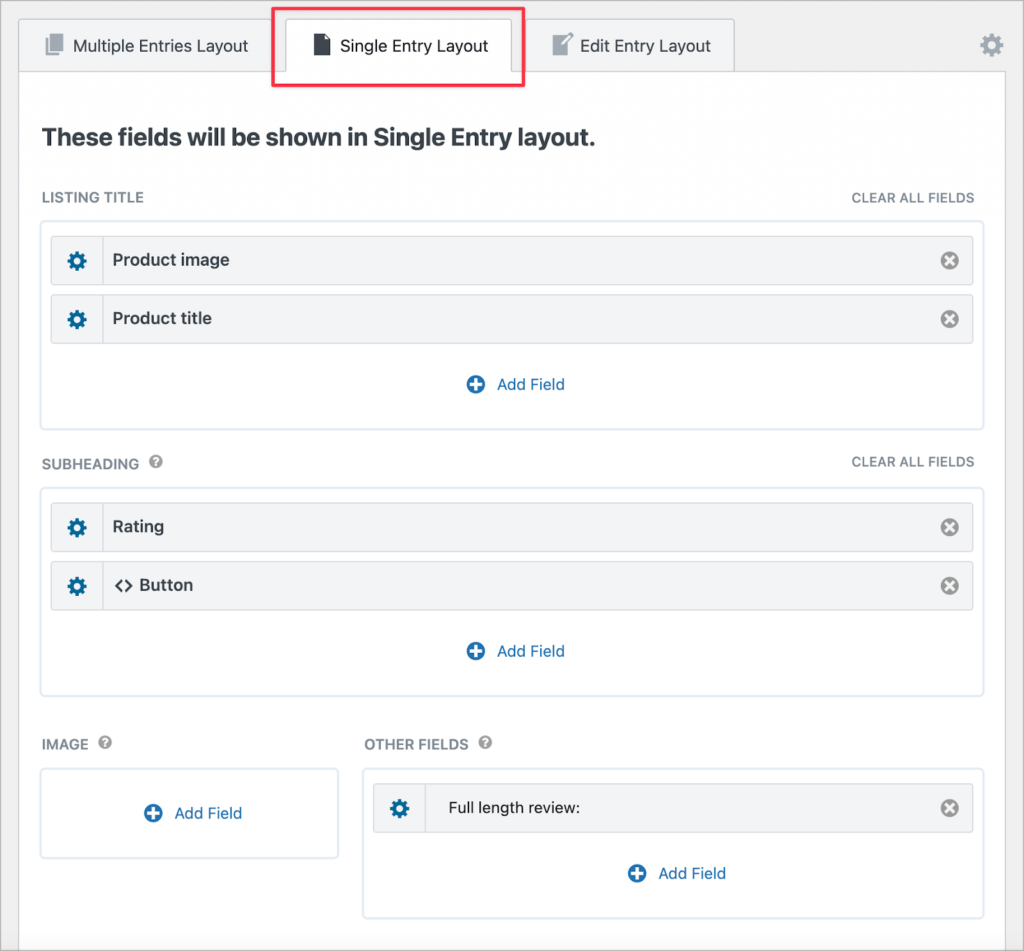
Configuring the Single Entry Layout
The Single Entry layout is where we can show additional information about a specific product. To configure this layout, we’ll click on the “Single Entry Layout” tab in the View editor.
We’ll start by adding the “Product image” and “Product title” fields to the “Listing Title” section. Next, we’ll add the “Rating” and our custom button to the “Subheading” section.
Finally, we’ll add the “Full length review” field to the “Other fields” section.
Here’s what the Single Entry layout looks like on the front end:
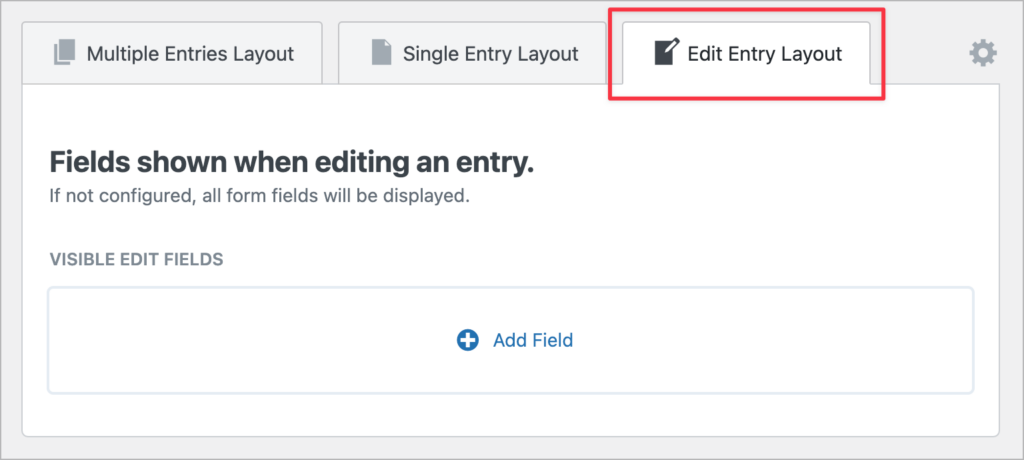
The final step is for us to configure the Edit Entry Layout, which allows product reviewers to update their reviews directly from the front end.
Allowing editors to update reviews from the front end
Configuring the Edit Entry Layout allows us to select which fields will be editable from the front end. If you leave the layout blank, all fields will be editable by default.
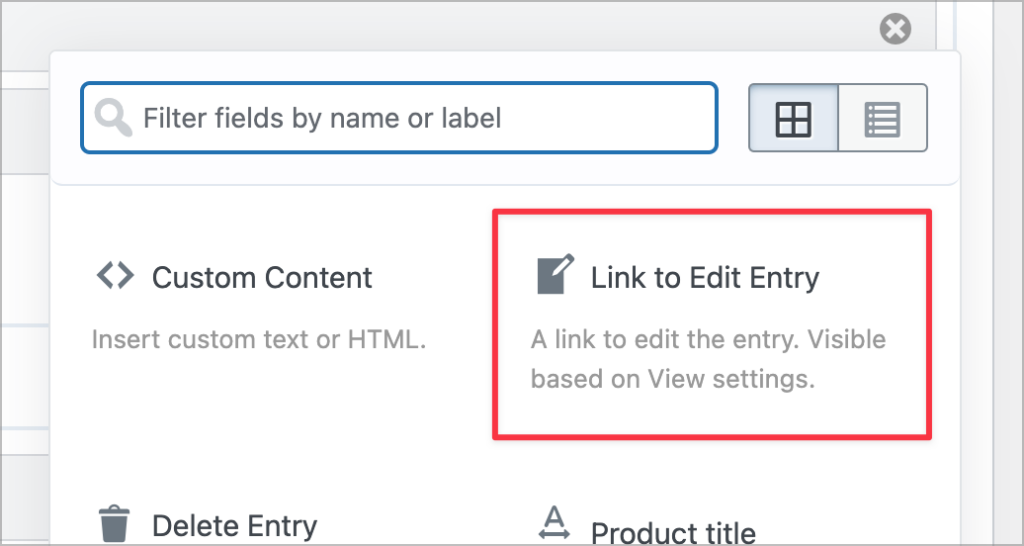
Next, we’ll need to add a link to the Edit Entry page from the Single Entry page.
Having a way to edit product reviews from the front end is important for several reasons. For example, reviews may need to be updated to ensure they reflect changes made to products over time.
Moreover, allowing reviewers to update their reviews from the front end eliminates the need for backend access (which can be a security risk).
That’s it!
Build a WordPress product review site today
Many product review websites make money by using affiliate links. They provide value to users through detailed product reviews, and when a user buys a product, they earn a small commission.
In this post, we showed you how to create a product review website using Gravity Forms and GravityView. If you found this tutorial helpful, subscribe to our newsletter below for more valuable content.

Helpful tips right in your inbox.
Subscribe to get the latest articles, information on releases and helpful Gravity Forms tips!
More articles

GravityKit turns 12: a year in review, and 30% off Lifetime All Access
GravityKit turns 12. A look back at a year of GravityView 3.0, GravitySearch, and AI-assisted building, plus a birthday sale on the Lifetime All Access Pass.

Launch Log: Row headers for screen readers, smarter conditional logic, and multi-View fixes
GravityView 3.1 adds row headers for screen readers, plus smarter conditional logic in GravityCalendar and fixes for DataTables, Maps, and Dynamic Lookup.

Ecommerce platform market share 2026: WooCommerce leads the web, Shopify leads the top tier
Ecommerce platform market share in 2026, from HTTP Archive data. WooCommerce leads the whole web at 6.64%, but Shopify already leads the top 1M sites.
