Published
•
Updated
5 web apps you can build using GravityKit in under 5 minutes
Discover 5 web applications you can build with Gravity Forms and GravityKit in under 5 minutes. From geolocation directories to calculators, no code required for any of them.

GravityKit plugins enhance Gravity Forms by allowing you to do more with your form submission data.
In this post, we’re breaking down 5 web applications that you can build using Gravity Forms and GravityKit. Using GravityKit you can speed up development time and optimize your workflow by building rich interfaces using drag-and-drop. No code required.
Let’s dive in and discover how you can transform your ideas into fully functional web applications in under 5 minutes!
1. Geolocation maps directory
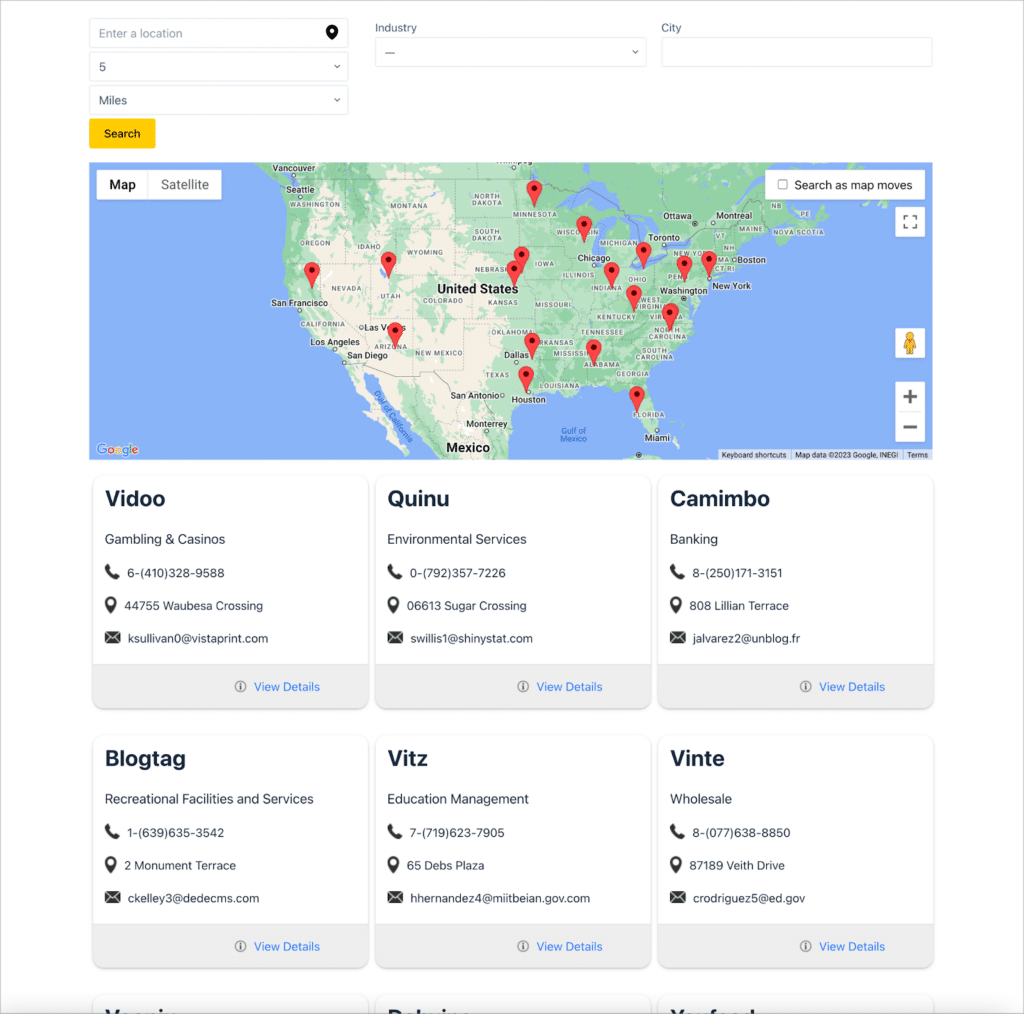
One of the most popular use cases for GravityView is building directories. All you need to do is create a directory listing form using Gravity Forms and output the data on the front end using GravityView!
GravityView’s intuitive interface and drag-and-drop builder gives you complete control over the data and layout of your listings. If you want to take things further, you can use the Maps Layout to create a geolocation directory where listings show up as markers on a Google Map.
Live demo
You can check out a live demo of the geolocation directory above on our demo site. Use the search facility at the top to filter listings by location, industry or city.
What you’ll need
Here are the plugins/extensions you’ll need to build a geolocation directory:
- Gravity Forms (any license level)
- GravityView Pro (includes the Maps Layout)
How to build it
To start, you will need to create a form with an “Address” field. This will serve as your directory listing form where businesses can submit their profiles for inclusion in your directory.
The Address field is necessary to ensure that the listing appears on the map!
Next, create a new View and select your desired View Type. The “List” View Type is usually the best for directories, but the “Table” type would work too. Ensure you add a map to your directory using GravityView’s Maps widget.
Next, decide which fields you want to appear on the Multiple Entries and Single Entry layout pages and add these to the View editor. Finally, configure the View settings (including map options!) and enable or disable entry approval.
For a more detailed guide, read our step by step tutorial on how to build a geolocation directory using Gravity Forms and GravityView.
Taking it further
Here are some additional ways to utilize GravityView’s Maps Layout:
- Use GravityView’s geolocation features to create a Store locator
- Use the GravityView Ratings & Reviews Extension to build a Yelp clone
2. Member directory
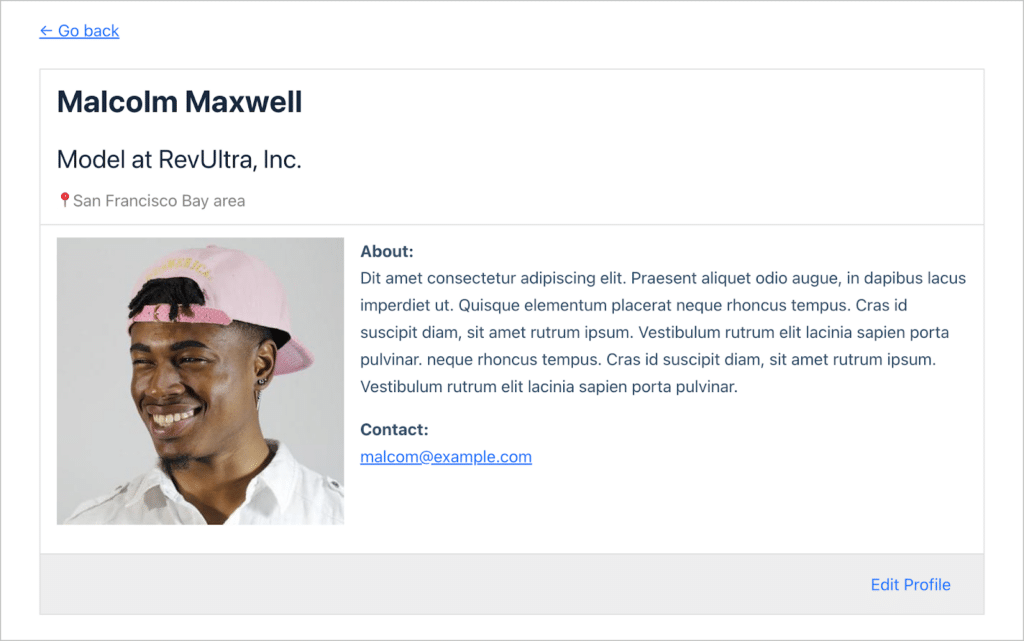
GravityView is a powerful solution for displaying people profiles on your site. Using Gravity Forms and the User Registration Add-On, you can collect profile information and register new users on your website. You can then display those profiles in a searchable directory using GravityView.
Live demo
You can view a live demo of the member directory above on our demo site. Click on “View profile” to see each member’s individual profile. You can also use the search facility at the top to filter alphabetically by name.
What you’ll need
Here are the plugins/extensions you’ll need to build a member directory:
- Gravity Forms (Elite license—includes the User Registration Add-On)
- GravityView Pro
How to build it
Start by creating a new form for users to submit their profile information. Your form should contain fields for location, bio, profile picture, and contact details. After that, create a new User Registration feed to register users on your site when they submit your form.
The next step is to create a View to display member profiles on the front end. The “List” View Type works well for this purpose. If you need a more customizable layout and have HTML/CSS skills, you could also use the “DIY” Layout.
Depending on the functionality you need, you may want to install one or more GravityView Extensions. For example, if you only want users to see their own profile, you will need to add conditional logic using the Advanced Filter Extension.
For a more detailed guide, read our step by step tutorial on how to build a member directory using Gravity Forms and GravityView.
Taking it further
Here are some ways to enhance your member directory:
- Create a paid membership site using Gravity Forms payment Add-Ons
- Build a company team page using the DIY View Type
- Add featured entries to your directory with the GravityView Featured Entries Extension.
3. Real-estate directory

Using Gravity Forms’ image upload capabilities and GravityView’s powerful display options, you can build a full-featured real-estate directory. GravityView’s advanced searching and sorting features allow users to find their ideal property across a range of metrics.
You can also use GravityView’s Maps Layout to display the locations of properties in your directory and allow users to find properties within a certain area.
Live demo
You can view a live demo of the real-estate directory above on our demo site. Use the search facility at the top of filter properties by a range of metrics. You can also click on a property to see more detailed information about it (including additional photos).
What you’ll need
Here are the plugins/extensions you’ll need to build a real-estate directory:
- Gravity Forms (any license tier)
- GravityView Pro (includes the Maps Layout)
How to build it
Start by creating a form for capturing property information. Make sure to include one or more “File Upload” fields in your form to allow agents to upload images of the property.
Next, create a View to display property listings on the front end. In the View editor, add a Map widget to display property locations on a Google Map. Be sure to include a search bar as well with multiple inputs for filtering properties based on different criteria.
After that, configure the Multiple Entries Layout to show basic property information in a grid. Finally, configure the Single Entry Layout to display more detailed information about each property, including an image gallery.
For a more detailed guide, read our step by step tutorial on how to create a Zillow clone on WordPress with no code.
Taking it further
Here are some ways to enhance your real-estate directory:
- Use the DIY View Type to build a custom layout for property listings
- Use the Gravity Forms field to add a contact form for users to enquire about listings
- Create a dashboard using GravityView for agents to manage their listings
4. Application management system
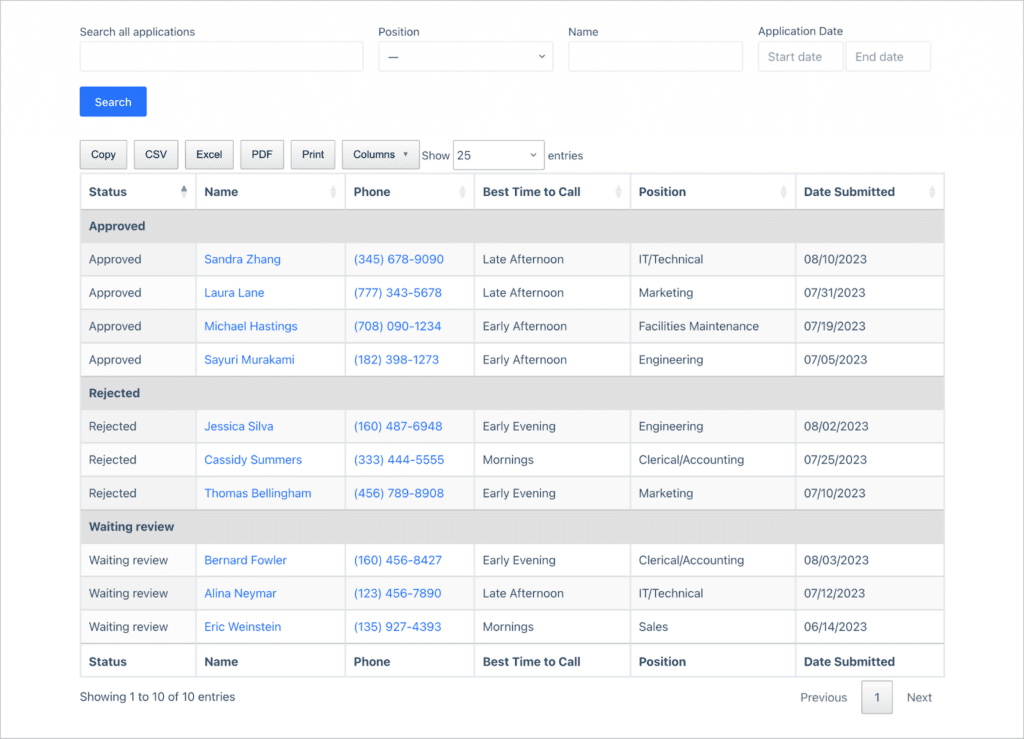
GravityView has an inbuilt approval system, allowing you to approve new submissions before they show up in your View. Using entry approval, you can create powerful systems for application management or review!
Live demo
You can view a live demo of the job application review system above on our demo site. This demo uses the GravityView DataTables View Type. Click the buttons to export data to CSV, Excel, and PDF.
What you’ll need
Here are the plugins/extensions you’ll need to build an application review system:
- Gravity Forms
- GravityView (any license level)
How to build it
Start by creating a form that you can use to collect applications. This could be for job applications, grant applications or anything that requires a review step.
Now you can create a View to gather new applications into a single interface. Make sure you enable entry approval and include the entry approval status as a View field. This will allow you to group applications by approval status.
Taking it further
Here are some ways to enhance your application review system:
- Use the PDF for GravityView Extension to add PDF export capabilities for individual applications
- Set up Gravity Forms notifications so users get notified when the status of their application changes.
5. Data dashboards

Using GravityCharts, you can visualize Gravity Forms submission data using customizable charts! This gives you the ability to create helpful visualizations and data dashboards.
GravityCharts support a range of chart types and customization options. You can also plot data against time. This allows you to build data dashboards for sales teams, analytics tracking, and more.
Live demo
You can view a live demo of the data dashboard above on our demo site.
What you’ll need
Here are the plugins/extensions you’ll need to build a data dashboard:
- Gravity Forms (any license level)
- GravityCharts
How to build it
As always, everything begins with a form! You can either create new forms for the data you want to collect, or you can create charts from existing submission data.
To create a chart, you’ll need to edit your form and add a new GravityCharts feed. After that, you’ll need to select a chart type and choose the form fields containing the data you want to plot. You can then customize your chart’s axes, colors, and more!
Taking it further
Here are some ways to enhance your charts:
- Use the GravityCharts widget in GravityView to build Views with embedded charts
- Use GravityCharts to visualize data collected from the Gravity Forms Survey and Poll Add-Ons
Building web apps with GravityKit
With the data collection capabilities of Gravity Forms and the advanced display options provided by GravityView, you have everything you need to build powerful web applications with ease and speed!
In this post, we showed you 5 different web apps that you can build with Gravity Forms and GravityKit in under 5 minutes. Ready to get started? Elevate your WordPress experience with GravityKit today!

Helpful tips right in your inbox.
Subscribe to get the latest articles, information on releases and helpful Gravity Forms tips!
More articles

How to build a WordPress CRM without code (a contact database you own)
Build a simple WordPress CRM with GravityView. Turn the Gravity Forms entries you already collect into a no-code contact database you own, with no monthly fees.

Launch Log: Distance sorting for radius searches, DataTables search improvements, and import reliability fixes
The latest GravityKit releases add distance sorting to map searches, bring built-in search to DataTables, and fix GravityCharts and GravityImport edge cases.

WordPress page builder market share 2026: Elementor leads at 32.67%
Elementor reaches 32.7% of WordPress sites. WordPress Block Editor 20.6%, wpBakery 8.5%, Divi 5.7%. Latest HTTP Archive crawl, share-of-WordPress basis throughout.