Published
•
Updated
How to build a fitness tracker app on WordPress with no code
Build a personal fitness tracking app on WordPress without code. Use Gravity Forms to log workouts and GravityView to display progress, history, and stats on the front end.
Are you passionate about fitness, but need a way to hold yourself accountable and meet your goals? Tracking your physical activity is a great way to stay motivated!
In this article, we’ll guide you through the process of creating your own fitness tracking app on WordPress, without writing a single line of code. We’ll harness the power of Gravity Forms and GravityView to help you effortlessly log and display all the details of your workouts.
Are you ready to build your user-friendly, personalized fitness tracking solution? Let’s get started!
Download the free workout log form template now!
Import the template into Gravity Forms and customize as necessary.
Sneak peek
Here’s what our fitness tracker app looks like on the front end. As you can see, there is a table of entries for each workout, a graph showing weight (in kilograms) over time, and a search bar at the top!
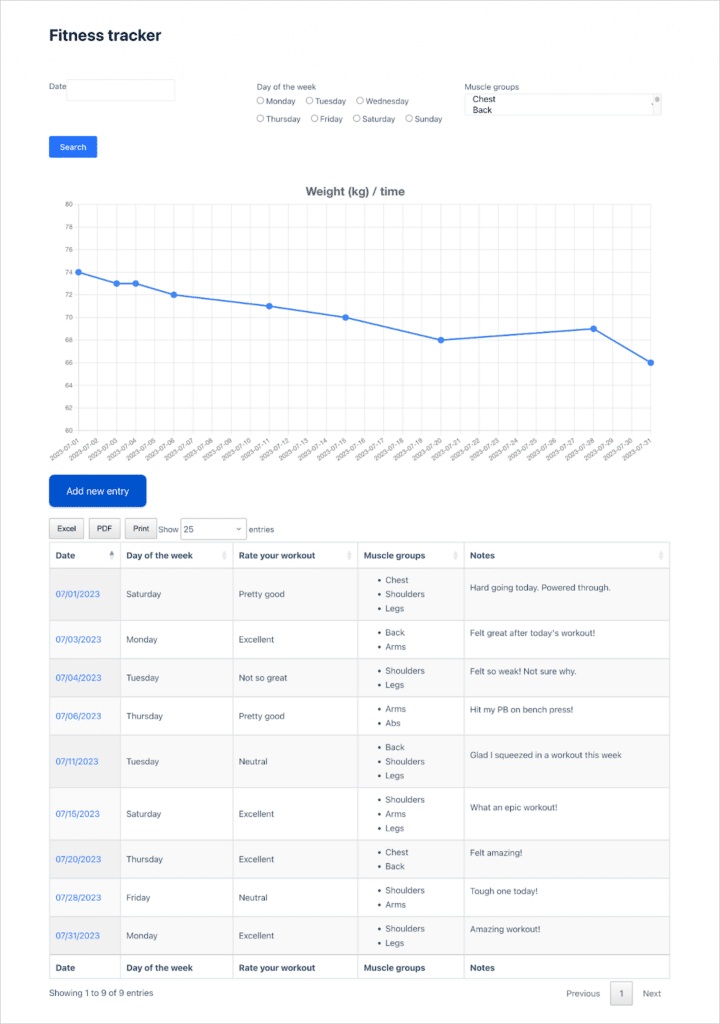
By clicking on the date of an entry, users can view the single entry page where they can see more details about that specific workout.
If they need to update anything, they can click “Edit Entry”, and make changes to the record from the front end.
See how it works below:
Wanna try it?
Spin up a demo
See a live fitness tracker built with GravityView — explore the demo.

What you’ll need
Here are the plugins/extensions you’ll need to build a fitness tracker like the one in this tutorial. Our fitness tracker app is highly customizable, so there are some plugins/extensions that are entirely optional, depending on the functionality you desire.
- Gravity Forms
- GravityView Pro
- GravityCharts (optional)
- Popup Maker (free)
- Gravity Forms – Survey Add-On (optional)
Why track your workouts?
Tracking your workouts offers a multitude of benefits that can significantly enhance your fitness journey and help you achieve your goals.
- Progress monitoring: Tracking your workouts allows you to monitor your progress over time. By keeping a record of your exercises, sets, reps, and weights, you can easily see how you’re improving. By identifyin patterns, you can make informed adjustments to your fitness routine.
- Goal setting: Tracking your workouts helps you set and achieve realistic goals. Whether it’s increasing your strength, improving endurance, or losing weight, having a clear picture of your past performances allows you to set goals that are measurable and attainable.
- Accountability: Keeping track of your workouts adds a level of accountability to your fitness journey. When you have a record of your activities, you’re more likely to stay consistent and committed to your exercise routine. It serves as a visual reminder of your dedication and progress.
- Identifying plateaus and challenges: Plateaus and challenges are a natural part of any fitness journey. By tracking your workouts, you can identify when progress slows down or stalls altogether. This information helps you pinpoint areas that may need adjustments, such as changing exercises, increasing intensity, or modifying your training plan.
- Motivation and encouragement: Seeing your progress and achievements laid out in front of you can be incredibly motivating and encouraging. Tracking your workouts allows you to celebrate your successes, no matter how small they may seem. It serves as a reminder of how far you’ve come, boosting your motivation to keep pushing forward and reaching new milestones.
Overall, tracking your workouts provides valuable insights, keeps you accountable, and enhances your motivation, ultimately leading to a more effective and rewarding fitness journey.
Creating the data input form
The first thing we need to do is create a form to log our workouts! To create a new Gravity Form, we’ll hover over “Forms” and click “New Form”.
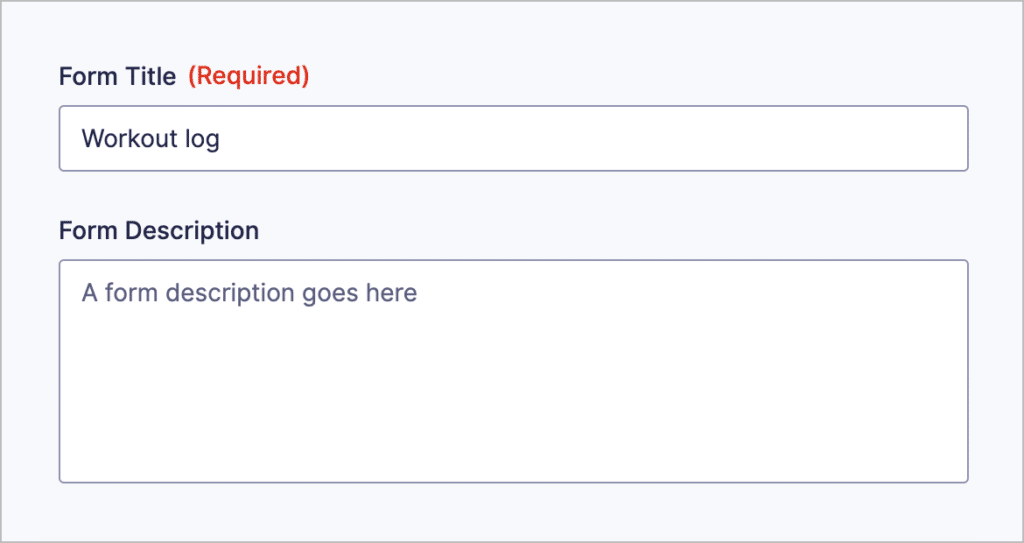
After giving our form a title, we can start adding fields using the Gravity Forms visual form builder. Gravity Forms support a range of field types, allowing us to capture all the data we need.
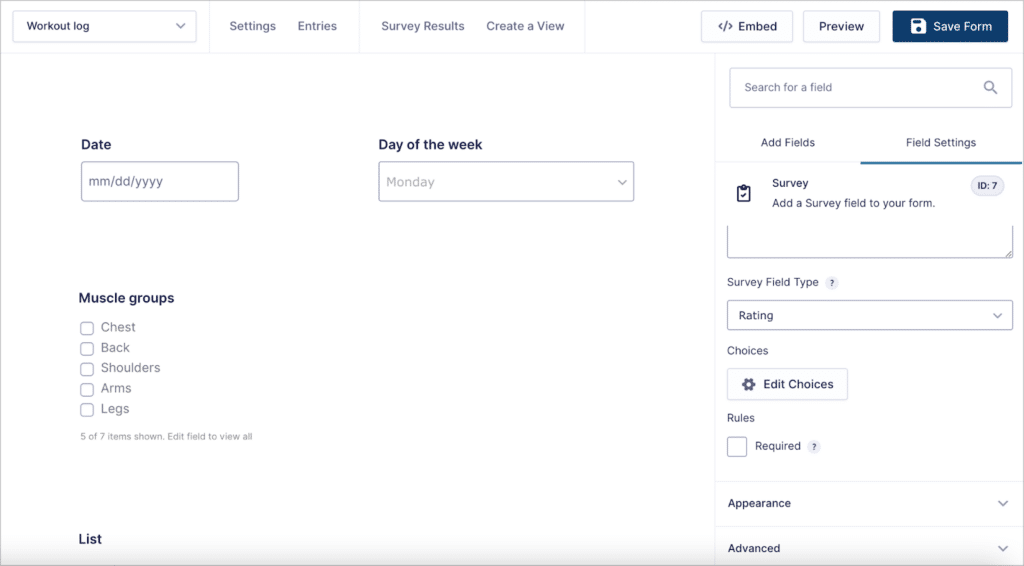
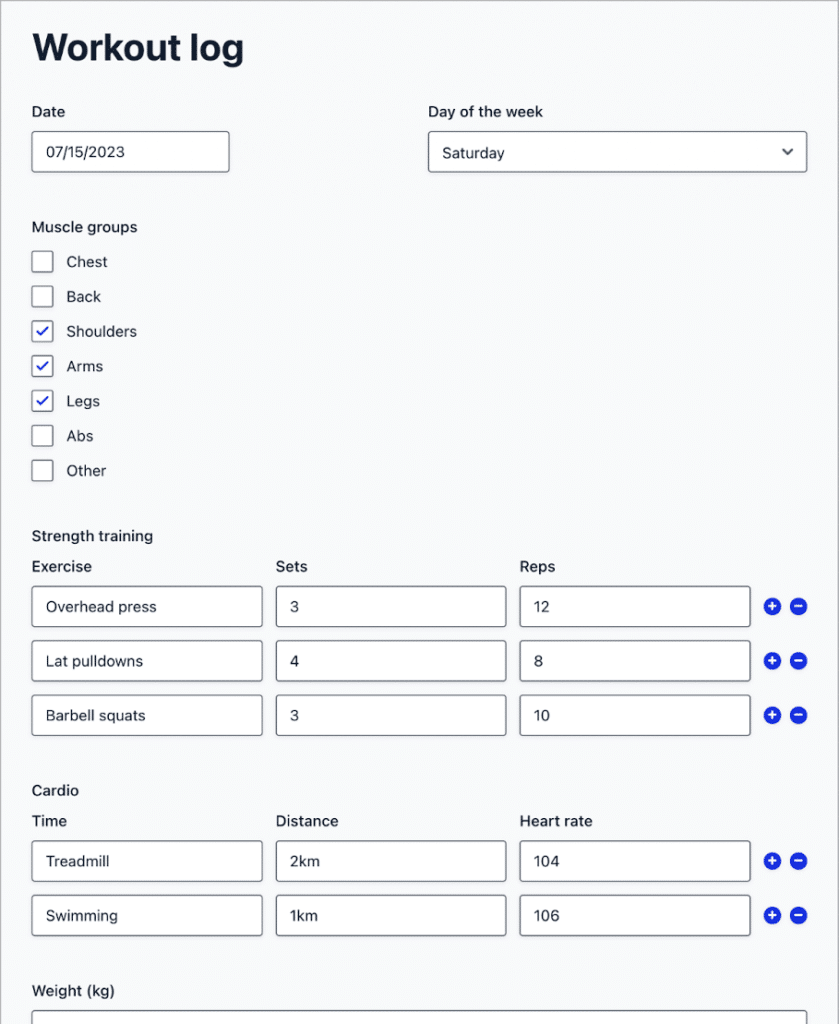
Let’s go ahead and add the following fields to our form:
- Date (Date field)
- Day of the week (Drop Down field)
- Muscle groups (Checkbox field)
- Strength training (List field)
- Exercise
- Sets
- Reps
- Cardio (List field)
- Time
- Distance
- Heart rate
- Weight (kg) (Number field)
- Notes (Paragraph field)
- Rate your workout (Survey field)
List fields are useful here as they allow users to input multiple rows of data in a single field! We have two List fields—”Strength training” and “Cardio”, and each contains multiple columns. For this to work, we’ll need to enable the “multiple columns” option in the field settings.

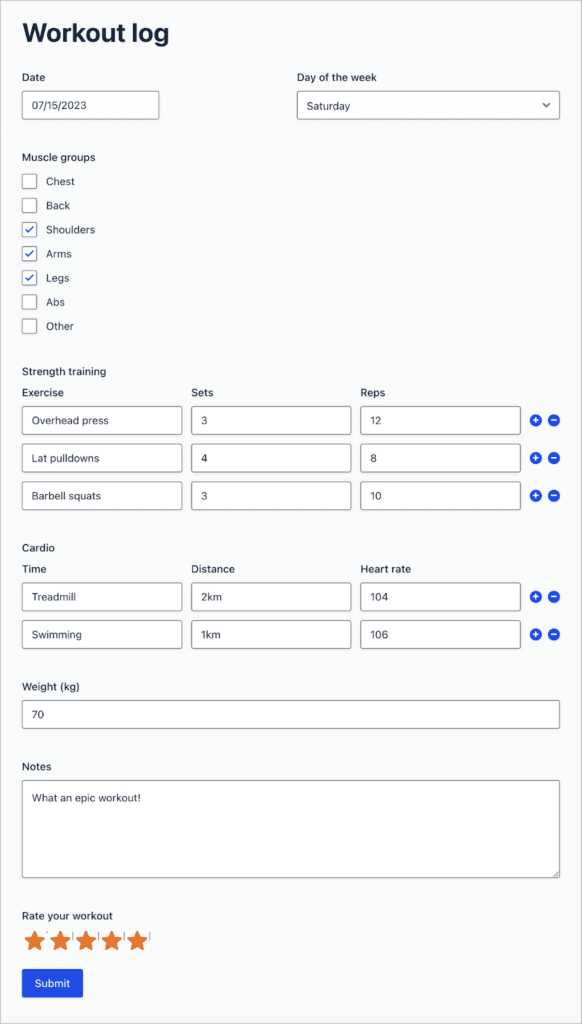
The final field in our form is a survey field, allowing users to rate their workouts. If you don’t want to use the Gravity Forms Survey add-on for this, you could replace this field with a simple Drop Down or Radio Buttons field type! You should also feel free to add any other fields you feel are necessary.
Here’s what our form looks like on the front end:
Save time by downloading the free workout log form template now!
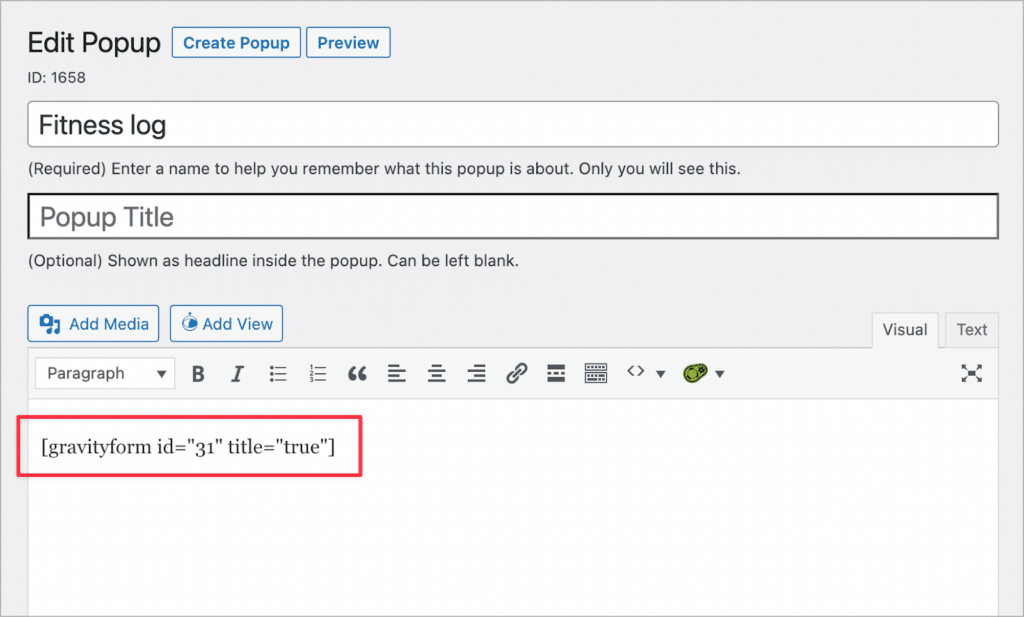
The next step is to embed our form in a popup, so that users can add a new entry, without leaving the fitness dashboard. We can do this using the free Popup Maker plugin.
All we need to do is create a new popup and add our form embed shortcode inside the content area. Then, we’ll add a trigger, so that the popup opens on click.
We’ll finish this implementation in the next section! Now that we have a form for inputting workout data, we can start building our fitness tracker dashboard.
Building a table of entries
We’re going to use GravityView to create a dashboard that displays our workout info on the front end and allows us to view and edit the data. To start, we need to create a new View.
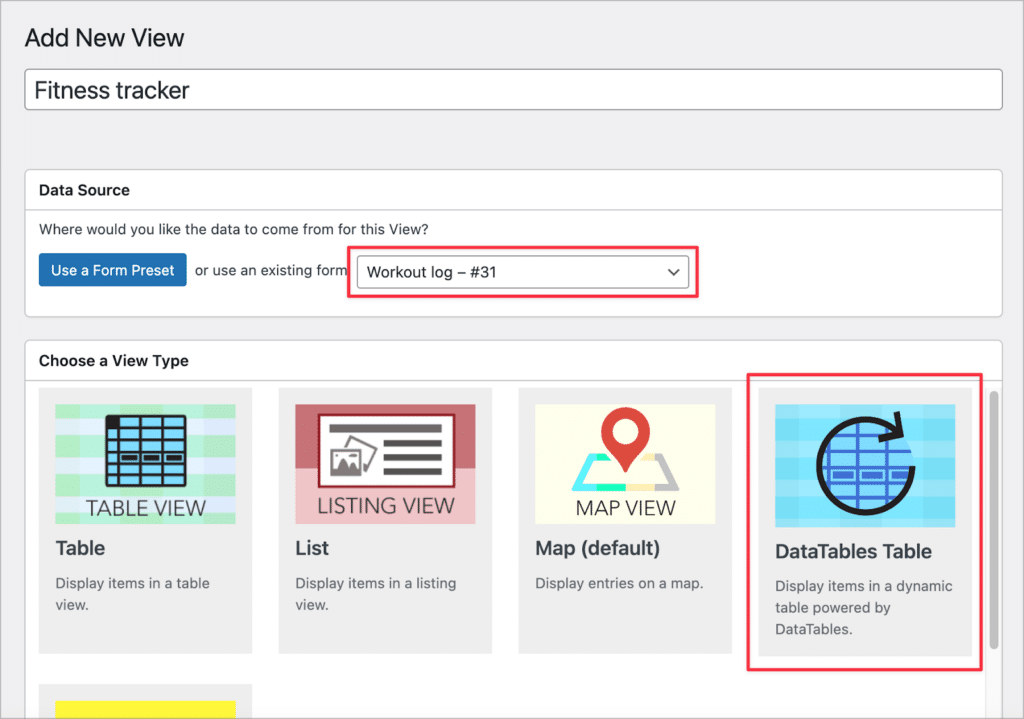
We can do this by hovering over “GravityKit” and clicking “New View”. After giving our View a name, we need to select a data source. This should be our “Workout log” form that we created in the previous step!
After that, we can choose a View Type. Different View Types allow us to display data using different layouts. For this example, we’ll select the “DataTables Table”, but the regular “Table” View Type would work as well.
Now we can start configuring the View using GravityView’s intuitive drag-and-drop interface! Let’s start by adding the form fields we want to display in our table. We can do this by clicking on the “Add Field” button and selecting the fields we want to add.
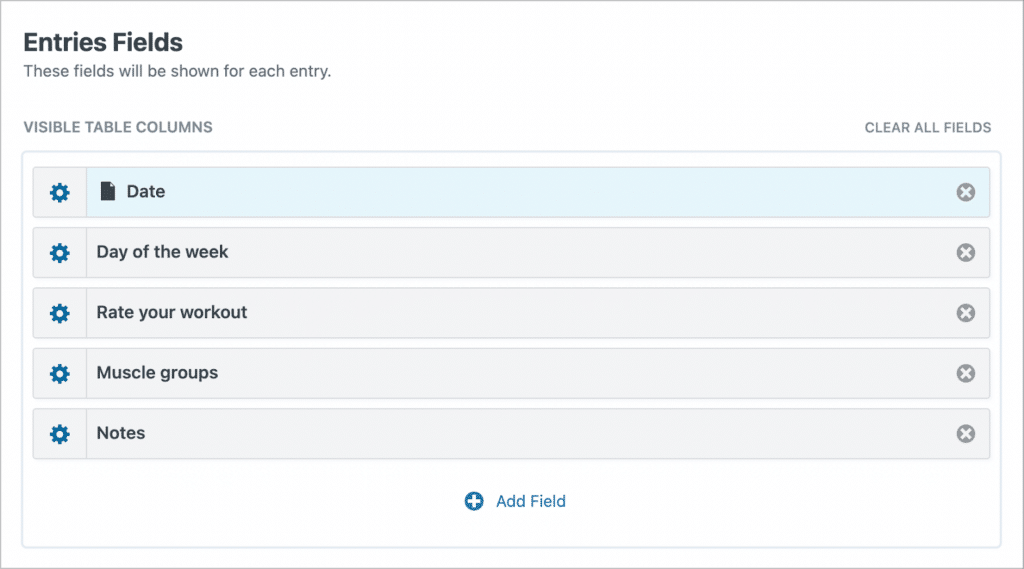
We’ll add the “Date”, “Day of the week”, “Rate your workout”, “Muscle groups”, and “Notes” fields here. We’ll also make the “Date” field a link to the Single Entry page, where we’ll add more details about specific workouts.
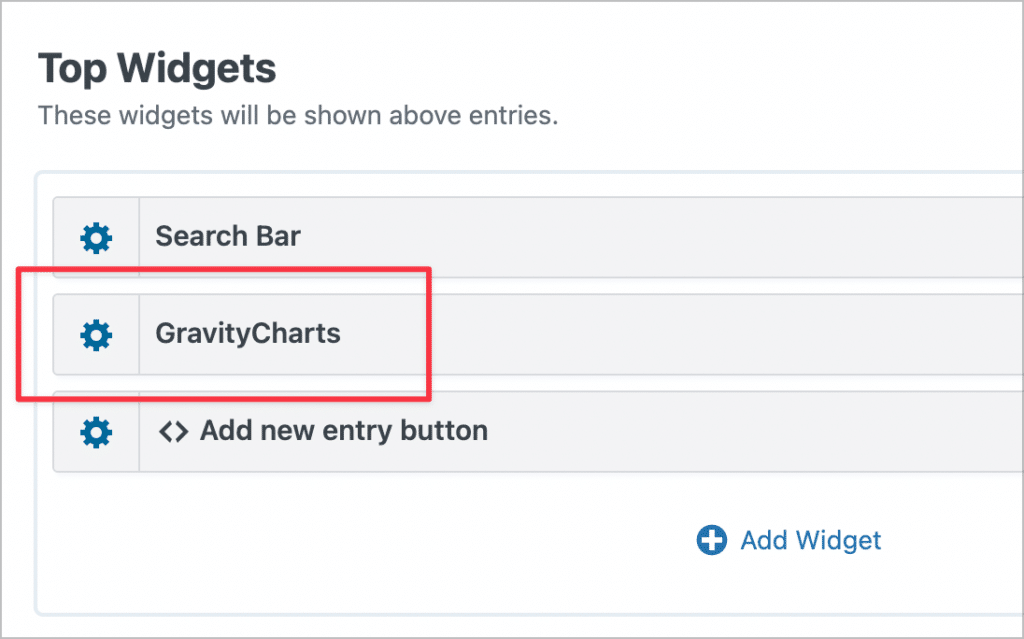
Next, we’ll add some widgets to the “Top Widgets” area of the View editor. Widgets are tools for navigating or enhancing Views. Here, we’ll add a search bar and a Custom Content widget.
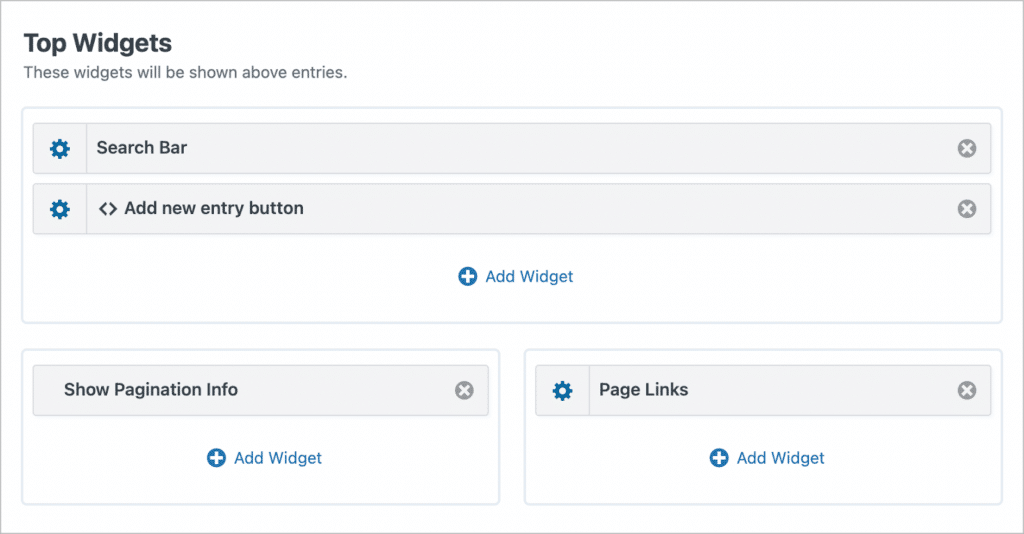
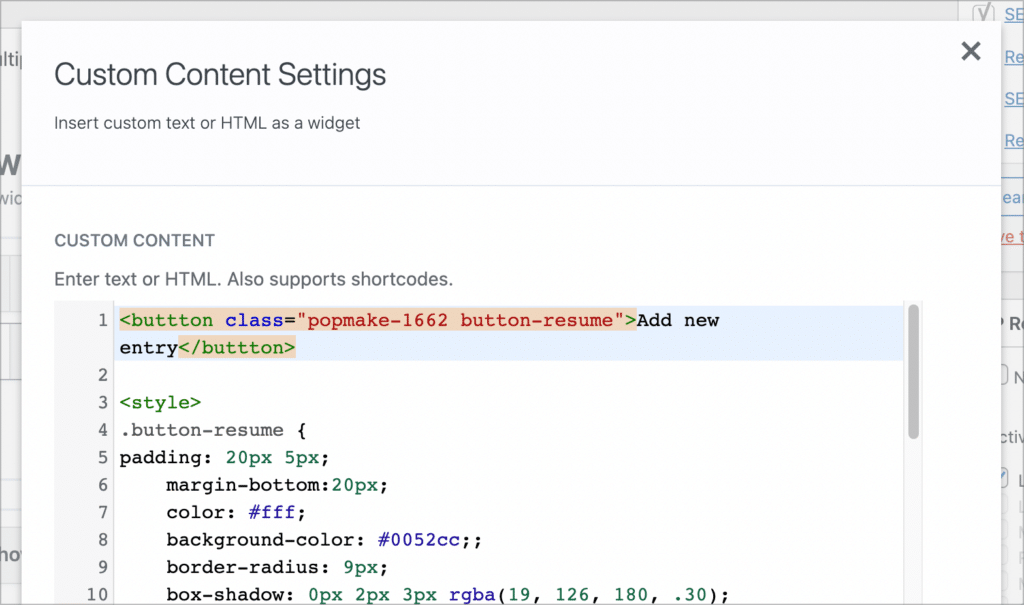
The Custom Content widget allows us to add HTML, merge tags or shortcodes to a View! We’re going to use it to create a button that opens our “workout log” form, allowing users to add a new entry to the tracker, without having to leave the page!
Here’s the code we used to create and style the button. Notice the button has the class “popmake-1662” — this is required to make the popup appear on click.
Here’s what this looks like on the front end:
After adding a button for opening the “Workout log” form, the next step is to configure the Single Entry layout.
Configuring the Single Entry Layout
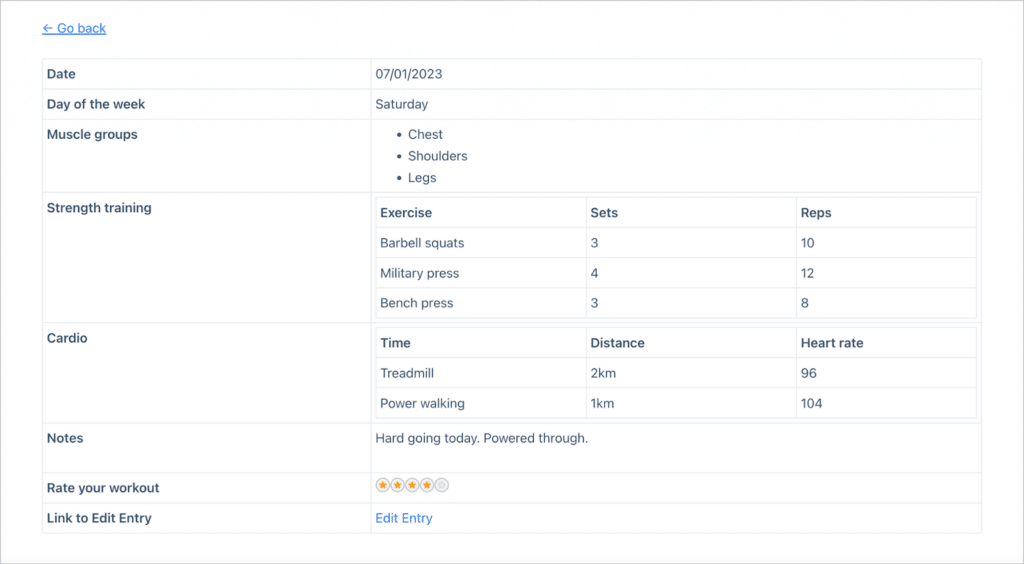
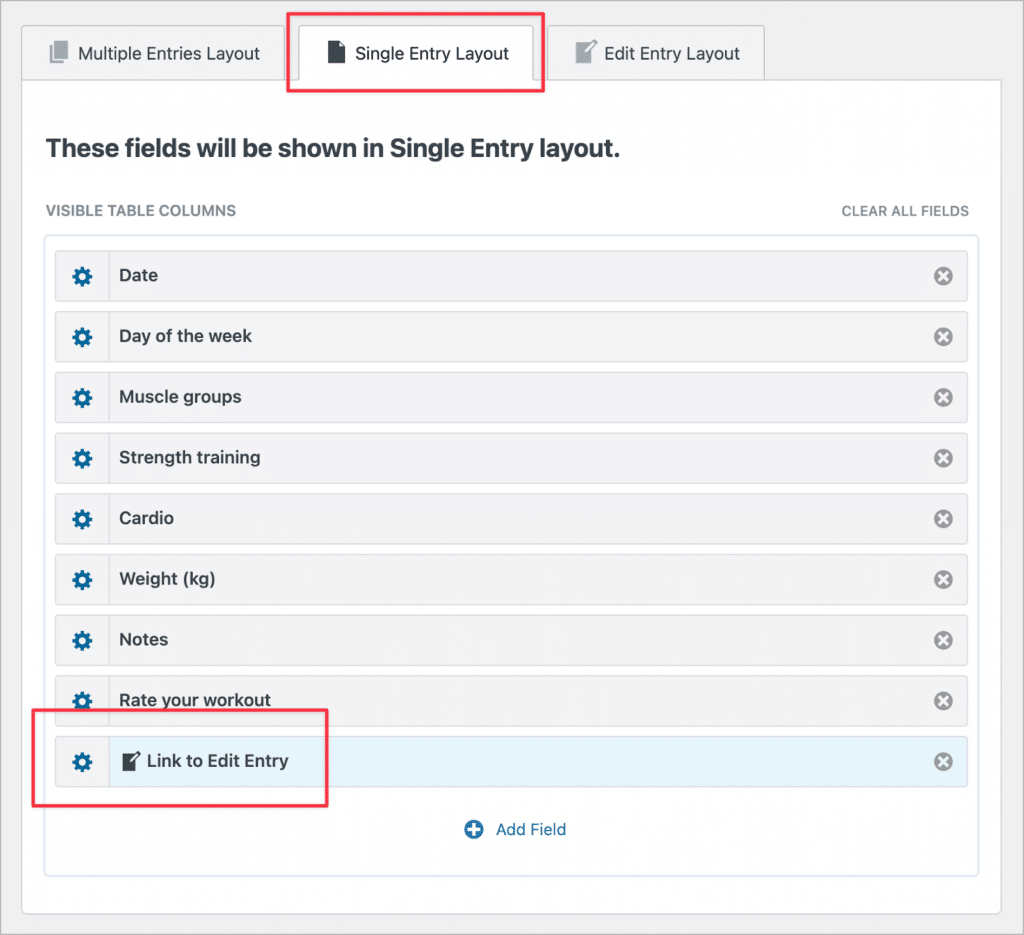
After adding fields to the Multiple Entries Layout, we can turn our attention to the Single Entry Layout. This is the page that displays additional information about an entry. In other words, it will show detailed information about a specific workout.
Here’s we’re going to add all of our form fields, including a link to the edit entry page.
Finally, we can configure the Edit Entry page, which allows us to edit our workout log from the front end.
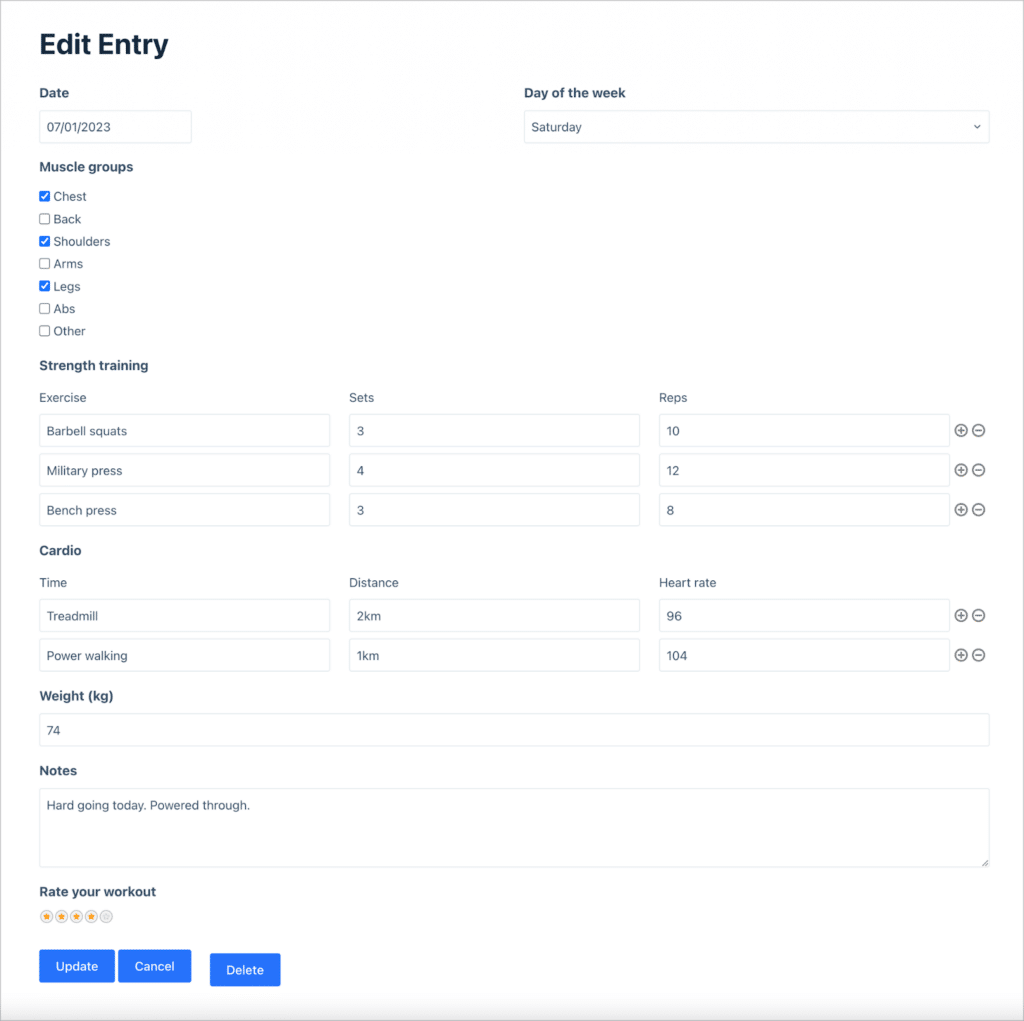
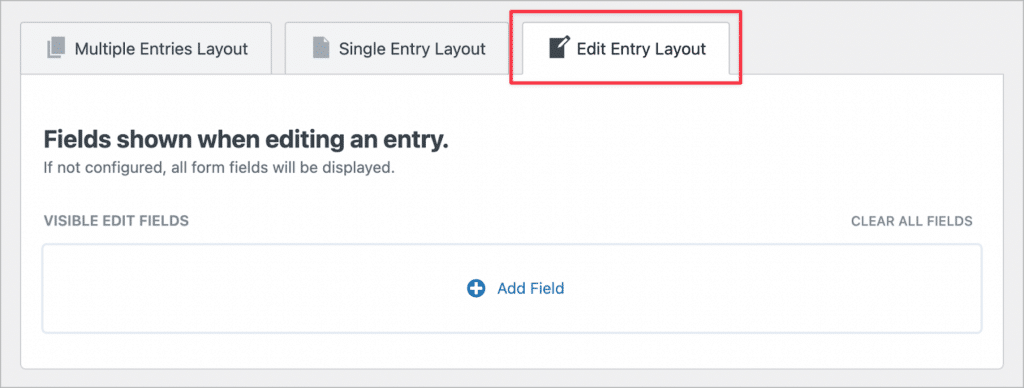
Configuring the Edit Entry Layout
We’re going to leave the Edit Entry layout blank (this is the default configuration). This way, every field will be editable from the front end!
Now that we’ve configured the Multiple Entries, Single Entry, and Edit Entry layouts, we need to modify the View Settings.
Adding export capabilities
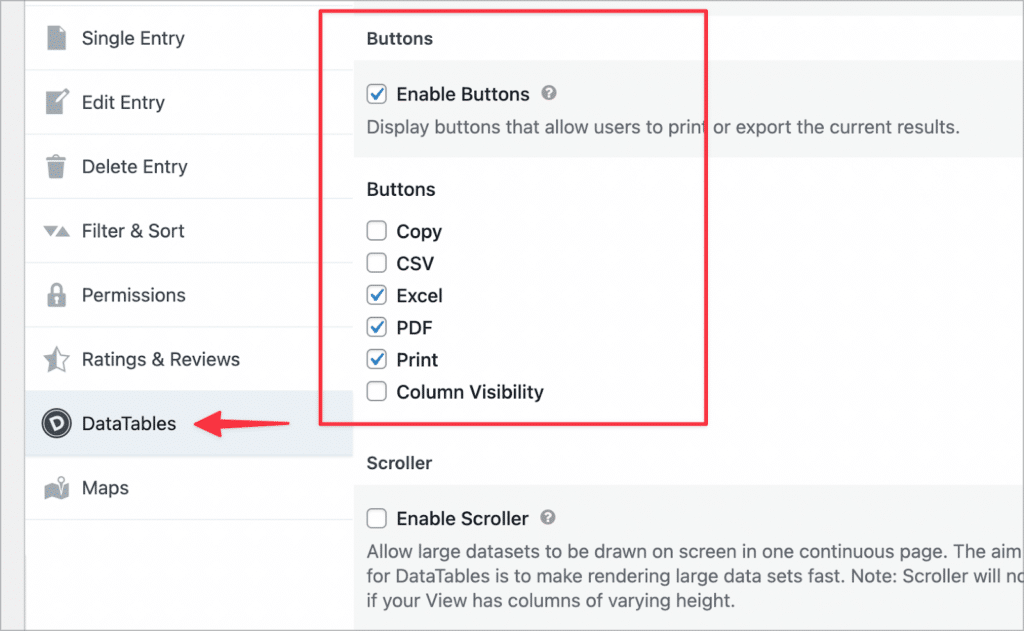
The GravityView DataTables layout allows us to export entries in a View to a variety of formats. But first, we need to enable this functionality in the View Settings.
Let’s scroll down to the Settings meta box at the bottom of the View editor. Next, we’ll click on the “DataTables” tab and then check the box labeled “Enable Buttons”. After that we can select which buttons to enable.
That’s it!
Bonus: Adding graphs and charts
We can take things further by adding graphs and charts to our fitness tracker. This adds a visual element to the data, making it easier to see our progress. To do this, we can use our plugin GravityCharts (which integrates with GravityView!).
Using GravityCharts, we can:
- Create a graph to visualize weight loss over time
- Track workout time
- Plot workouts per week, month or year
- Visualize the frequency of working out certain muscle groups
- And much more!
To get started, we’ll go to the form settings page, click on the “GravityCharts” tab and click “Add New” to create a new chart feed. After giving our chart a name, we’ll need to select a chart type. For this example, we’ll choose the “Line Area” chart.

After selecting a chart type, we need to configure the chart data options. Here we’ll configure a timeline chart that displays weight over time.

If we scroll down, we can see a live chart preview which updates in real-time as we make changes. We can also style our chart using the different tabs at the top.
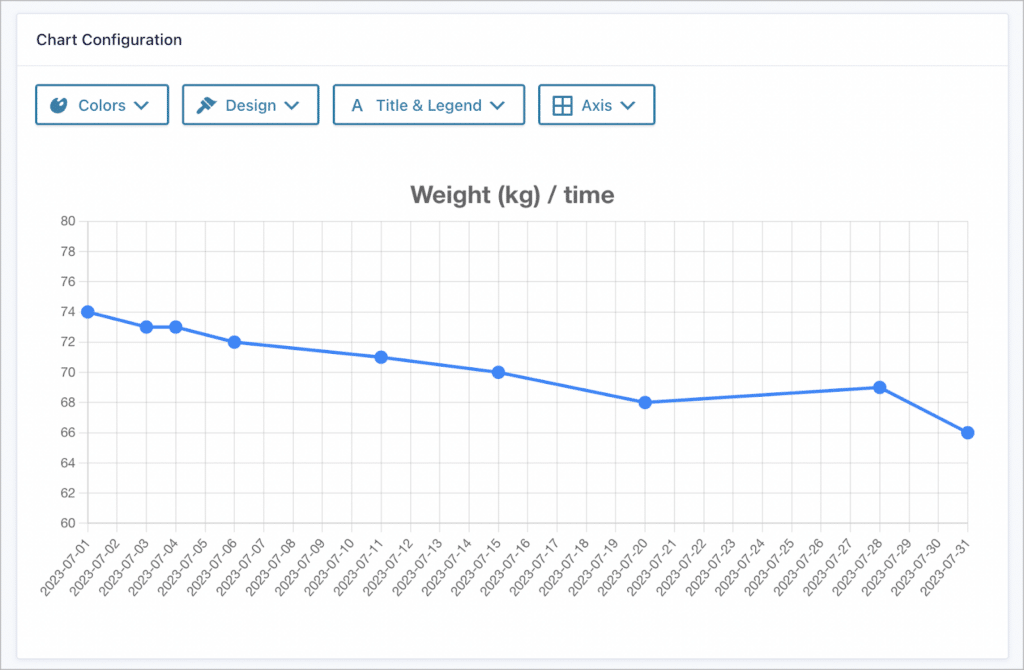
Now we can add our chart to the GravityView View editor using the GravityCharts widget.
Okay, here’s what our fitness tracker looks like on the front end after adding our chart:

That’s it! We successfully built a fitness tracker on WordPress using Gravity Forms and GravityView.
Build a custom WordPress fitness tracker now
In this tutorial, we showed you how to build a fitness tracking app on WordPress without any coding knowledge. By utilizing Gravity Forms and GravityView, you can build a custom tracker and take control of your fitness journey!
If you found this post helpful, read our tutorial on building a health log and meal tracker next!

Helpful tips right in your inbox.
Subscribe to get the latest articles, information on releases and helpful Gravity Forms tips!
More articles

Launch Log: Distance sorting for radius searches, DataTables search improvements, and import reliability fixes
The latest GravityKit releases add distance sorting to map searches, bring built-in search to DataTables, and fix GravityCharts and GravityImport edge cases.

WordPress page builder market share 2026: Elementor leads at 32.67%
Elementor reaches 32.7% of WordPress sites. WordPress Block Editor 20.6%, wpBakery 8.5%, Divi 5.7%. Latest HTTP Archive crawl, share-of-WordPress basis throughout.

Launch Log: GravityView 3.0, plus upgrades to Block MCP and GravityKit MCP
GravityView 3.0 lands with the new Vantage theme, frontend bulk actions, and AI-assisted View creation. This launch log also covers updates to GravityKit MCP, Block MCP, and Dashboard Views.