Published
•
Updated
Master surveys with Gravity Forms: Step-by-step guide for beginners
Build effective surveys with Gravity Forms using the Survey Add-On. Covers form setup, best practices for higher response rates, and tools for analyzing results.

Surveys are a great way to gather feedback, analyze trends, and make data-driven decisions—but building an effective survey can sometimes feel overwhelming.
That’s where Gravity Forms and its Survey Add-On come in. In this guide, I’ll walk you through how to create surveys with Gravity Forms, showcase best practices for improving response rates, and explore tools for analyzing and sharing your results.
Whether you’re gathering customer feedback, conducting market research, or polling customers, this tutorial will help you build a survey that gets results.
Download the free survey form example template now!
Import the template into Gravity Forms and customize as necessary.
Wanna try it?
Spin up a demo
See GravityCharts in action on its live demo site.

Which Gravity Forms license do you need for surveys?
The Survey add-on isn’t bundled with the Basic or Pro tiers — it’s an Elite-only add-on (and is also included with the Nonprofit license). That makes it one of the clearer feature differentiators when you’re deciding between Pro and Elite.
| License | Price (USD/year) | Sites | Survey add-on |
|---|---|---|---|
| Basic | $59 | 1 | No |
| Pro | $159 | 3 | No |
| Elite | $259 | Unlimited | Yes |
| Nonprofit | $129 | 3 | Yes |
Pricing reflects the Gravity Forms pricing page as of April 2026 — check the current figures before purchasing.
A few practical notes:
- Pro covers most general form-building. Payment integrations (Stripe, Square), Zapier, Dropbox, and conditional notifications all sit at the Pro tier. If the Survey dashboard is the only reason you’d upgrade, Elite is the cheapest official path.
- The Nonprofit license includes the Survey add-on at $129/year for three sites — less than Elite. Registered nonprofits can apply on the Gravity Forms nonprofit license page.
- Without an Elite or Nonprofit license, you can still build a survey-style form using dropdowns, radio buttons, and text fields — but you won’t get the dedicated survey field types (Likert, Rank, Rating) or the aggregated “Survey Results” dashboard described below.
How to use Gravity Forms for surveys
Gravity Forms is a powerful form builder and data management platform for WordPress. Using Gravity Forms, it’s quick and easy to set up a survey that you can host on your website and share with your users!
The Gravity Forms Survey add-on makes this even easier by adding specialized field types, and a dashboard where you can track survey results. The Survey add-on is included with an Elite or Nonprofit license.
Let’s dig into the Survey add-on and how it works!
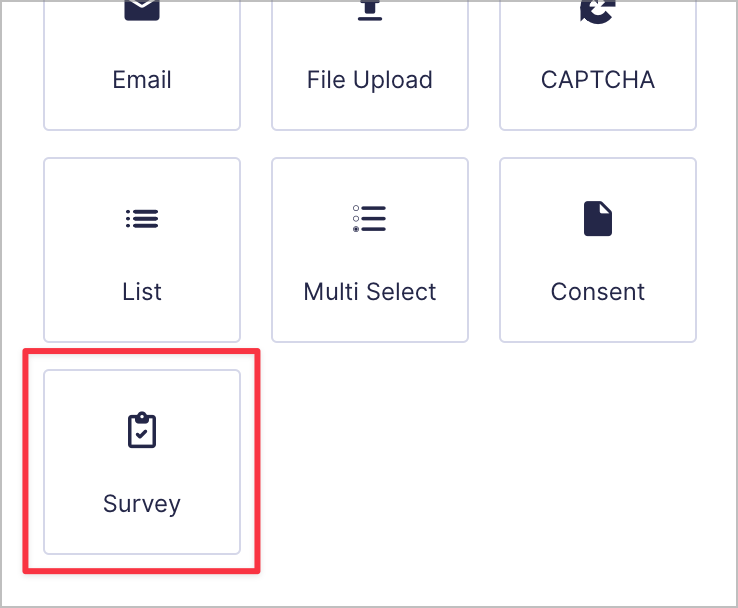
After installing the add-on, you’ll see a new “Survey” field in the Gravity Forms editor. This is a specialized field type that you can use to record survey responses and track the results. You’ll find this field under the “Advanced Fields” tab.
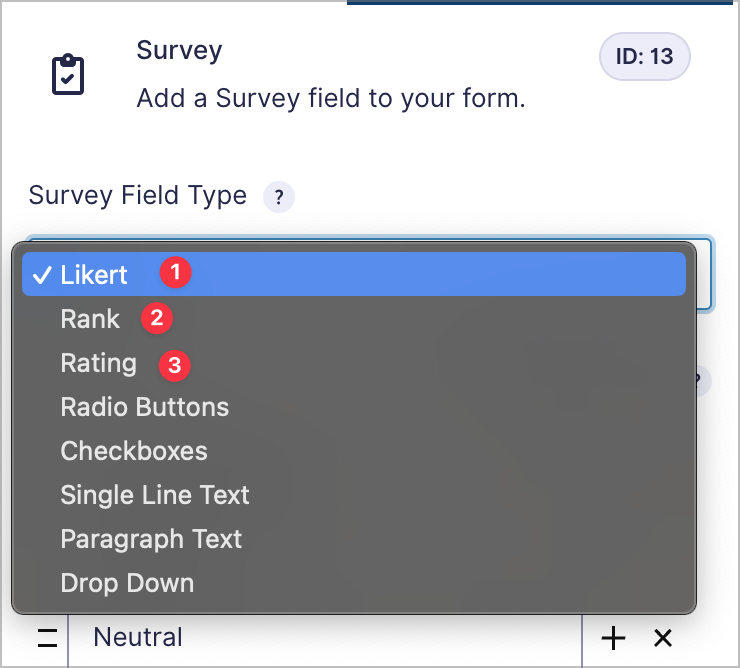
After adding the field to your form, you’ll see a dropdown in the field settings for selecting a field type. This enables you to choose how the field functions on the front-end. The survey field supports a range of field types, including three new ones that aren’t available in the standard Gravity Forms editor. I’ll touch on those later on.
But first, you may be wondering why you should use a survey field instead of a regular “Checkboxes” or “Single Line Text” field, for example. After all, these are available as standalone fields in the Gravity Forms editor.
Well, the reason it’s better to use survey fields for ALL your survey-related questions is because these fields will track responses and aggregate results in a special dashboard on the backend. This will make it much easier to analyze the results of your survey after sending it out! I’ll dive into the dashboard later on.
Now let’s talk about the three special field types added by the Gravity Forms Survey add-on: Likert, Rank, and Rating. These fields are designed specifically for gathering structured feedback and are far more powerful than a basic “Dropdown” or “Checkbox” field when it comes to analyzing survey responses.
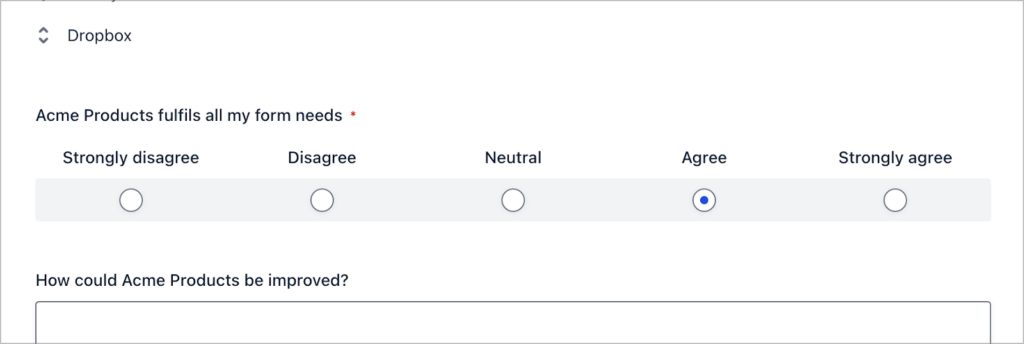
1. Likert
The Likert field lets you gauge opinions or attitudes by asking users to rate their agreement or satisfaction across a scale. Think of it as a tool for measuring nuanced responses to statements like, “I’m satisfied with the quality of support.”
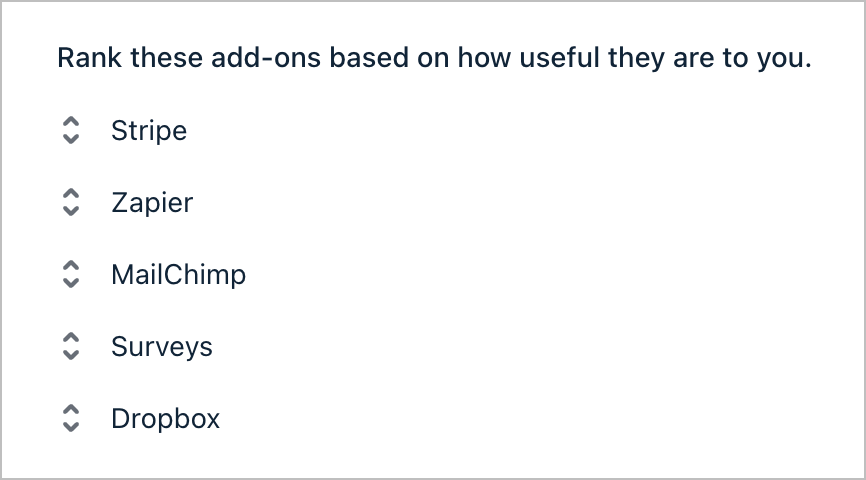
2. Rank
The Rank field enables respondents to prioritize options by dragging and dropping items into their preferred order. This is perfect for questions like, “Rank these features in order of importance.”
3. Rating
Finally, the Rating field lets users rate something on a scale, represented by stars. It’s great for questions like, “How would you rate our service?”

Using these survey fields ensures that responses are aggregated and analyzed in the survey results dashboard, making it a breeze to extract meaningful insights!
Survey best practices
Creating an effective survey isn’t just about asking the right questions—it’s about encouraging participation to deliver actionable insights. Here’s a quick list of best practices to help you get the most out of your Gravity Forms surveys:
Use a mix of question types
According to Survicate, closed-ended questions are easier to analyze (and quicker to answer), but open-ended questions are important for obtaining more detailed, qualitative insights. For example, you could follow a Likert scale question with an optional text field asking users to explain their answer.
Break longer surveys into sections
Avoid overwhelming respondents with a single, lengthy form. Instead, use the Gravity Forms “Section” field to split your survey into multiple pages. This will keep things more manageable, ensuring users aren’t overwhelmed. Multi-page forms also include progress indicators to show users how far they have come, improving overall completion rates.
Keep it focused
Ask only the questions you truly need to answer your objectives. Long, unfocused surveys can discourage participation. In fact, recent research from Survey Monkey indicates that surveys are becoming shorter on average, with most containing 5 or fewer questions per page.
Ensure your survey is mobile-friendly
With many users accessing surveys on mobile devices, it’s essential to design forms that look great and function smoothly on smaller screens. Luckily, if you’re creating surveys using Gravity Forms, you won’t have any issues with mobile responsiveness! Pro tip—use the Orbital theme to give your forms a sleek, modern look on both desktop and mobile.
Test your survey before sending it out
Preview your form and test it with a small group before sharing it widely. SurveySparrow recommends sending your survey to stakeholders within your organization first to get their opinion on the wording and order of the questions.
If your survey is built using Gravity Forms, you should also ensure that conditional logic, multi-page navigation, and survey fields like Likert scales are working correctly.
Whether you’re conducting employee feedback surveys, customer satisfaction polls, or product research, these tips will set you up for success!
How to create a survey form in Gravity Forms
Start by installing the Survey add-on. You can do this by hovering over “Forms”, clicking “Add-Ons”, scrolling down to “Survey” and clicking “Install”. This add-on is only available to Elite or Nonprofit license holders. If you don’t have an Elite or Nonprofit license, you can still create surveys, but you will have to analyze them manually (you won’t be able to leverage the survey dashboard for easy analysis!).

After installing the add-on, hover over “Forms” in your WordPress menu and click “New Form”. Now you can start building your survey using the dedicated “Survey” field. Simply drag and drop it onto the editor and select a field type in the settings.
The visual form builder enables you to reposition fields using drag-and-drop, adjust widths, configure conditional logic, and much more!
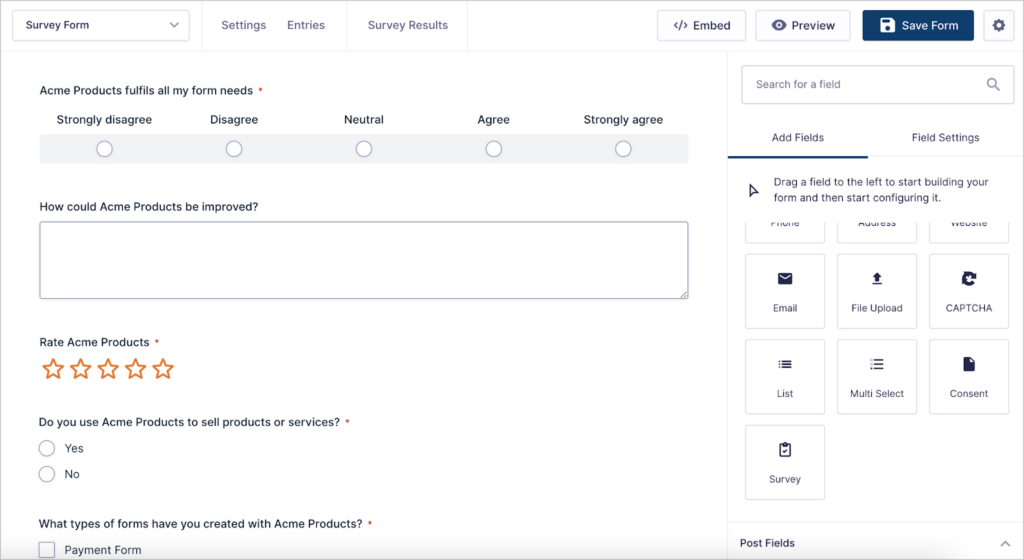
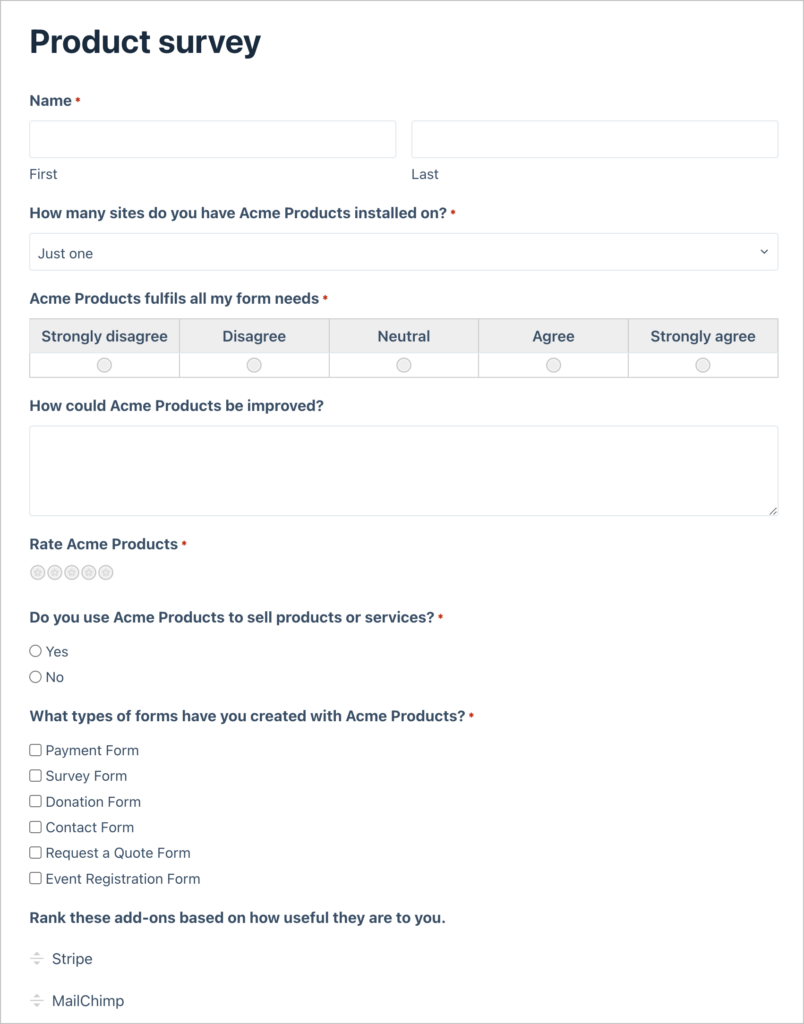
When you’re done, save your form and click “Preview” to see what it looks like. When you’re happy with your survey, embed it on a page using the “Gravity Forms” block in WordPress! Here’s an example of a completed survey form:
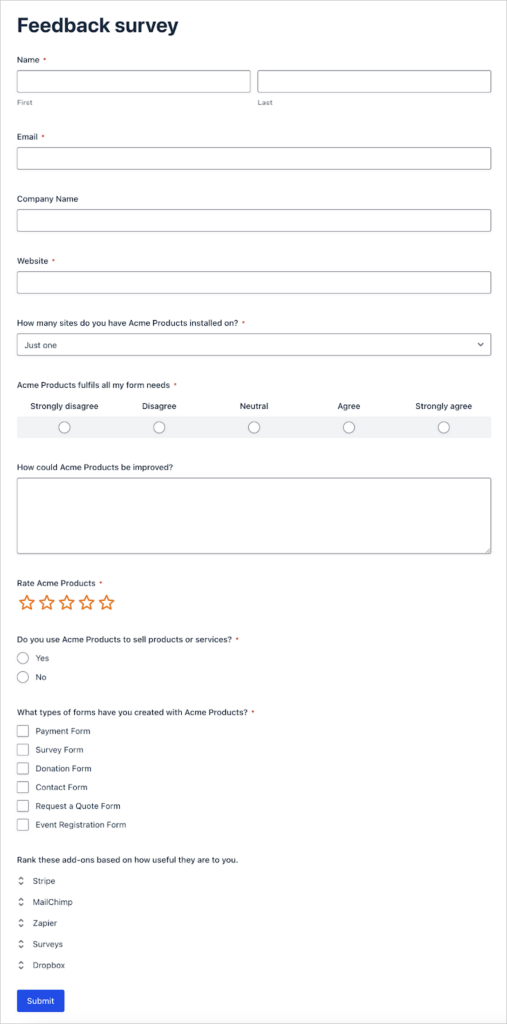
Pro tipLooking for a survey example? Download our free Gravity Forms survey template!
Sharing the survey with your users
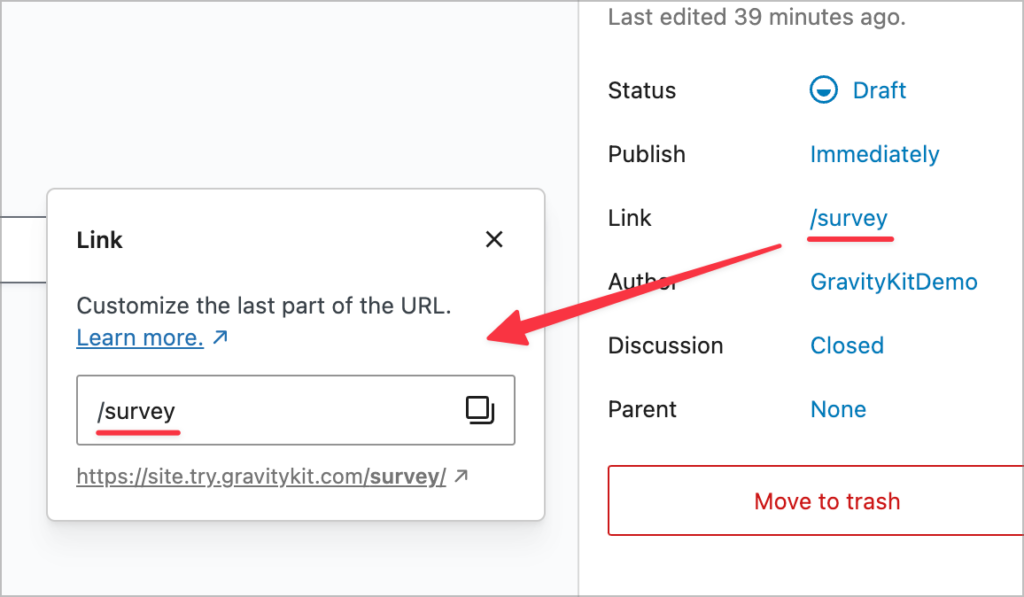
The advantage of using Gravity Forms to create surveys is that you have full control over your forms and submissions. After embedding your survey form on a page, you can easily share it with users by sending them a link to that page.
By default, WordPress uses the title of your page as the URL. However, you can easily modify this by clicking on the “Link” property in the Gutenberg side panel and editing the slug.
What’s more, if you want to modify your survey in any way, you can simply edit the form in the backend and the changes will automatically take effect. Just be careful when deleting fields, as you don’t want to lose important data.
Analyzing survey results in Gravity Forms
The Survey add-on adds a handy dashboard to Gravity Forms where you can view the aggregated responses to your survey and analyze the results. To open the dashboard, simply edit your form and click the “Survey Results” tab at the top.
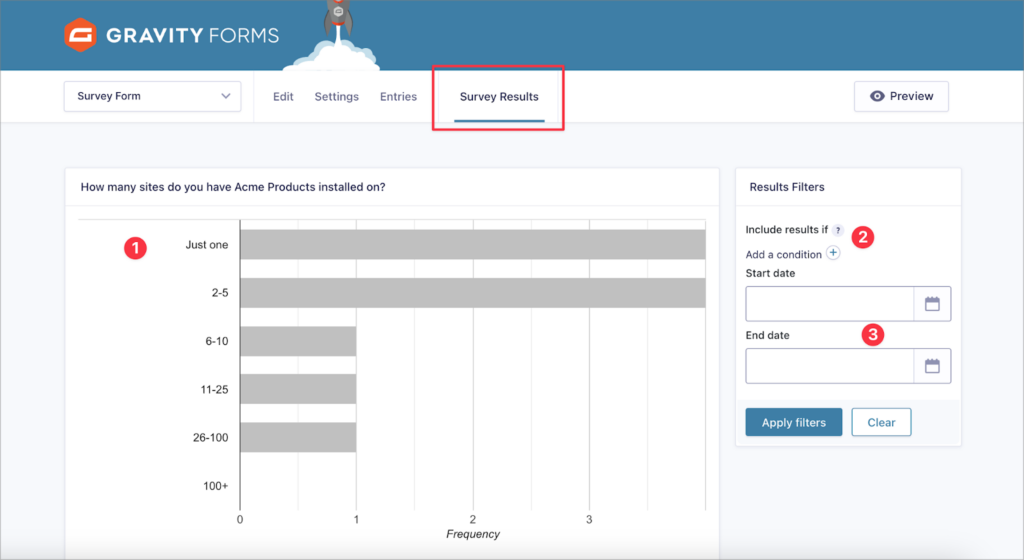
Here’s a breakdown of the dashboard:
- Aggregated survey results: Here you can view the aggregated results from your survey. If your survey includes open-ended questions, you can also view those answers here.
- Conditional logic filters: Here you can filter survey responses based on conditions that you set. Add one or more filters to drill down into your data and extract meaningful insights.
- Date filter: Filter survey responses by date. This is handy for removing older submissions from the overall scoring.
Now let’s take a look at how to populate survey fields dynamically.
Populating survey fields dynamically
Did you know Gravity Forms allows you to pre-fill form fields using dynamic population? This feature improves the user experience and streamlines your workflow. For instance, if you’re surveying customers about your latest product launch, you can dynamically pre-populate fields with their personal information—like name and email—making it quicker and easier for them to complete the survey!
To learn more about how this works, read our ultimate guide to dynamic field population in Gravity Forms.
Displaying survey results on the front end
So far we’ve covered how to create effective surveys in Gravity Forms, how to share them with your users, and how to analyze the results. However, survey submissions and results are only available in the WordPress admin dashboard for users with admin access. What if you want to show this information on the front-end of your site?
That’s where GravityKit comes in! GravityKit provides a toolkit of powerful add-ons for Gravity Forms, enabling you to display data on the front-end, build web apps, display charts, create reports, and much, much more.
Displaying individual submissions using GravityView
GravityView is an add-on for Gravity Forms that enables you to display form entries on the front-end using customizable layouts and interfaces. If you need an easy way to visualize survey submissions, you can use GravityView to display them in a table with searching, sorting and filtering capabilities!
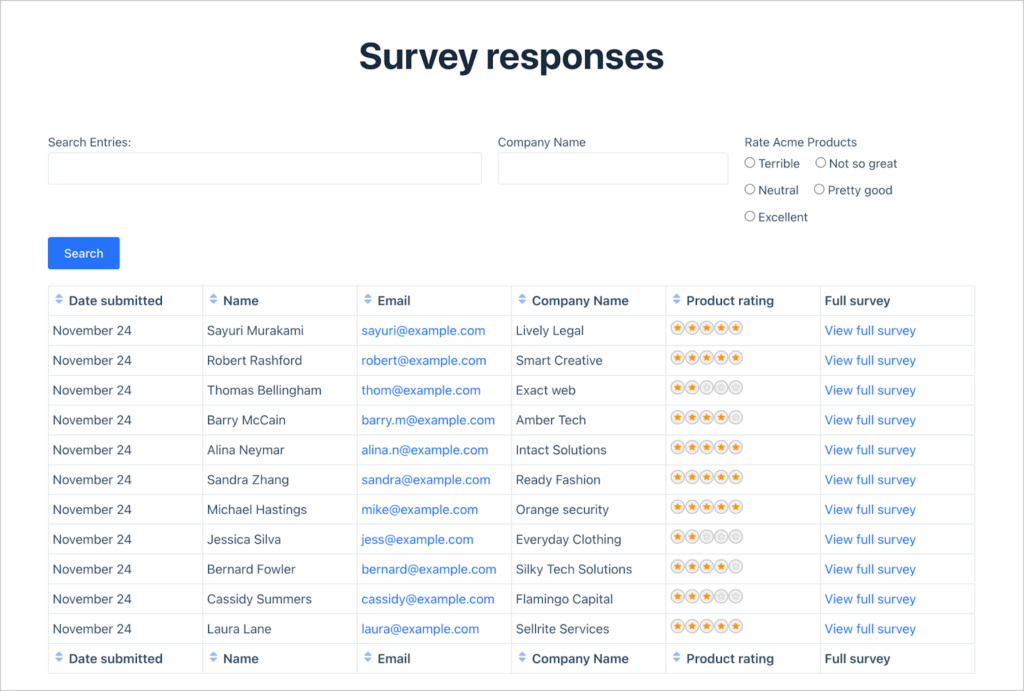
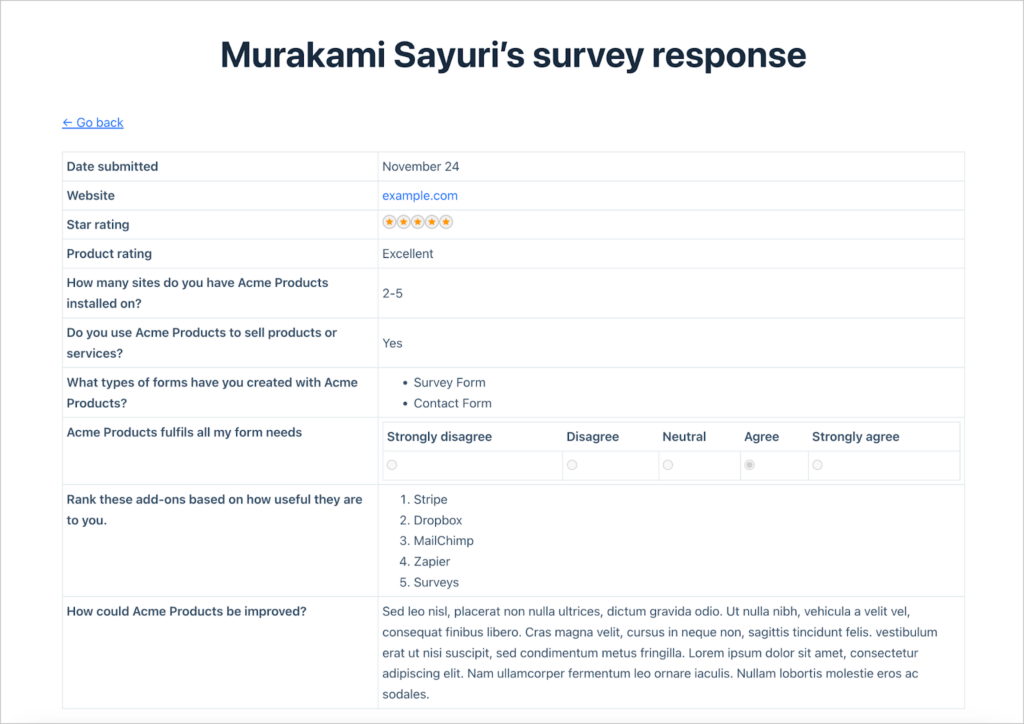
GravityView’s Single Entry page also enables you to view individual form submissions. This makes it easy to share responses with other team members, or make your data openly accessible.
So, if you’re looking to build a more robust dashboard for recording and analyzing your survey submissions, give GravityView a try!
Creating graphs with GravityCharts
Using the GravityCharts add-on, you can visualize your Gravity Forms survey results using customizable charts and graphs! GravityCharts includes an array of styling options and chart types to choose from, giving you plenty of options for visualizing your survey data.
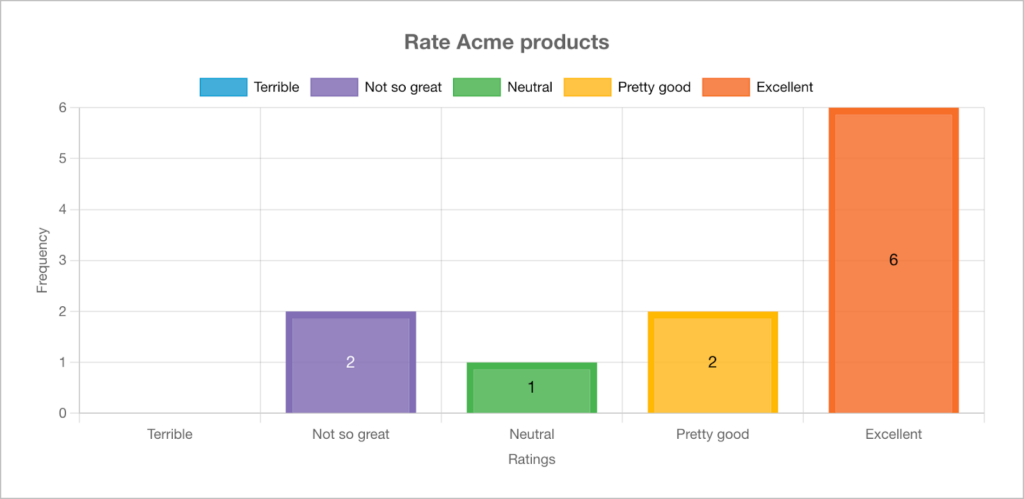
After creating your charts, you can embed them using a block or shortcode. Dynamic charts will update as you receive new entries, enabling you to show live survey results directly on the front-end of your site.
Calculate the total number of respondents using GravityMath
GravityMath enables you to perform advanced calculations on your Gravity Forms data using a simple shortcode. The plugin supports a range of mathematical operations and also integrates with GravityView.
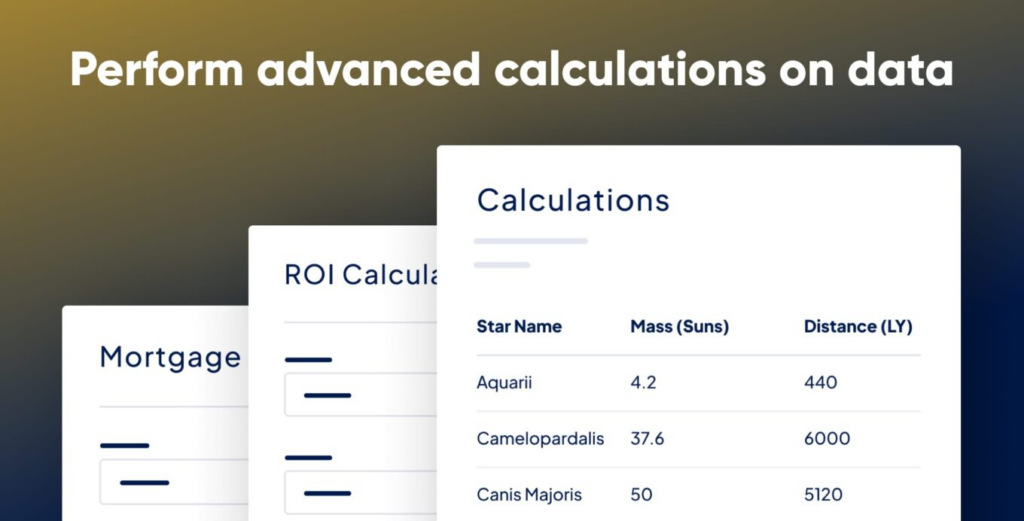
Note that GravityMath does not integrate with the Gravity Forms Survey add-on. However, the shortcode does enable you to perform calculations on numerical fields, calculate the total number of respondents, and display summary reports of your data. Learn more in this mortgage calculator example.
Sharing the results of your survey
So you’ve created a survey, sent it out and received responses. What if you need to share that data with other team members or organizations? Perhaps you want to send that data to Excel or your Dropbox? Enter GravityExport.
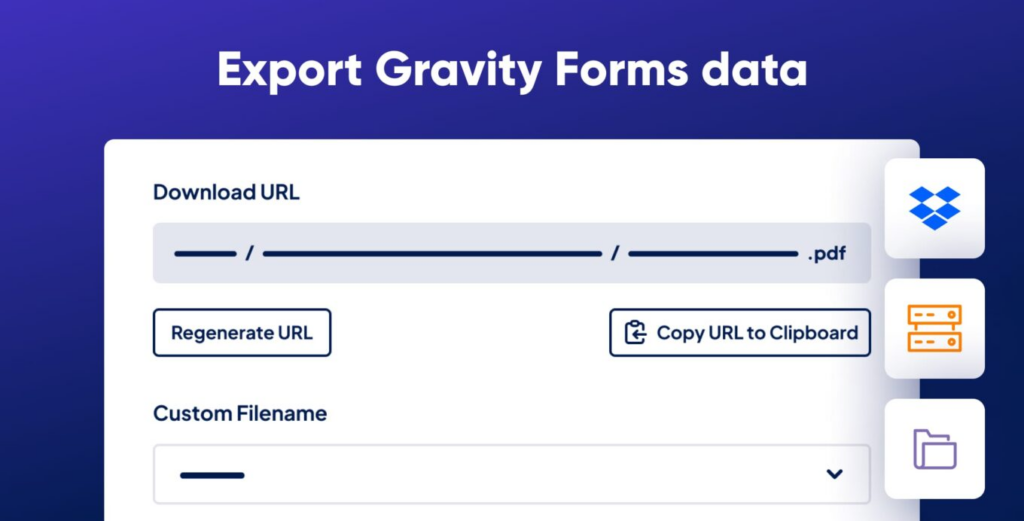
GravityExport makes it easy to create custom reports in Gravity Forms. You can export submission data to CSV, Excel or PDF! You can also send data to external storage locations.
GravityExport also makes it easy to share reports by providing a secure URL that you can send to anyone that needs the data. This enables you to share survey data without granting admin privileges.
Start crafting your survey today!
Gravity Forms is more than just a form builder—it’s a powerful tool for creating and managing surveys. By combining the Survey Add-On with GravityView, GravityCharts, and GravityExport, you can take your survey workflow to the next level.
From building effective forms to analyzing data and displaying results on the front end, the Gravity Forms ecosystem offers everything you need for successful surveys.

Helpful tips right in your inbox.
Subscribe to get the latest articles, information on releases and helpful Gravity Forms tips!
More articles

Launch Log: Distance sorting for radius searches, DataTables search improvements, and import reliability fixes
The latest GravityKit releases add distance sorting to map searches, bring built-in search to DataTables, and fix GravityCharts and GravityImport edge cases.

WordPress page builder market share 2026: Elementor leads at 32.67%
Elementor reaches 32.7% of WordPress sites. WordPress Block Editor 20.6%, wpBakery 8.5%, Divi 5.7%. Latest HTTP Archive crawl, share-of-WordPress basis throughout.

Launch Log: GravityView 3.0, plus upgrades to Block MCP and GravityKit MCP
GravityView 3.0 lands with the new Vantage theme, frontend bulk actions, and AI-assisted View creation. This launch log also covers updates to GravityKit MCP, Block MCP, and Dashboard Views.