Published
•
Updated
How to create WordPress posts or pages from Gravity Forms entries
Turn Gravity Forms submissions into WordPress posts using three methods: the Advanced Post Creation add-on, built-in Post Fields, or GravityView for flexible front-end content displays.
In this article, I explore three powerful ways to transform user-submitted entries in Gravity Forms into WordPress posts or custom content displays.
We’ll cover:
- Using the Advanced Post Creation Add-On
- Leveraging built-in Post Fields
- A bonus method with GravityView for even more flexibility
Whether you’re building a guest post system, collecting user-generated content, or streamlining article submissions, these tools make it easy. Let’s dive in!
1. Use the Gravity Forms Advanced Post Creation add-on
The Gravity Forms Advanced Post Creation Add-On enables you to turn user-submitted form entries into posts on your website. The add-on makes this simple by adding a new “Post Creation” feed option to Gravity Forms.
When configuring a new Post Creation feed, you can map fields from your form to specific areas of a post or page. This works with any Gravity Forms field type! Let’s go through an example.
Take a look at the below form. It’s got four fields:
- Post title (Single Line Text field)
- Post content (Paragraph field)
- Featured image (File Upload field)
- Category (Drop Down field)
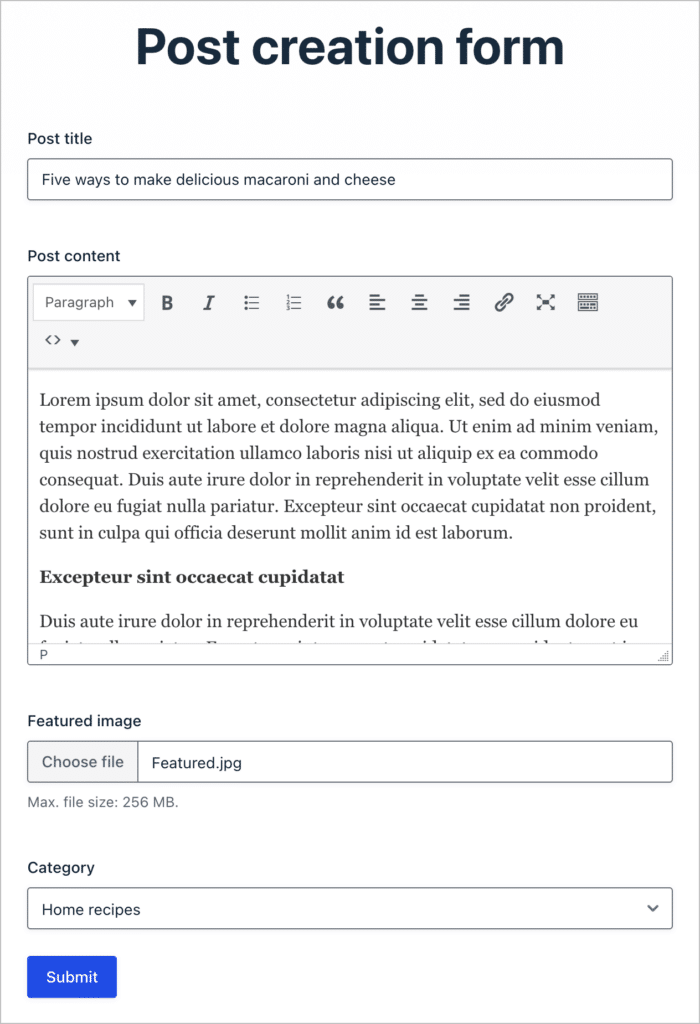
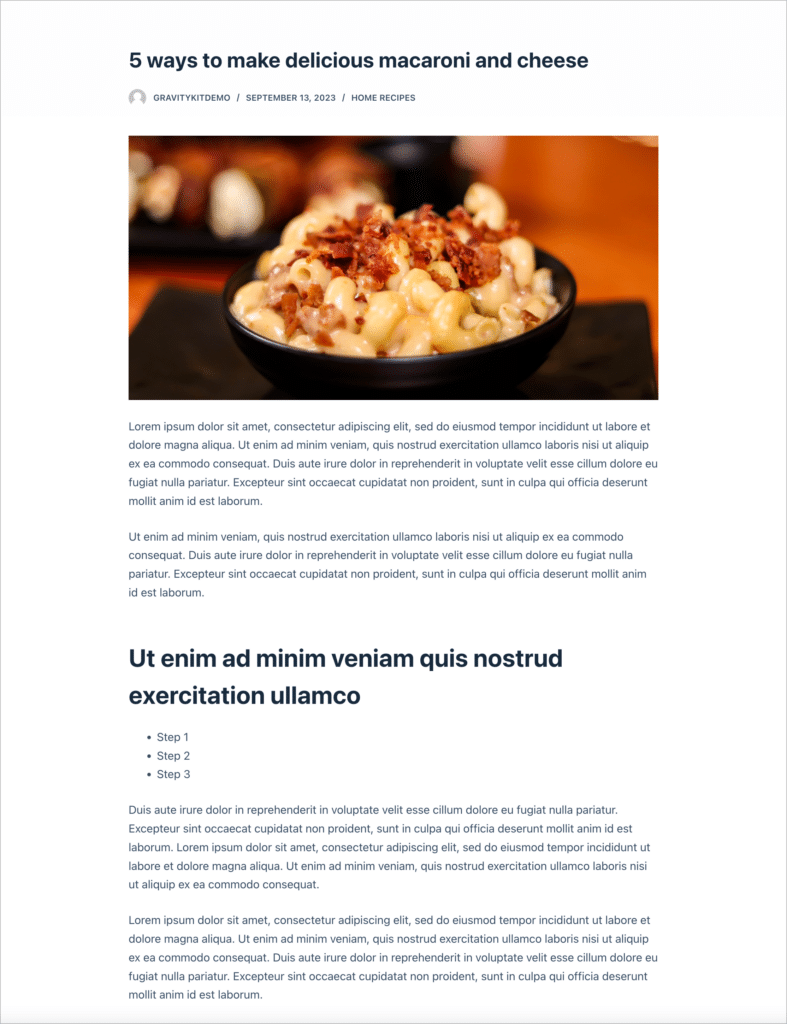
By configuring a Post Creation feed we can turn user-submitted submissions into a post or page on our website!
Creating a the Post Creation feed
To create a new Post Creation Feed, we’ll go to the form settings page by hovering over our form, select “Settings” and then click “Add New”.
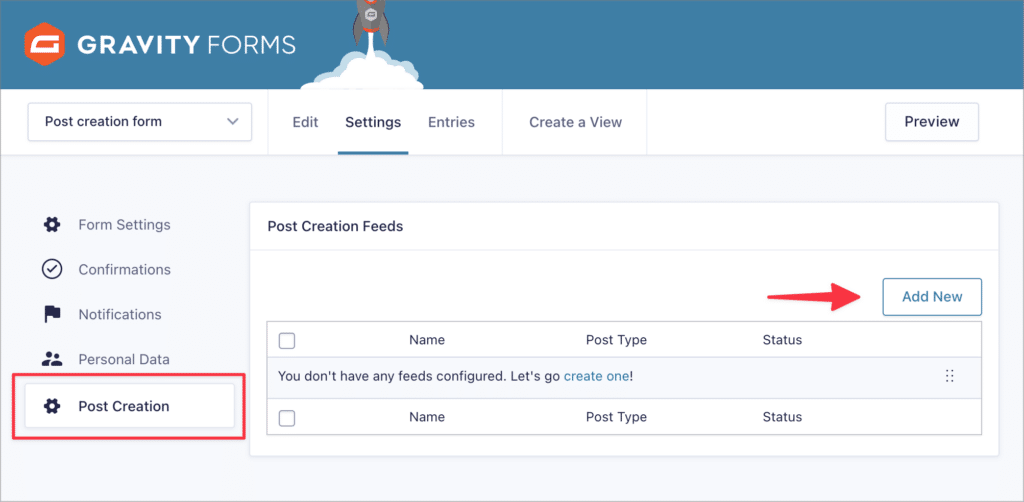
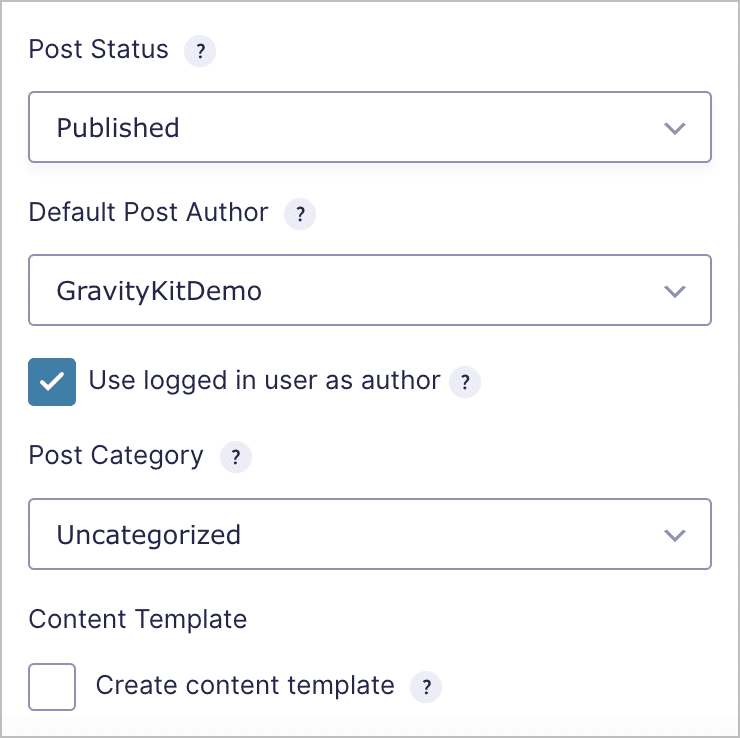
In the feed settings, we can choose whether to create a post or page, select a status and much more.
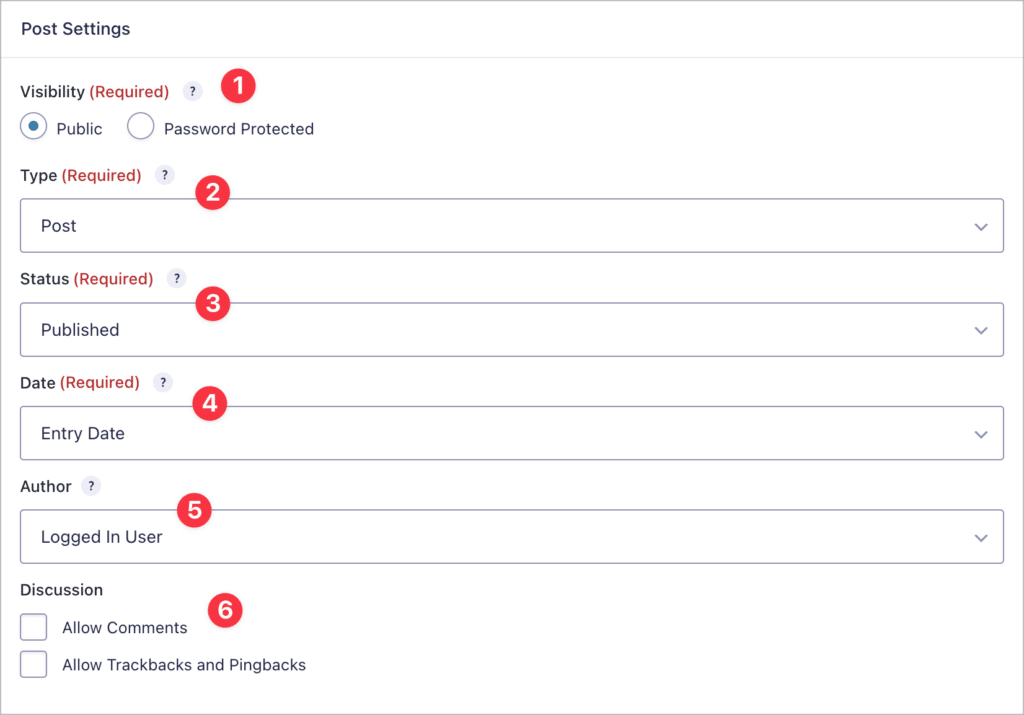
Let’s go through each option in more detail:
- Visibility: Select whether you want the generated post to be public (i.e., viewable by anyone on the site), or password protected. If you choose “Password protected”, another field will appear prompting you to set a password.
- Type: Here you can choose whether to create a WordPress page or post when a user submits your form. You can also choose a custom post type such as a WooCommerce product!
- Status: This option allows you to set the default status of new posts. There are several options to choose from, including Published, Draft, Pending, Private and more.
- Date: Here you can specify a date and time for when you want the post to be published. If you want the post to be published immediately after submission you can set the date to the entry date. Alternatively, you can set a custom date (this can be specific such as “22/09/2021” or relative such as “next week”).
- Author: Here you can set the author of the post. You can either choose the logged-in user or select a specific user on your site.
- Discussion: The Advanced Post Creation Add-On also gives you the ability to allow comments and/or trackbacks and pingbacks on your posts.
Next, scroll down to configure the Post Content. Here you can set the post title, body content, and featured image. In the “Title” and “Content” fields, you can use merge tags to dynamically display the information submitted by the user in their entry.
You can also select file upload fields for upload to the WordPress Media Library.
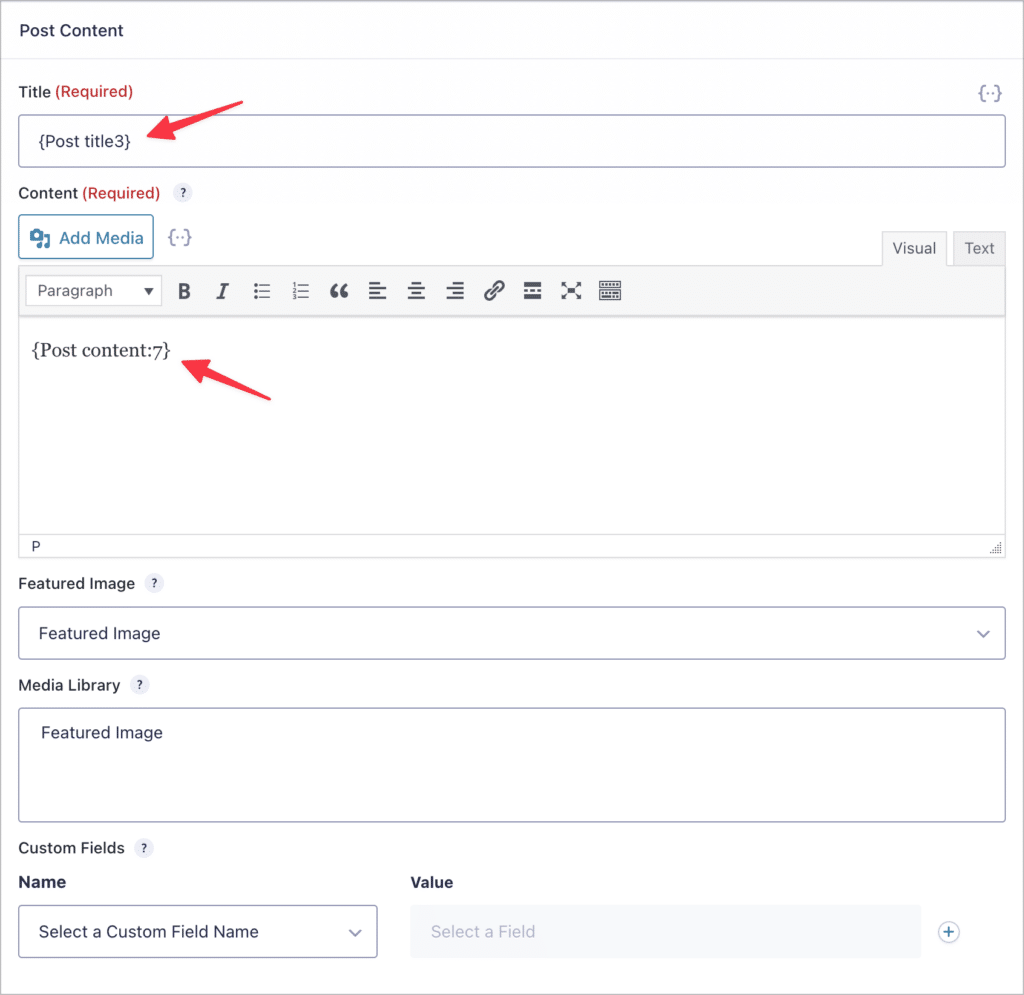
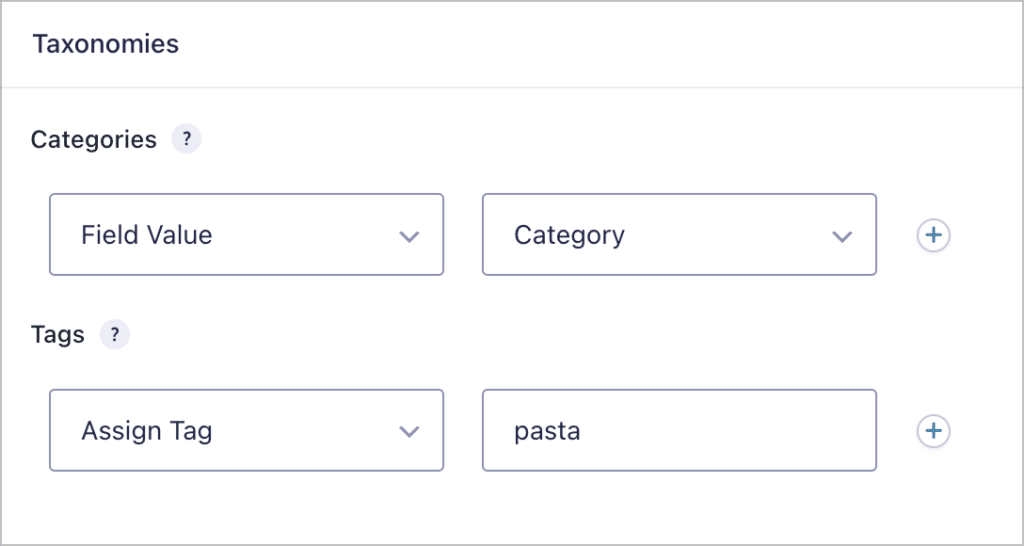
Finally, the “Taxonomies” section allows you to set the post category and tags. You can either choose to map these to fields in your form, or you can specify a custom value.
When you’re finished setting up your Post Creation feed, scroll down and click “Save Settings”.
When you’ve configured the Post Creation feed, test it out by filling out the fields and submitting your form. You should see a new post or page that reflects the information in your submission.
That’s it!
💡 Pro tip: Did you know you can also turn Gravity Forms entries into custom post types? Read our ultimate guide to using Gravity Forms with custom post types and fields.
2. Create posts in Gravity Forms using Post fields
While the Advanced Post Creation Add-On is the best way to create user-submitted posts in Gravity Forms, you can also do it using built-in Post fields. While the APC add-on requires you to have an Elite license, Post fields are part of the core Gravity Forms plugin.
You can find these fields in the form editor under “Post Fields”.
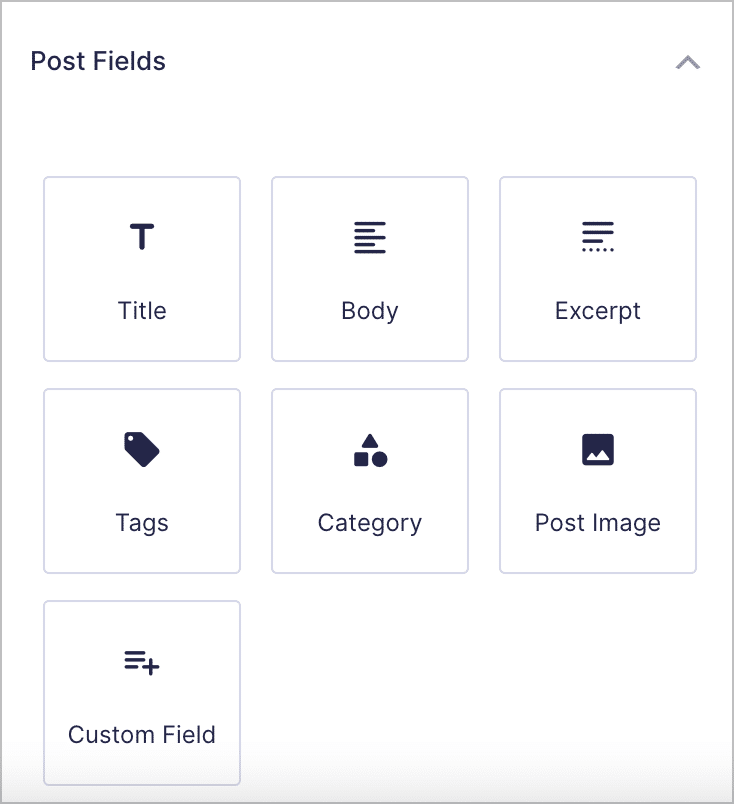
As you can see, there are seven different Post Fields. Let’s take a look at each one in more detail:
Setting the post title
The “Title” field allows the user to specify a title for the post. In the field settings, you can set the “Author”, “Post Status”, “Category”, and “Post Format”.
The “Post Title” field also gives you the ability to set a “Content Template”. Enabling this allows you to use merge tags to populate the post title with dynamic content. This lets you do things like add the author’s name to the title.
Setting the post body
The “Body” field allows the user to submit content that will be displayed in the body of the post. Like the “Title” field, it also allows you to set the post “Category”, “Author”, “Post Status”, and “Format”. Changing one of these options in the body will update it in the title as well!
The “Post Body” field also gives you the ability to add a Content Template. This allows you to use merge tags to display images and other user-submitted content in the body of the post.
Setting the post excerpt
The “Excerpt” field allows the user submitting the form to write their own post excerpt. In WordPress, exceprts are usually short summaries of posts that appear on the main blog page, preventing the need to display the entire content of the post.
Setting the post category
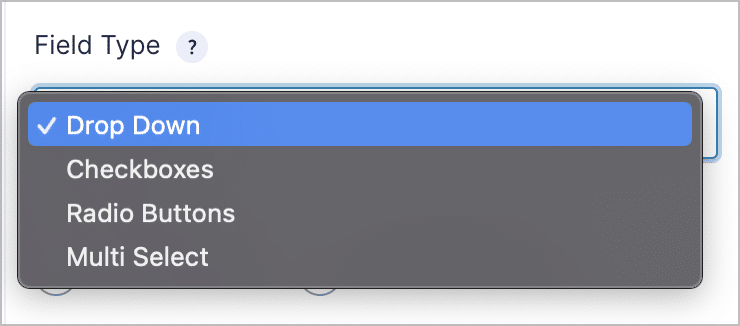
Adding a “Category” field to your form allows the user to specify the post category when submitting new posts. In the field settings, you can choose which categories should be visible to the user. You can also specify the field type (either Drop Down, Checkboxes, Radio Buttons, or Multi Select).
Setting the post tags
The “Tags” field allows the user the specify tags for their post. Tags are a good way to organize content based on keywords or subtopics. In the field settings, you can also specify the field type (either Single Line Text, Drop Down, Checkboxes, Radio Buttons, or Multi Select). If you decide to use “Single Line Text”, the tags need to be comma-separated.
Setting post images
The “Post Image” field allows the user to upload an image for their post. These can also be included in the post body by using the Content Template functionality.
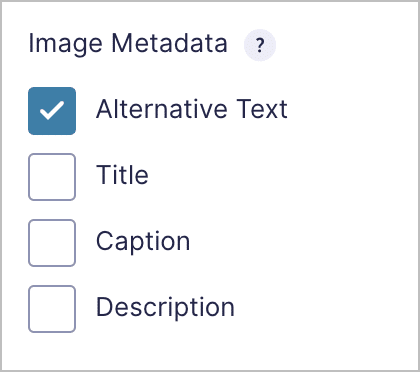
You can also add image metadata fields by checking the box next to the metadata you want to include. For example, if you check “Alternative Text” then a text box will show up underneath the “Post Image” field allowing the user to specify alternative text for that image. Alt text is important for accessibility reasons.
You can also choose a “Post Image” field to use as the featured image by checking the box that says “Set as Featured Image” in the Field Settings.

Creating custom post fields
The “Custom Field” field allows the user to submit content that will be stored in a custom field. Custom fields in WordPress provide a simple way to add related data to a particular post.
Okay, so far we’ve covered two different ways to create user-submitted posts in Gravity Forms. Both methods work well and will allow you to create simple pages and posts from your form submissions.
However, what if you want more control over the layout of your data, and more flexibility to build different interfaces, or full dynamic web applications, you’ll need to use GravityView!
Bonus: Display user-submitted content using GravityView
GravityView is an add-on for Gravity Forms that allows you to display form entries on the front end and build dynamic web applications using drag-and-drop! Let’s take a look at some examples…
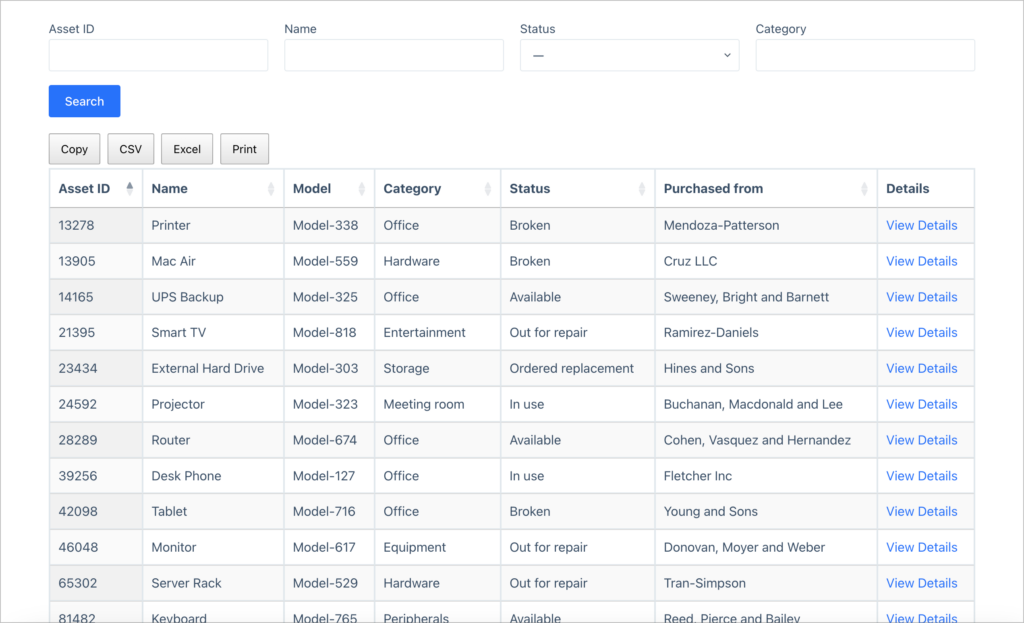
Create a table of form entries
Using GravityView’s table layout, you can easily display user-submitted form entries in a table, like the one below.
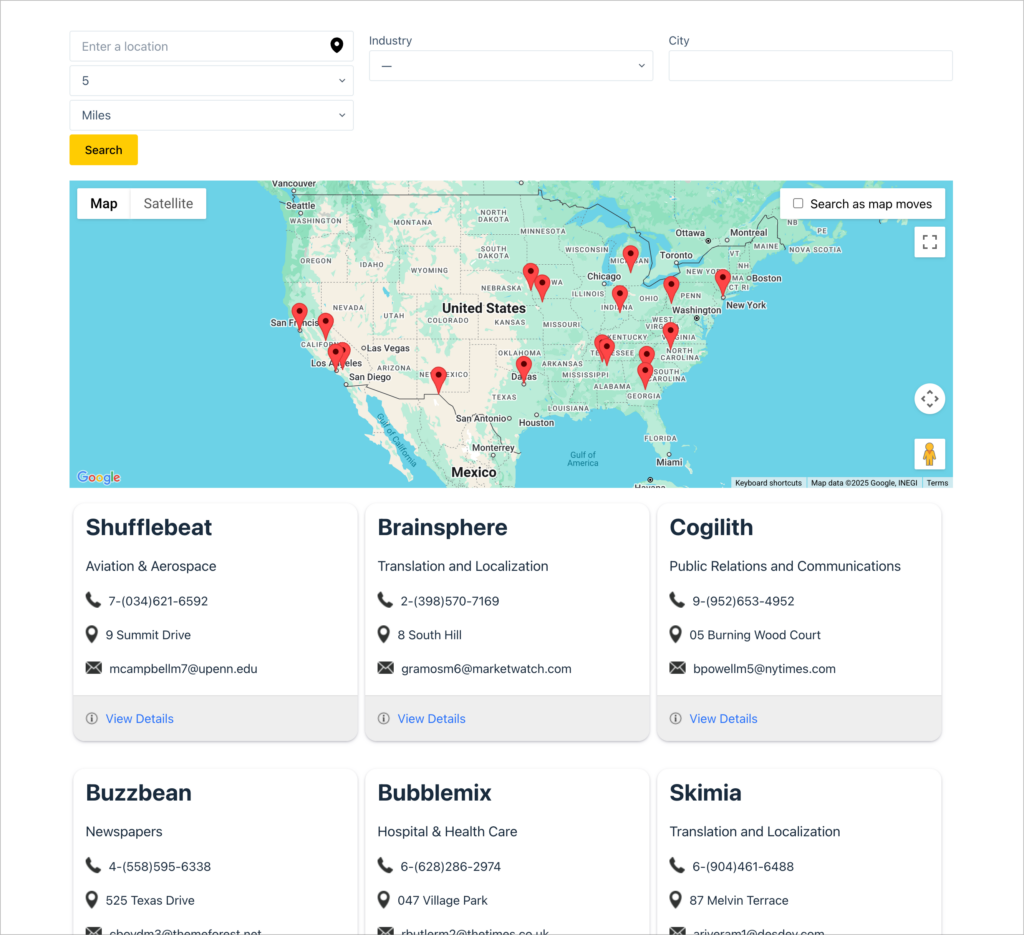
Create directories and geolocation applications
The GravityView Maps layout allows you to display your form entries as markers on a Google Map. Using this functionality, you can create directories, store locators, and other dynamic apps!
💡 Pro tip: Check out live versions of these front-end web apps on our demo site, and get your own demo site with GravityView pre-installed!
Gravity Forms front end posting: Final thoughts
In this article, we showed you how to turn your Gravity Forms submissions into WordPress posts or pages using the Advanced Post Creation add-on or built-in Post fields.
If you want to take things further and build dynamic, highly customized displays, you’ll need to use GravityView. To learn more about what you can do with GarvityView, check out our range of build it guides.

Helpful tips right in your inbox.
Subscribe to get the latest articles, information on releases and helpful Gravity Forms tips!
More articles

WordPress page builder market share 2026: Elementor leads at 32.67%
Elementor reaches 32.7% of WordPress sites. WordPress Block Editor 20.6%, wpBakery 8.5%, Divi 5.7%. Latest HTTP Archive crawl, share-of-WordPress basis throughout.

Launch Log: GravityView 3.0, plus upgrades to Block MCP and GravityKit MCP
GravityView 3.0 lands with the new Vantage theme, frontend bulk actions, and AI-assisted View creation. This launch log also covers updates to GravityKit MCP, Block MCP, and Dashboard Views.

Announcing GravityView 3.0: a fresh new look, AI View creation, and native page builder support
GravityView 3.0 is here: restyle Views with the new Vantage theme, build them with AI, embed them in any page builder, and run bulk actions on the front end.