Published
•
Updated
Ultimate guide to using Gravity Forms with custom post types and fields
WordPress is powerful, but sometimes you need more than standard posts and pages. Using Gravity Forms with custom post types and custom fields can help you collect, organize, and display user-generated content on your site! In this guide, I’ll show you how to send form data to custom post types and ACF fields, plus explore…
WordPress is powerful, but sometimes you need more than standard posts and pages. Using Gravity Forms with custom post types and custom fields can help you collect, organize, and display user-generated content on your site!
In this guide, I’ll show you how to send form data to custom post types and ACF fields, plus explore GravityView—a simpler way to display entries without CPTs or ACF. Let’s dive in.
What is a custom post type?
A custom post type (CPT) in WordPress is a powerful way to extend your website beyond standard posts and pages. It allows you to create and manage different types of content tailored to your needs, such as portfolios, testimonials, events, products, or any other structured data.
Unlike regular posts, which are typically used for blog content, custom post types can have their own unique taxonomies, fields, and display settings, making them highly flexible.
Creating custom post types helps ensure that your website is structured in a way that makes sense for your audience and goals.
Pro tipTo learn more about custom post types, read this helpful article on the WordPress.org documentation site.
How to send data from Gravity Forms to custom post types
While Gravity Forms does include support for Post fields (form fields that enable you to save user-submitted content as WordPress posts) these fields do not support custom post types.
To send data to a custom post type from Gravity Forms, you’ll need to use the Advanced Post Creation add-on.
Available with a Gravity Forms Elite or Nonprofit license, the Advanced Post Creation add-on streamlines the process of publishing user-submitted content on your WordPress site. Instead of manually copying and pasting submissions, this powerful add-on automates content creation by transforming form entries into posts, pages, or any custom post type.
With support for taxonomies, custom fields, and merge tags, you can create new posts dynamically. Plus, uploaded files are automatically added to the Media Library. Whether you’re running a blog, directory, or user-driven platform, the Advanced Post Creation add-on can save you time.
Method 1: Send data to custom post types using the Advanced Post Creation add-on
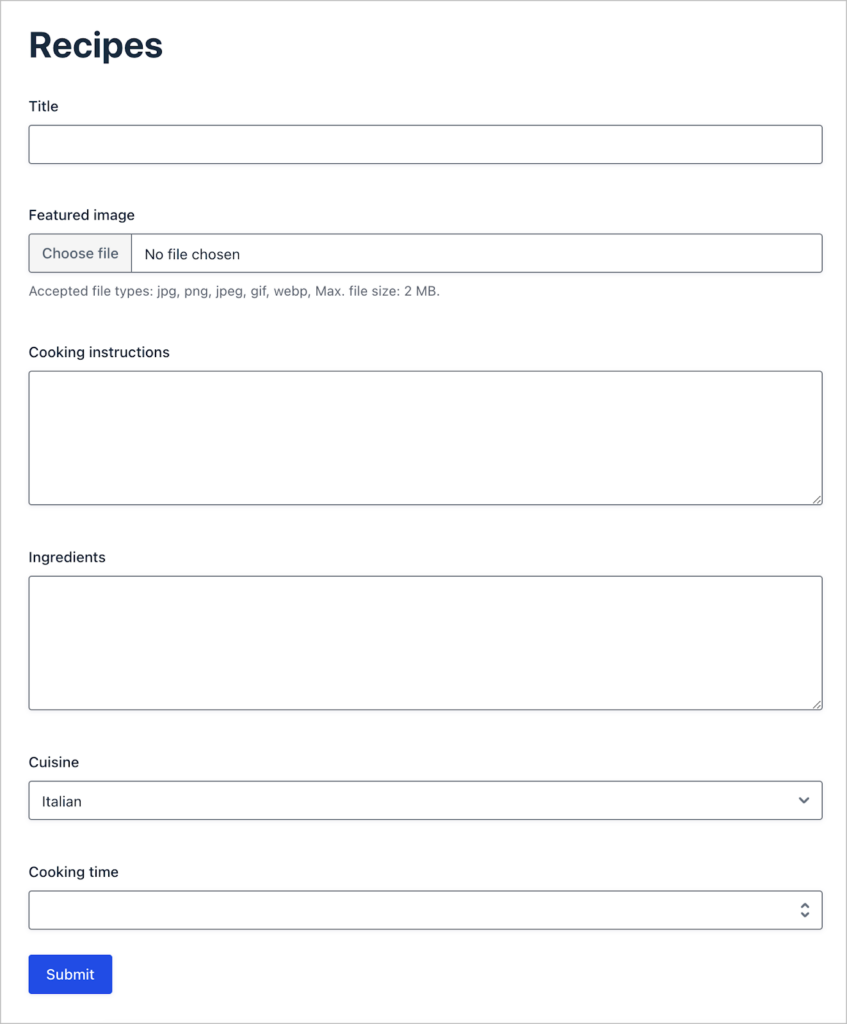
In this example, we have a form for submitting new recipes. On our WordPress site, we’ve created a new “Recipe” custom post type for storing all our recipes. Now, we’re going to use the Advanced Post Creation add-on to send form data directly to our CPT.
Here’s what our form looks like. As you can see, there are different fields, some of which we’re going to display in the body of the post, and some that are better suited as custom fields.
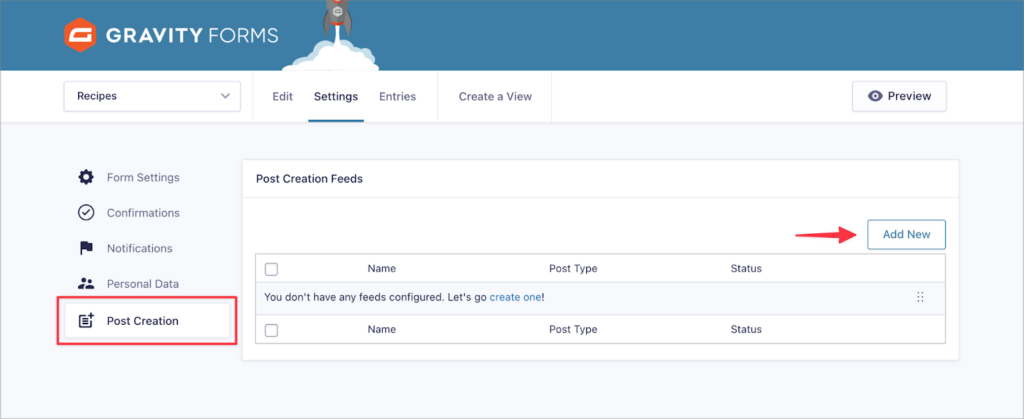
The first thing we need to do is create a new post creation feed. We can do this by navigating to the form setting page, selecting the “Post Creation” tab on the left and clicking “Add New”.
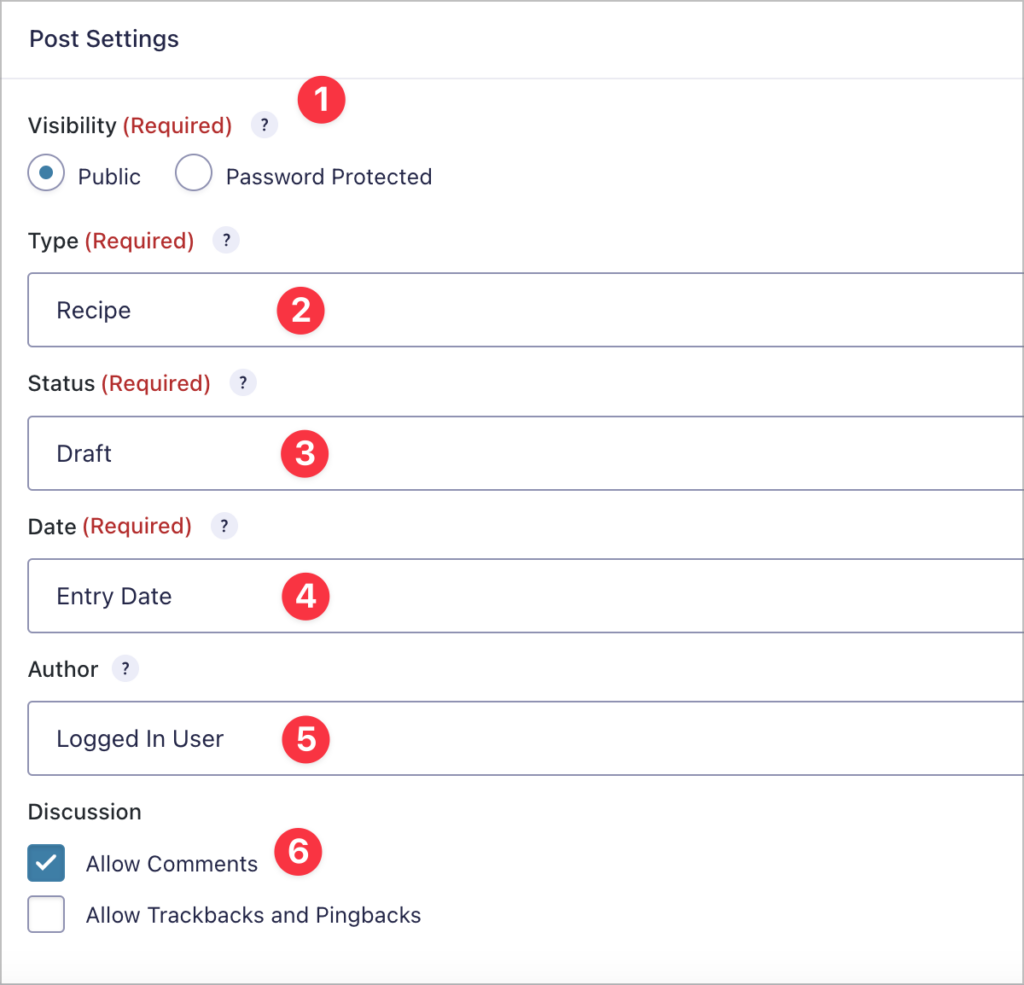
Now we can configure the feed starting with the post settings. Most importantly, we need to choose a post “type” to ensure we create a new recipe CPT and not a regular WordPress post.
- Visibility – Choose whether you want the post to be public or password protected.
- Type – Select the type of post you want to create. All available custom post types will appear here for selection.
- Status – Select the status of the created post (either Published, Scheduled, Draft, Pending, Private or Trashed).
- Date – Set the publication date (either the form entry date or a custom date).
- Author – Choose the post author.
- Discussion – Choose whether to allow comments, pingbacks and trackbacks.
Next, we’ll turn our attention to the post content. Here we can define what information to include in the post title and body. To pull in content dynamically from user-submitted field values, we’ll use field merge tags.
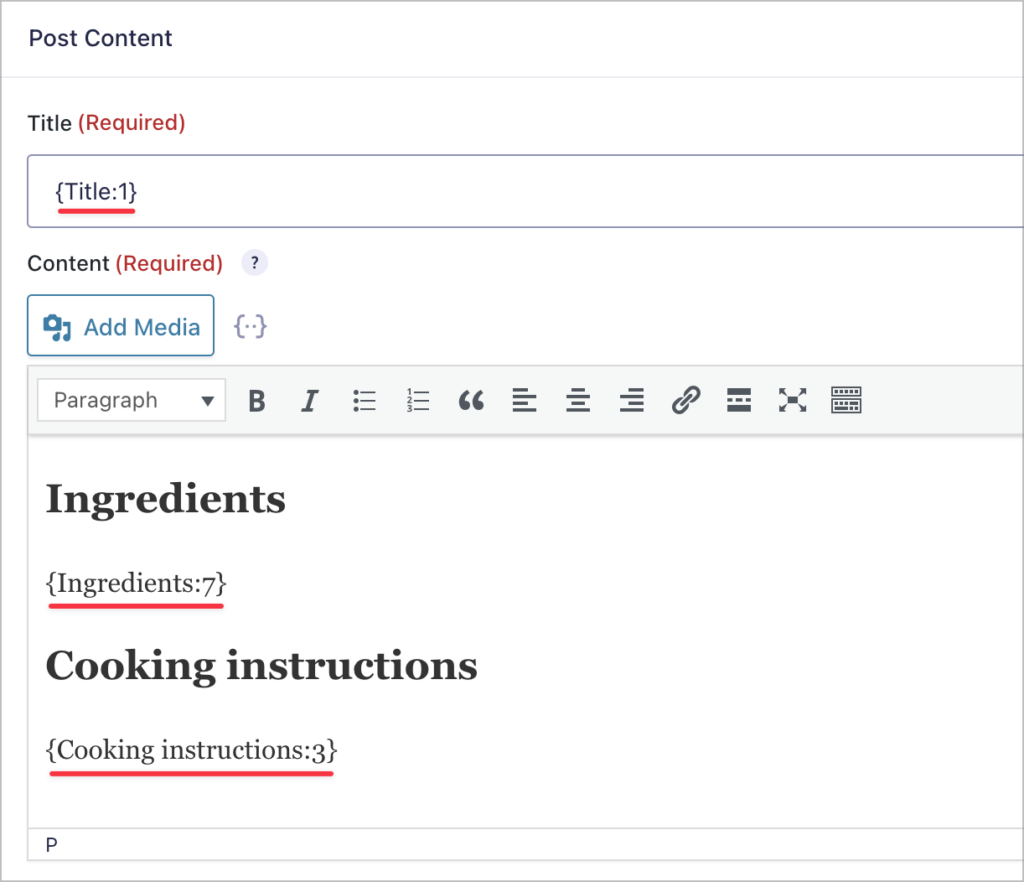
To add merge tags to the title or body, simply click on the {..} icon and choose a field from the list! Next, we can choose a post featured image, select which images to upload to the media library, and map custom fields.
- Featured Image – Select a File Upload field that will be used as the featured image for the post.
- Media Library – Choose File Upload fields with images that will be uploaded to the WordPress Media Library.
- Custom Fields – Map form field values to new or existing WordPress custom fields.

Custom fields in WordPress store metadata about a post. You can select an existing custom field or create a new one and map it to a field in your form. We’ll discuss custom fields more in the next section.
Lastly, you’ll need to configure your post taxonomies. Here you can assign one or more categories and tags to your post. You have the ability to assign existing categories/tags or map form fields to assign them dynamically.

Gravity Forms also allows you to add conditional logic filters to a feed. This enables you to choose when the feed will run based on one or more conditions that you set.
Advanced Post Creation vs. Gravity Forms + Custom Post Types (free plugin)
The official Advanced Post Creation add-on isn’t the only way to map Gravity Forms submissions to custom post types. There’s also a legacy free plugin called Gravity Forms + Custom Post Types by Dave Smith (the developer behind Gravity Wiz).
Here’s how they compare:
| Advanced Post Creation (official) | Gravity Forms + Custom Post Types (free) | |
|---|---|---|
| Price | Included with Elite license ($259/yr) | Free |
| Post type mapping | Yes — via feed settings | Yes — via Post Title field dropdown |
| Custom taxonomy support | Yes — via feed settings | Yes — via field settings (Dropdown, Checkbox, Radio, Multi Select, Single Line Text) |
| Custom field mapping | Full support (including ACF, Pods, Toolset, Meta Box) | Limited — uses Gravity Forms’ built-in Post fields |
| Post editing from the front end | Yes — built-in block/shortcode for editing existing posts | No |
| Conditional feed logic | Yes — create posts only when conditions are met | No |
| Multiple feeds per form | Yes — create different post types based on conditions | No |
| Third-party CPT support | WooCommerce Products, The Events Calendar, and others | Any registered CPT |
| Support | Official Gravity Forms support | Community support via WordPress.org |
Which should you choose?
The free plugin has been around since 2011 and still has 10,000+ active installations, but it’s largely a legacy option at this point. It only works with Gravity Forms’ built-in Post Fields (Post Title, Post Body, Post Category, etc.), which are limited in what they can do. The official Advanced Post Creation add-on replaces and extends this approach with feed-based mapping, conditional logic, ACF support, and front-end editing.
If you’re on an Elite license, the Advanced Post Creation add-on is the recommended path. The free plugin is still a viable option if you’re on a lower-tier license and only need basic CPT mapping with taxonomy support.
Method 2: Using Gravity Forms to populate ACF custom fields
Advanced Custom Fields (ACF) is a powerful WordPress plugin that makes it easy to add and manage custom fields for posts, pages, and custom post types. With ACF, you can create structured, dynamic content by adding extra data fields like text, images, repeaters, and relationships—all without writing complex code.
It’s a plugin that’s commonly used by developers and site owners looking to customize WordPress beyond its default capabilities.
Using the Gravity Forms Advanced Post Creation add-on, you can populate custom fields added via ACF during form submission. The process is the same as I described above, but there is one important thing to keep in mind: The data format used in your form must match the format of the ACF field where it will be stored!
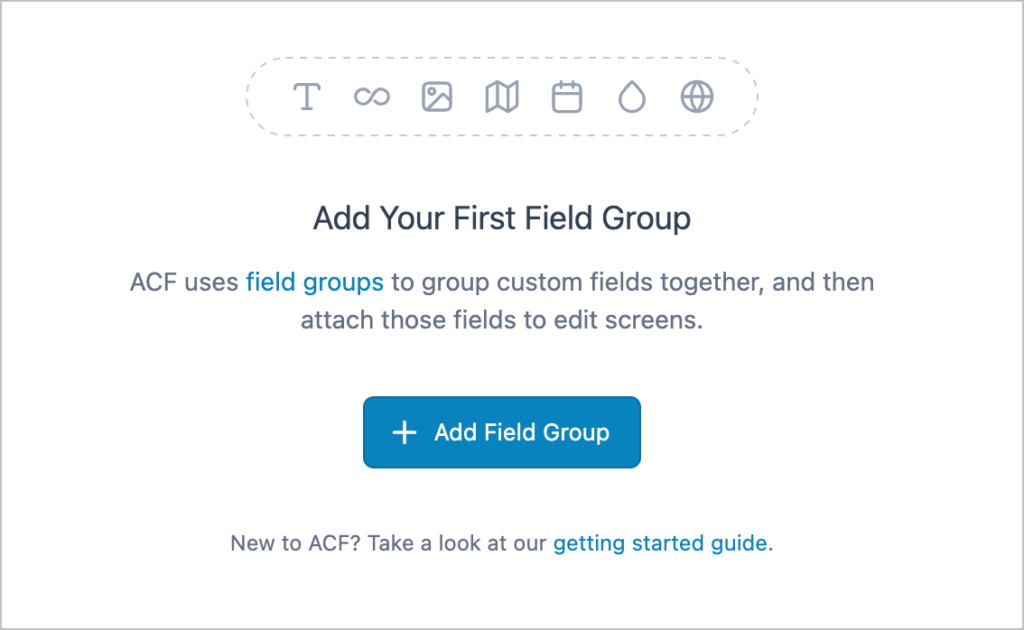
Let’s go through the process, step by step. It starts with creating a new field group in ACF. To do this, we’ll hover over “ACF” in the WordPress menu, select “Field Groups” and then click “Add Field Group”.
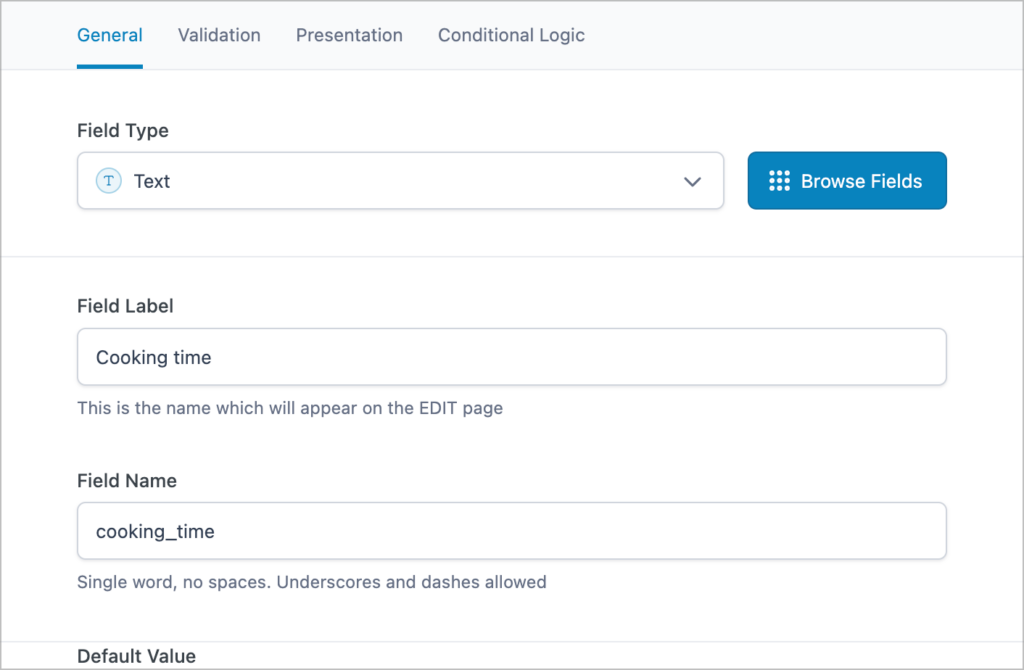
Now we can choose a field type and give it a label and a name. ACF supports a range of field types, enabling you to add different kinds of structured data to your posts.
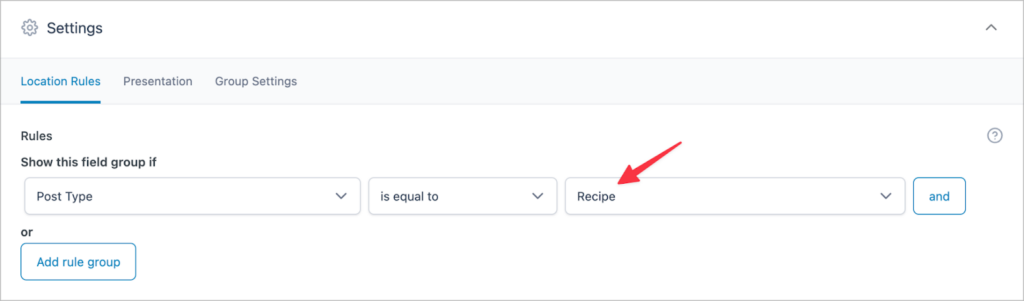
After creating the field group, we’ll attach it to our “Recipes” custom post type by adding a new location rule.
After saving our field group, all we need to do is edit/create a Post Creation feed, scroll down to “Custom Fields” and add the ACF field name. We can then map the field to a field in our form. Of course, you’ll also need to configure the remaining feed options (see section above for details).

That’s it! After saving the feed, a new “Recipe” CPT will be created every time your form is submitted and all your ACF custom fields will be populated according to your assigned mappings.
Creating web apps and front-end displays without CPTs or ACF
Want a simpler way to display Gravity Forms entries on the front end—without the hassle of custom post types or Advanced Custom Fields? GravityView is the perfect solution!
Deeply integrated with Gravity Forms, GravityView enables you to display and manage form data without extra plugins or complex setups. With its intuitive drag-and-drop layout builder, you can create dynamic web apps, directories, and front-end displays directly from form entries—no CPTs or coding required.
Here’s how it works…
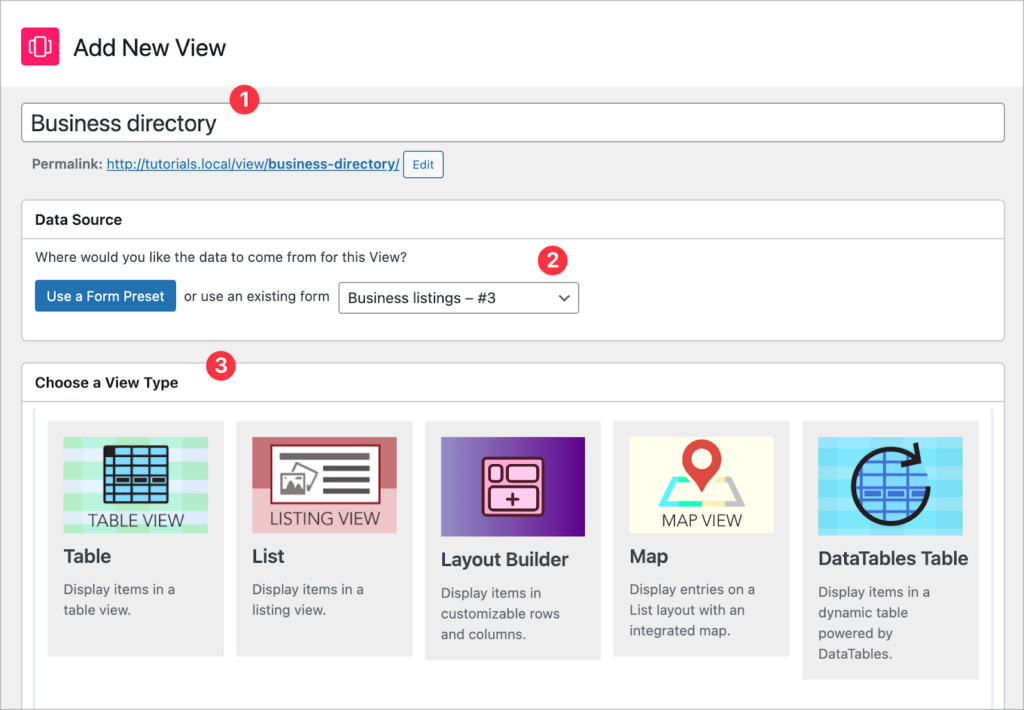
First, you create a new “View”, give it a name (1) and connect it to your form by selecting it as a data source (2). Next, you choose a View type for displaying your entry data on the front end (3).
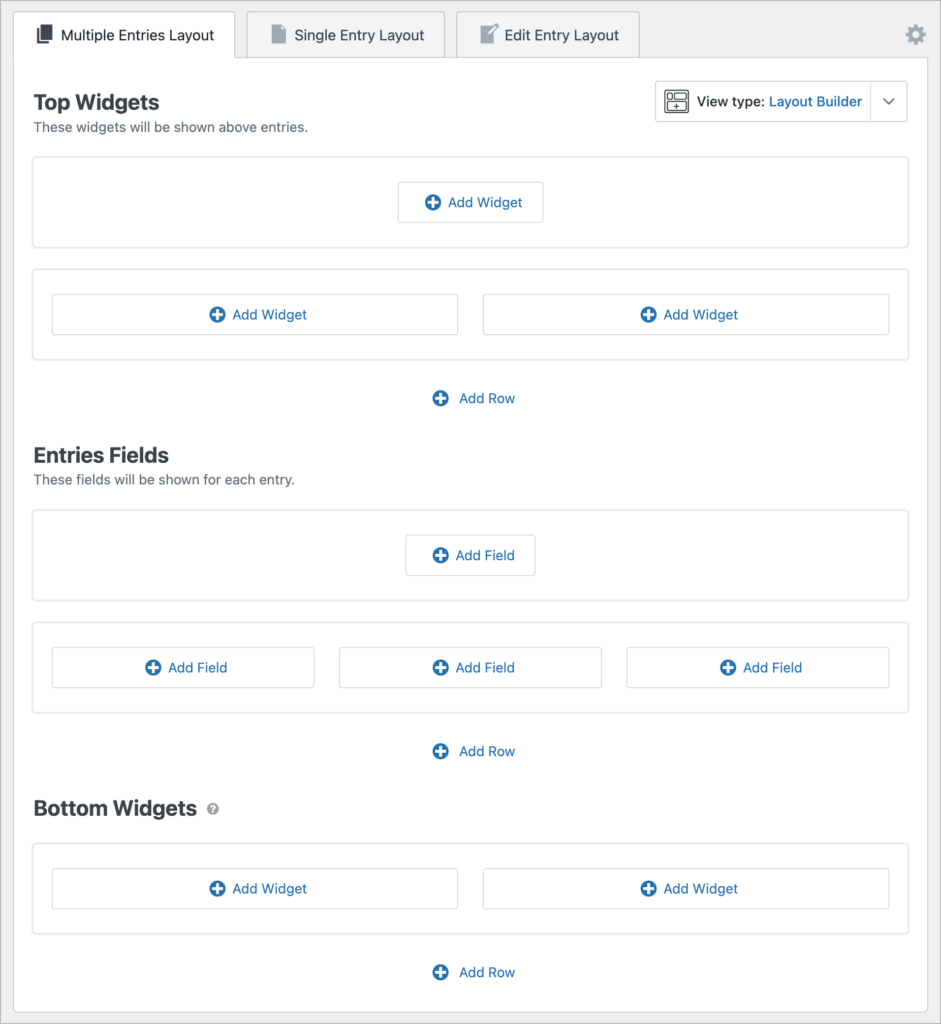
The next step is to configure the front-end layout using GravityView’s intuitive drag-and-drop builder. You can easily create custom layouts using rows and columns, and then add the data from your form fields.
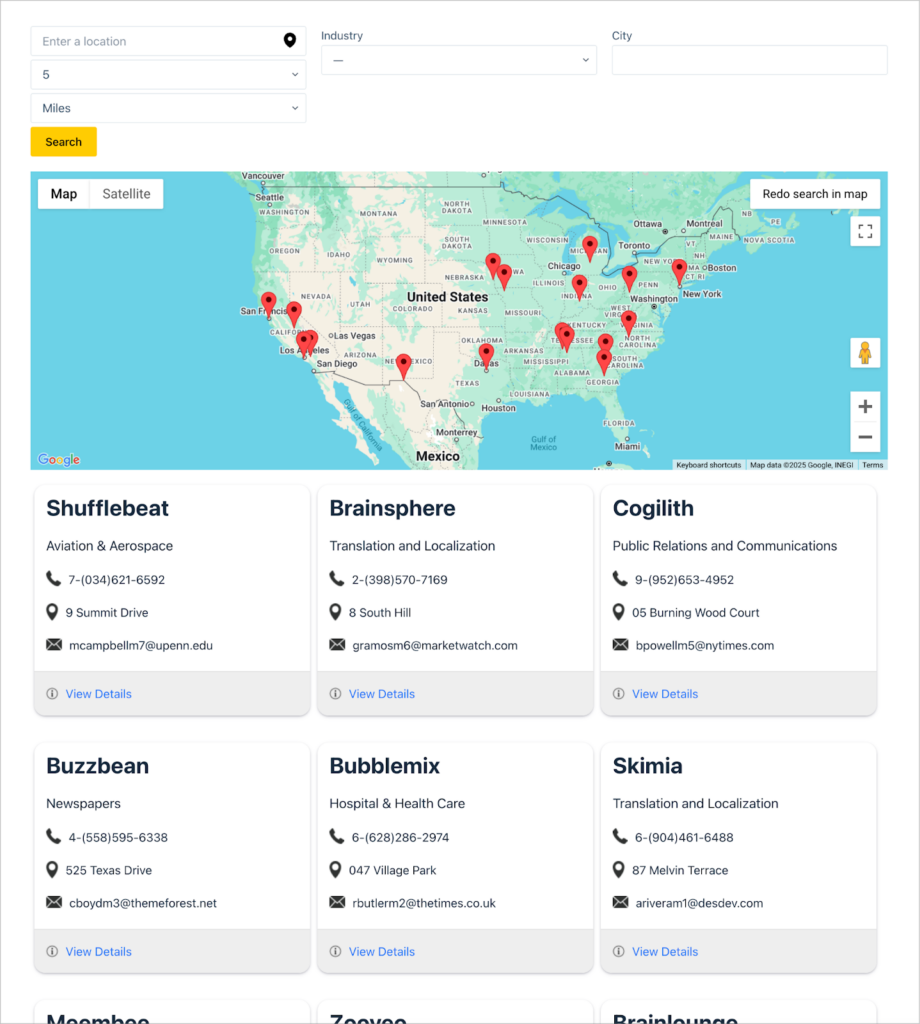
Here’s an example of a geolocation directory built using GravityView’s powerful Layout Builder along with the maps integration.
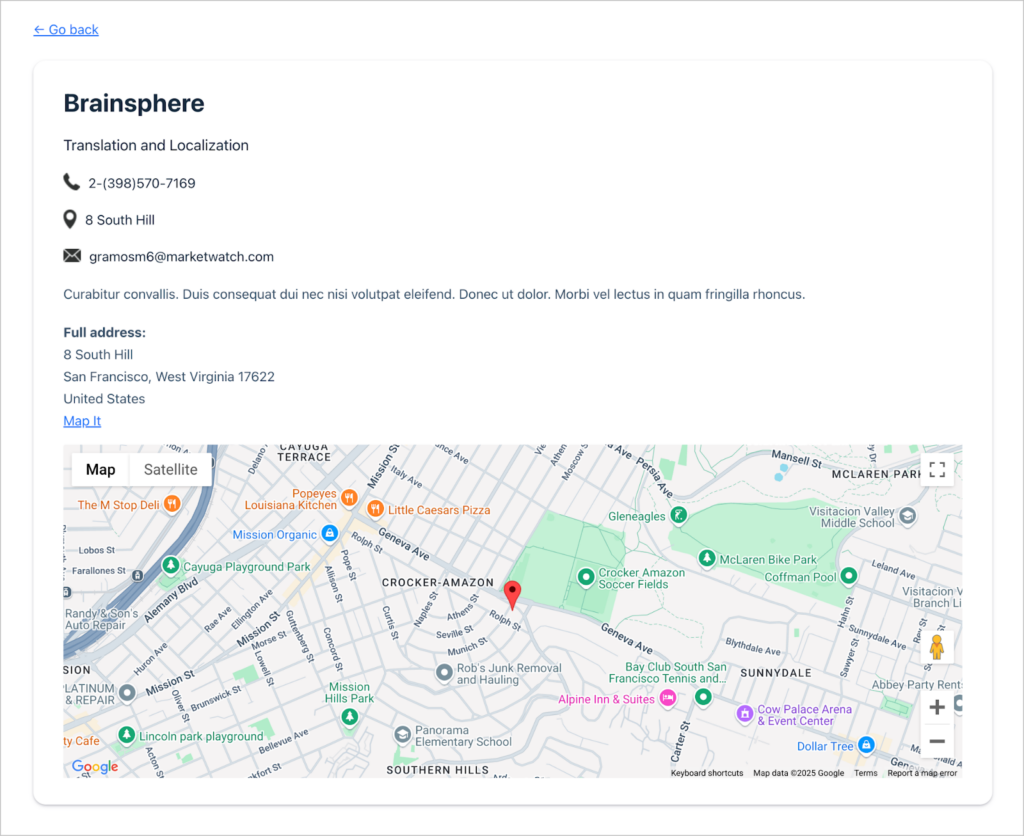
And here’s what a single entry looks like on the front end. GravityView’s layouts are highly customizable, enabling you to build web apps and interfaces that suit your project’s needs. And yes, you can also edit entry data directly from the front-end!
Pro tipSee GravityView in action by checking out our range of live demos, and get your own free trial site preloaded with all GravityKit add-ons.
Use ACF when…
Use ACF (together with custom post types and the Advanced Post Creation add-on) when you want Gravity Forms submissions to become native WordPress content. In this setup, forms act as a structured content input layer, while WordPress handles long-term storage, organization, and presentation.
This approach is best suited to cases where submissions should behave like real posts—showing up in archives, using theme templates, working with SEO plugins, and integrating cleanly with the wider WordPress ecosystem. It’s especially useful when you need well-defined, structured data stored as post metadata and are comfortable managing the extra setup involved, such as creating CPTs, defining ACF field groups, and carefully mapping field formats.
Use GravityView when…
Use GravityView when your primary goal is to display and interact with form data, rather than to turn them into posts. In this model, Gravity Forms entries remain the source of truth, and GravityView becomes the presentation and interaction layer.
GravityView is ideal for building directories, dashboards, and lightweight web apps quickly, without the overhead of custom post types, custom fields, or template development. Layouts are created visually using a drag-and-drop builder, front-end editing is built in, and everything stays code-free. This makes it a strong choice when speed, simplicity, and flexibility matter more than WordPress-native storage.
Send Gravity Forms entries to custom fields and post types
By integrating Gravity Forms with custom post types and ACF, you can transform user-submitted data into structured, dynamic content on your WordPress site. The Advanced Post Creation add-on makes it easy to automate content creation, while ACF ensures you can store and manage custom fields with ease.
And if you’re looking for an even simpler way to display Gravity Forms entries on the front end, GravityView provides a streamlined, code-free solution.

Helpful tips right in your inbox.
Subscribe to get the latest articles, information on releases and helpful Gravity Forms tips!
More articles

How to build a searchable directory on Gravity Forms by chatting with AI
Build a searchable directory from your Gravity Forms entries by chatting with AI. See how the free GravityKit MCP creates a GravityView directory in minutes.

10 things you can ask AI to do with Gravity Forms (using the free GravityKit MCP)
See 10 practical things you can ask AI to do with Gravity Forms using the free GravityKit MCP: create forms, manage entries, build Views, and more.

Launch Log: theme template editing in Block MCP, Shield silentCAPTCHA for Zero Spam, and GravityView fixes
Block MCP adds safe theme template editing, Gravity Forms Zero Spam gains Shield silentCAPTCHA support, and GravityView fixes lightbox and notice bugs.