When creating a new View in GravityView, you have to select a data source. The data source is where your View draws its data from for displaying on the front end.
But what if you haven’t created a form yet? Or you’re planning to build an application but don’t know what fields you’ll need?
That’s where form presets come in.
GravityView form presets are helpful templates that allow you to create new web applications in only a few clicks. In this post, we’ll introduce you to form presets and explain when you should use them.
What Are GravityView Form Presets?
When selecting a data source for your new View, you have two options: select an existing form in Gravity Forms or choose a ‘form preset’.

Form presets are templates for building different kinds of web apps using GravityView. After selecting a form preset, GravityView will pre-populate the View editor with fields corresponding to the preset you selected. And once you click “publish”, a new form will automatically be created for you in Gravity Forms containing all the relevant fields!
Available Form Presets
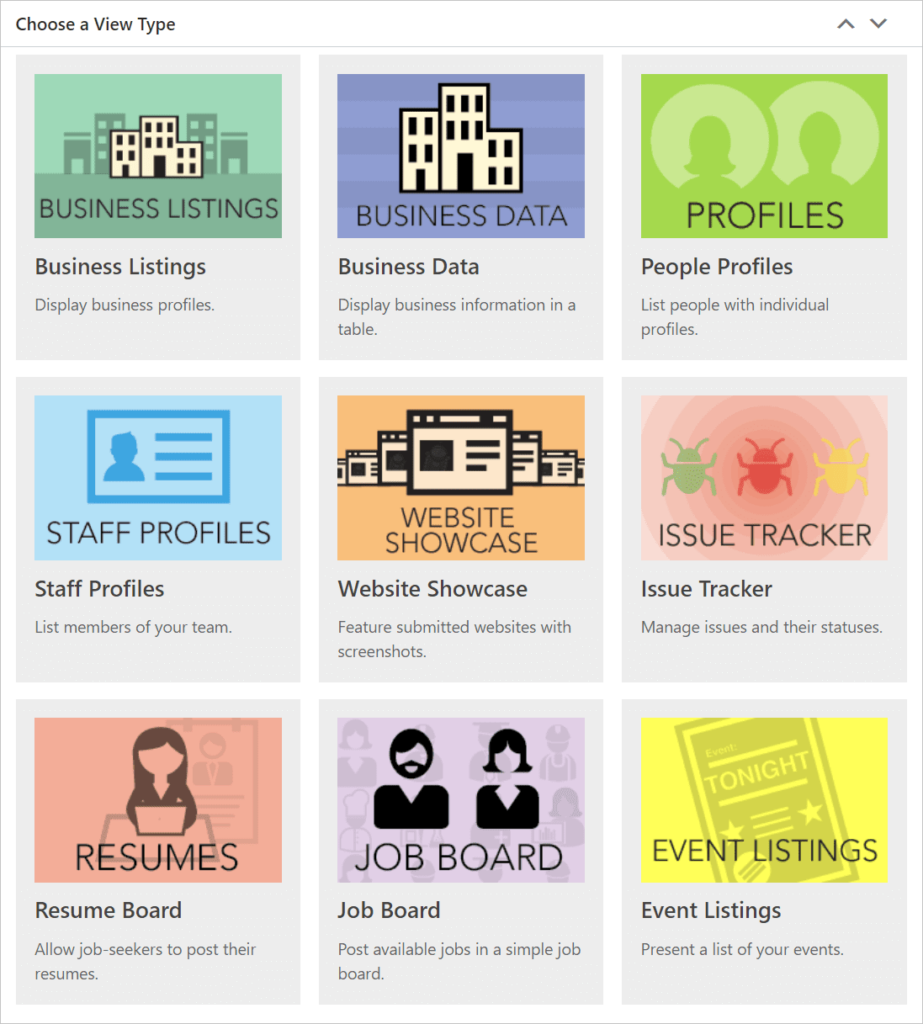
When you create a new View there are nine form presets available to choose from. Each of them correspond to common applications built using GravityView:
- Business Listings
Perfect for business directories (uses the List layout).
- Business Data
This preset is handy if you’re building a database/catalog of businesses.
- People Profiles
This preset is helpful for building a member directory.
- Staff Profiles
The “Staff Profiles” preset is similar to the “People Profiles” preset, except it’s tailored for company staff rather than members of the public.
- Website Showcase
Show off websites for a design competition or display submitted photographs.
- Issue Tracker
Create a bug tracker system that allows you to manage issues and update their statuses.
- Resume Board
Create a resume board that allows job seekers to submit their resume for display in a searchable directory.
- Job Board
This template includes all the fields you need to create a simple job board.
- Event Listings
Showcase upcoming events in a list layout.

As you can see, each form preset is tailor-made for a specific use-case. However, form presets are easily editable, so even if the app you want to build is slightly different from the available presets, selecting a preset may still be helpful to you!
When to Use Form Presets?
GravityView is a plugin that allows you to display Gravity Forms data. The recommended workflow is always to build your form first and then use GravityView to display your existing form entries.
However, form presets can give you a head start if you need a helping hand. For example, let’s say you bought GravityView for the express purpose of creating a business directory.
And let’s say you’re new to Gravity Forms and GravityView and you’re looking for a template on which you can build and expand. To save yourself time you could skip the form creation process, create a new View and select the “Business Listings” preset.
The View editor will then load with all the required fields and widgets for a business directory. After publishing the View, GravityView will automatically create a new form for you in Gravity Forms containing all the relevant fields.
Now you can edit your new form by adding/deleting fields, changing the field labels, updating conditional logic settings and more. When you’re done you can head back to the View editor and adjust the layout using GravityView’s drag and drop builder!
By selecting a form preset that matches what you’re trying to build, you can save yourself time and effort.
Form presets are also helpful for testing layouts and features. For example, if you wanted to test GravityView’s functionality by creating a demo application, starting with a form preset is ideal as it saves you the hassle of creating a new form from scratch.
📝 By choosing a form preset you won’t need to choose a View layout as this is determined by the preset you select.
We’ve covered all the reasons why you should use form presets, so when shouldn’t you use form presets?
When Not to Use Form Presets
There are three main situations where form presets won’t help you.
- If you already have an existing form in Gravity Forms that you want to connect to a View.
- If you’re building something custom that doesn’t match any of the preset options.
- If you’re an experienced user of Gravity Forms and GravityView (in this case you can still use form presets, but depending on what you’re building, they might just end up slowing you down 😉).
Although form presets can be helpful in certain situations, they don’t have a place in everyone’s workflow!
Creating a New View Using a Form Preset
Log in to your WordPress dashboard, hover over Views and select New View. Now give your View a name and select Use a Form Preset under where it says “Data Source”.

You can now choose a preset from the options that appear below.

After selecting a form preset, you will now see the View editor, prepopulated with fields corresponding to the preset that you chose.

Now click Publish. GravityView will now automatically create a new form for you in Gravity Forms containing all the relevant fields.
To view the new form, hover over Forms and click Forms. To edit your new form, hover over it and click Edit.
📝 Forms created using presets will be named “GravityView -” followed by the name of the preset (e.g. “GravityView – Business Listing”).

That’s it! 🙌
GravityView Form Presets: Wrapping Up
Form presets are templates for quickly building new web apps using GravityView. GravityView includes 9 different form templates for things like business profiles, job boards and resume boards.
In this post, we showed you how to use form presets to get an application up and running in only a few clicks. If you’re a GravityView beginner, form presets can help you save time and speed up your workflow!
Join Our Newsletter!📧🙌
✅ Helpful Gravity Forms content straight to your inbox
✅ Be the first to hear about new updates and releases
