Published
•
Updated
How to build a WordPress event website: Full tutorial (2025)
Build a complete event website on WordPress using Gravity Forms and GravityKit. Let visitors submit events and display them in a map, list, or calendar without code.
Are you looking for a way to showcase events on your WordPress website?
Creating an event website is a great way to help users find upcoming events within a specific area. In this tutorial, we’re going to show you how to showcase events on your website using Gravity Forms and GravityKit.
First, we’ll create an event submission form using Gravity Forms. After that, we’ll show you how to display those events on your site using a map, list, or calendar! Let’s get started!
Download the free event form template now!
Import the template into Gravity Forms and customize as necessary.
Sneak peek
Here’s a sneak peek at the finished event showcase. As you can see, there is a search bar at the top, followed by a map showing the locations of each event. The events are then listed below, one after the other.
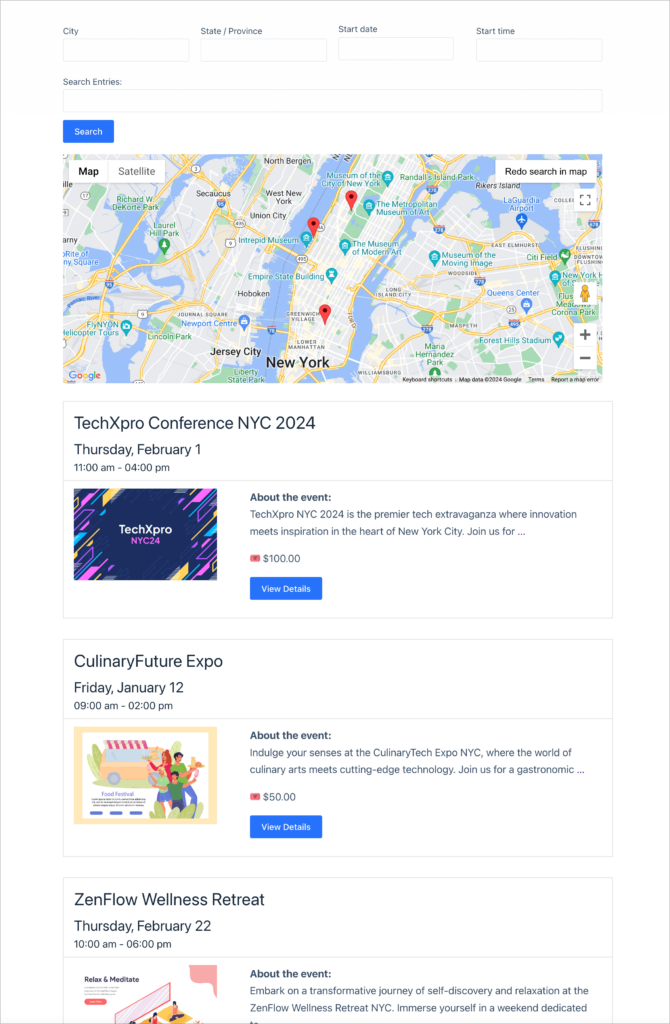
If we click “View Details” on one of the events, we are taken to a page with more details information about that specific event.

This is an example of one of the many ways you could build an events showcase using Gravity Forms and GravityView. Keep reading to see how we built it.
Wanna try it?
Spin up a demo
See a live event website built with GravityView — explore the demo.

What you’ll need
Here are the plugins you’ll need to build a WordPress event website like the one in this article:
What is a WordPress event website?
An event website showcases an organized list of upcoming events in a certain area. It serves as a platform for businesses, artists, or individuals to display and promote their upcoming events to a targeted audience.
An online event site usually lists events with a search bar, allowing users to find events that interest them and register or buy tickets.
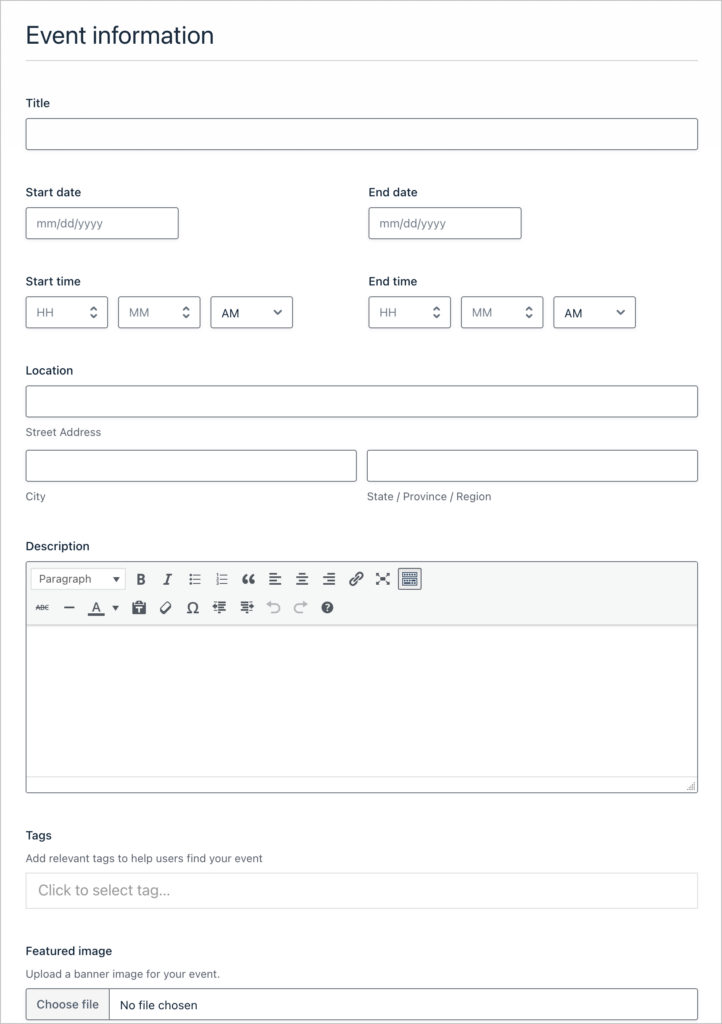
Creating a form to submit new events
The first thing we’re going to do is create a new form allowing users to submit new events for listing on the site.
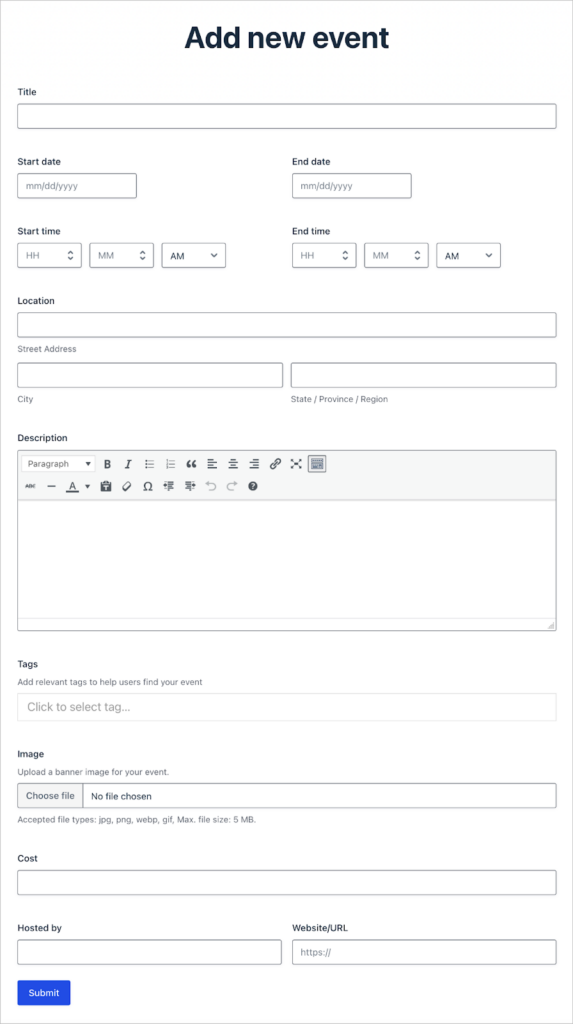
We’ll create a new form by hovering over “Forms” and clicking “New Form”. After creating a new blank form, we can start adding fields using the Gravity Forms drag and drop builder.
We’ll add the following fields to our event submission form:
- Title (Single Line Text field)
- Start date (Date field)
- End date (Date field)
- Start time (Time field)
- End time (Time field)
- Location (Address field)
- Description (Paragraph Text field)
- Tags (Entry Tags field)
- Image (File Upload field)
- Cost (Number field)
- Hosted by (Single Line Text field)
- Website/URL (Website field)
Feel free to add any other fields you feel are necessary! Here’s what our form looks like on the front end:
Save yourself time by downloading the event form template now!
Pro tipThe Entry Tags field allows you to easily label and group entries using tags that you define!
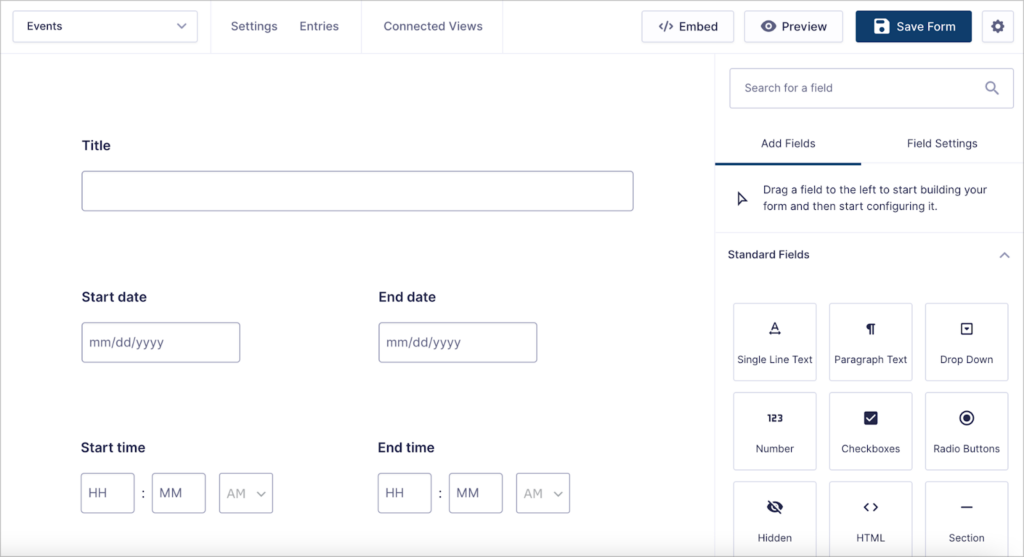
Building a View to showcase events on the front end
Now that we have a form allowing users to submit events to our showcase, we’re going to create a View to display events on the front end.
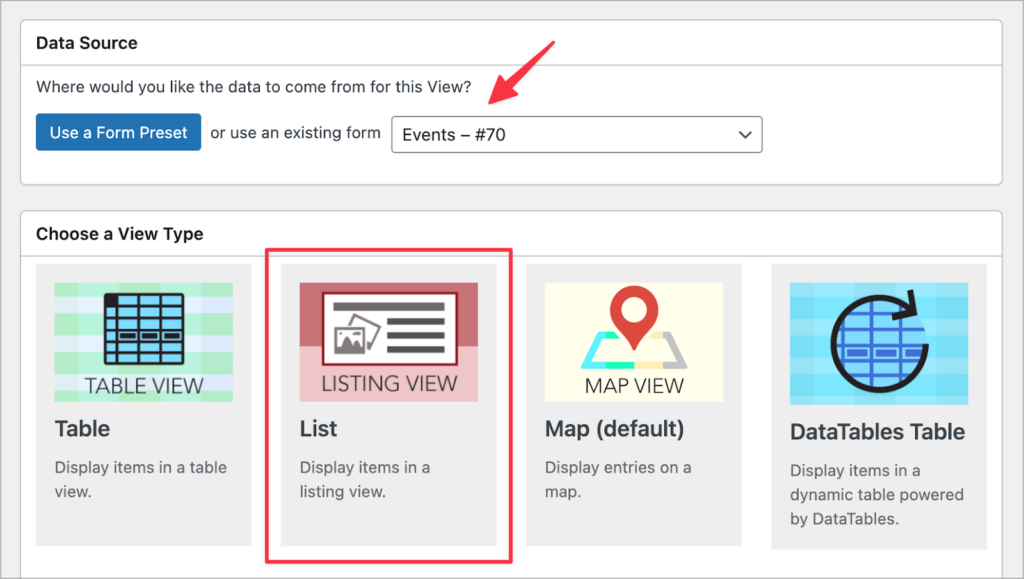
We’ll create a new View by hovering over “GravityKit” and clicking “New View”. After giving our View a name, well select our event submission form as the data source and choose “List” as our View Type.
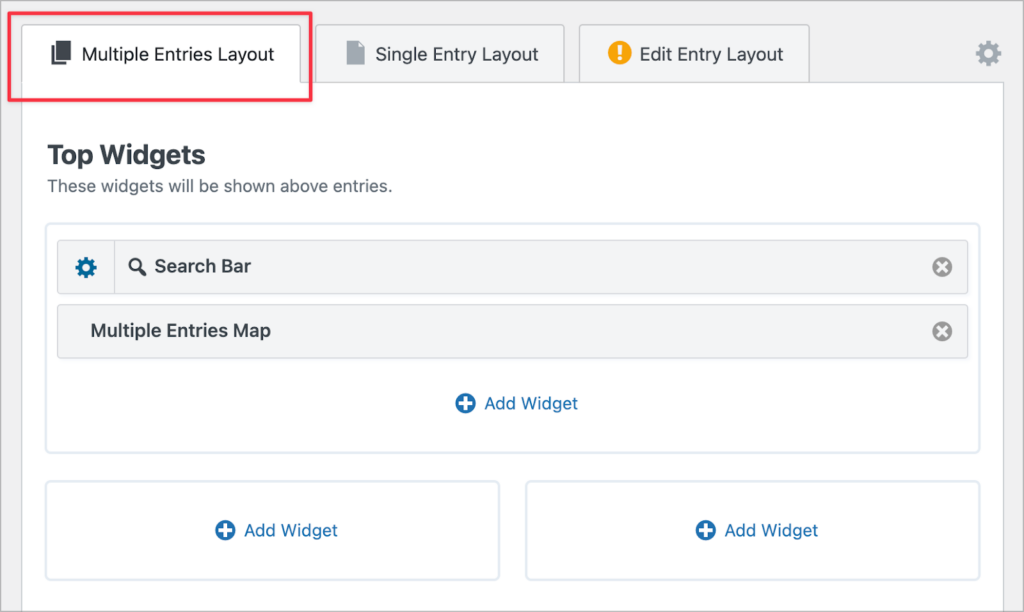
Now we can start constructing our View by adding fields and widgets. Let’s start by configuring the Multiple Entries layout.
Configuring the Multiple Entries layout
The Multiple Entries layout is the main page where each of our events will be displayed one after the other. Let’s start by adding widgets to the “Top Widgets” area.
Here, we’ll add two widgets:
- Search Bar: The search bar widget enables users to search for events based on different metrics.
- Multiple Entries Map: The map widget shows entries as markers on a Google Map. (Note: your form needs an “Address” field for the map to work properly).
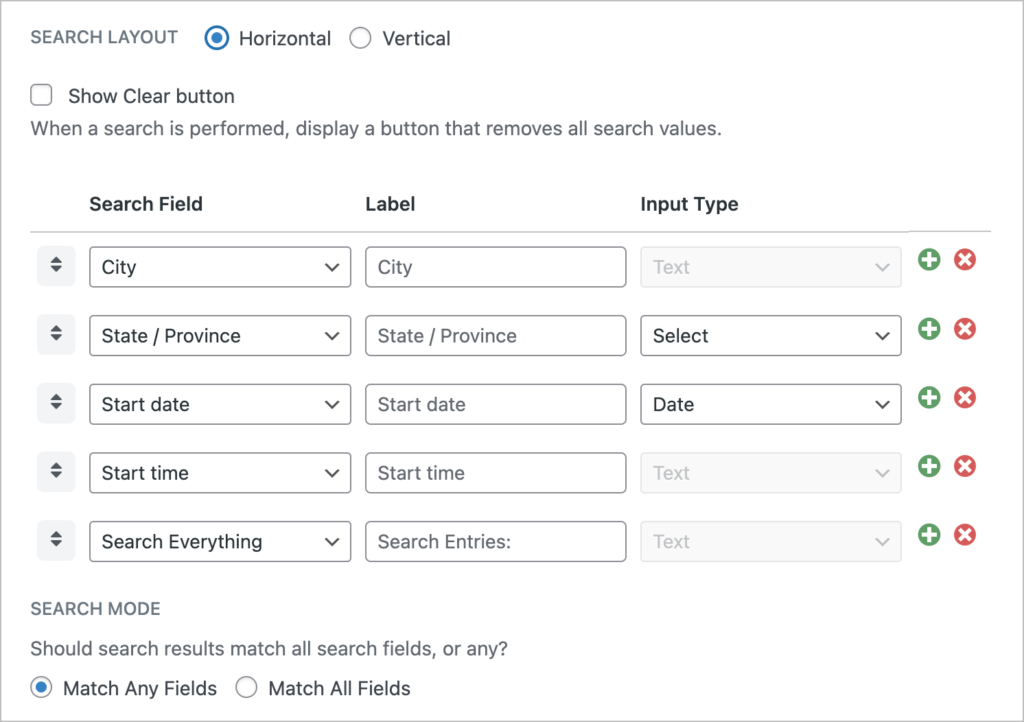
After adding the search widget to our View, we’ll click on the gear icon to configure the search settings. Here, we can add search inputs for different fields in our form. Let’s add the following search inputs:
- City
- State / Province
- Start date
- Start time
- Search everything
After adding our widgets, we’ll scroll down to the “Entries Fields” section. Here, we can add form fields to our View to display entry content on the front end.
We’ll start by adding the “Title” field to the “Listing Title” section. Next, we’ll add the “Start date” to the “Subheading” section.
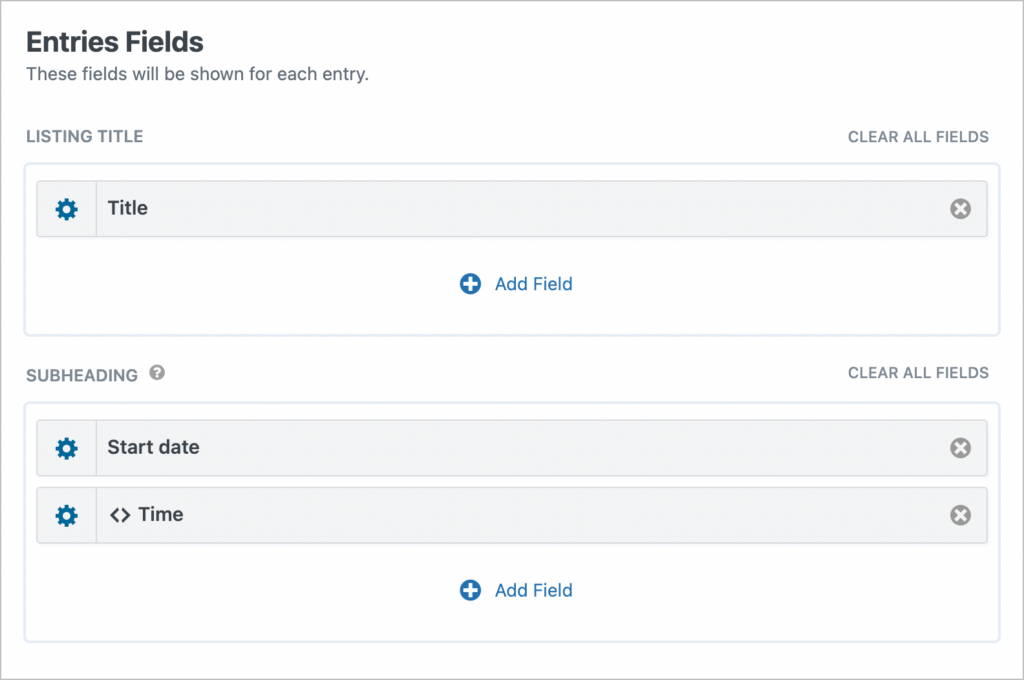
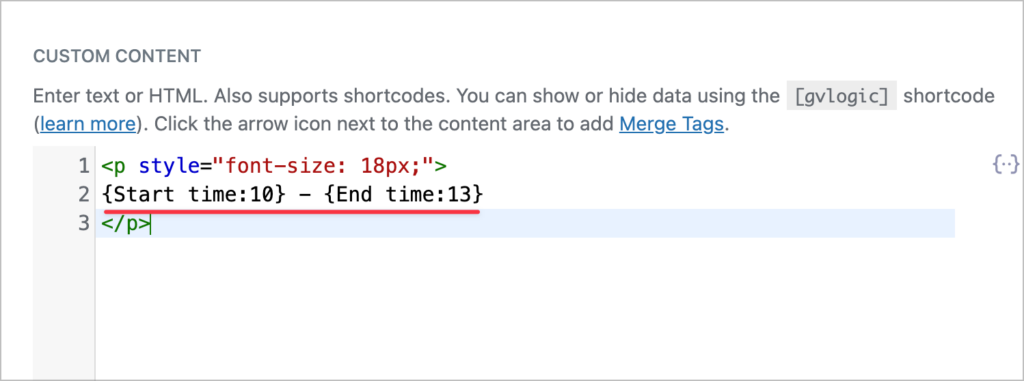
Underneath the start date, we’re going to put the time of the event. We’ll put this inside a Custom Content field using merge tags.
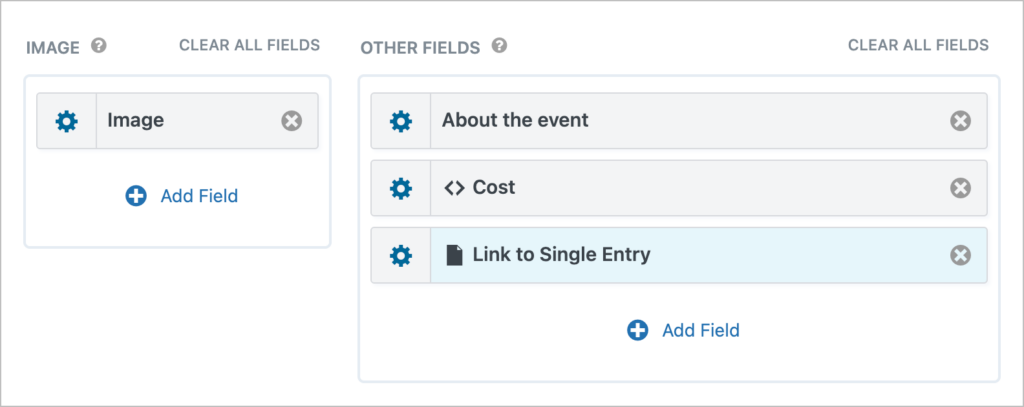
Next, we’ll add the “Image” field to the “Image” section, and the “Description”, “Cost”, and “Link to Single Entry” fields to the “Other Fields section”.
Let’s see what our View looks like on the front end:

Now let’s turn our attention to the Single Entry layout.
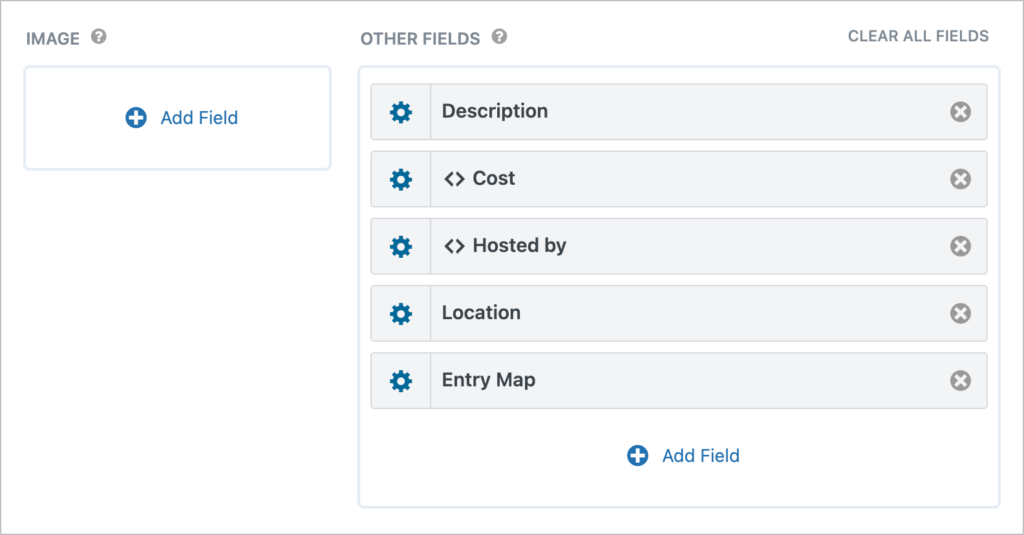
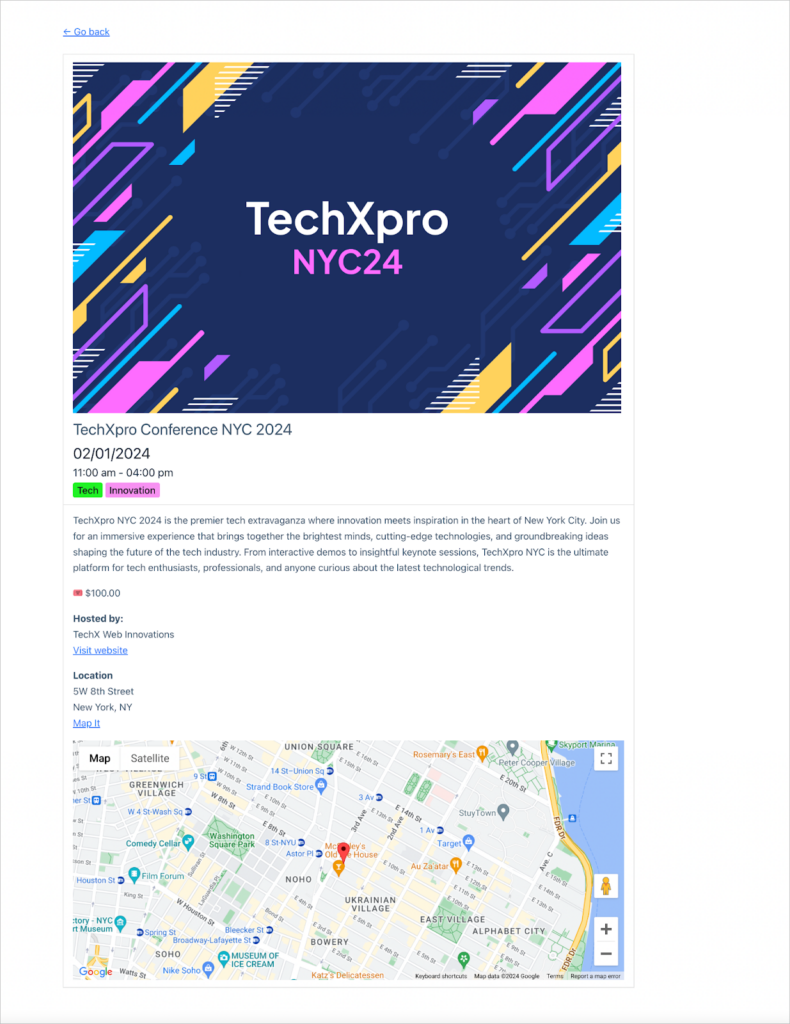
Configuring the Single Entry layout
The Single Entry layout is a page where we can display additional information about events.
We’ll start by adding the “Image” and “Title” fields to the “Listing Title” section. Next, we’ll add the “Start date”, “Time”, and “Tags” fields to the “Subheading” section.
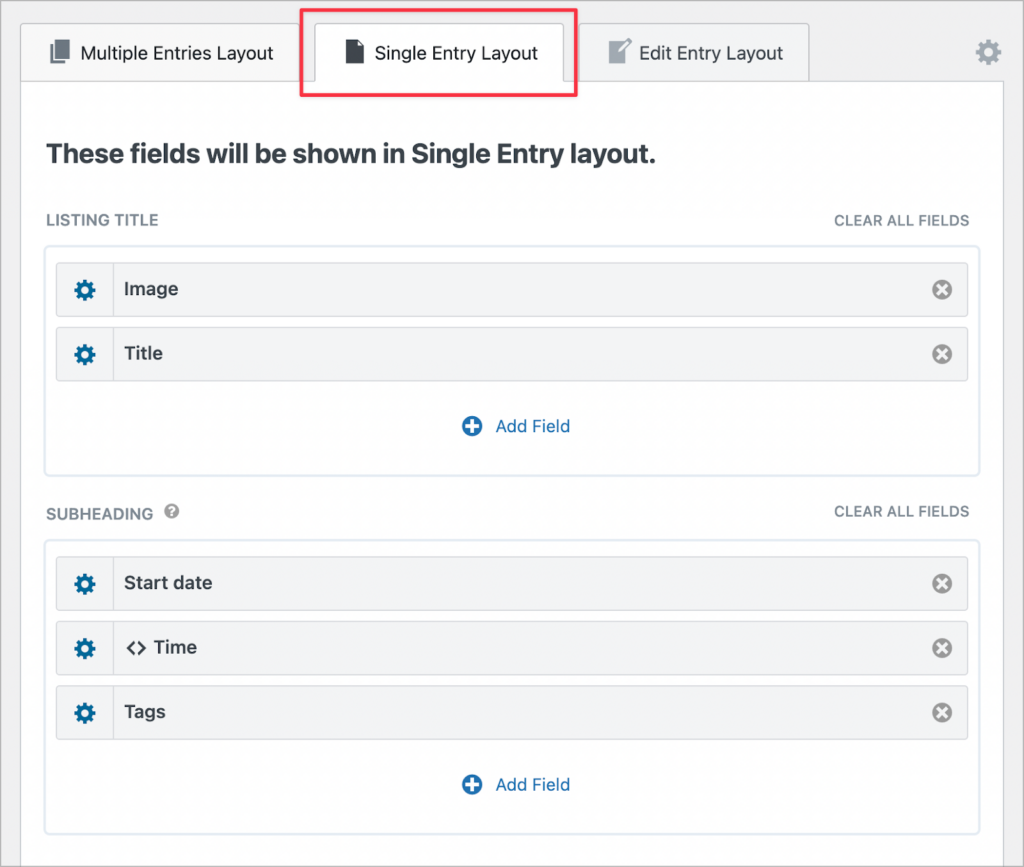
Finally, we’ll add the remaining fields to the “Other Fields” section. Here, we’ll also add an “Entry Map” field. This field will display a Google Map showing the location of the event.
Here’s what the Single Entry layout looks like on the front end:
Build a dashboard for users to edit their events (optional)
We want users to be able to edit events that they create, so we’re going to create a separate View that functions like a personalized dashboard.
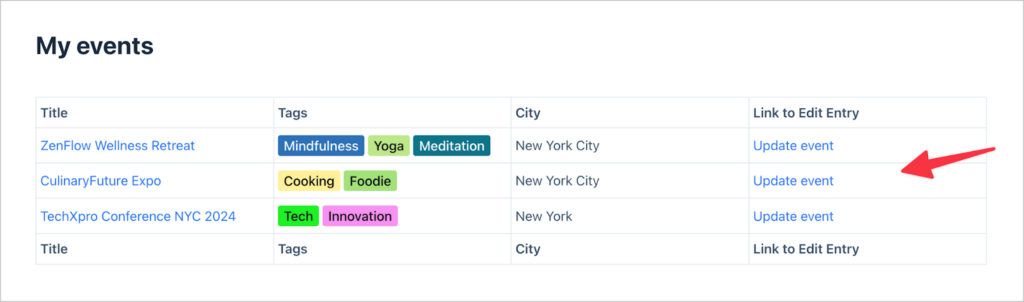
For this View, we’ll use the “Table” layout and add a few fields to the Multiple Entries layout, including the “Link to Edit Entry” field.
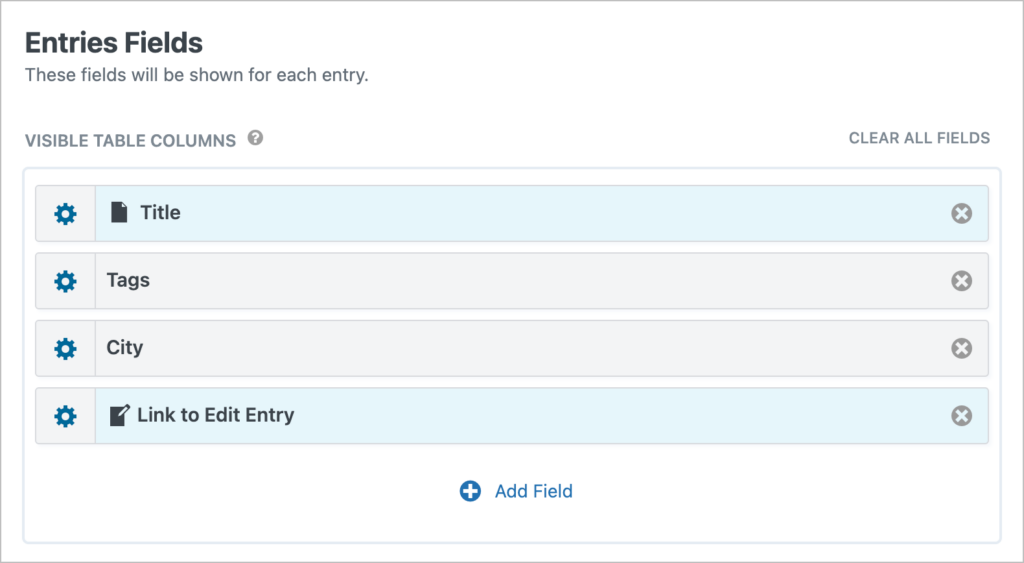
This field will output a link that takes users to a page where they can update events from the front end.
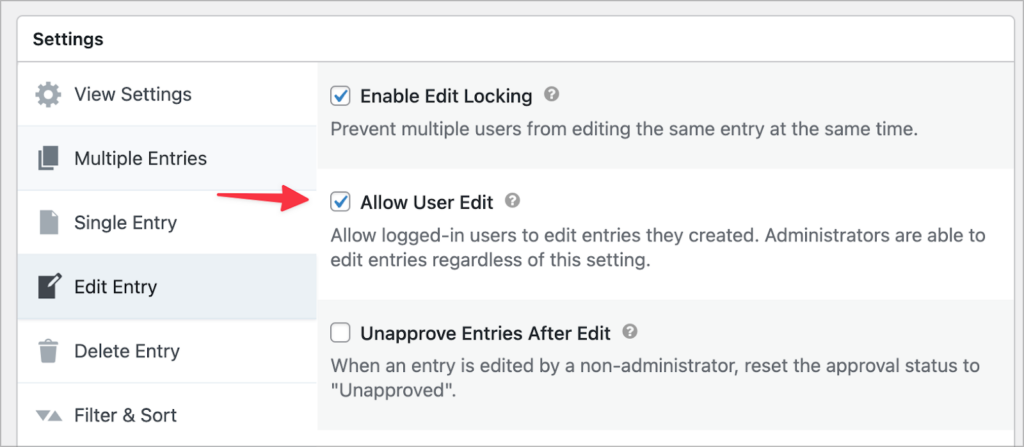
Now, we’ll scroll down to the View settings, click on the “Edit Entry” tab and check the box labeled “Allow User Edit”. This will allow users to edit events that they create.
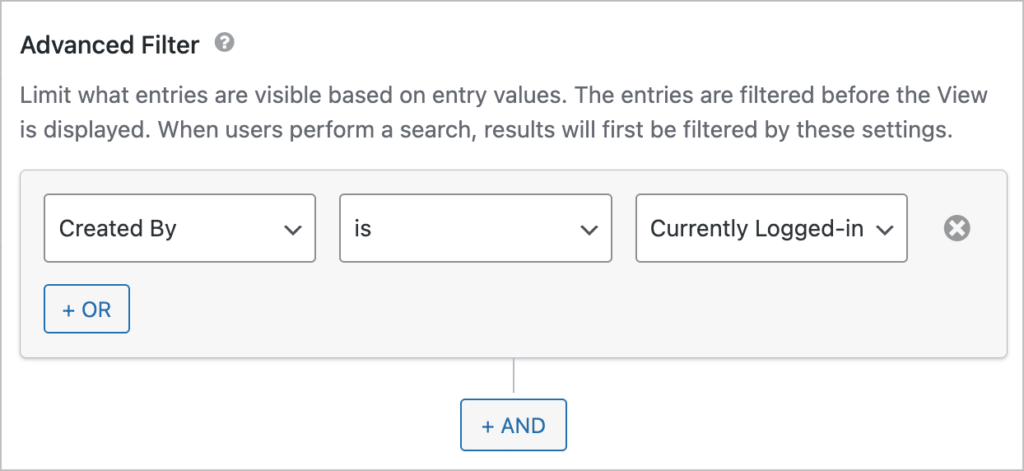
We’re also going to click on the “Filter & Sort” tab and add an advanced filtering condition to ensure that users only see events that they created.
Here’s what our dashboard page looks like on the front end. It’s a simple table displaying all of the events submitted by the user. The user can then click on “Update event” to update event details front he front end.
Here’s what the Edit Entry page looks like. As you can see, all the event information is editable directly from the front end (no need for backend access!).
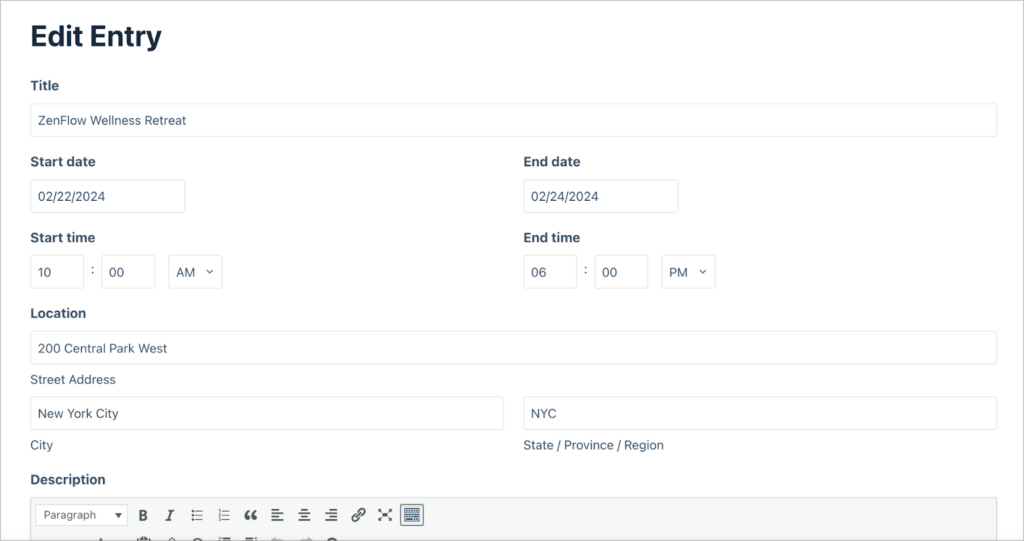
By default, all form fields are editable. However, if you want to limit which fields are editable, you can do so by adding those fields to the Edit Entry layout in the View editor.
Taking things further: Calendars and registration forms
It wouldn’t be right to end this tutorial without mentioning some of the ways you can take things further and enhance your WordPress event website.
Add an event calendar
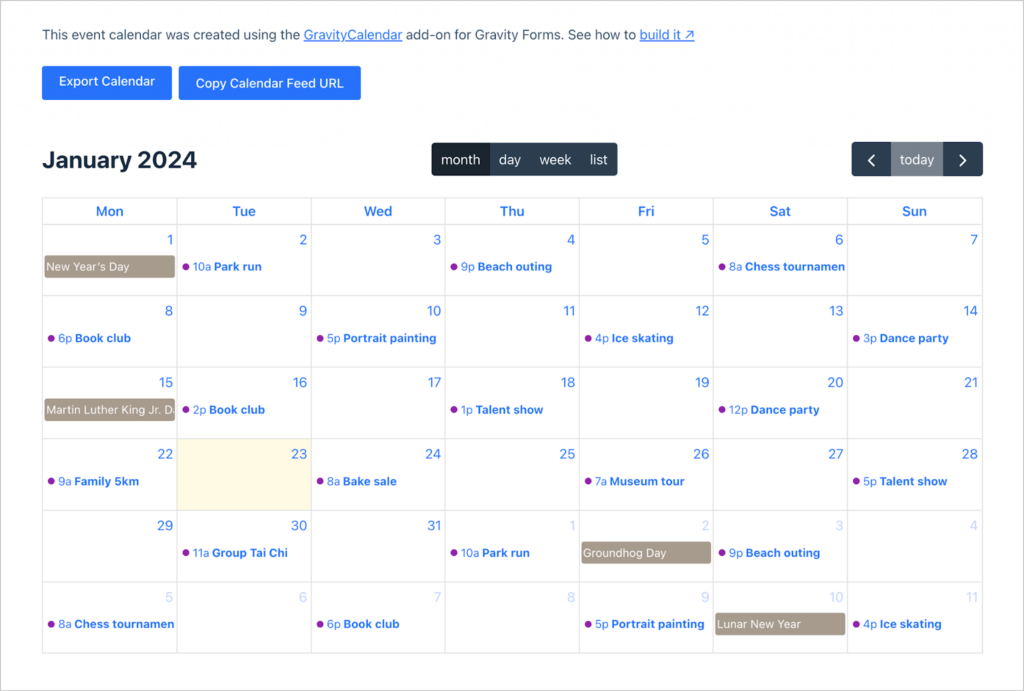
If you want to showcase a calendar of upcoming events that your users can subscribe to, you can use our powerful GravityCalendar add-on!
GravityCalendar enables you to display Gravity Forms entries on a dynamic calendar that you can customize. You can also enable the “feed URL”, allowing site visitors to subscribe to your events from their personal Google or Apple calendar.
Pro tipFor a full tutorial on creating an events calendar, read How to build a Gravity Forms event registration calendar.
Add an event registration form
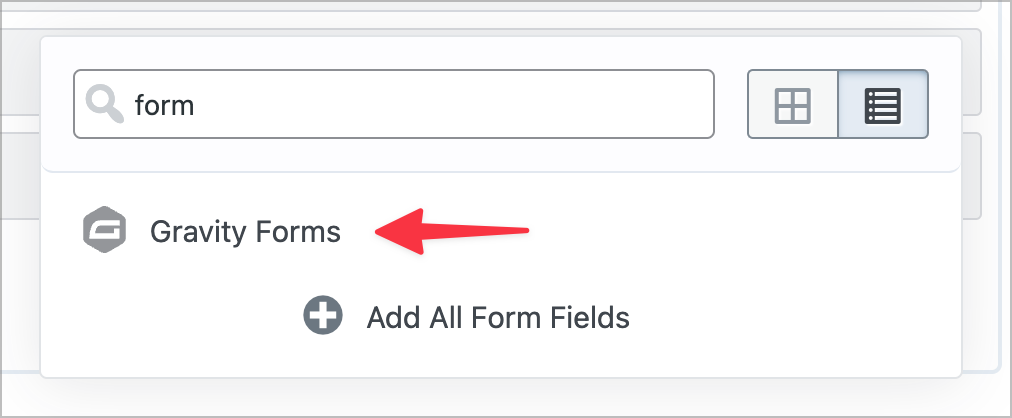
Did you know that GravityView allows you to embed other Gravity Forms into your Views? You can do this using the “Gravity Forms” field type.
If you want to add an event registration form to your event pages, simply create a new form and embed it in the Single Entry page.
You can then use dynamic population to update a field in the form with the title of the event that the user wants to register for.
Showcase events on your WordPress site today!
In this tutorial, we showed you how to create a WordPress event website using Gravity Forms and GravityKit. First, we created an event submission form for users to add events to our showcase. Next, we create a View to display events on the front end.
If you found this tutorial helpful, make sure you subscribe to our newsletter so we can notify you when we publish new content.

Helpful tips right in your inbox.
Subscribe to get the latest articles, information on releases and helpful Gravity Forms tips!
More articles

Launch Log: theme template editing in Block MCP, Shield silentCAPTCHA for Zero Spam, and GravityView fixes
Block MCP adds safe theme template editing, Gravity Forms Zero Spam gains Shield silentCAPTCHA support, and GravityView fixes lightbox and notice bugs.

GravityKit turns 12: a year in review, and 30% off Lifetime All Access
GravityKit turns 12. A look back at a year of GravityView 3.0, GravitySearch, and AI-assisted building, plus a birthday sale on the Lifetime All Access Pass.

Launch Log: Row headers for screen readers, smarter conditional logic, and multi-View fixes
GravityView 3.1 adds row headers for screen readers, plus smarter conditional logic in GravityCalendar and fixes for DataTables, Maps, and Dynamic Lookup.
