Published
•
Updated
How to build a to-do list app on WordPress (without code)
Build a simple but powerful to-do list app on WordPress using Gravity Forms and GravityView. Users can add tasks, set priorities, and check off items from the front end.
A quick search for ‘productivity hacks’ reveals thousands of tips, ranging from planning your day ahead of time to listening to classical music while you work.
But there’s one, simple productivity strategy that is a mainstay for the majority of successful people: keeping a to-do list.
To-do lists work wonders for people who feel overwhelmed by the amount of things they need to keep track of. Thinking of all the tasks you need to do can lead to confusion and stress. However, writing them down in a prioritized list can help you feel more organized and boost your productivity.
In this post, we’re going to show you how to build a simple (but powerful) WordPress to-do list application using Gravity Forms and GravityView. Let’s dive in! 👇
Check out a live demo of the finished to-do list and get your own free trial site preloaded with all GravityKit add-ons!
Sneak peek
Here’s what our finished WordPress to-do list app list looks like:

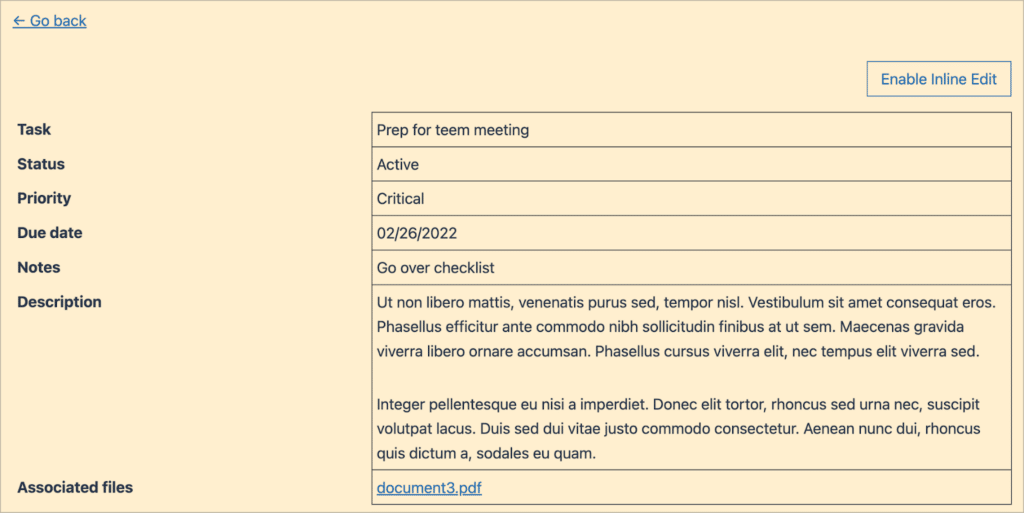
Each task is a link that takes you through to the Single Entry screen where you can view more information about the task:
What is a to-do list?
Creating to-do lists is an age-old productivity hack, but what are they, and how do they work?
At the most basic level, a to-do list is a written list of tasks that you need to accomplish. It can be a physical list written out on a piece of paper, or it could be a note on your phone or computer.
To-do lists are more effective if they are prioritized. In other words, a to-do list should list everything that you have to do, with the most important tasks at the top of the list, and the least important tasks at the bottom.
Can keeping a to-do list make you more productive?
By keeping a to-do list, you make sure that your tasks are written down all in one place. This prevents you from forgetting something important. By putting the most important tasks at the top, you can tell what needs your immediate attention, and what you can leave until later.
Taking tasks out of your head and writing them down is tremendously helpful. This practice allows you to stop thinking about what you need to do and start doing it. When information piles up in your head, it leads to stress, and anxiety.
In fact, taking thoughts out of your head and writing them down is a central component of David Allen’s well known productivity system, Getting Things Done.
By keeping a prioritized to-do list, you’ll be able to confidently answer “what should I be working on?” at any given moment without worrying that you might forget something important.
This is why maintaining a to-do list helps to make you more productive. And if you’re really into productivity hacks, why not create a “not-to-do” list as well?
Why create a to-do list application on WordPress?
WordPress is a powerful, open source framework for building websites and apps. If you’re looking to increase your productivity, it makes sense to create a simple to-do list application on WordPress.
Think about it… A physical list can easily get lost amongst the papers on your desk, and a note in your phone can be deleted by accident. However, building a simple to-do list application on WordPress is the perfect way to catalog your tasks and improve your productivity.
Building a simple to-do list using Gravity Forms and GravityView
Now let’s take a look at how to create a powerful to-do list application on WordPress using Gravity Forms and GravityView.
Create the task form
We’ll start by creating a new form in Gravity Forms that allows us to capture new tasks. To create the form, we’ll hover over Forms and click New Form. Now we can start building our task form using the Gravity Forms visual builder.
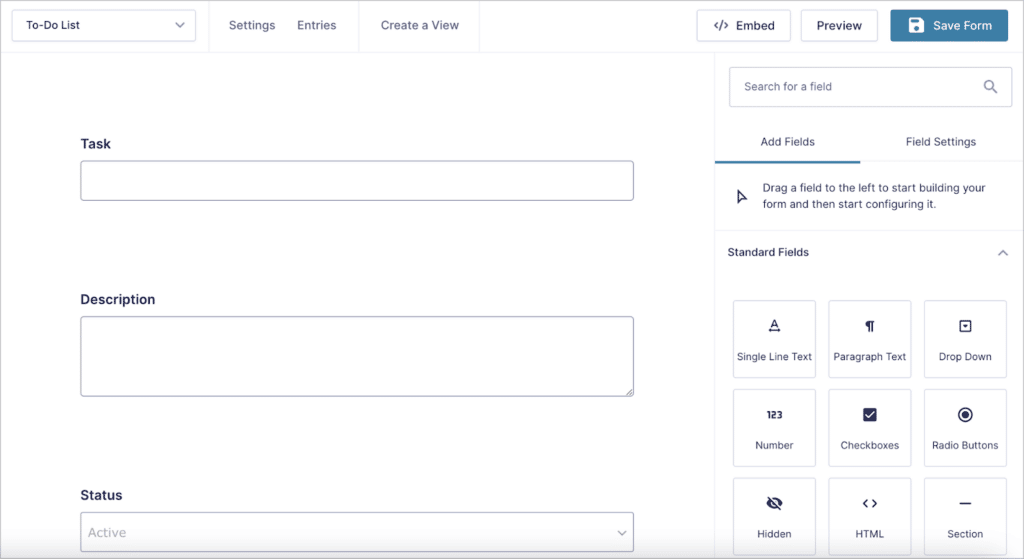
Our task form has the following fields:
- Task (Single Line Text field)
- Notes (Single Line Text field)
- Description (Paragraph field)
- Status (Drop Down field)
- Priority (Drop Down field)
- Due date (Date field)
- Associated file (File Upload field)
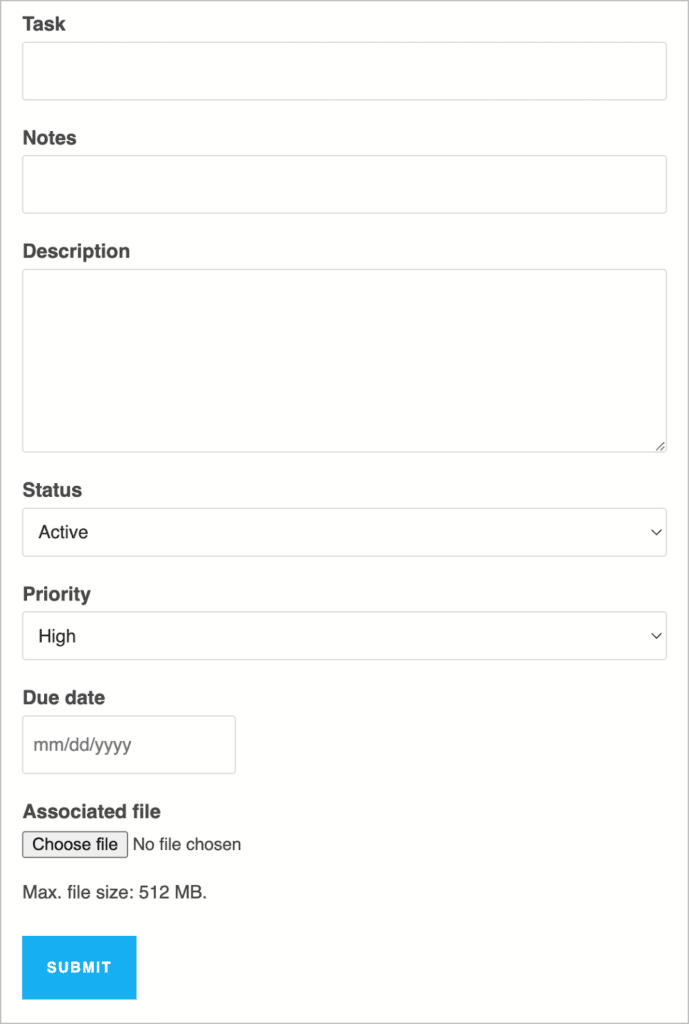
The ‘Status’ field has two options – ‘Active’ and ‘Completed’. This is how we’ll keep track of which tasks are outstanding and which ones we’ve already completed. The ‘Priority’ field is also a Drop Down field with four options – ‘Critical’, ‘High’, ‘Medium’ and ‘Low’.
Finally, we also added a File Upload field, as this allows us to attach files and documents to specific tasks. This is helpful if a task requires a certain documents to get done.
We’re keeping things simple with our example, but feel free to add additional fields or options to your form as you see fit!
When you’re done, remember to embed your form on a page or post.
Here’s what our form looks like on the front end:
Now that we have a form set up for us to input new tasks, let’s build the to-do list itself using GravityView.
Creating the task list using GravityView’s Table layout
To create a new View, we’ll hover over Views and click New View. After giving our View a name, we’ll need to select a data source – this is the form in Gravity Forms containing the data we want to display. We’ll select the to-do list form that we created in the previous step.
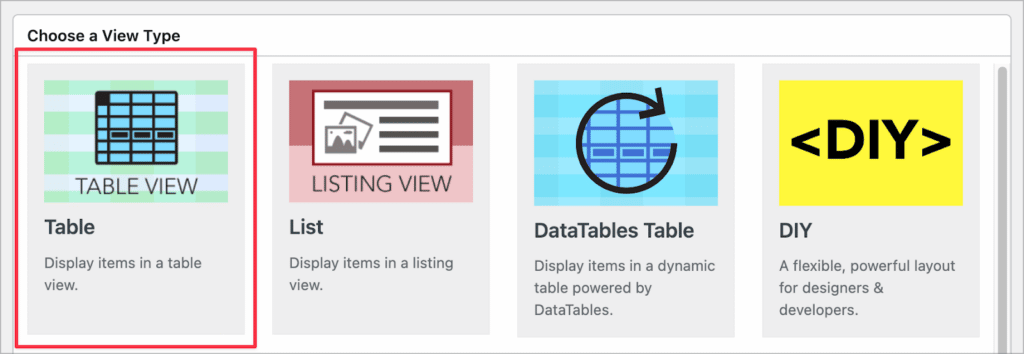
Now we need to select a View layout. GravityView offers several layout options, each one suited for different kinds of WordPress web apps. Seeing as we’re building a to-do list, we’ll select the Table layout.
Now we can start constructing our to-do list using GravityView’s drag-and-drop builder. The first thing we’ll do is remove all widgets from the View. Widgets are tools for navigating a View (such as a search bar), but we won’t need them for a simple to-do list.
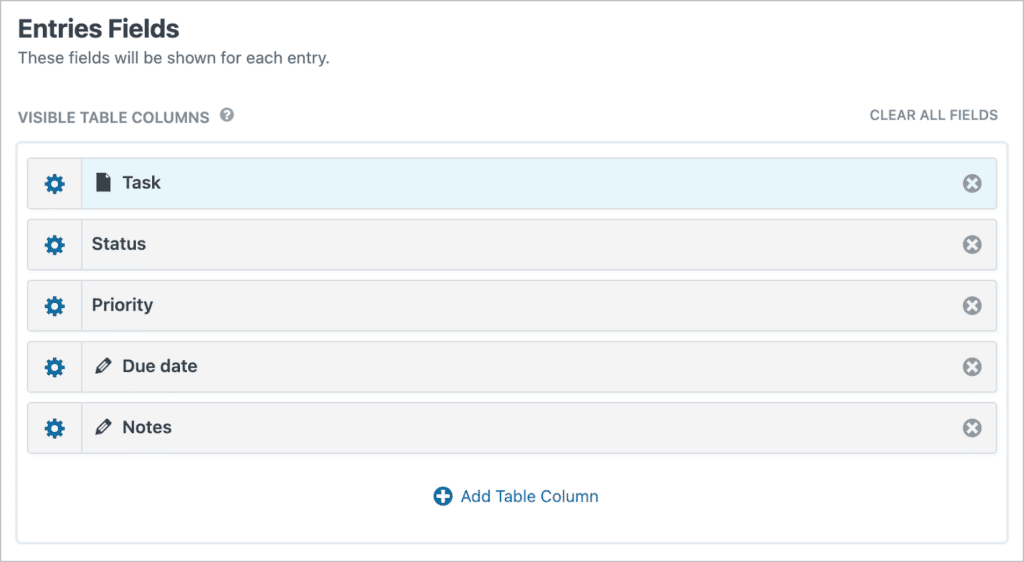
After that, we’ll add fields to the ‘Entries Fields’ section. Each field we add here will show up as a column in our table. We’ll go ahead and add the ‘Task’, ‘Status’, ‘Priority’, ‘Due date’ and ‘Notes’ fields.
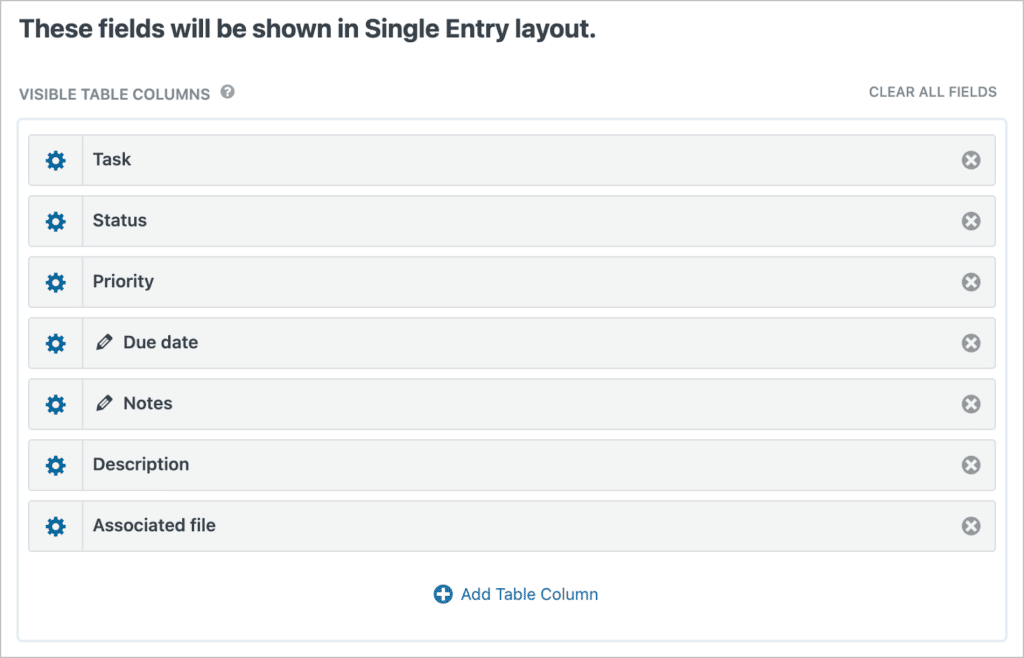
You may have noticed that we left out the ‘Description’ and ‘Associated file’ fields. That’s because we’re going to add them to the Single Entry Layout instead. The Single Entry Layout allows us to display additional information about each task.
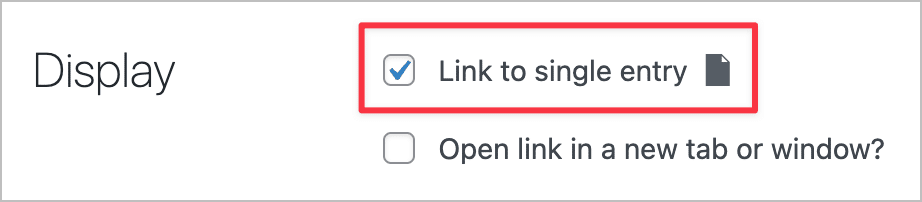
Before we can configure the Single Entry Layout, we need to add a link through to the Single Entry page. To do this, we’ll click on the gear icon next to the ‘Task’ field label to open the field settings and check the box that says ‘Link to single entry’.
Now we can navigate to the Single Entry Layout and start adding fields.

Here we can add fields just as we did for the Multiple Entries Layout.
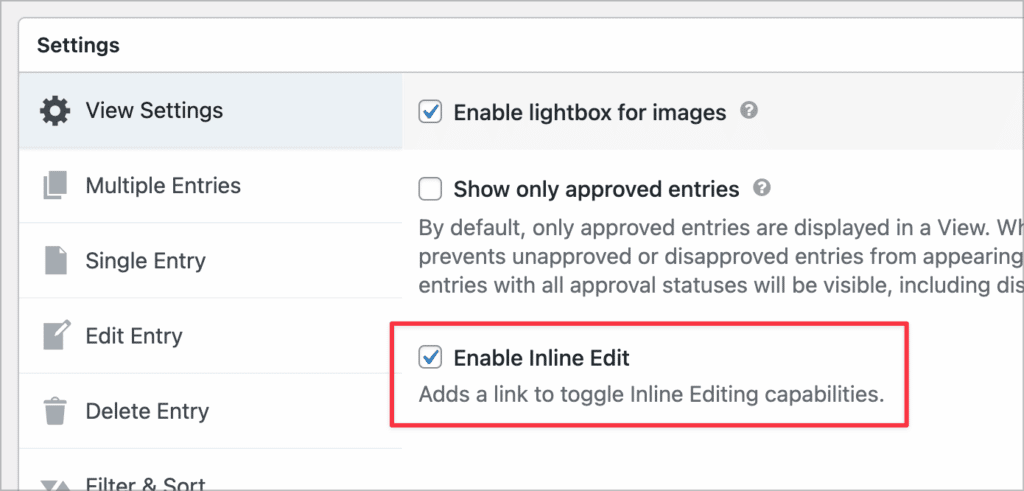
We also need a way to edit tasks. For example, we may need to update a task’s status from ‘Active’ to ‘Completed’ or change the priority from ‘Low’ to ‘High’. We could enable front end editing by configuring the Edit Entry Layout, but instead we’re going to use the GravityEdit Add-On.
GravityKit allows you to edit Gravity Forms entries quicker and it also integrates with GravityView. After installing the add-on, all we need to do is scroll down to the View settings and check the box that says ‘Enable Inline Edit’.
Inline editing allows us to update tasks from the front end without needing to go to the Edit Entry Layout. Here’s a quick video showing how it works:
Filtering the View by status
The next thing we’re going to do is apply a filter to our View so that we’re only displaying ‘Active’ tasks. We don’t want to display tasks that have been completed already!
We can do this using the GravityView Advanced Filtering extension. After installing the extension, we’ll scroll down to the View settings, select the ‘Filter & Sort’ tab and click ‘Add Condition’.
We’ll add the following condition, ensuring that only tasks with the status of ‘Active’ are displayed in our table.
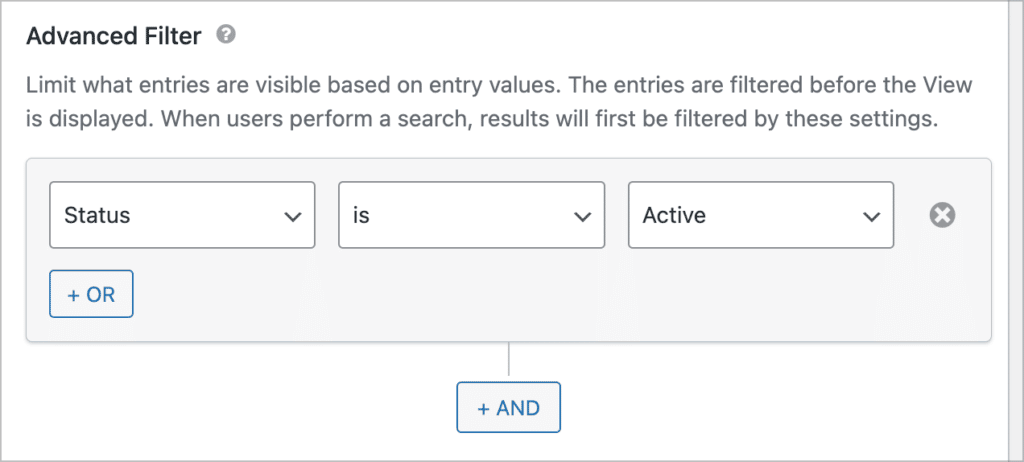
So now when we complete a task and update its status, it will disappear from our to-do list, which is exactly what we want to happen! If you want to keep a record of your completed tasks, you could create a View and filter it to only show tasks with the status ‘Completed’ (we’ll show you what that may look like below).
Embedding our to-do list on a page or post
Finally, we’ll need to embed our to-do list on the front end. We can do this by using the GravityView embed shortcode above the ‘Update’ button in the View editor.
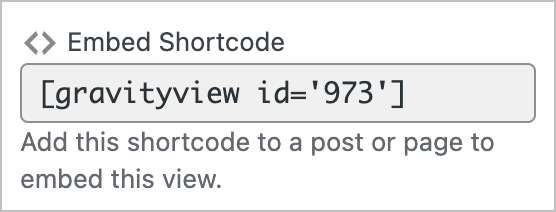
All we need to do is create a new page and paste the above shortcode inside a WordPress ‘Shortcode’ module or inside an equivalent module if you’re using a different page builder.
After adding some custom styles, here’s what our to-do list application looks like on the front end:
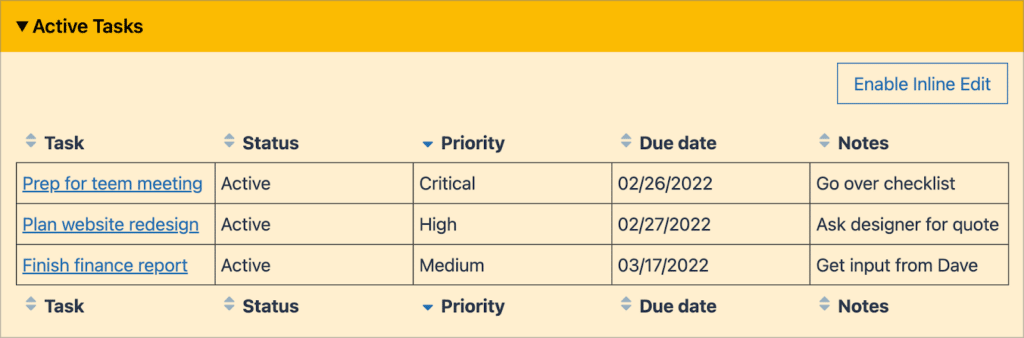
Clicking on the name of a task takes us through to the Single Entry page where we can view more details about the task, including the description and associated documents/files (if applicable).

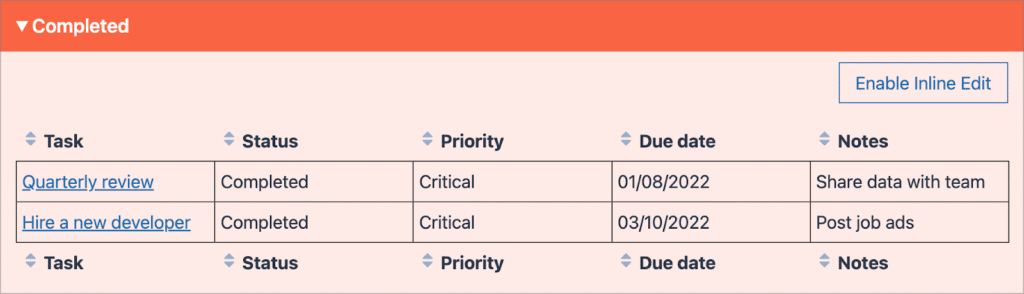
Clicking on the ‘Enable Inline Edit’ button will allow us to update tasks from the front end! And if you want to record your completed tasks in a separate View, you can easily do that using the Advanced Filter:
That’s it!
Build your to-do list on WordPress
Keeping a prioritized to-do list helps you to stay organized by seeing which tasks need your attention and which ones can be left to a later date. Taking things out of your head and writing them down is a great way to rid your mind of clutter, increase your focus and boost your productivity.
But paper to-do lists don’t offer much flexibility, and simple notes stored in your phone are often forgotten about or accidentally deleted. That’s why you should create your to-do list on WordPress.
In this post, we created a powerful front end to-do list application using Gravity Forms and GravityView. If you found this tutorial useful, and you want to create a similar application for yourself or other, get GravityView today!

Helpful tips right in your inbox.
Subscribe to get the latest articles, information on releases and helpful Gravity Forms tips!
More articles

GravityKit turns 12: a year in review, and 30% off Lifetime All Access
GravityKit turns 12. A look back at a year of GravityView 3.0, GravitySearch, and AI-assisted building, plus a birthday sale on the Lifetime All Access Pass.

Launch Log: Row headers for screen readers, smarter conditional logic, and multi-View fixes
GravityView 3.1 adds row headers for screen readers, plus smarter conditional logic in GravityCalendar and fixes for DataTables, Maps, and Dynamic Lookup.

Ecommerce platform market share 2026: WooCommerce leads the web, Shopify leads the top tier
Ecommerce platform market share in 2026, from HTTP Archive data. WooCommerce leads the whole web at 6.64%, but Shopify already leads the top 1M sites.
