Published
•
Updated
How to add a contact form to your GravityView listings
Embed a Gravity Forms contact or enquiry form on any GravityView single-entry page. Dynamic population pre-fills fields with the listing details automatically.

Want to let visitors submit an enquiry, request a quote, or send a message directly from a GravityView single entry page? You can do this by embedding a separate Gravity Forms form on the page and using dynamic population to link it to the entry being viewed.
In this tutorial, I’ll walk you through the process using a product catalog as an example. We’ll add a “Rental enquiry” form to each product’s detail page so visitors can ask about a specific item without leaving the page.
Let’s dive in!
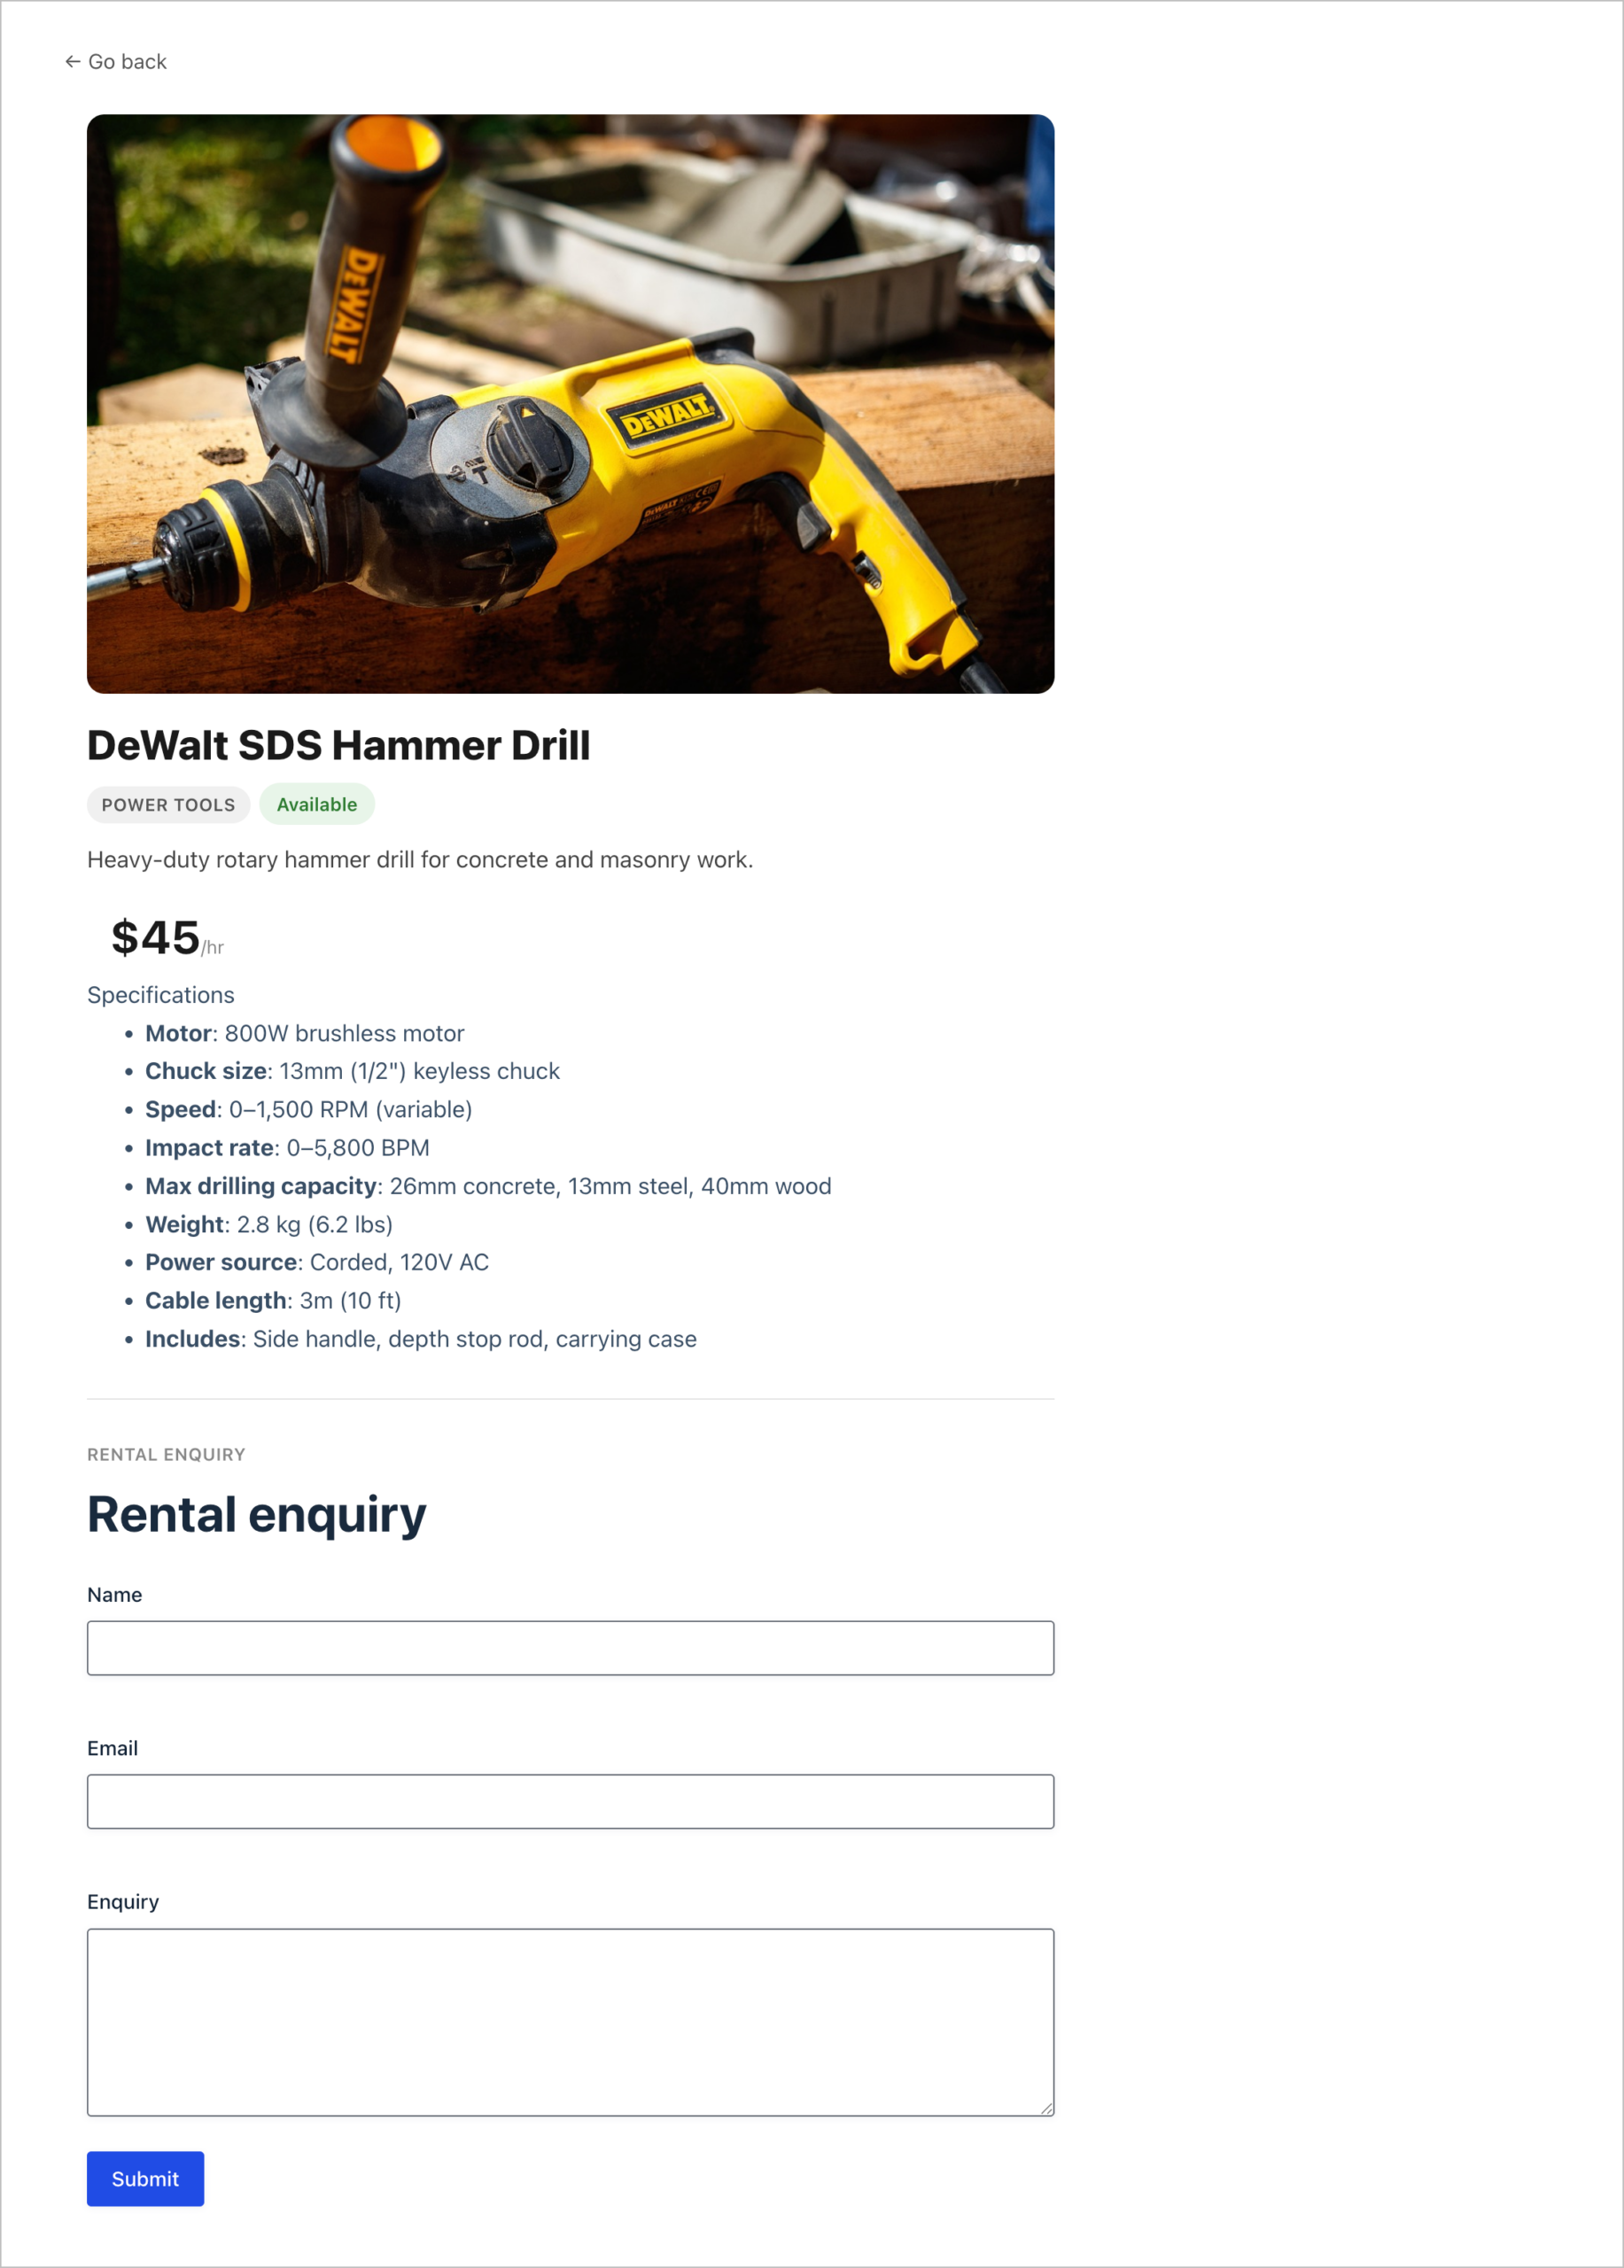
Sneak peek
Here’s what the finished result looks like: a product detail page with an embedded enquiry form at the bottom.
This technique works for any type of directory or listing, whether you’re building a product catalog, a staff directory, a service provider directory, or anything else powered by GravityView.
Wanna try it?
Spin up a demo
See what you can build with GravityView — explore the live demo.

Edit Entry vs. embedding a separate form
Before we dive in, let’s clear up a common point of confusion. GravityView offers two different ways to interact with forms on a single entry page, and they serve very different purposes:
Edit Entry is a built-in GravityView feature that lets users modify the data in an existing entry. For example, if you have a product catalog, Edit Entry allows a staff member to update the product’s price, description, or availability status directly from the front end. Learn more about configuring Edit Entry.
Embedding a separate form (the approach covered in this tutorial) adds an entirely new form to the single entry page — like an enquiry form that lets visitors send a message about the product they’re viewing. The form creates a new submission rather than modifying the existing entry.
| Edit Entry | Embedded Form | |
|---|---|---|
| Purpose | Update existing entry data | Collect new submissions (e.g., enquiries, messages) |
| Who uses it | The entry owner or an admin | Visitors to the listing |
| Result | Modifies the original entry | Creates a new, separate form submission |
| Example | “Let staff update product availability” | “Let visitors ask about a product” |
If your goal is to let people update their own listings, use Edit Entry. If you want visitors to submit something about an entry (a message, enquiry, review, etc.), keep reading.
What you’ll need
To follow along with this tutorial, you’ll need:
- Gravity Forms — for creating both your data form and your enquiry form
- GravityView — for displaying entries on the front end with a single entry detail page
I’ll assume you already have a GravityView View set up with a working single entry page. If you don’t, check out our guide on how to build a product catalog with GravityView for a step-by-step walkthrough.
Step 1: Create the enquiry form
First, we’ll create a simple Gravity Forms form for visitors to submit their enquiry. Hover over Forms, click New Form and add the following fields:
- Name (Name field)
- Email (Email field)
- Message (Paragraph Text field)
- Product (Hidden field) — this will automatically capture which product the visitor is enquiring about
The hidden field is the key to making this work. It will be dynamically populated with the product name (or entry ID) so you know exactly which item the visitor is asking about.
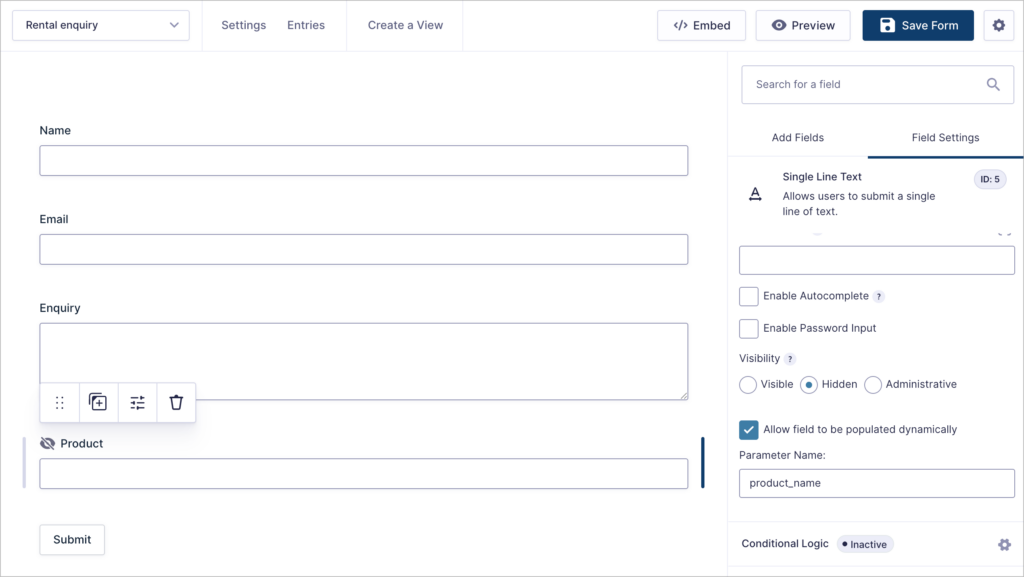
To set up the hidden field:
- Add a new Single Line Text field
- Set Visibility to Hidden
- Check “Allow field to be populated dynamically”
- Enter a parameter name, such as
product_name
When you’re done, save your form.
Step 2: Add the form to your Single Entry layout
Now we’ll embed the enquiry form on the product detail page in GravityView.
- Open your View in the GravityView editor
- Click on the Single Entry Layout tab
- Click Add Field and select the Gravity Forms field type
- In the field settings, select your enquiry form from the dropdown
Now comes the important part: configure the Field value parameters to dynamically populate the hidden field with the product name. In the field settings, you’ll see an option for field value parameters. Here, we’ll set our field parameter equal to the product name, using a Gravity Forms merge tag.
product_name={Product name:3}This tells GravityView to pass the product name from the current entry into the hidden field on the enquiry form. The {Product name:3} part is a merge tag that pulls the value from the entry being viewed.
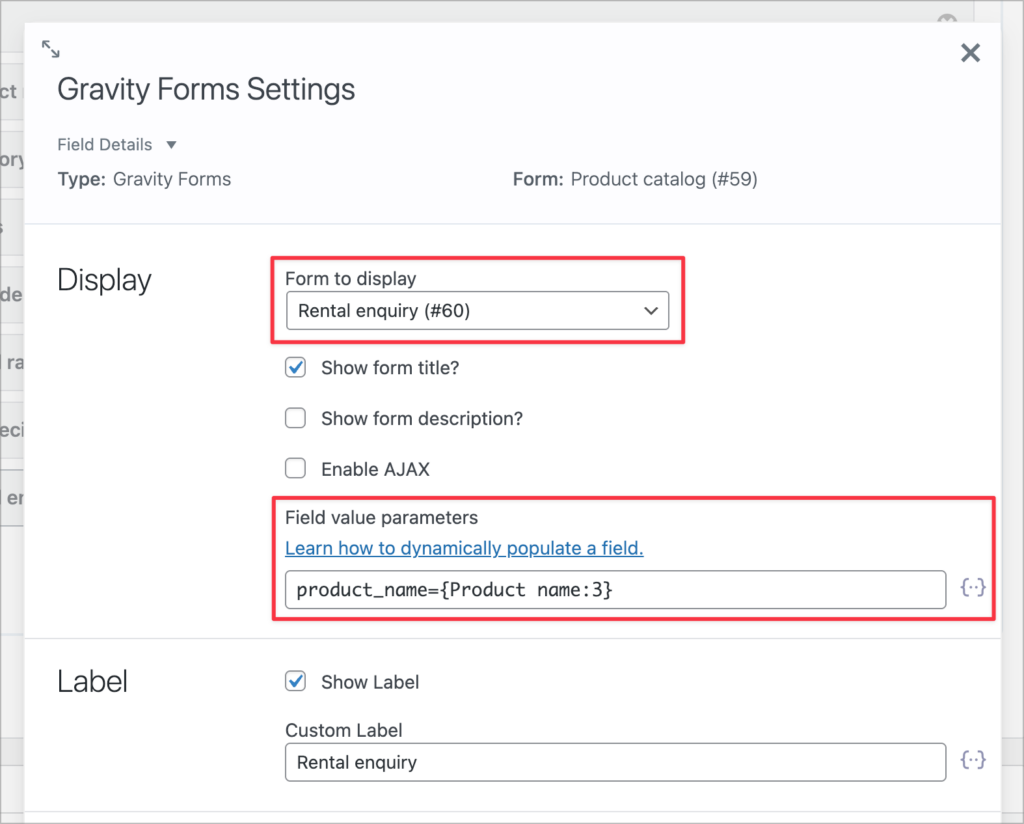
You can use this method to dynamically populate any fields in your form with information from the entry where it’s embedded!
Step 3: Configure the notification
When someone submits the enquiry form, you’ll want to receive an email notification that includes the product they’re asking about.
- Go to your enquiry form’s notification settings
- Edit the default notification (or create a new one)
- In the notification body, include the
{Product:4}merge tag (where 4 is the ID of your hidden product field) so you can see which product the enquiry is about
If your directory includes contact information for different people (e.g., a staff directory where visitors can message individual team members), you can route notifications dynamically. Simply add a hidden email field to the enquiry form, populate it with the entry’s email address using merge tags, and set the notification’s Send To field to reference that hidden field.
Step 4: Test the form
Submit a test entry through the enquiry form on the front end to make sure:
- The hidden field is correctly populated with the product name
- The notification email is sent and includes the right product information
- The form displays properly on the single entry page
Alternative: Link to a separate page
If you’d prefer not to embed the form directly on the single entry page, you can link to a separate contact page instead. Add a Custom Content field to your Single Entry layout with an HTML link that passes the product information via URL query parameters:
<a href="/enquiry/?product_name={Product name:1}">Enquire about this product</a>On the destination page, the enquiry form will pick up the product_name parameter and populate the hidden field automatically.
Wrapping up
Adding a form to a GravityView Single Entry page is a powerful way to let visitors interact with your listings, whether that’s submitting an enquiry, requesting a quote, leaving feedback, or sending a message to the person behind the listing.
The key steps are:
- Create a Gravity Forms form with a hidden field for dynamic population
- Add the Gravity Forms field type to your GravityView Single Entry layout
- Configure the field value parameters to pass entry data into the form
- Set up notifications so you know which entry the submission relates to
This technique works for any type of GravityView directory or listing. Once you’ve got the basics down, you can adapt it to fit your specific use case!

Helpful tips right in your inbox.
Subscribe to get the latest articles, information on releases and helpful Gravity Forms tips!
More articles

Launch Log: Distance sorting for radius searches, DataTables search improvements, and import reliability fixes
The latest GravityKit releases add distance sorting to map searches, bring built-in search to DataTables, and fix GravityCharts and GravityImport edge cases.

WordPress page builder market share 2026: Elementor leads at 32.67%
Elementor reaches 32.7% of WordPress sites. WordPress Block Editor 20.6%, wpBakery 8.5%, Divi 5.7%. Latest HTTP Archive crawl, share-of-WordPress basis throughout.

Launch Log: GravityView 3.0, plus upgrades to Block MCP and GravityKit MCP
GravityView 3.0 lands with the new Vantage theme, frontend bulk actions, and AI-assisted View creation. This launch log also covers updates to GravityKit MCP, Block MCP, and Dashboard Views.