Published
•
Updated
How to build a WordPress business intelligence dashboard
Build a WordPress business intelligence dashboard using Gravity Forms, GravityCharts, and GravityView. Visualize form data, track KPIs, and make better decisions without expensive BI tools.

Many companies use business intelligence tools to collect and analyze data. This can lead to more informed decision-making and an increase in key performance metrics!
However, many business intelligence platforms are costly and difficult to use. Wouldn’t it be great if you could build your own BI dashboard directly on your WordPress website?
In this post, we’re going to show you how to build your own WordPress business intelligence platform using Gravity Forms, GravityCharts and GravityView!
Let’s get started.
Check out our live demo applications and get your own free trial site preloaded with all GravityKit add-ons!
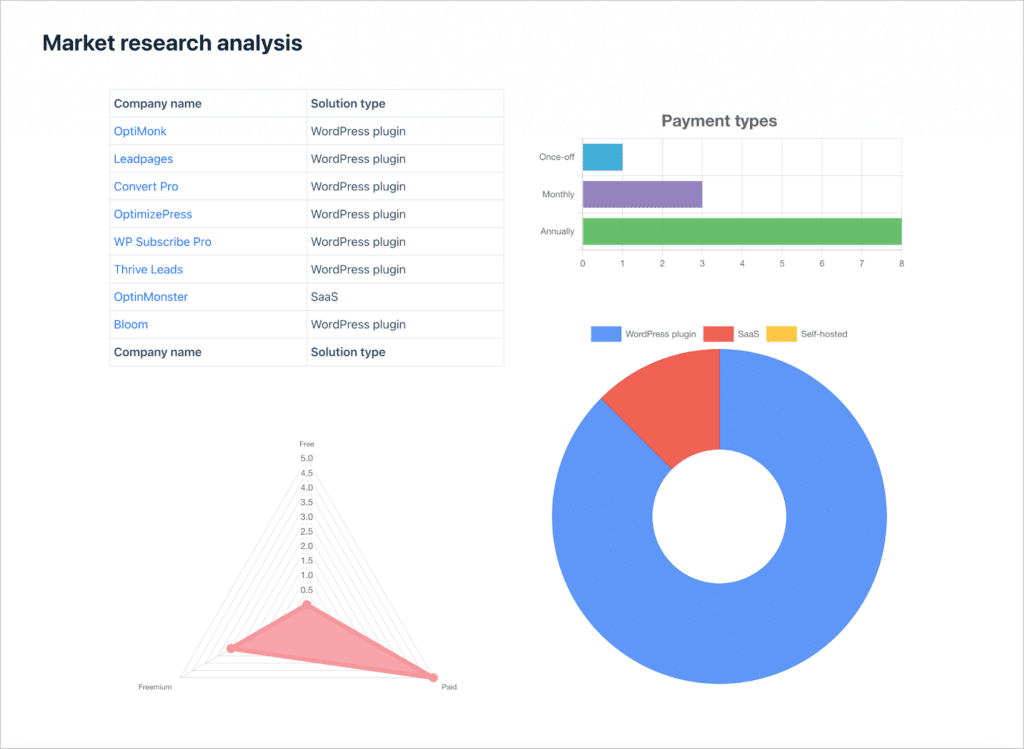
Sneak peek
Here’s a look at our finished business intelligence dashboard. In this example, we’ve created a system for analyzing data collected during a market research campaign.
Pro tipCheck out our tutorial on building a market research platform using Gravity Forms and GravityView.
What is business intelligence?
Business intelligence (BI) refers to the process of gathering and analyzing data in order to deliver actionable information and insights. Business intelligence is a technology-driven process used by companies to inform operational strategy and planning.
The ultimate goal of the business intelligence process is to drive better decision-making, leading to an improvement in key business metrics. This includes increased revenue, expanded market share, and more.
Is WordPress a good business tool?
Absolutely! Although WordPress began as a blogging platform, it has since evolved into a flexible tool for publishing articles, building web applications, managing data and more. In fact, it now powers around a third of the web, and some of the world’s biggest brands use it as their go-to website builder.
- Sony Music uses WordPress to showcase its artists, latest news, and more.
- TechCrunch is a popular technology news website that uses WordPress as its publishing platform.
- Time Magazine, a well-known media platform and magazine in the US, uses WordPress to power its online news platform.
- Spotify uses WordPress to power their Newsroom website—the press arm of the company, which publishes news, trends, and more.
- Wired, a long-running news website and magazine with a focus on technology and politics, also uses WordPress.
There are plenty more examples of big brands using WordPress, just check out this list!
With so many big brands using WordPress, it’s clear that WordPress is a powerful business tool that can help your business grow. But how can WordPress function as a BI platform? Read on to find out!
Introducing GravityCharts for Gravity Forms
Gravity Forms is a powerful form plugin and data management platform that allows you to build forms for collecting any kind of data on your website! GravityCharts extends Gravity Forms by giving you the ability to visualize your data using charts and graphs.
In this tutorial, we’re going to use both of these plugins to create a BI dashboard. We’ll also show you how GravityView fits into the mix by allowing you to display, sort, and filter Gravity Forms data from the font end.
Creating your forms
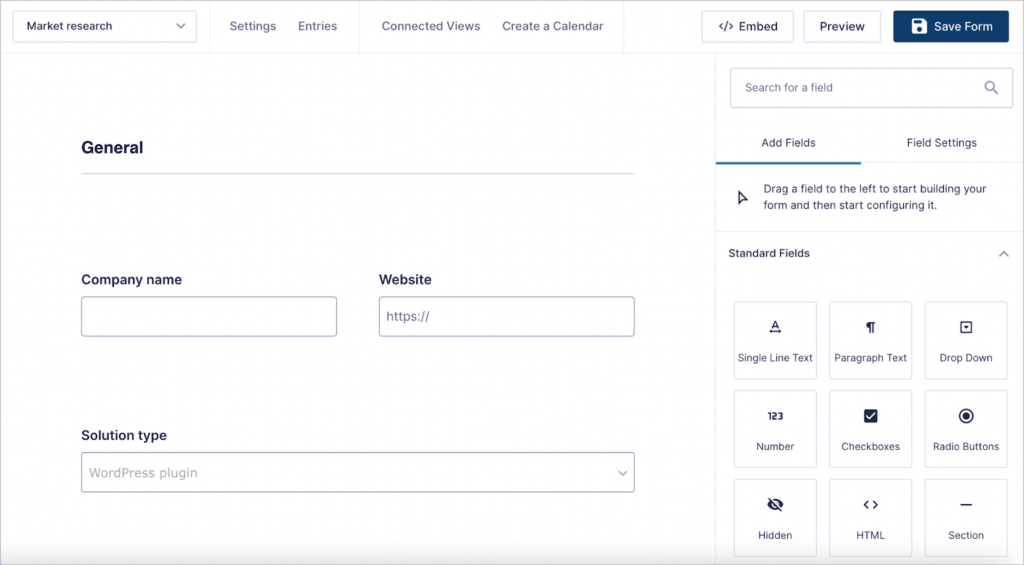
In this example, we’re going to build a BI dashboard for a market research campaign. The first thing we’ll need to do is create a form for collecting the data we want to measure.
To create a new Gravity Form, we’ll hover over “Forms” and click “New Form”. After giving our form a name, we can start adding fields to it using the visual form editor.
In this example, we’re going to be collecting competitor data for a fictitious lead generation company. However, you could create a form for surveys, lead generation, user registration, ecommerce—basically anything!
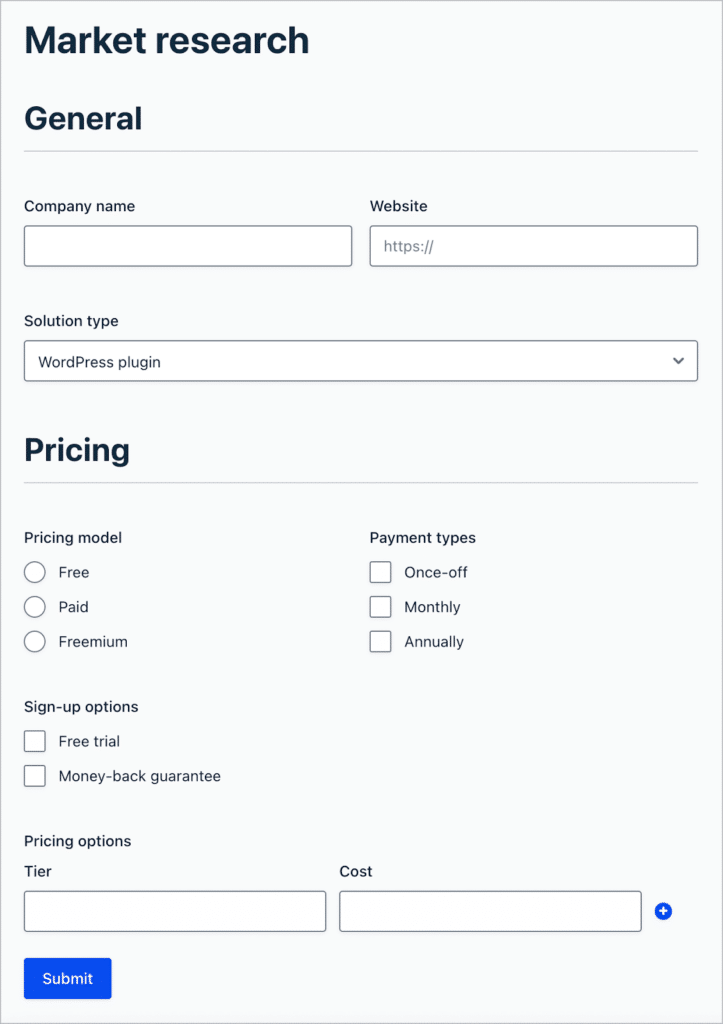
After adding all the necessary fields, here’s what our form looks like on the front end:
Let’s move on to the next step—creating charts to visualize the data on the front end.
Creating charts and visualizations using GravityCharts
After collecting market research data, the next step is to create visualizations that allow us to extract insights and spot trends. These charts will form the basis of our WordPress business intelligence platform!
We can create charts and visualizations using GravityCharts—the best charting and reporting plugin for Gravity Forms!
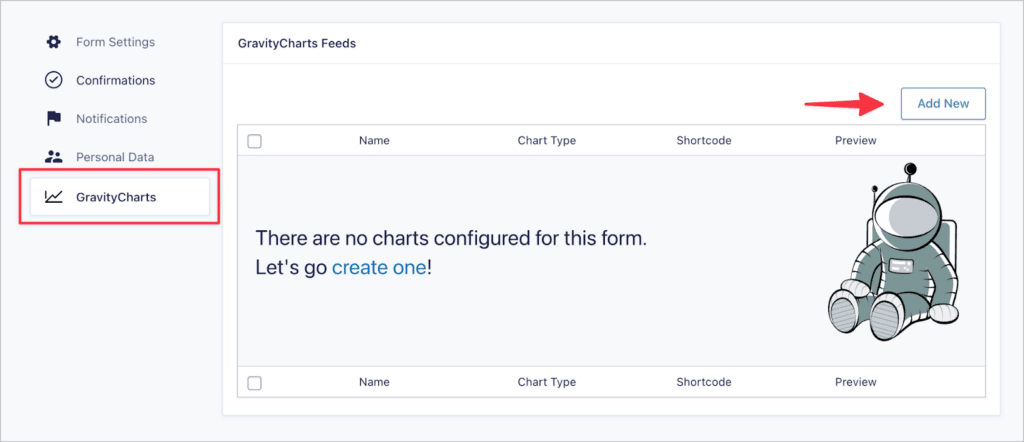
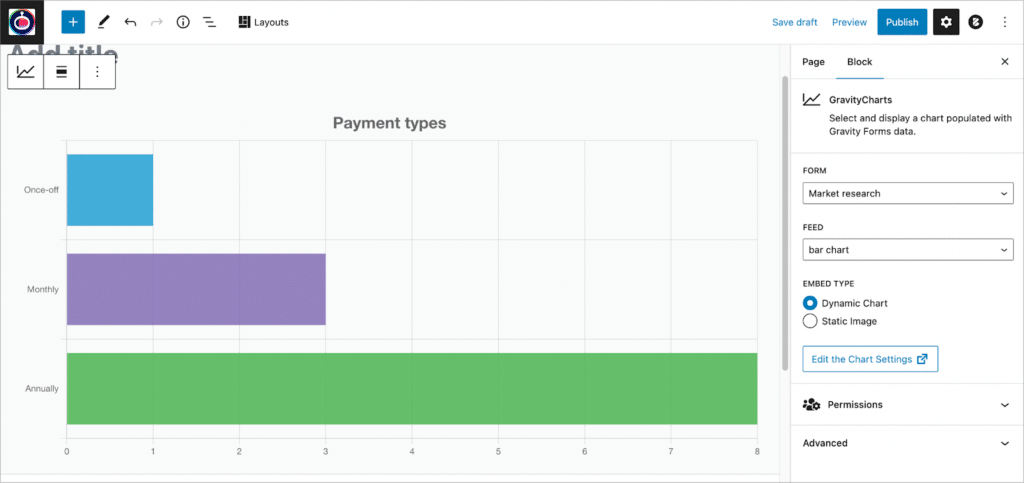
We’ll go to the form settings page and click on “GravityCharts” on the left. To create a new GravityCharts feed, we’ll click “Add New”.
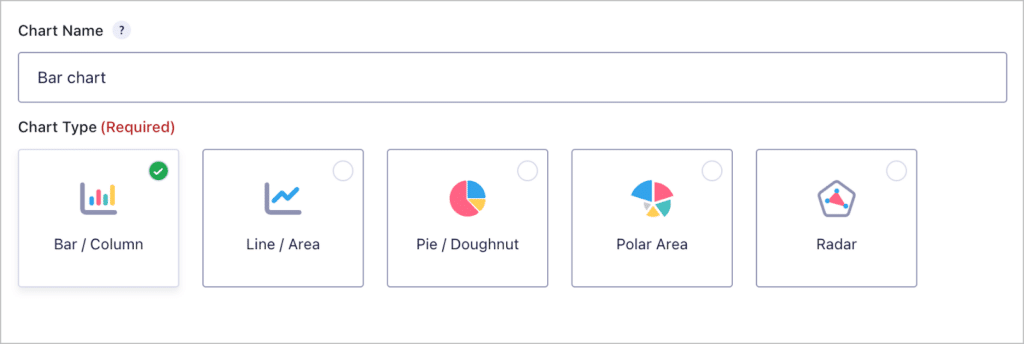
After giving our chart a name, we’ll need to select a chart type. GravityCharts supports the following 5 chart types:
- Bar/Column chart
- Line/Area chart
- Pie/Doughnut chart
- Polar Area chart
- Radar chart
We’ll go ahead and select the “Bar/Column” chart.
After selecting a chart type, we’ll need to choose the field on our form that we want to chart. GravityCharts supports any field with multiple choices such as Drop Downs, Checkboxes and Radio Buttons.
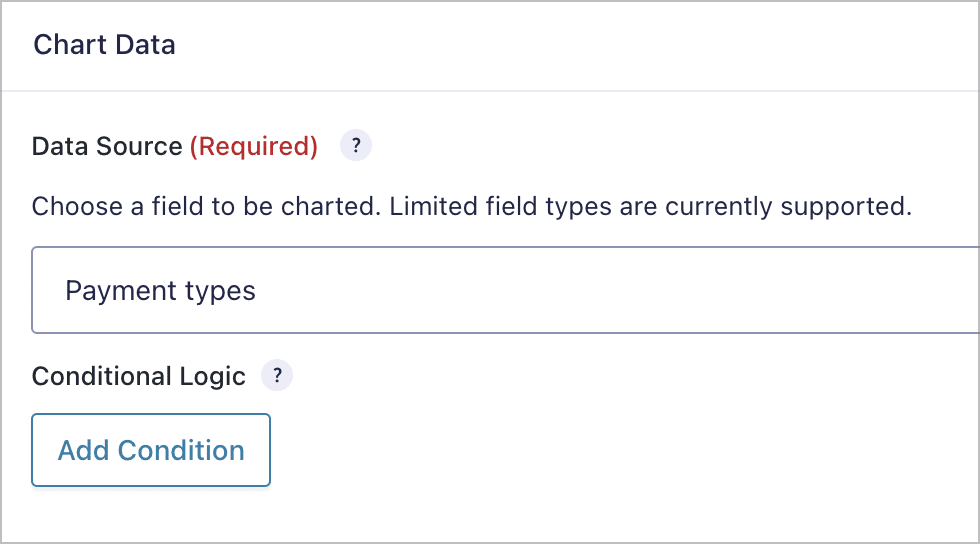
Pro tipYou can also use conditional logic to filter the data in your chart. To learn more about conditional logic, read our ultimate guide to conditional logic in Gravity Forms.
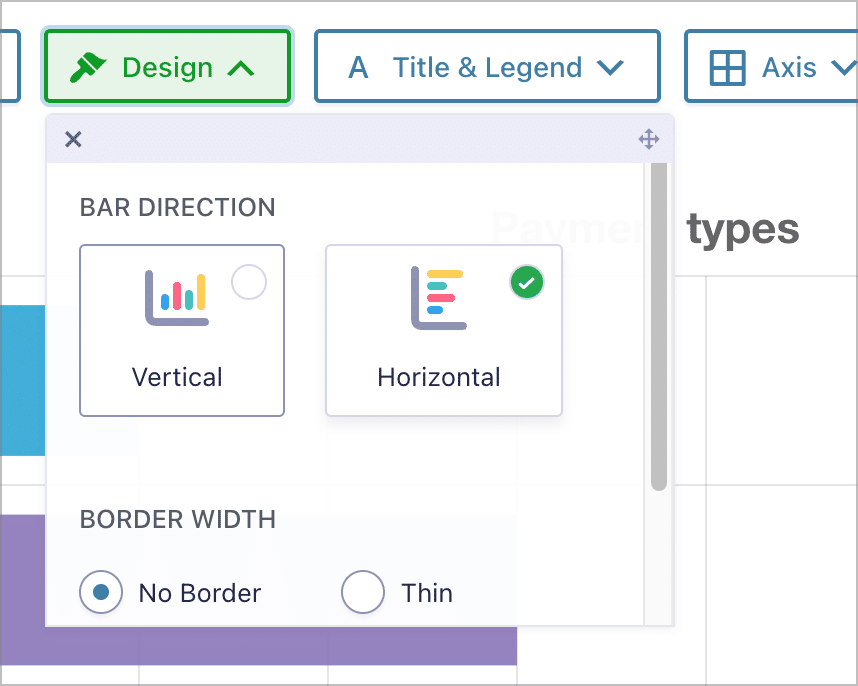
Finally, we’ll scroll down to the live chart preview. Here we can style the chart using the tabs at the top—“Colors”, “Design”, “Title & Legend”, and “Axis”.
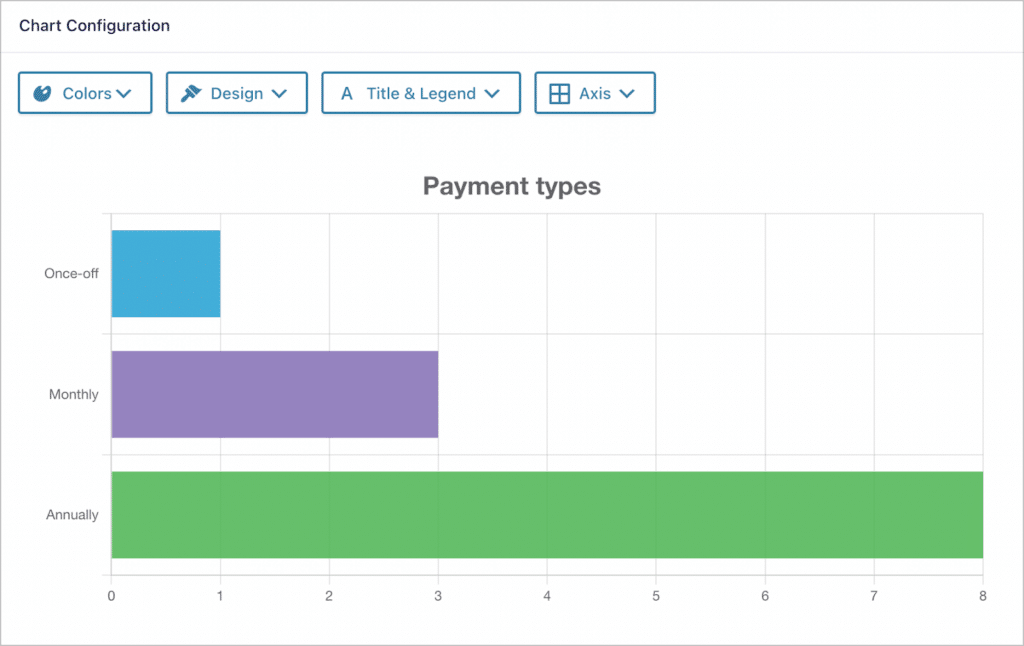
There are several options here for customizing our chart. In the “Design” panel, we can even change the bar direction from vertical to horizontal.
GravityCharts allows you to create as many charts as you like for each of your Gravity Forms, so we can easily repeat this process to create pie charts, radar charts and more! Each chart you create will automatically update when your form receives new data.
After creating your charts, you can embed them into a page or post using the “GravityCharts” block.
Apart from charts, you may also want to visualize your data using tables.
Displaying data in tabular format using GravityView
GravityView is an add-on for Gravity Forms that allows you to display your form data on the front end using tables, lists, maps and other powerful layouts! GravityView and GravityCharts is a great combination for building business intelligence systems.
For this example, let’s go ahead and create a simple table layout containing data about our biggest market competitors. To create a new View, we’ll hover over “GravityKit” and click “New View”.
Next, we’ll give our View a name and choose our data source. In this example, our data source will be our market research form that we created in the first step.

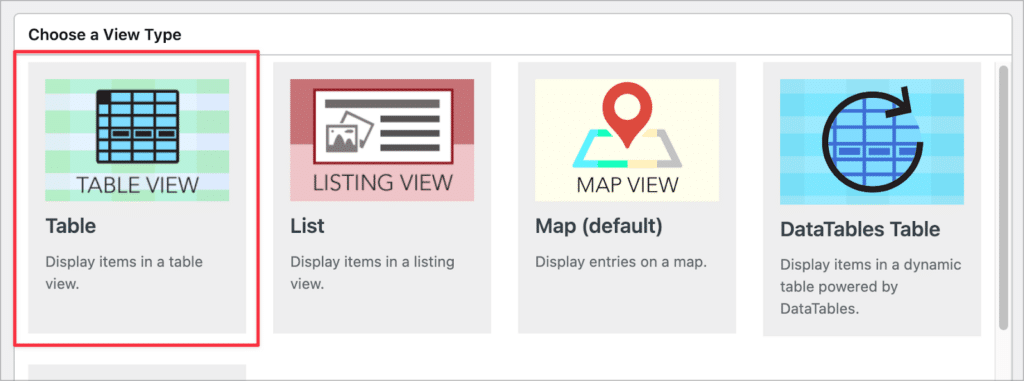
After selecting a data source, we’ll need to choose a View Type. Each View Type allows you to display data using different layouts. Seeing as we want to show data in a table, we’ll select the “Table” layout.
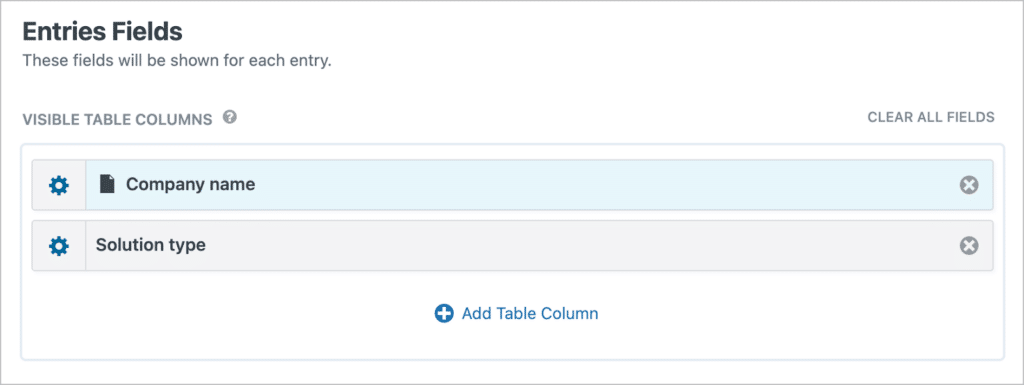
We can now configure the View layout using GravityView’s visual builder. Each form field we add here will show up as a column in our table. To keep things simple, we’ll just add two fields.
After configuring our View layout, we can embed it on a page using the “GravityView View” block.

We can now start putting together our business intelligence dashboard by embedding our View and charts on a single page. Here’s an example of what that might look like on the front end:

💡 Pro tip: If you want to link the data in your Views and charts, you can do so by adding a GravityCharts widget to your View editor.
That’s it!
Build your business intelligence system using Gravity Forms and GravityCharts!
Business intelligence is a technology-driven process used by companies to inform operational strategy and planning. Simply put, BI is the process of gathering and analyzing data in order to deliver actionable information and insights.
In this post, we showed you how to build a WordPress business intelligence dashboard using Gravity Forms, GravityCharts and GravityView. To learn more about building dashboards with GravityView, read our post on creating a client portal.
If you want to see if this solution could work for you, check out our live demos or try all of these plugins free for 30 days!

Helpful tips right in your inbox.
Subscribe to get the latest articles, information on releases and helpful Gravity Forms tips!
More articles

10 things you can ask AI to do with Gravity Forms (using the free GravityKit MCP)
See 10 practical things you can ask AI to do with Gravity Forms using the free GravityKit MCP: create forms, manage entries, build Views, and more.

Launch Log: theme template editing in Block MCP, Shield silentCAPTCHA for Zero Spam, and GravityView fixes
Block MCP adds safe theme template editing, Gravity Forms Zero Spam gains Shield silentCAPTCHA support, and GravityView fixes lightbox and notice bugs.

GravityKit turns 12: a year in review, and 30% off Lifetime All Access
GravityKit turns 12. A look back at a year of GravityView 3.0, GravitySearch, and AI-assisted building, plus a birthday sale on the Lifetime All Access Pass.
