Published
•
Updated
How to build a user feedback board on WordPress without code
Build a user feedback board on WordPress where visitors submit ideas, upvote suggestions, and track request status. Uses Gravity Forms and GravityView, no code required.

Have you ever wished you had an easy way for users to share feedback on your products?
In this tutorial, I’ll show you how to build a fully functional user feedback board where visitors can submit ideas, vote on suggestions, and track the status of their requests—all using Gravity Forms and GravityView.
Ready to bring your feedback process to life? Let’s dive in!
Sneak peek
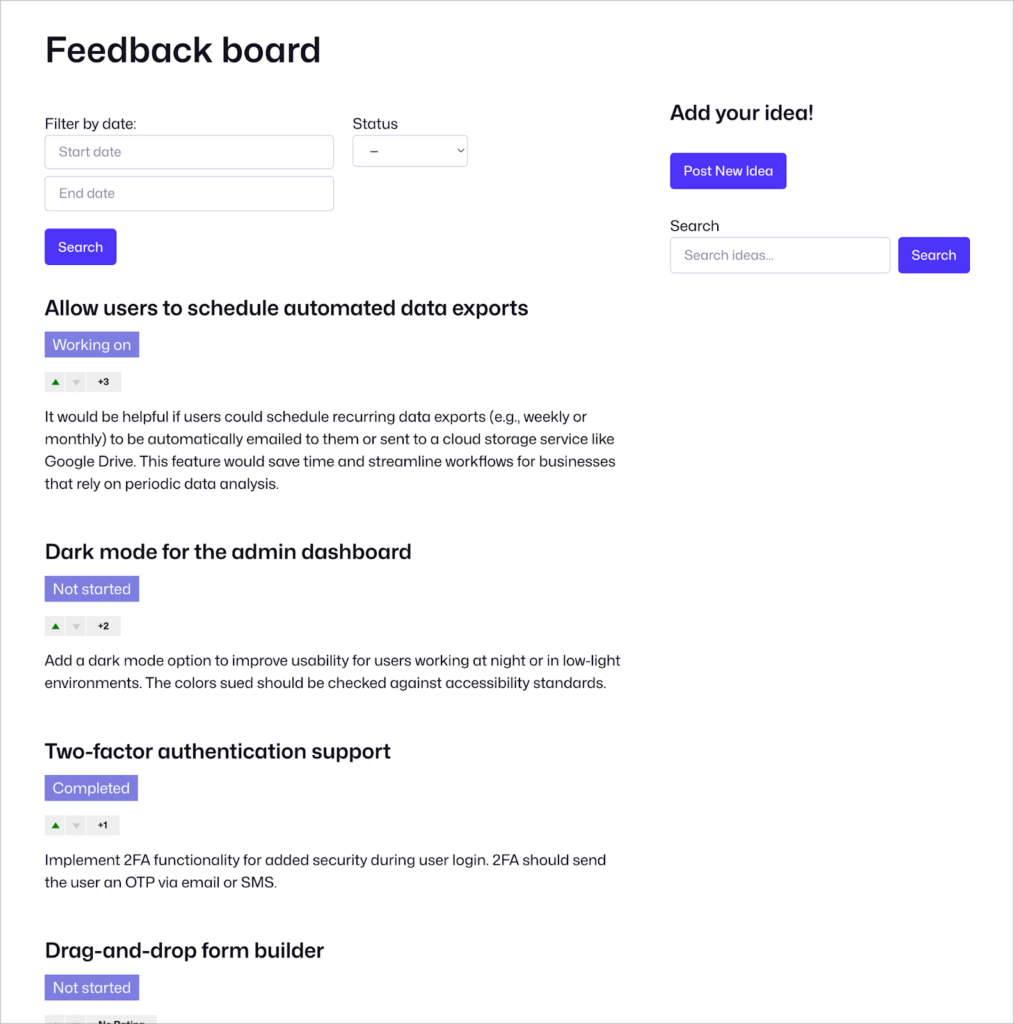
Here’s a preview of the user feedback board that we’re going to build in this tutorial. As you can see, users can submit product feedback in the form of “ideas” that other users can vote on.

Clicking on a specific idea enables users to view comments on the idea and leave their own comments! Each idea also has a status indicating whether it’s being worked.

Let’s start building!
Wanna try it?
Spin up a demo
See GravityBoard in action on its live demo site.

What you’ll need
Here are the plugins you’ll need to build a user feedback board like the one in this tutorial:
- Gravity Forms
- GravityView Pro
- GravityView – Ratings & Reviews Extension
Installing the GravityView Ratings & Reviews Extension
GravityView Pro includes all of the premium layouts and extensions for GravityView. In this tutorial, we’re going to make use of the Ratings & Reviews extension which enables users to rate and comment on entries!
To install the extension, simply hover over “GravityKit”, click “Manage Your Kit” and then scroll down to “Extensions” and install Ratings & Reviews.
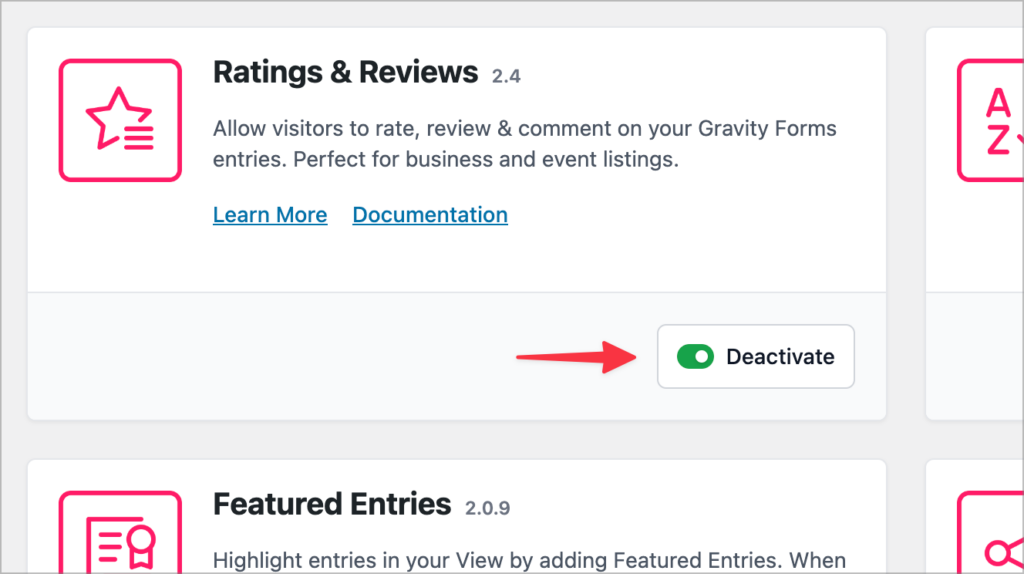
Okay, now we can move on with the rest of the tutorial.
Creating the feedback form
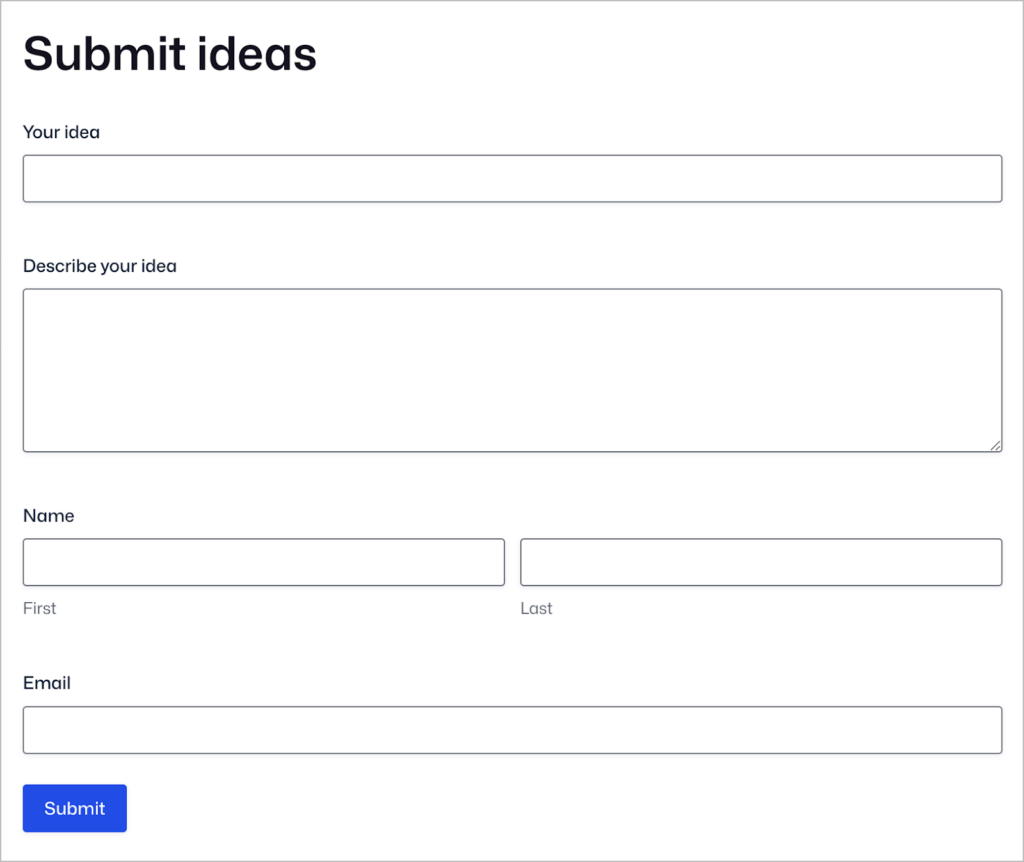
The first step is to create a form enabling users to submit new “ideas”, i.e., product features. To create a new form we’ll hover over “Forms” and click “New Form”. Now we can start constructing our form using the Gravity Forms visual editor.
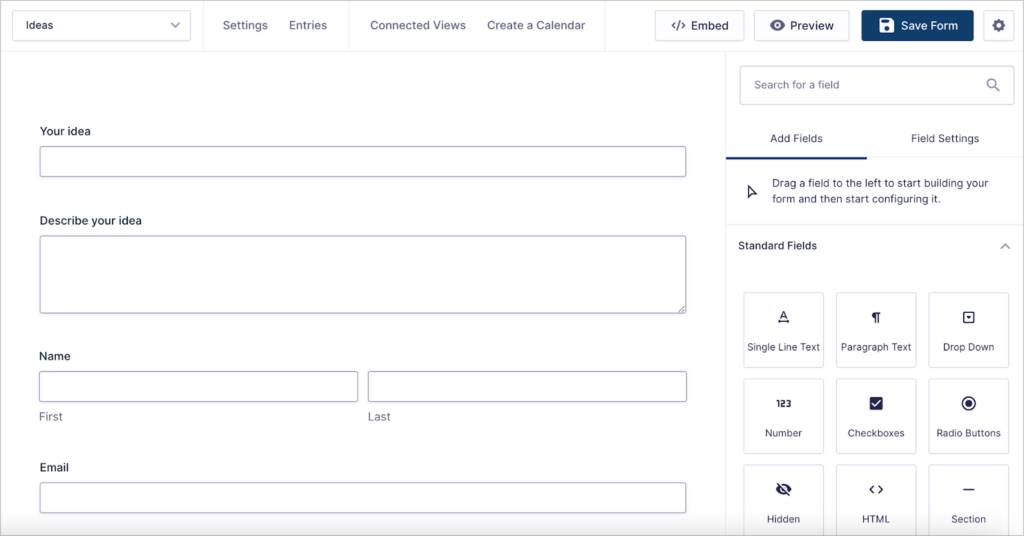
To keep things simple, we’ll add the following fields to our form:
- Your idea (“Single Line Text” field)
- Describe your idea (“Paragraph Text” field)
- Name (“Name” field)
- Email (“Email” field)
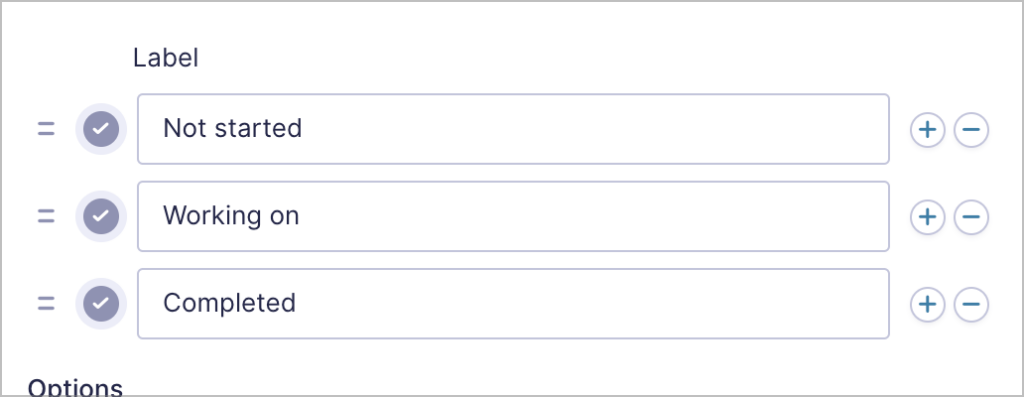
- Status (“Drop Down” field)
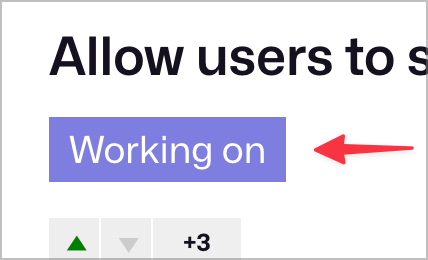
The “Status” field will enable admins to update the status of ideas for users to see. After adding this field, we’ll add three choices—“Not started”, “Working on” and “Completed”.
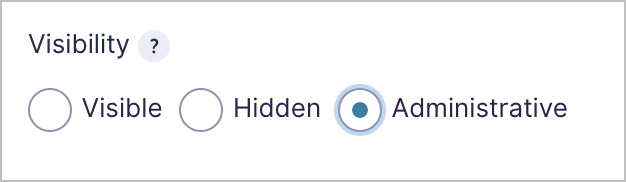
Next, we’ll open the visibility options and select “Administrative”. This will hide the field for regular users so that it is only visible to administrators.
Here’s what our form looks like on the front end:
The next step is to create a View to display user submitted ideas.
Creating a View to display submitted ideas
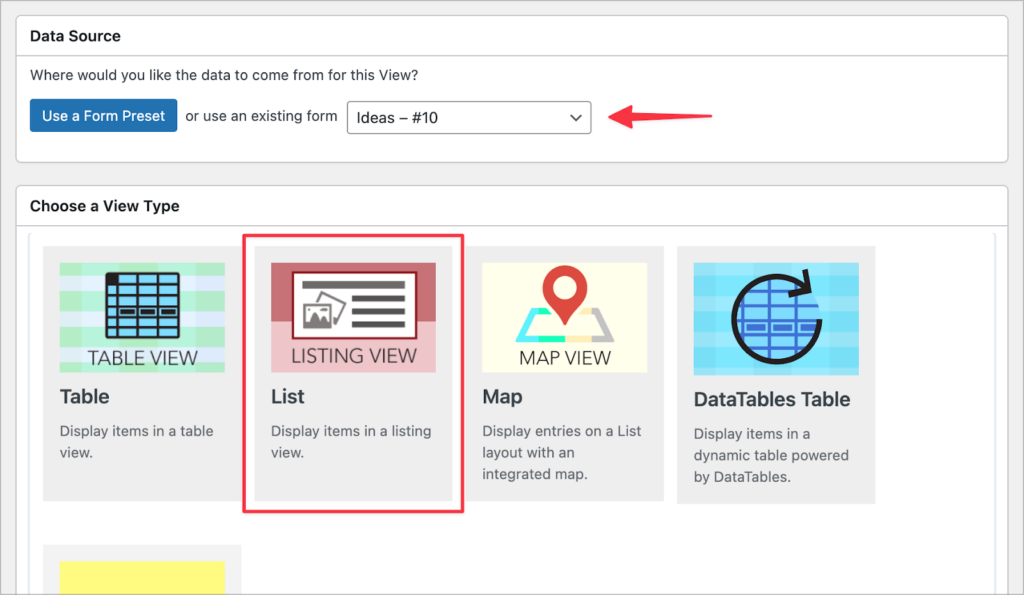
To create a View, we’ll hover over “GravityKit” and click “New View”. Next, we’ll select our “Ideas” form as the data source and the “List” type as our View type.
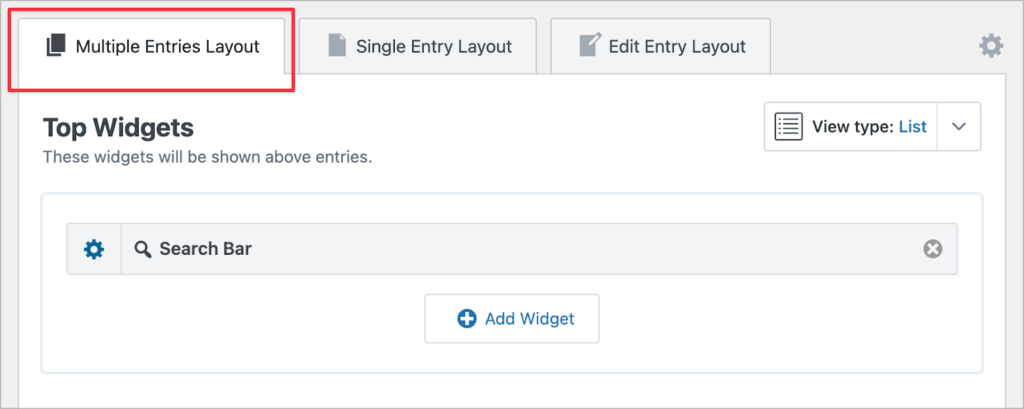
Now we can start configuring the View by adding fields and widgets. Let’s begin with the Multiple Entries layout.
Configuring the Multiple Entries layout
We’ll start by adding a search bar widget to the top of the View. This will enable users to search and filter feedback items (ideas) directly from the front-end. To add a search bar, we’ll click on the “Add Widget” button and select the search bar widget.
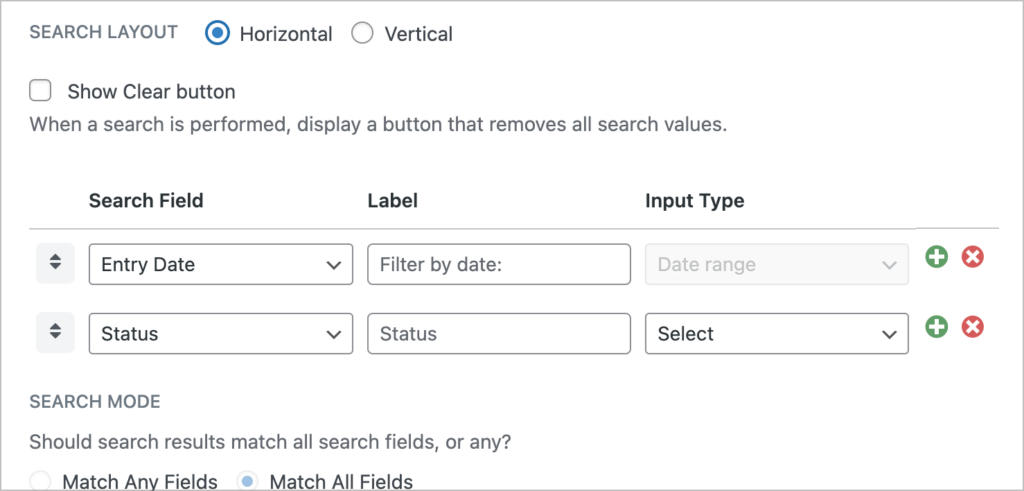
After adding the widget, we’ll click on the gear icon to open the widget settings. Here, we can configure the search bar by adding search inputs. Let’s add the “Entry Date” and “Status” as searchable fields.
Next, we’ll scroll down to the View settings, click on the “Ratings & Reviews” tab and enable entry reviews. Then, we’ll select up/down votes as our review type and configure the remaining options.
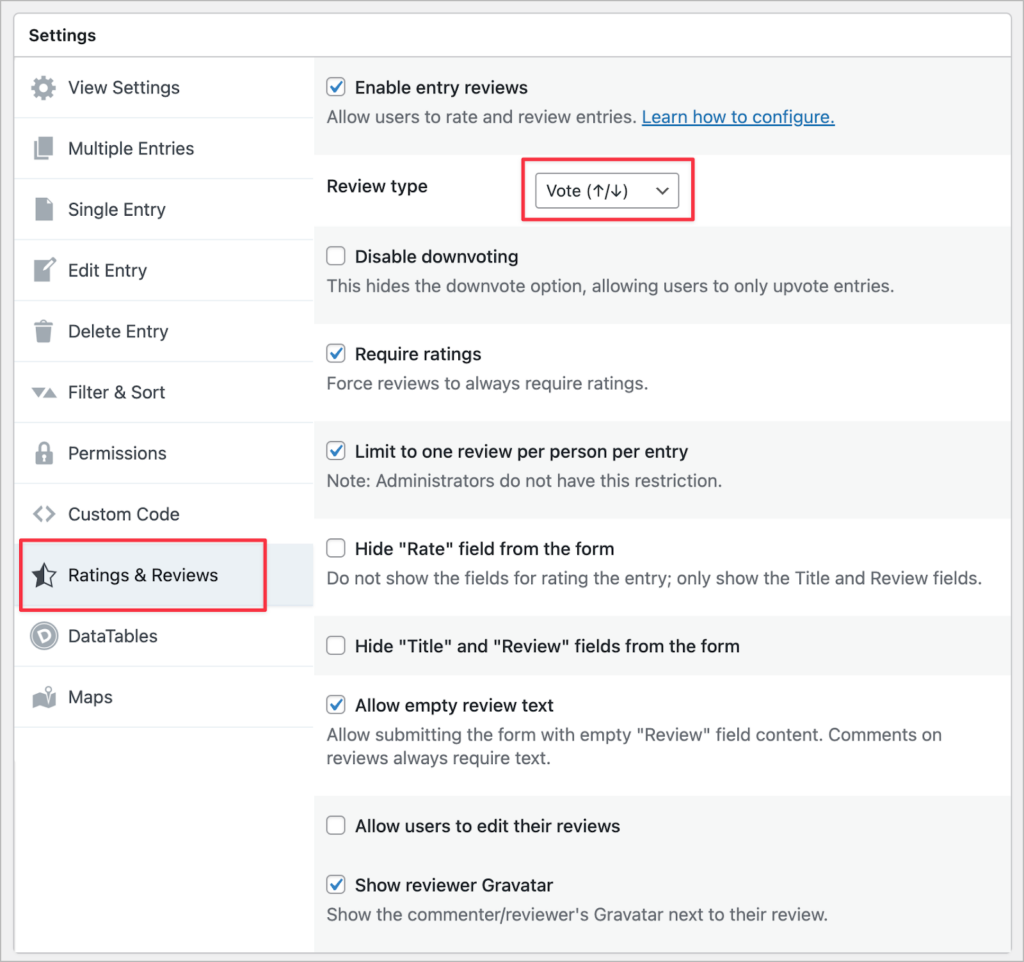
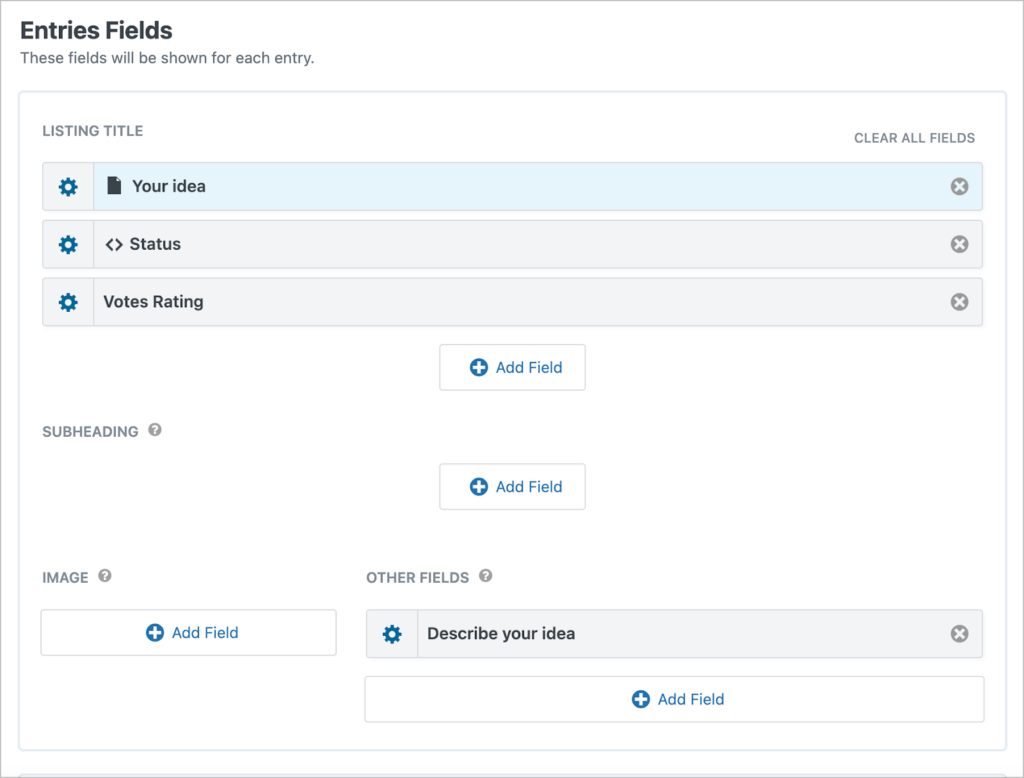
After enabling entry reviews, we can start adding fields to our View. Let’s start by adding the “Your idea”, “Status” and “Vote Rating” fields to the “Listing Title” section. Next, we’ll add the “Describe your idea” field to the “Other Fields” section.
That’s it! If you want to style the “Status” field like we did with the purple background and white text, you can use a Custom Content field with some custom HTML and CSS.
Here how I did it: I added a Custom Content field to the View. Then I added the “Status” merge tag and wrapped it in an HTML <span> tag with the class fb-staus.
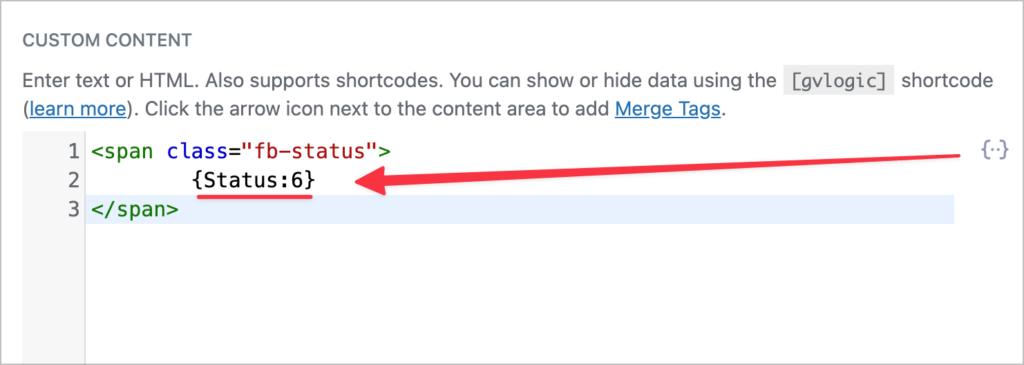
I then added the following CSS code to the “Custom Code” panel in the View settings:
.fb-status {
	padding:5px 10px;
	background-color: #7D7EDF;
	color: #ffffff;
}
💡 Pro tip: You can learn more about merge tags by reading our ultimate guide to Gravity Forms merge tags.
Configuring the Single Entry layout
Now we can turn our attention to the Single Entry layout. This is where users can leave comments and view previous comments added to an idea. Here, we’ll add the three main fields (“Your idea”, “Describe your idea” and “Status”) to the “Listing Title” section and then we’ll add the “Link to Edit Entry” field to the “Other Fields” section.
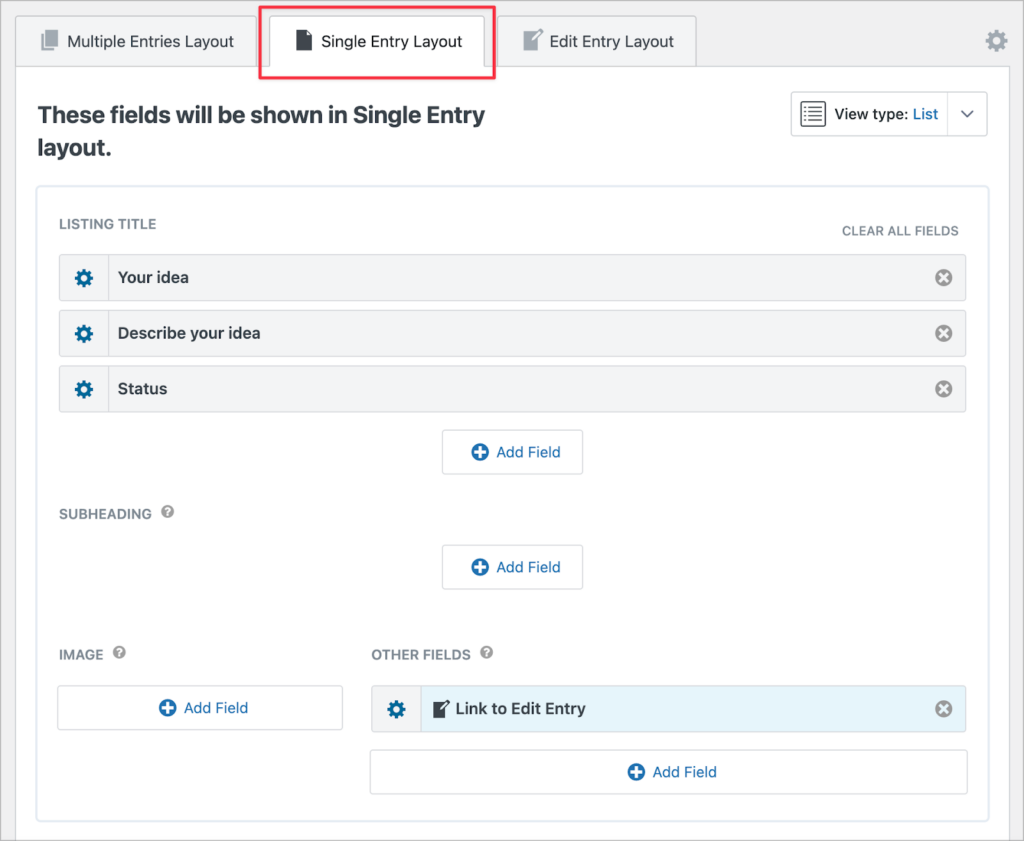
The “Link to Edit Entry” field will output a link that enables admins to update entry details directly from the front-end.
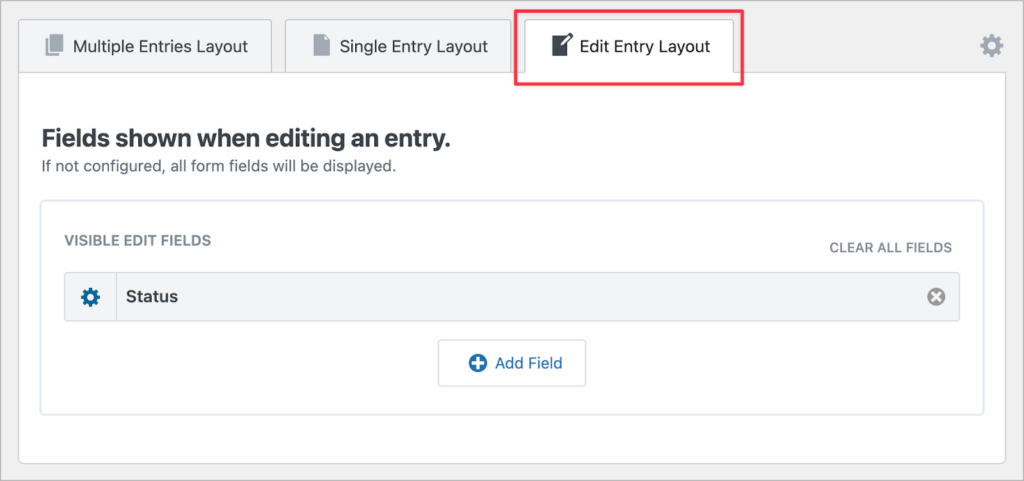
Configuring the Edit Entry layout
On the Edit Entry tab we can add the fields that we want to be editable from the front-end. Adding the “Status” field will enable admins to update the status of an idea so that users can track their feature requests.
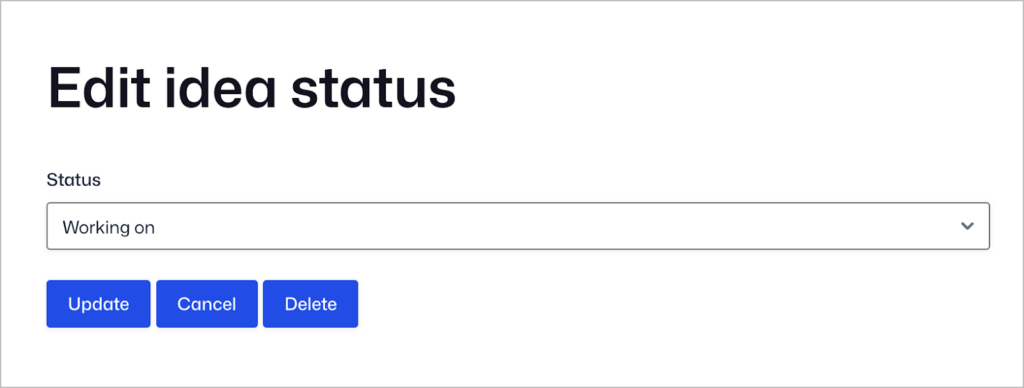
Here’s what the Edit Entry page looks like on the front end:
Now let’s take a look at the finished user feedback board. Here’s what the multiple entries page looks like:
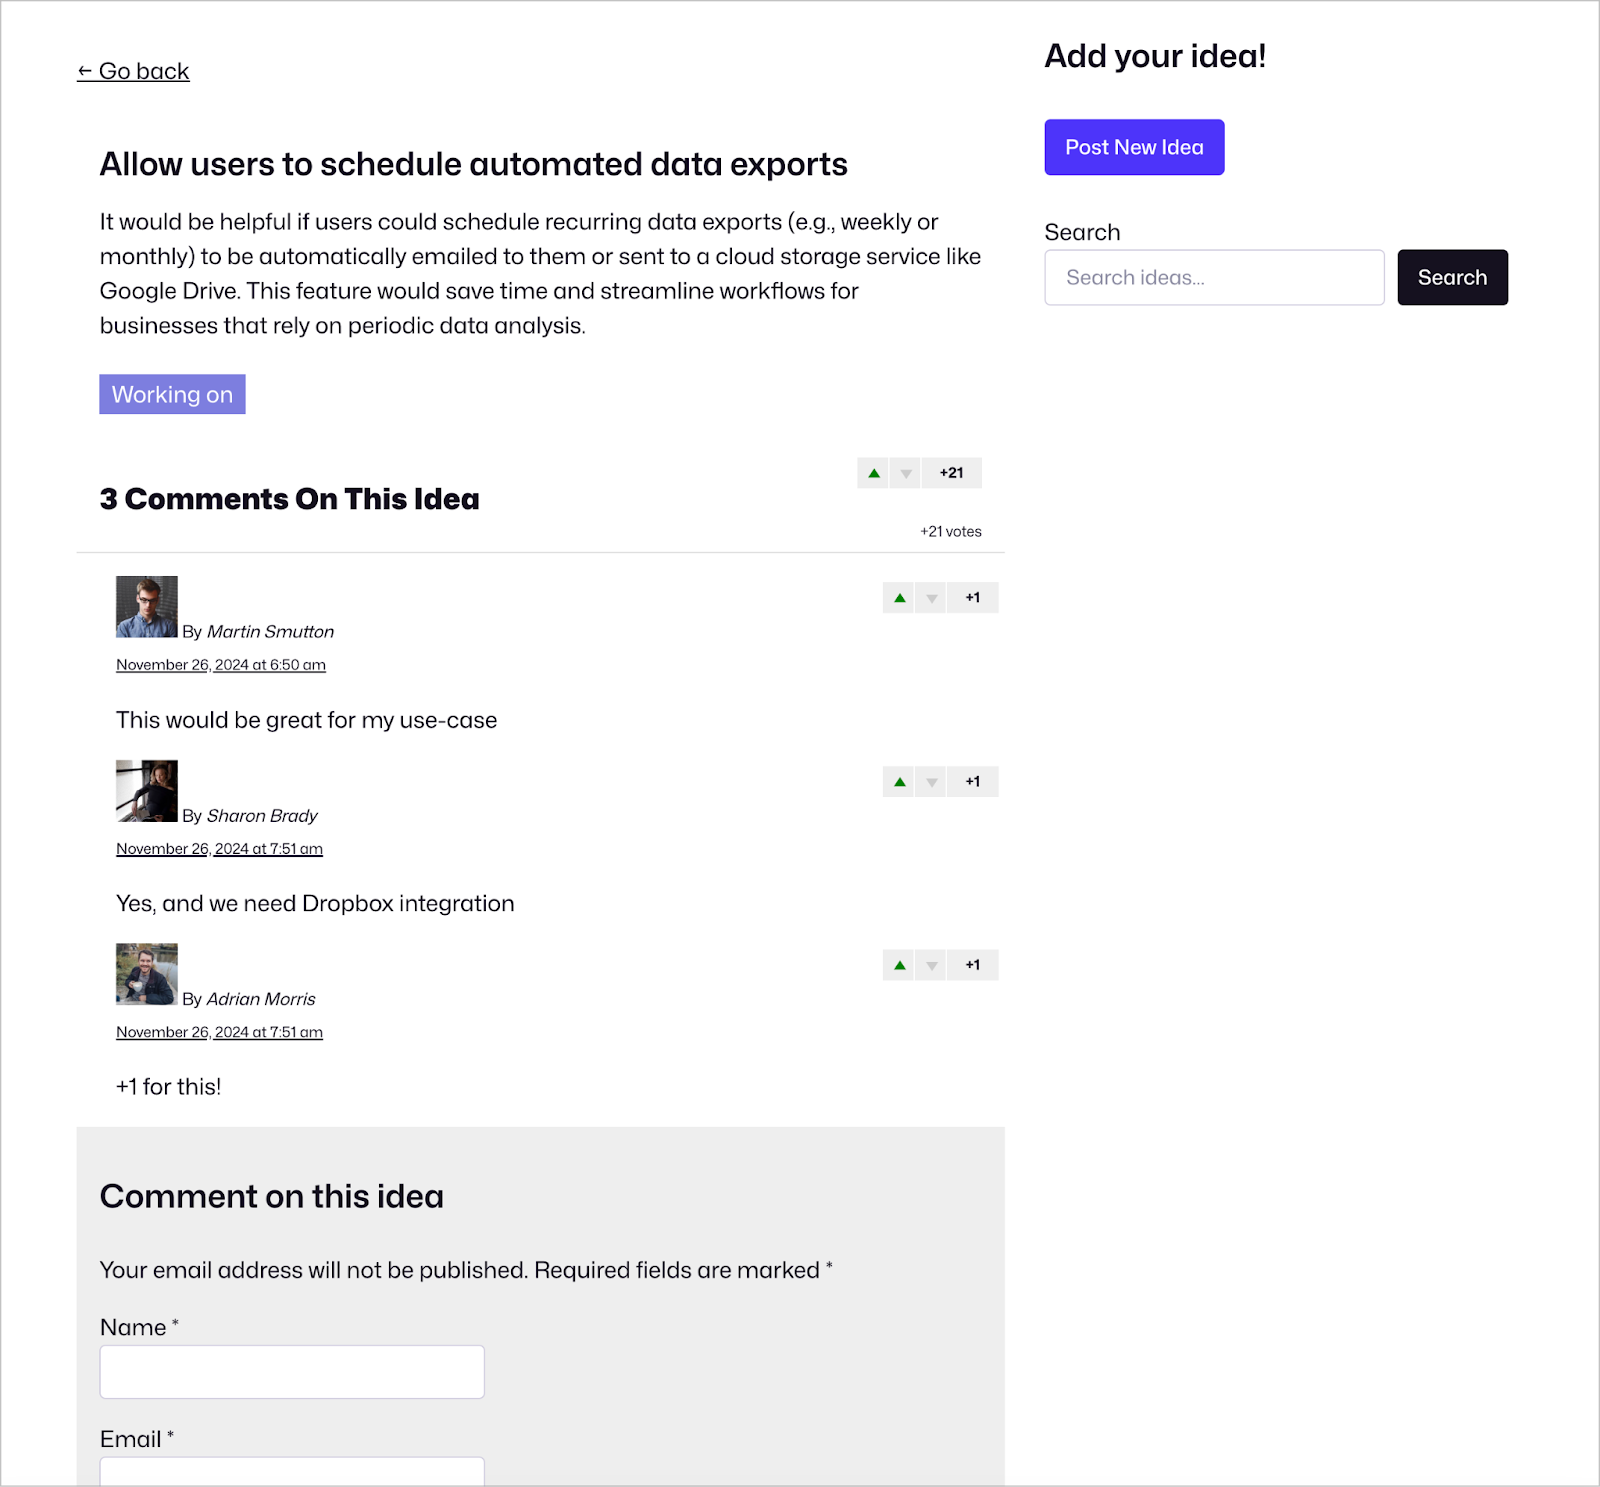
Here’s what users will see when they click on a specific idea. (Note the form enabling them to rate the idea and leave a comment!).
That’s it!
Build a user feedback board today
There you have it—a fully operational user feedback board where users can submit, vote, and comment on ideas, all while tracking their status.
By combining the power of Gravity Forms and GravityView Pro, you can create an intuitive way to engage with your users and collect valuable feedback.
Start building your own feedback board today, and don’t forget to explore our blog for more tutorials to help you get the most out of GravityKit!

Helpful tips right in your inbox.
Subscribe to get the latest articles, information on releases and helpful Gravity Forms tips!
More articles

Launch Log: theme template editing in Block MCP, Shield silentCAPTCHA for Zero Spam, and GravityView fixes
Block MCP adds safe theme template editing, Gravity Forms Zero Spam gains Shield silentCAPTCHA support, and GravityView fixes lightbox and notice bugs.

GravityKit turns 12: a year in review, and 30% off Lifetime All Access
GravityKit turns 12. A look back at a year of GravityView 3.0, GravitySearch, and AI-assisted building, plus a birthday sale on the Lifetime All Access Pass.

Launch Log: Row headers for screen readers, smarter conditional logic, and multi-View fixes
GravityView 3.1 adds row headers for screen readers, plus smarter conditional logic in GravityCalendar and fixes for DataTables, Maps, and Dynamic Lookup.
