Published
•
Updated
How to Display Your Gravity Forms Survey Responses on the Front End
Are you looking for a way to display your Gravity Forms survey responses on the front end of your website? The Gravity Forms Survey Add-On allows you to track the results of your surveys, but only from the backend. One way around this limitation...
Are you looking for a way to display your Gravity Forms survey responses on the front end of your website?
The Gravity Forms Survey Add-On allows you to track the results of your surveys, but only from the backend. One way around this limitation is to use GravityView!
The GravityView plugin is fully compatible with the Gravity Forms Survey Add-On, allowing you to display survey responses inside a View on the front end.
Keep reading to find out more! 👇
Wanna try it?
Spin up a demo
See what you can build with GravityView — explore the live demo.

What Is the Gravity Forms Survey Add-On?
The Gravity Forms Survey Add-On allows you to collect and analyze data from your target audience by building custom survey forms.
Using the Survey Add-On, you can conduct market research, gauge customer satisfaction, get feedback for products or online courses and much more! The Survey Add-On is included with the Gravity Forms Elite license.
How to create a survey in Gravity Forms
After installing and activating the Survey Add-On, hover over Forms, click New Form and give your new form a name. Now you can start adding Survey fields to your form using the Gravity Forms drag-and-drop builder.
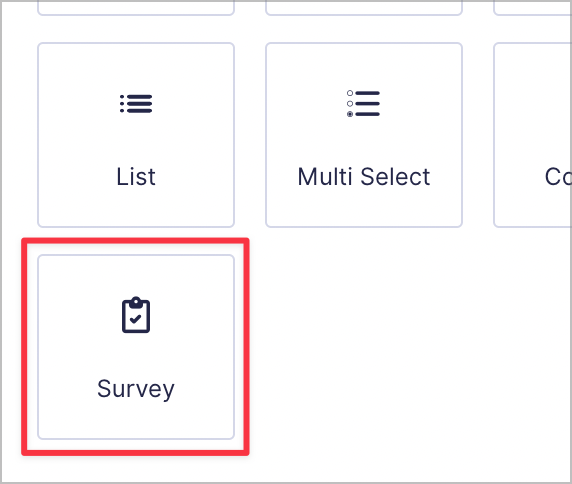
Adding survey fields to your form
You’ll find the Survey field underneath the Advanced tab on the right. To add it to your form, simply drag and drop it onto the canvas.
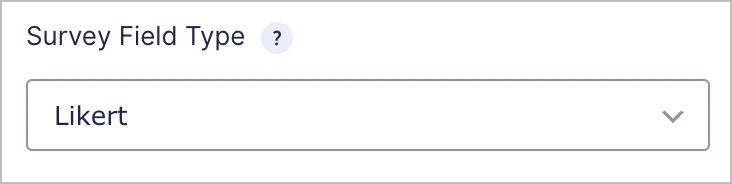
The single “Survey” field supports eight different field types! To change the field type, simply select a different option from the Survey Field Type drop down. Here’s a brief overview of each field type.
- Likert – Allow the user to choose from a range of options (e.g. “Agree”, “Disagree”, “Neutral”).
- Rank – Allow users to drag and drop options to rank them in their preferred order.
- Rating – Allow users to select a star rating (out of 5).
- Radio buttons – Allow users to choose from a range of options.
- Checkboxes – Allow users to choose multiple options from a list.
- Single Line Text – Allow users to input a single line of text.
- Paragraph Text – Allow users to input multiple lines of text (great for questions with open answers).
- Dropdown – Allow users to select an option from a drop down list.
After constructing your survey form, the next step is to embed it on a page or post.
Embedding your form
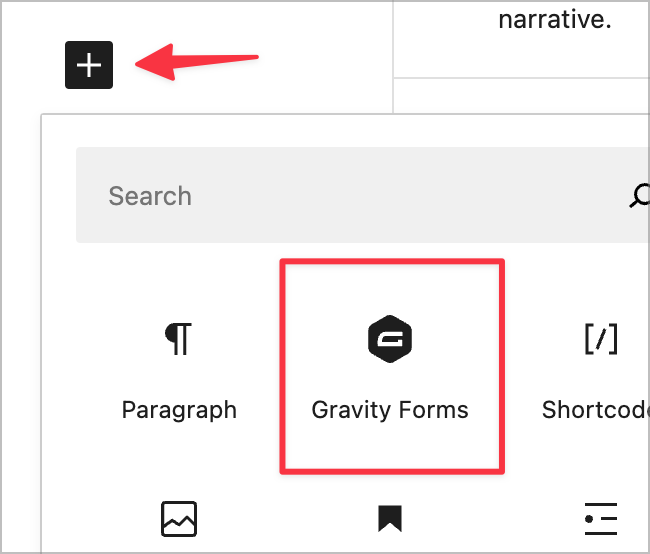
You can add your new survey form to a page or post using the Gravity Forms WordPress block.
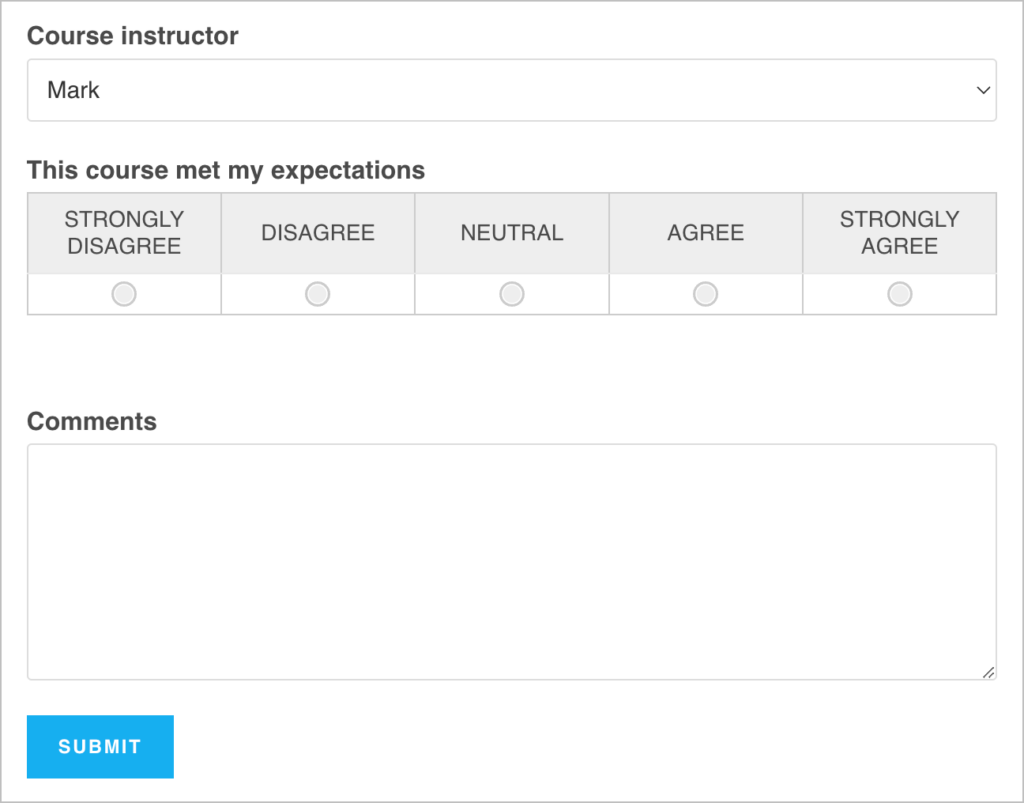
Here’s what our survey form looks like on the front end:
Pro tipLearn more about creating, distributing and analyzing surveys by reading our ultimate guide to survey mastery with Gravity Forms.
After creating and embedding your survey form, you can send the link out to your customers, employees or whoever you plan on surveying!
After receiving some responses, you’ll probably want to view the results.
Viewing survey results in Gravity Forms
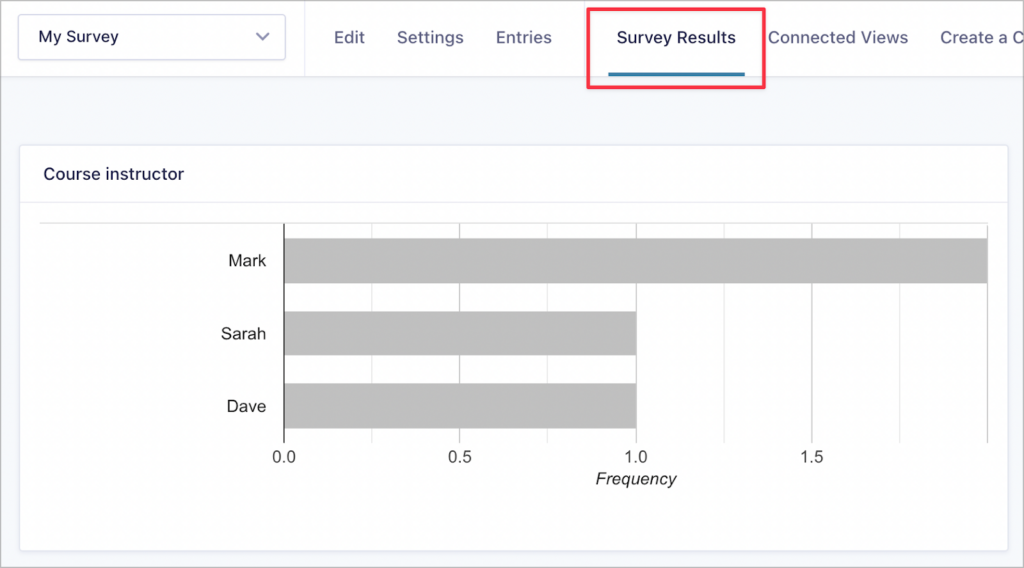
Gravity Forms allows you to view survey reports from inside your WordPress dashboard. To do this, edit your survey form and click on Survey Results at the top of the page.
Here you’ll be able to see an overview of your survey responses with some helpful charts showing frequency scores and other important metrics.
While displaying these results on the front end isn’t possible in Gravity Forms, you can display survey responses using GravityView!
Pro tipRead our guide about exporting survey responses from Gravity Forms.
How to display survey responses with a Gravity Forms add-on
GravityView is an add-on for Gravity Forms that allows you to display your form entries on the front end and build powerful web applications.
GravityView is also fully compatible with the Gravity Forms Survey Add-On! This allows you to display survey responses on the front end using one of GravityView’s preset layout options.
Installing GravityView
To install GravityView, follow the steps below:
- Go to your GravityView Account page and download the plugin ZIP file.
- Log in to your WordPress website, hover over Plugins and click Add New.
- Click Upload Plugin and then Choose File.
- Select the GravityView plugin ZIP file you downloaded previously and click Install Now.
- When the plugin has finished installing, click Activate Plugin.
Now you can create a View to display survey responses on the front end!
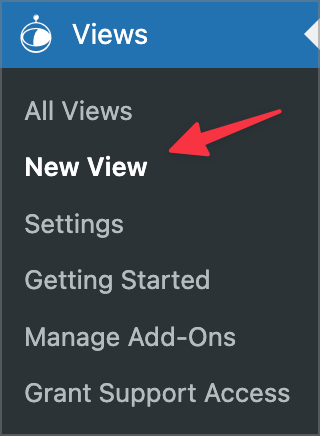
Creating a View
To create a new View, hover over Views and click New View.
Now give your View a name and select your survey form as the data source.

Finally, you’ll need to choose a layout type. For displaying survey results, the Table and List layouts work best.
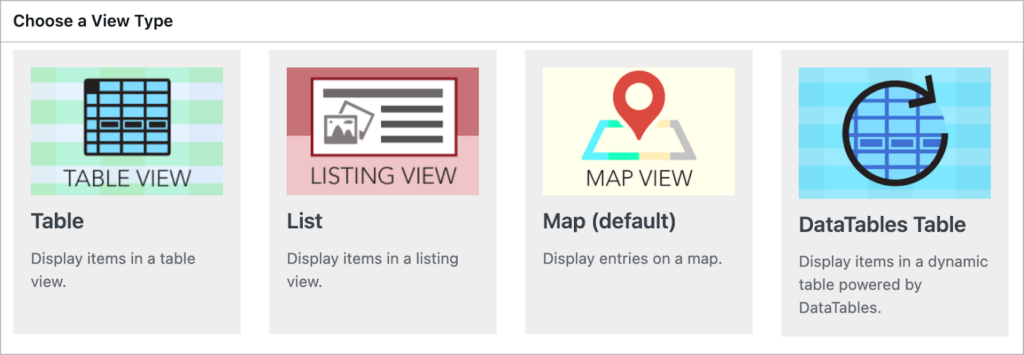
For this example, we’ll select the “List” layout.
Adding the survey fields
Now you can start adding your survey fields to your View using GravityView’s drag-and-drop editor.

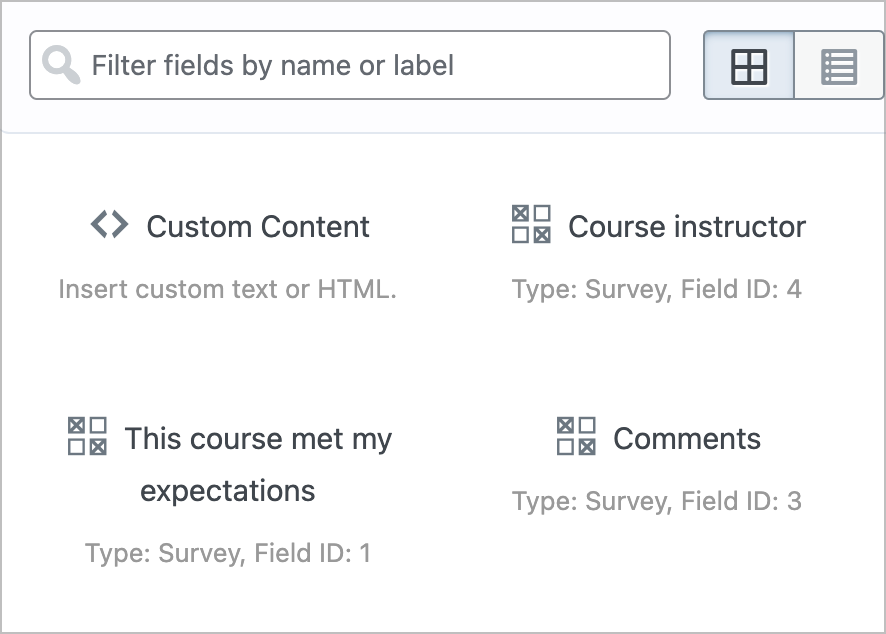
Simply click on the “Add Field” button and select your survey fields from the list. As you can see from the image below, survey fields are marked with a special icon.
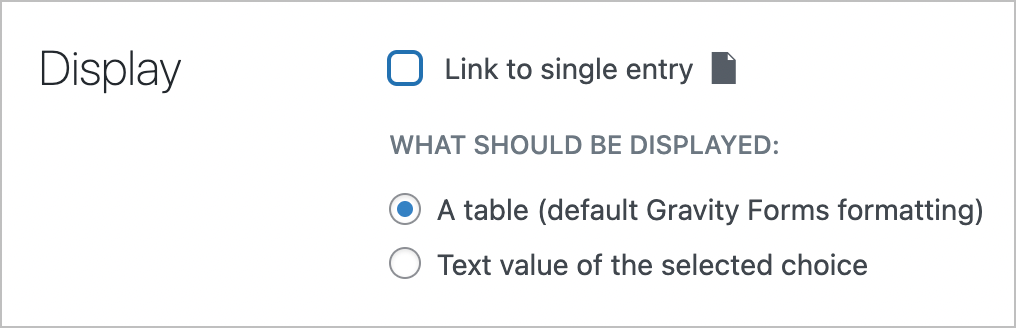
After adding a field, you can click on the gear icon to modify the field settings. For example, you can change the display setting for Likert fields from a table to a text value.
You can also give your fields custom labels, adjust the visibility settings and add your own CSS classes for custom styles.
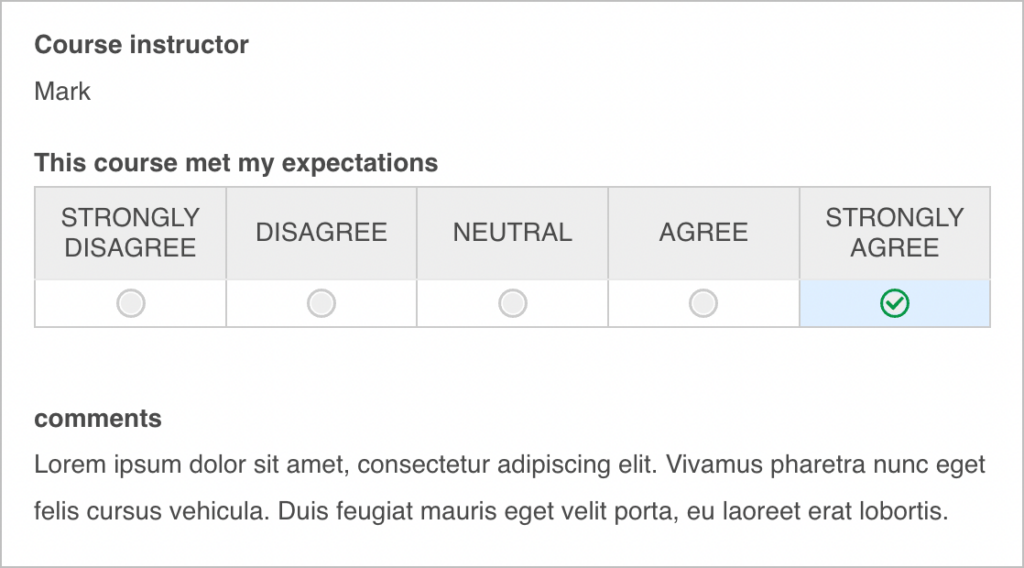
When you’re finished, publish your View and check it out on the front end. Each survey response will be displayed one after the other.
GravityView also includes an embed shortcode, allowing you to embed survey responses on a page or post.
Embedding survey responses on a page or post
To start off, copy the GravityView embed shortcode (it’s on the right side of the page above the Update button).
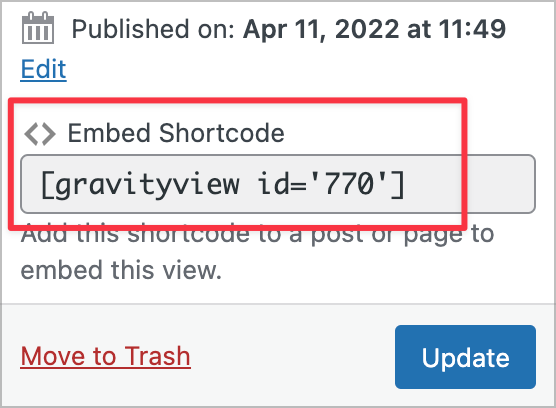
Now head over to your page or post and paste the shortcode inside a WordPress Shortcode block.

That’s it!
Pro tip: To learn more about the GravityView embed shortcode, check out this article on our docs site.
Display your Gravity Forms survey responses using GravityView!
The Gravity Forms Survey Add-On allows you to conduct market research, create questionnaires, and analyze customer feedback. The add-on adds a new “Survey” field to the form builder with 8 different field types.
Gravity Forms allows you to view the results of your survey from inside your WordPress Admin but there’s no way to display those results on the front end.
In this post, we showed you how to display your Gravity Forms Survey responses on the front end using GravityView. For more information about displaying survey results in Gravity Forms, enroll in our comprehensive course on Gravity Guide! 🚀

Helpful tips right in your inbox.
Subscribe to get the latest articles, information on releases and helpful Gravity Forms tips!
More articles

Launch Log: Distance sorting for radius searches, DataTables search improvements, and import reliability fixes
The latest GravityKit releases add distance sorting to map searches, bring built-in search to DataTables, and fix GravityCharts and GravityImport edge cases.

WordPress page builder market share 2026: Elementor leads at 32.67%
Elementor reaches 32.7% of WordPress sites. WordPress Block Editor 20.6%, wpBakery 8.5%, Divi 5.7%. Latest HTTP Archive crawl, share-of-WordPress basis throughout.

Launch Log: GravityView 3.0, plus upgrades to Block MCP and GravityKit MCP
GravityView 3.0 lands with the new Vantage theme, frontend bulk actions, and AI-assisted View creation. This launch log also covers updates to GravityKit MCP, Block MCP, and Dashboard Views.