Published
•
Updated
How to create a dynamic “Edit Profile” link in GravityView
Add a dynamic Edit Profile link to any page that takes logged-in users directly to their GravityView entry edit screen, without requiring access to the WordPress admin area.
When you’re displaying Gravity Forms entries on the front end with GravityView, giving users control over their own information is often essential.
Whether you’re managing directory profiles, applications, listings, or other submissions, users need an easy way to make updates.
In this tutorial, we’ll walk through how to create a dynamic “Edit profile” link that directs users straight to the Edit Entry screen, so they can update their submission without accessing the admin area. This link will be independent of your main View, so you can place it anywhere on your site.
If you use GravityView to power directories, membership sites, or other user-based apps, this tutorial is for you.
In this post, we assume that you already have a GravityView-powered app up and running. If not, check out our library of build-it guides.
Here is the independent “Edit Profile” link (styled as a button!) that will always link to the logged-in user’s “Edit Entry” page, allowing them to update their information from the frontend.
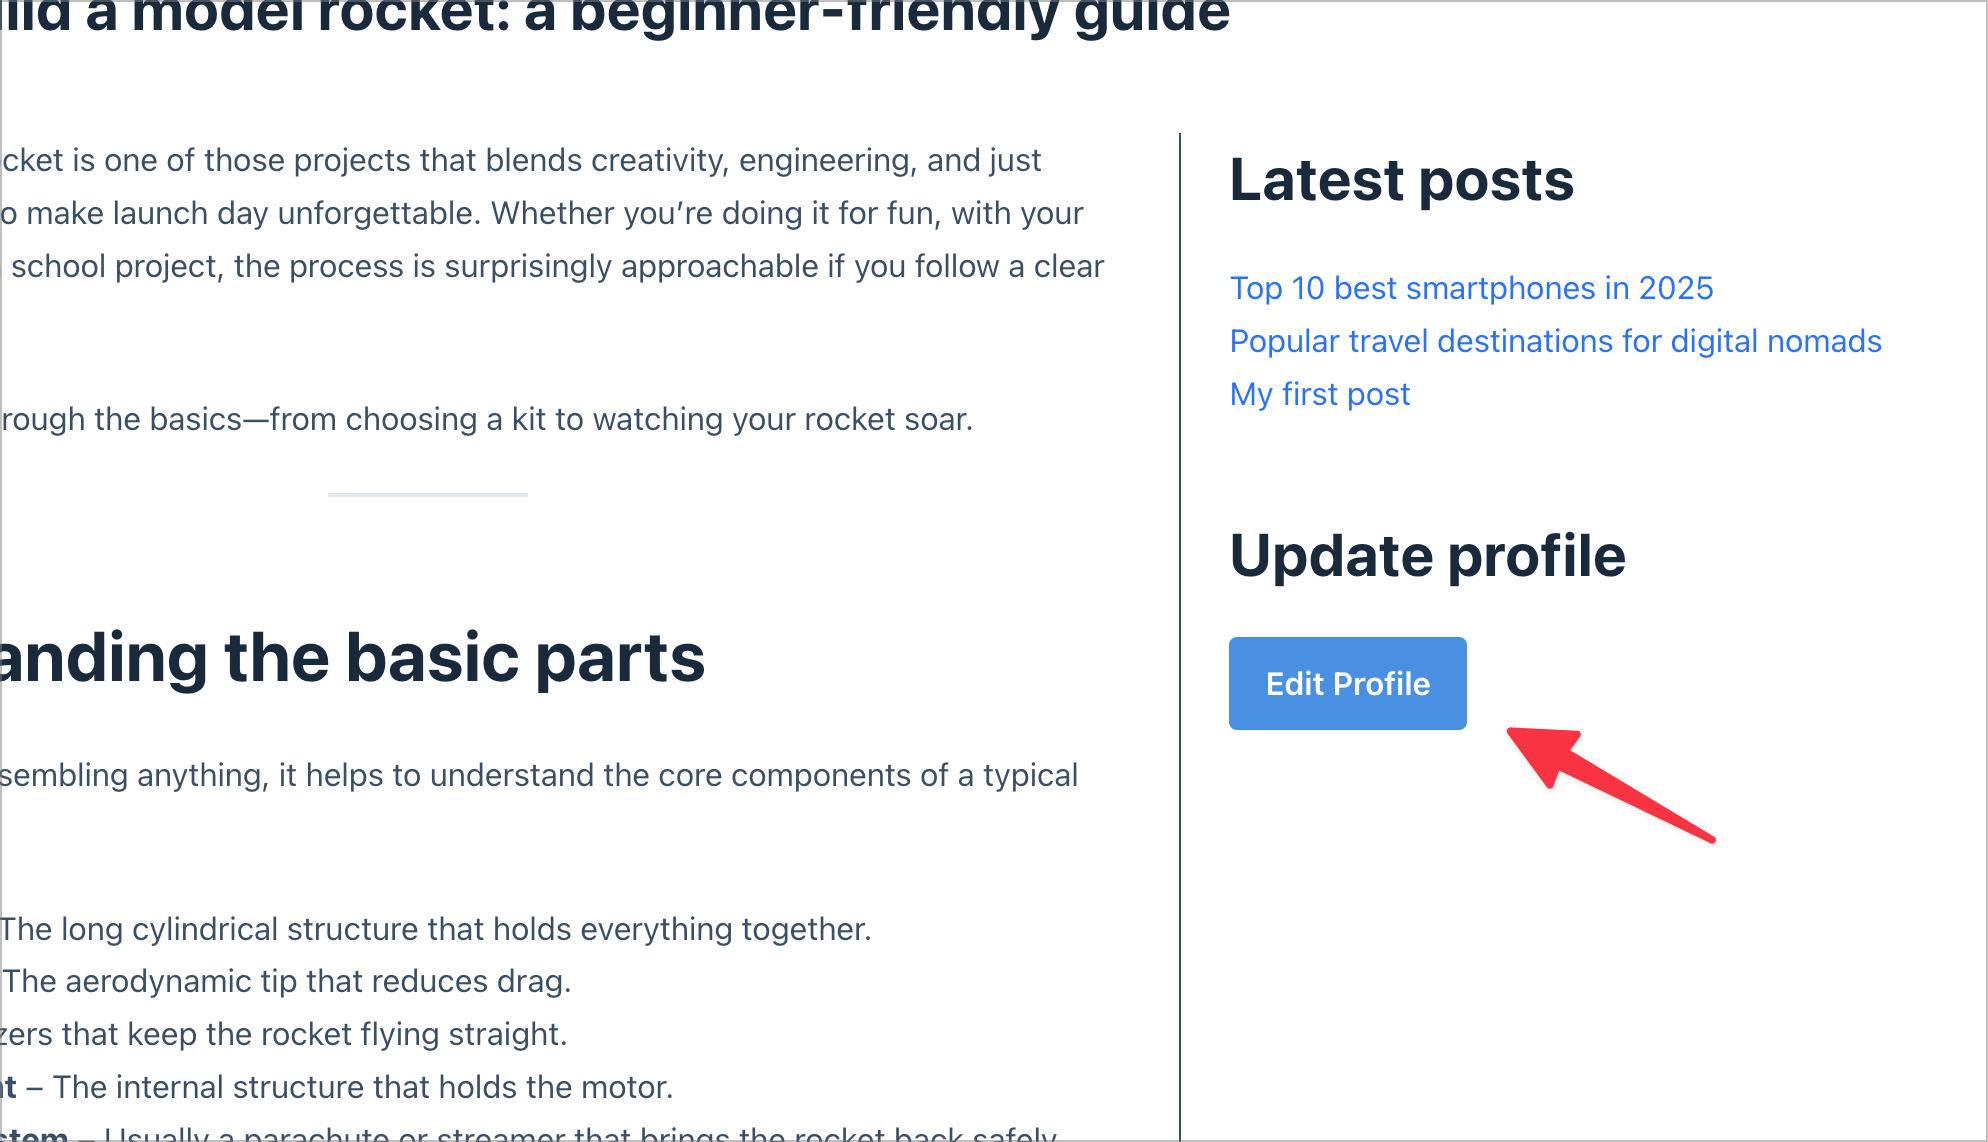
In this example, we’ve added it to our post sidebar, but you can embed it anywhere your theme allows.
Wanna try it?
Spin up a demo
See what you can build with GravityView — explore the live demo.

Apart from Gravity Forms and GravityView, here’s a list of all the plugins and add-ons you’ll need to create an “Edit Entry” link.
- GravityView Pro – for creating the dynamic edit link.
- Members (free) or Block Visibility (free) – for conditionally displaying content based on user role and/or login status.
Let’s get started!
To create our “Edit entry” link, we’ll build a dedicated View that outputs a single link. By keeping it as its own View, the link remains completely independent and can be embedded anywhere on your site.
We’ll start by creating a List View and adding a single Custom Content field. Inside that field, we’ll insert the [[gv_entry_link]] shortcode, which generates a direct link to the Edit Entry screen for the current entry.
By default, the shortcode links to the Edit Entry layout of the same View. However, you can also configure it to send users to a different View for editing by using the view_id parameter. This is useful if you want one View to handle editing and another View to act purely as the link—giving you more control over layout, permissions, and display settings.
Next, we’ll configure the View so it only displays the logged-in user’s entry, apply some basic styling so the link looks like a button, and then embed the View wherever we need it. This could be in a sidebar, footer, template part, or dedicated page.
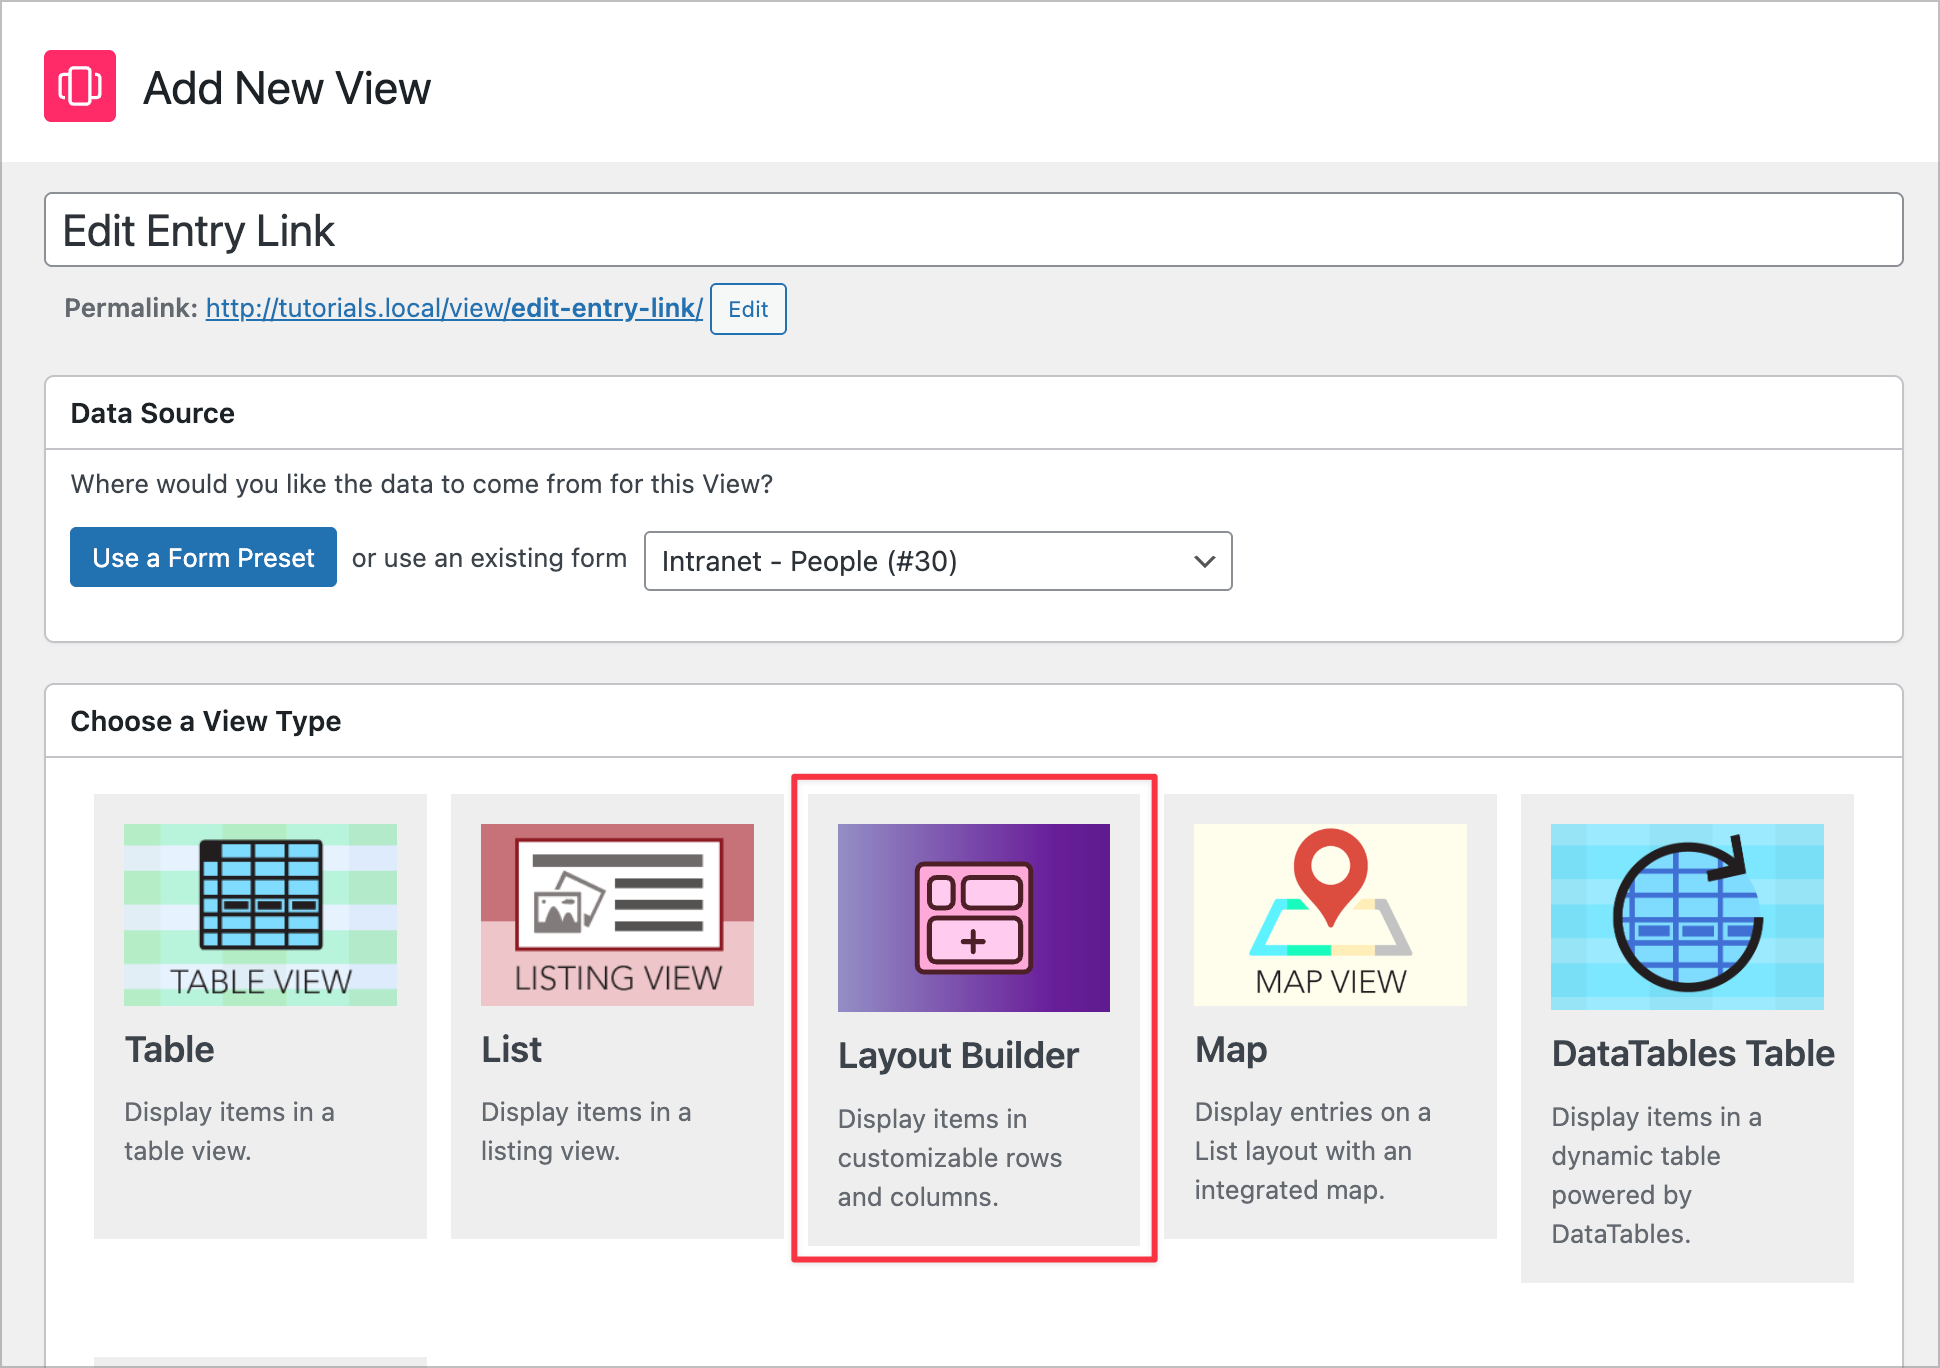
Start by creating a new View. In your WordPress dashboard, hover over Views and click New View.
Give your View a clear name (for example, “Edit Entry Link”), select the relevant form as the Data Source, and choose Layout Builder as the View Type.
Once the View editor loads, remove any default widgets from the widget areas by clicking the “×” icon next to each widget.
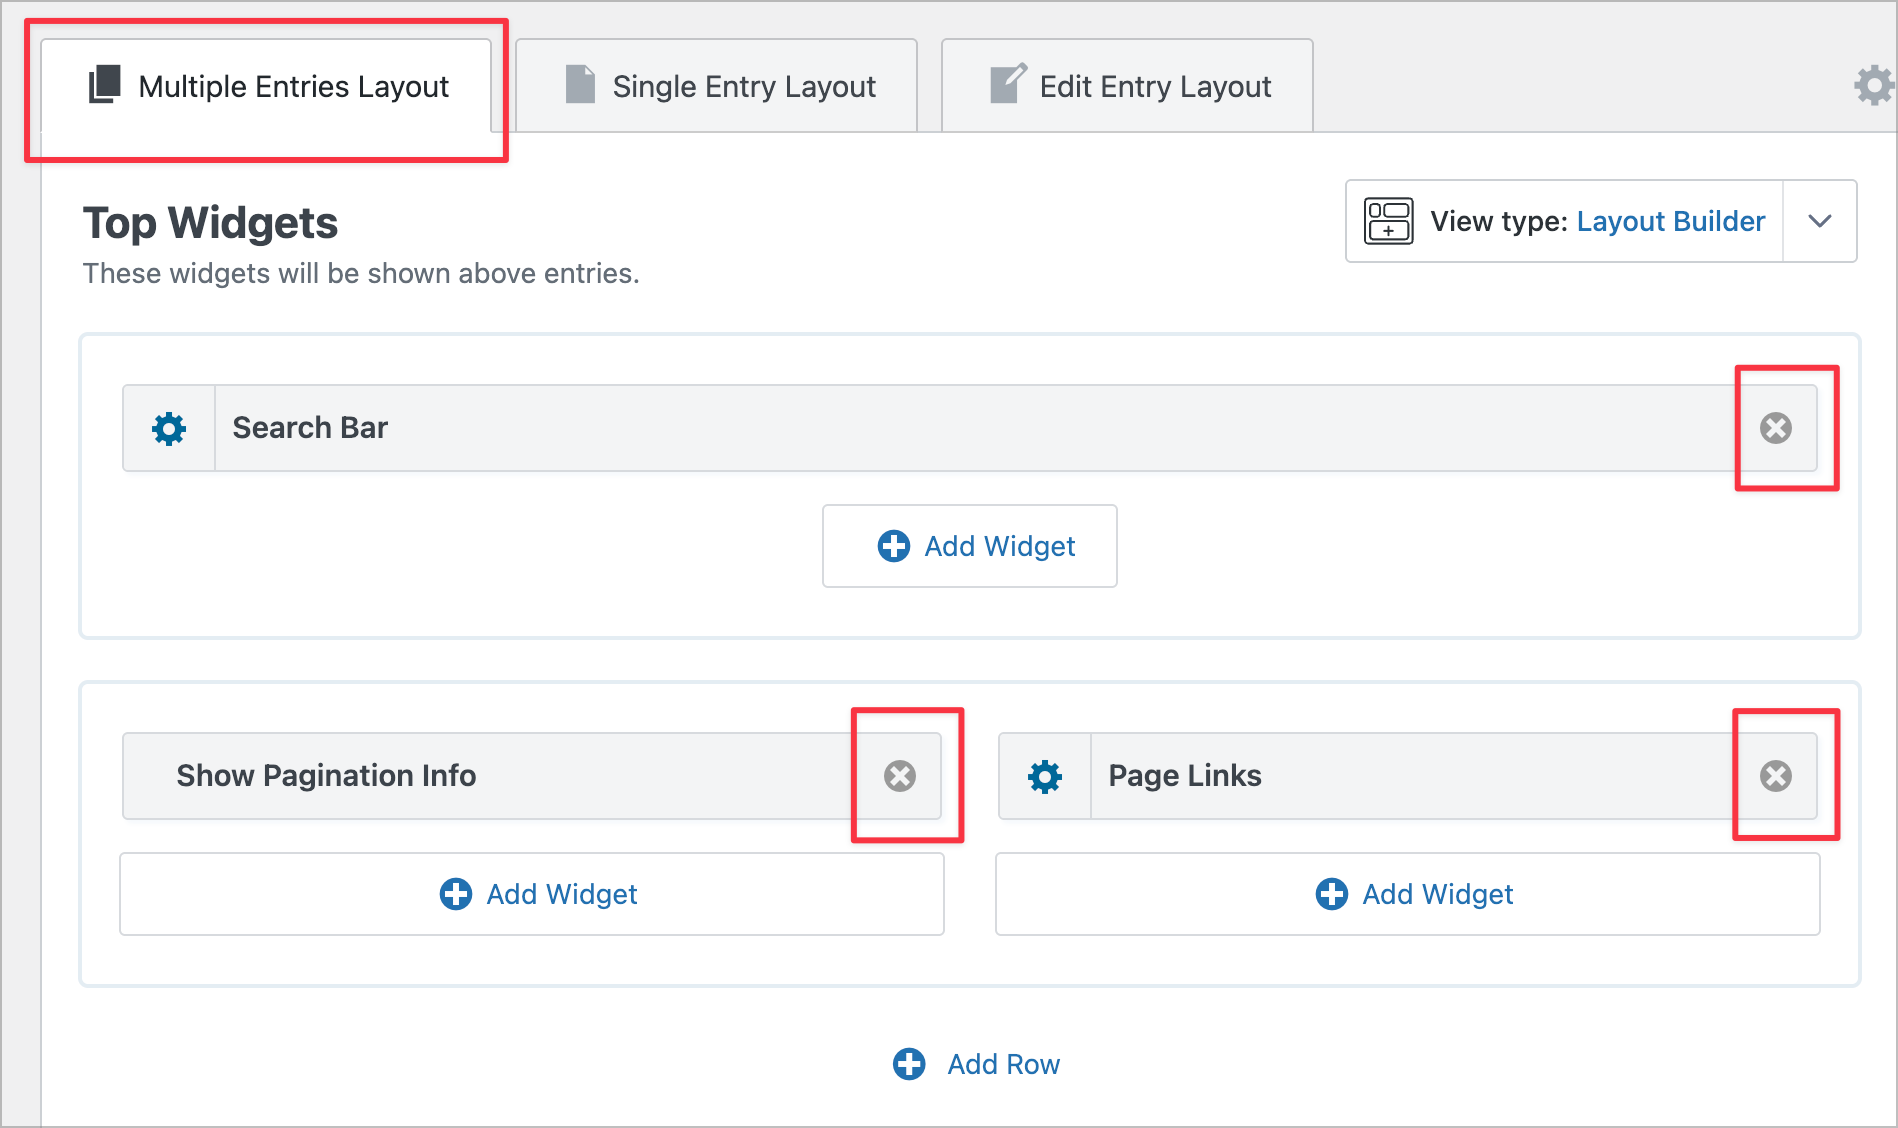
You should now have a clean, empty View layout. For this setup, we only need a single field: Custom Content.
Scroll down to the Entries Fields section, click + Add Fields, and select Custom Content.
Next, click the gear icon on the Custom Content field to open its settings. Inside the content editor, add the following shortcode:
[gv_entry_link action="edit"]Enter your link text here[/gv_entry_link]This shortcode generates a link to edit the current entry. By setting action="edit", the link sends the user to the Edit Entry screen for that specific entry.
By default, the shortcode links to the Edit Entry layout of the same View. However, you can direct users to a different View for editing by specifying additional parameters.
If you have a separate View embedded on a specific page for handling edits, you can use:
view_id— the ID of the View responsible for editing.post_id— the ID of the page or post where the editing View is embedded (if it’s embedded on another page).
Example:
[gv_entry_link action="edit" post_id="123" view_id="456"]Edit your information[/gv_entry_link]Here’s what our shortcode looks like for this example:
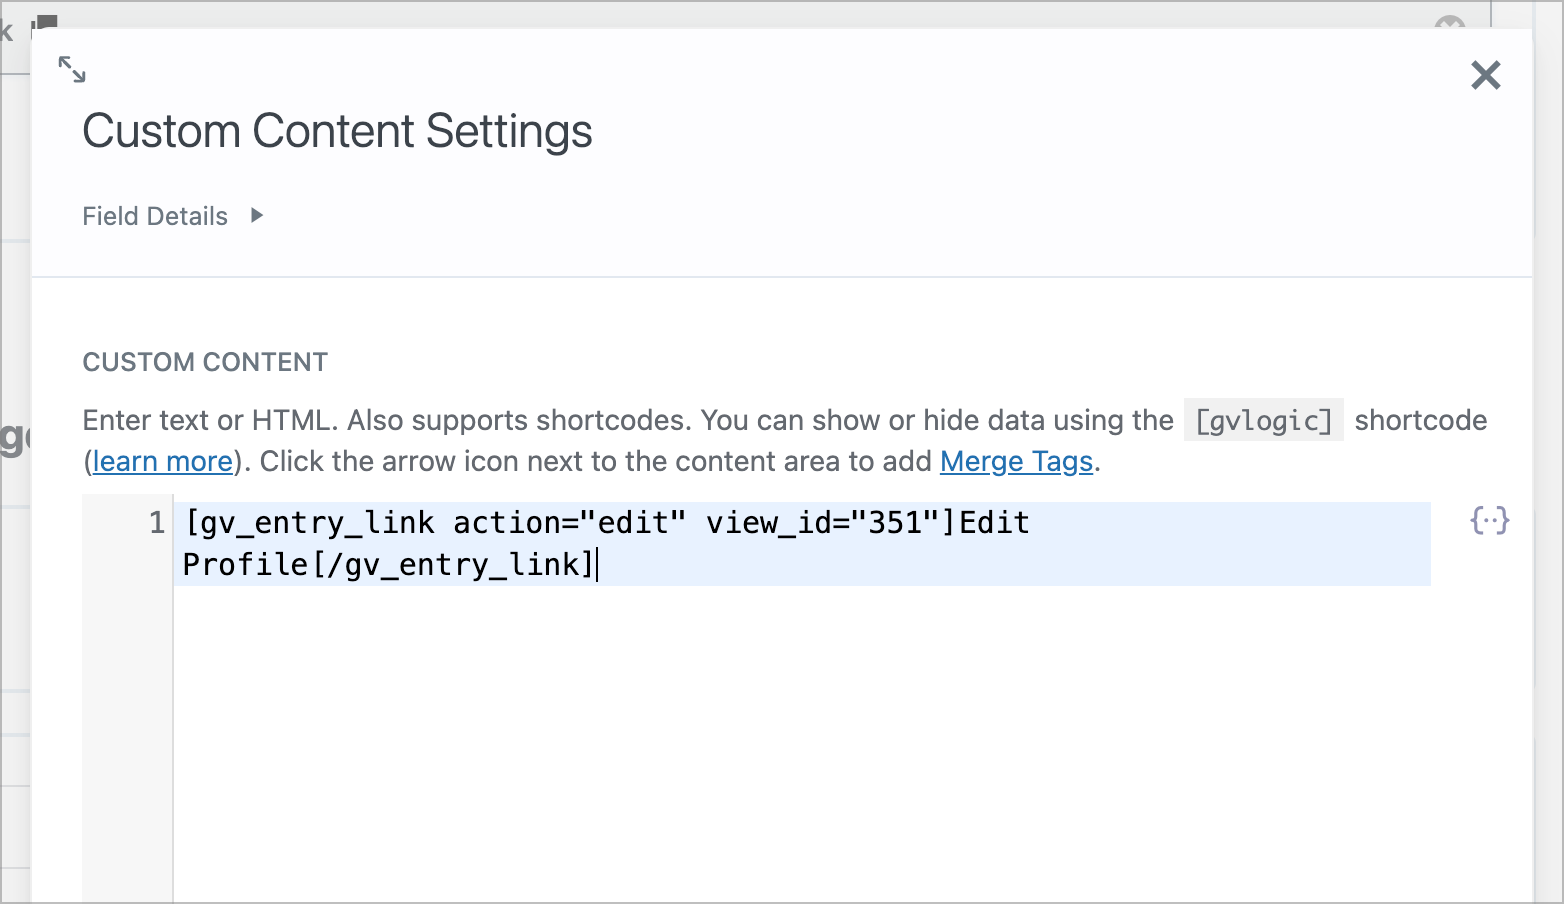
This approach is helpful if you want one View to act purely as a reusable link, while another View controls the full editing experience (layout, permissions, and field visibility). This is often the ideal setup.
With the link displaying correctly, the final step is adjusting how it looks.
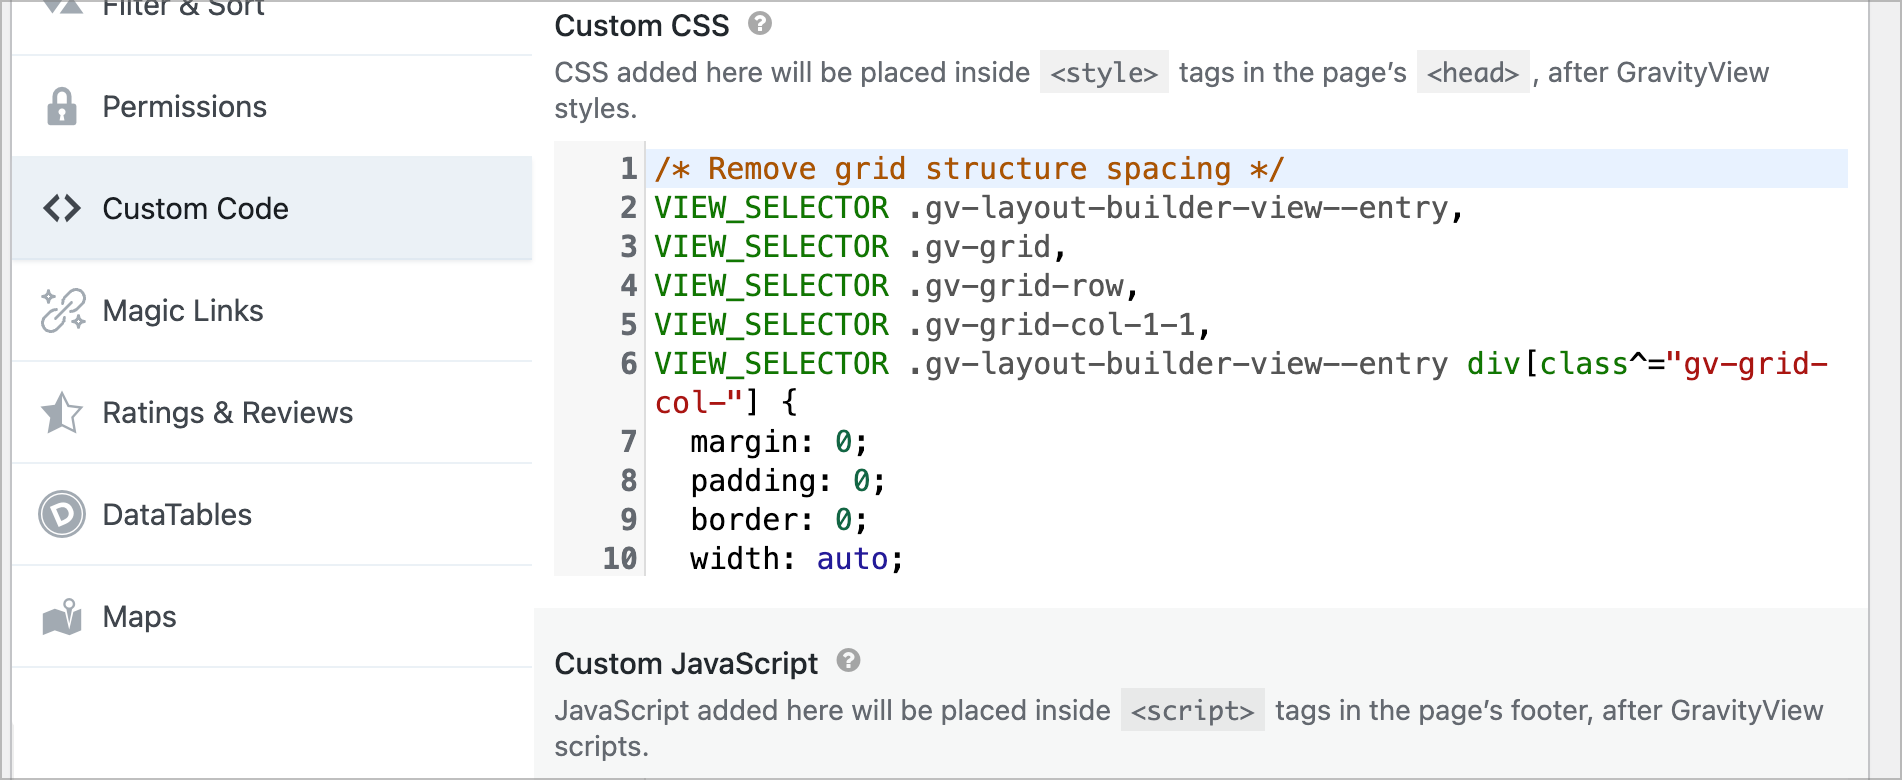
In our example, we kept things simple. First, we removed the default GravityView grid spacing so the link wouldn’t inherit unnecessary margins or layout structure. Then, we styled the link to look like a button.
Here’s the exact CSS we used:
/* Remove grid structure spacing */
VIEW_SELECTOR .gv-layout-builder-view--entry,
VIEW_SELECTOR .gv-grid,
VIEW_SELECTOR .gv-grid-row,
VIEW_SELECTOR .gv-grid-col-1-1,
VIEW_SELECTOR .gv-layout-builder-view--entry div[class^="gv-grid-col-"] {
  margin: 0;
  padding: 0;
  border: 0;
  width: auto;
}

/* Style link as button */
VIEW_SELECTOR .gv-grid-value a {
  display: inline-block;
  padding: 10px 18px;
  background: #4a90e2;
  color: #fff;
  text-decoration: none;
  border-radius: 4px;
  font-weight: 600;
}

VIEW_SELECTOR .gv-grid-value a:hover {
  opacity: 0.85;
}
Place this CSS into the Custom CSS box in the View settings.

Pro Tip
Notice we’re using the VIEW_SELECTOR placeholder to ensure we’re targeting the current View (recommended). You can learn more about custom code placeholders here.
- The first block removes GravityView’s default grid spacing so the output sits cleanly in the sidebar.
- The second block turns the plain link into a button by adding padding, background color, rounded corners, and stronger font weight.
- The hover rule adds a subtle opacity change for visual feedback.
That’s it—clean layout, clear call-to-action, and no unnecessary styling complexity.
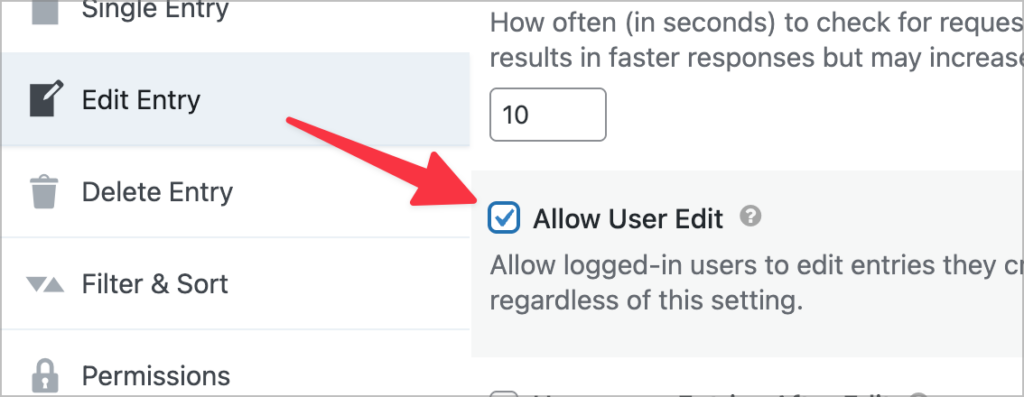
After adding the [[gv_entry_link]] shortcode to the Custom Content field, you need to update the View Settings to allow users to edit entries that they create. Without this option enabled, users won’t be able to edit their entries.
Remember, you’ll need to enable this option on the View that controls editing.
To enable user edit, scroll down to the View Settings, click on the Edit Entry tab and check the box that says “Allow User Edit”.
The next step is to filter the link View so that users will only be able to see their own profiles.
To do this, click on the Filter & Sort tab, and add the following Advanced Filter condition: Created By is Currently Logged-in user.
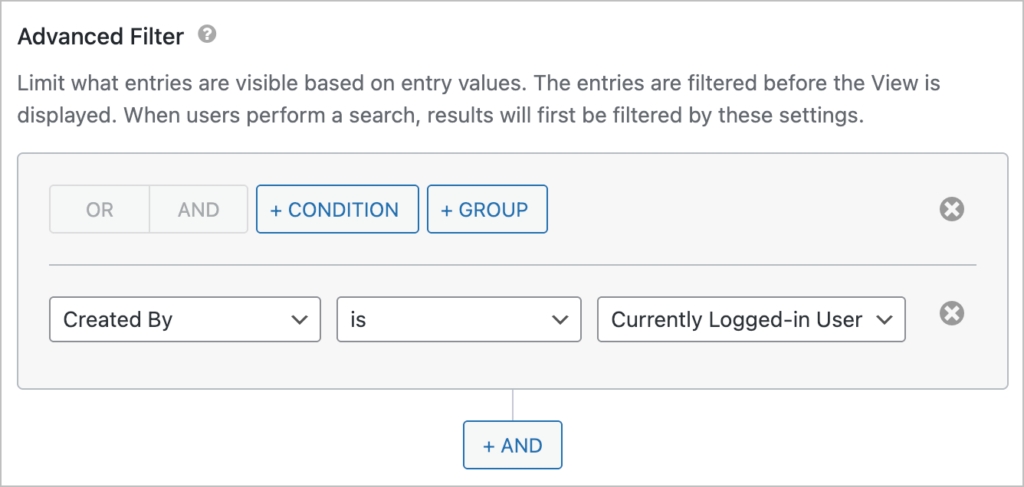
This ensures that when users click on the “Edit your profile” link, they will be taken to edit their own profile and not another member’s profile!
Now that your View is ready, the next step is placing it on the site and controlling who can see it.
In this example, we’ll add the link to the sidebar and use conditional logic to display it only to logged-in users. To do this, we’ll use the GravityView block along with the Block Visibility plugin.
To make the section clearer and more structured, we’ll group the GravityView block with a heading.
- Add a Heading block above the GravityView block (e.g., “Update profile”).
- Select both the Heading and the GravityView block.
- Click Group from the block toolbar.
Now you have a single grouped section that contains both the heading and the View output.
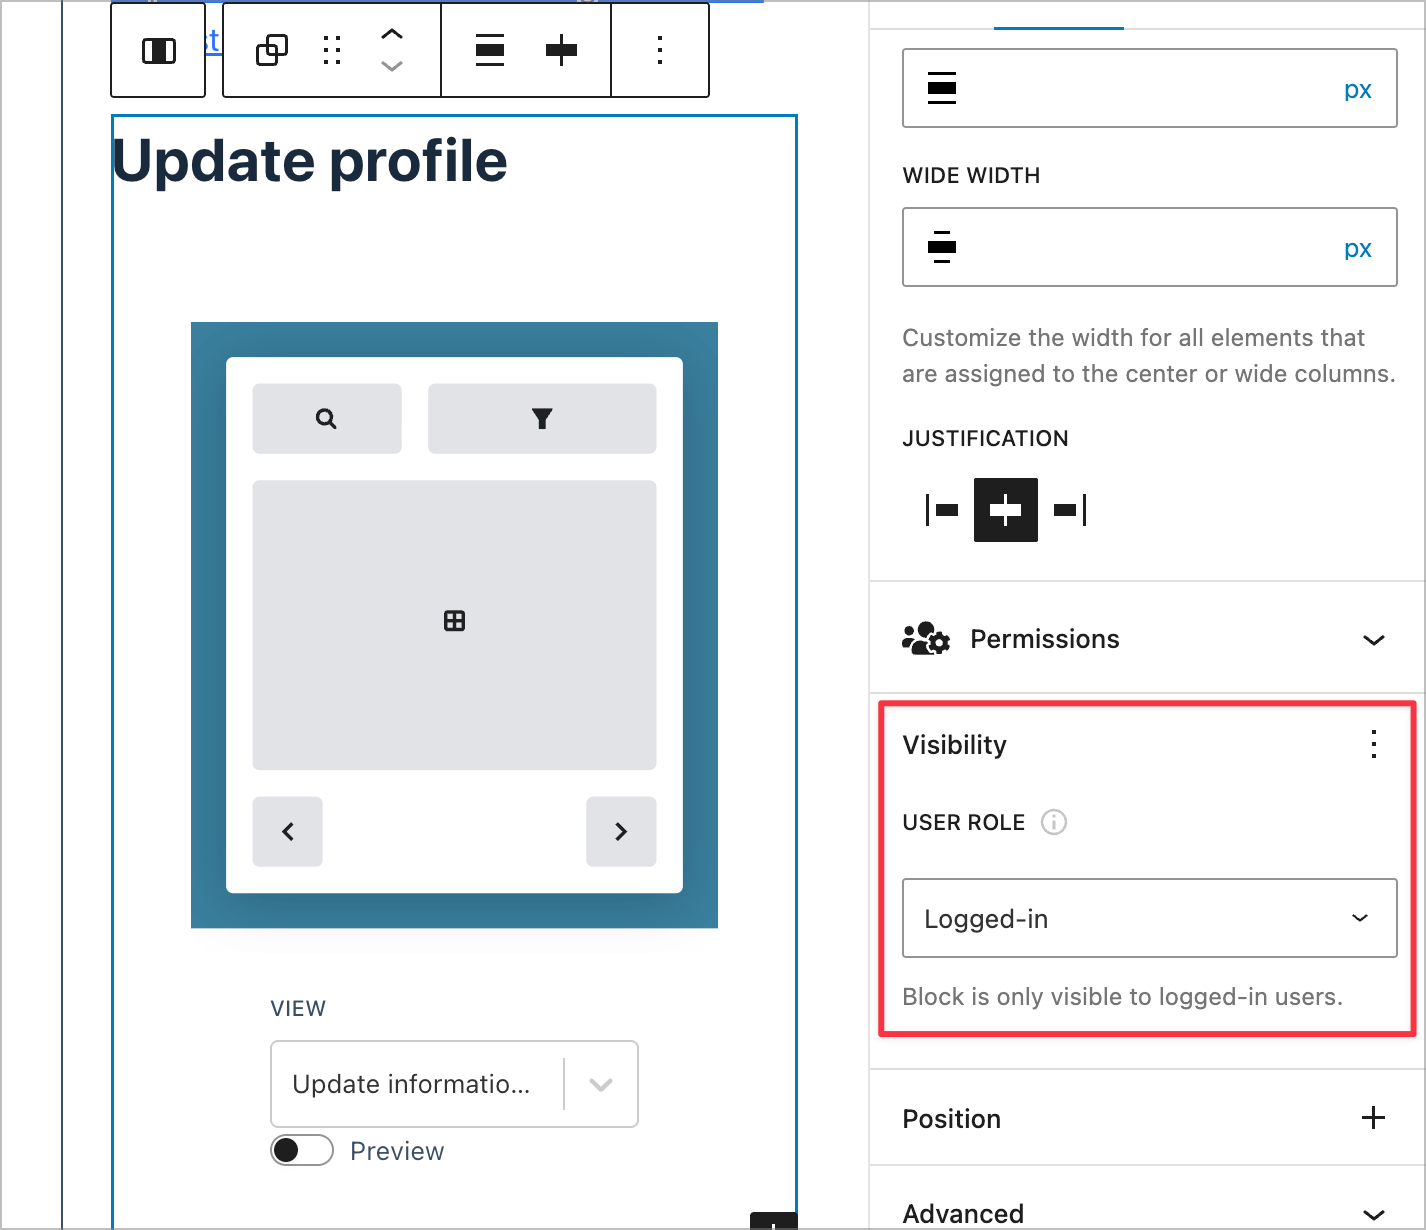
Next, we’ll control who can see this entire group.
- Select the Group block (not the individual blocks inside it).
- In the block settings panel, locate the Block Visibility options.
- Enable visibility controls.
- Set the condition to Show block if user is logged in.
This ensures the entire grouped section, including the heading and the GravityView output, only appears to authenticated users.
Applying visibility rules to the Group block instead of individual blocks keeps things clean and scalable. If you later add more elements (buttons, descriptions, icons), they’ll automatically inherit the same visibility rules without extra configuration.
Save your changes, test while logged in and logged out, and confirm the sidebar behaves as expected.
That’s it! Your dynamic link is now embedded and conditionally displayed based on login status.
Throughout this tutorial, we used the [gv_entry_link] shortcode to generate the edit link. Here’s a quick reference for all its available attributes:
| Attribute | Description | Default | Options |
|---|---|---|---|
action | The type of link to generate | read | read, edit, delete |
view_id | The ID of the View | Current View ID | Any View ID |
entry_id | The ID of the entry | Current entry ID | Any entry ID, first, last |
post_id | The page/post ID where the View is embedded | — | Any post ID |
return | What the shortcode returns | html | html (anchor link), url (raw URL) |
link_atts | HTML attributes for the link | — | e.g., target=_blank |
field_values | URL parameters to pass to the link | — | URL-encoded values |
lightbox | Open the entry in a modal instead of a new page | false | true, false |
For the full shortcode documentation with examples, see The [gv_entry_link] Shortcode.
The sidebar approach works well, but what if you want a standalone page where users can edit their profile directly, without needing a separate View?
You can embed an editable entry form on any WordPress page using the [gventry] shortcode. Here’s how:
- Create a new WordPress page (e.g., “Edit Your Profile”).
- Add a Shortcode block and paste the following:
[gventry view_id="123" entry_id="first" edit="1"]Replace 123 with your View’s ID. The entry_id="first" parameter automatically loads the logged-in user’s first entry, and edit="1" puts it straight into edit mode.
That’s it! When a logged-in user visits the page, they’ll see an editable form pre-filled with their entry data, along with Update, Cancel, and Delete buttons.
You can combine this with the Block Visibility plugin to restrict the page to logged-in users only, just like we did with the sidebar widget.
For more details on the [gventry] shortcode, see the full documentation. You can also read more about embedding the Edit Entry form into a page.
By using the [gv_entry_link] shortcode inside a dedicated View, you can turn a simple link into a dynamic, user-aware element that only appears when it should. No custom templates, no complex logic!
This approach keeps your setup flexible. Use it for member directories, staff portals, job boards, or any scenario where you need an edit link that can be added anywhere on your site and isn’t tied to a specific page or View.

Helpful tips right in your inbox.
Subscribe to get the latest articles, information on releases and helpful Gravity Forms tips!
More articles

GravityKit turns 12: a year in review, and 30% off Lifetime All Access
GravityKit turns 12. A look back at a year of GravityView 3.0, GravitySearch, and AI-assisted building, plus a birthday sale on the Lifetime All Access Pass.

Launch Log: Row headers for screen readers, smarter conditional logic, and multi-View fixes
GravityView 3.1 adds row headers for screen readers, plus smarter conditional logic in GravityCalendar and fixes for DataTables, Maps, and Dynamic Lookup.

Ecommerce platform market share 2026: WooCommerce leads the web, Shopify leads the top tier
Ecommerce platform market share in 2026, from HTTP Archive data. WooCommerce leads the whole web at 6.64%, but Shopify already leads the top 1M sites.
