---
title: "Rank featured listings and sell featured spots"
date: 2026-11-12
updated: 2026-11-12
author: "GravityKit"
link: "https://www.gravitykit.com/docs/gravityview-pro/featured-entries/sell-featured-spots/"
category: "GravityView Pro > Featured Entries"
---
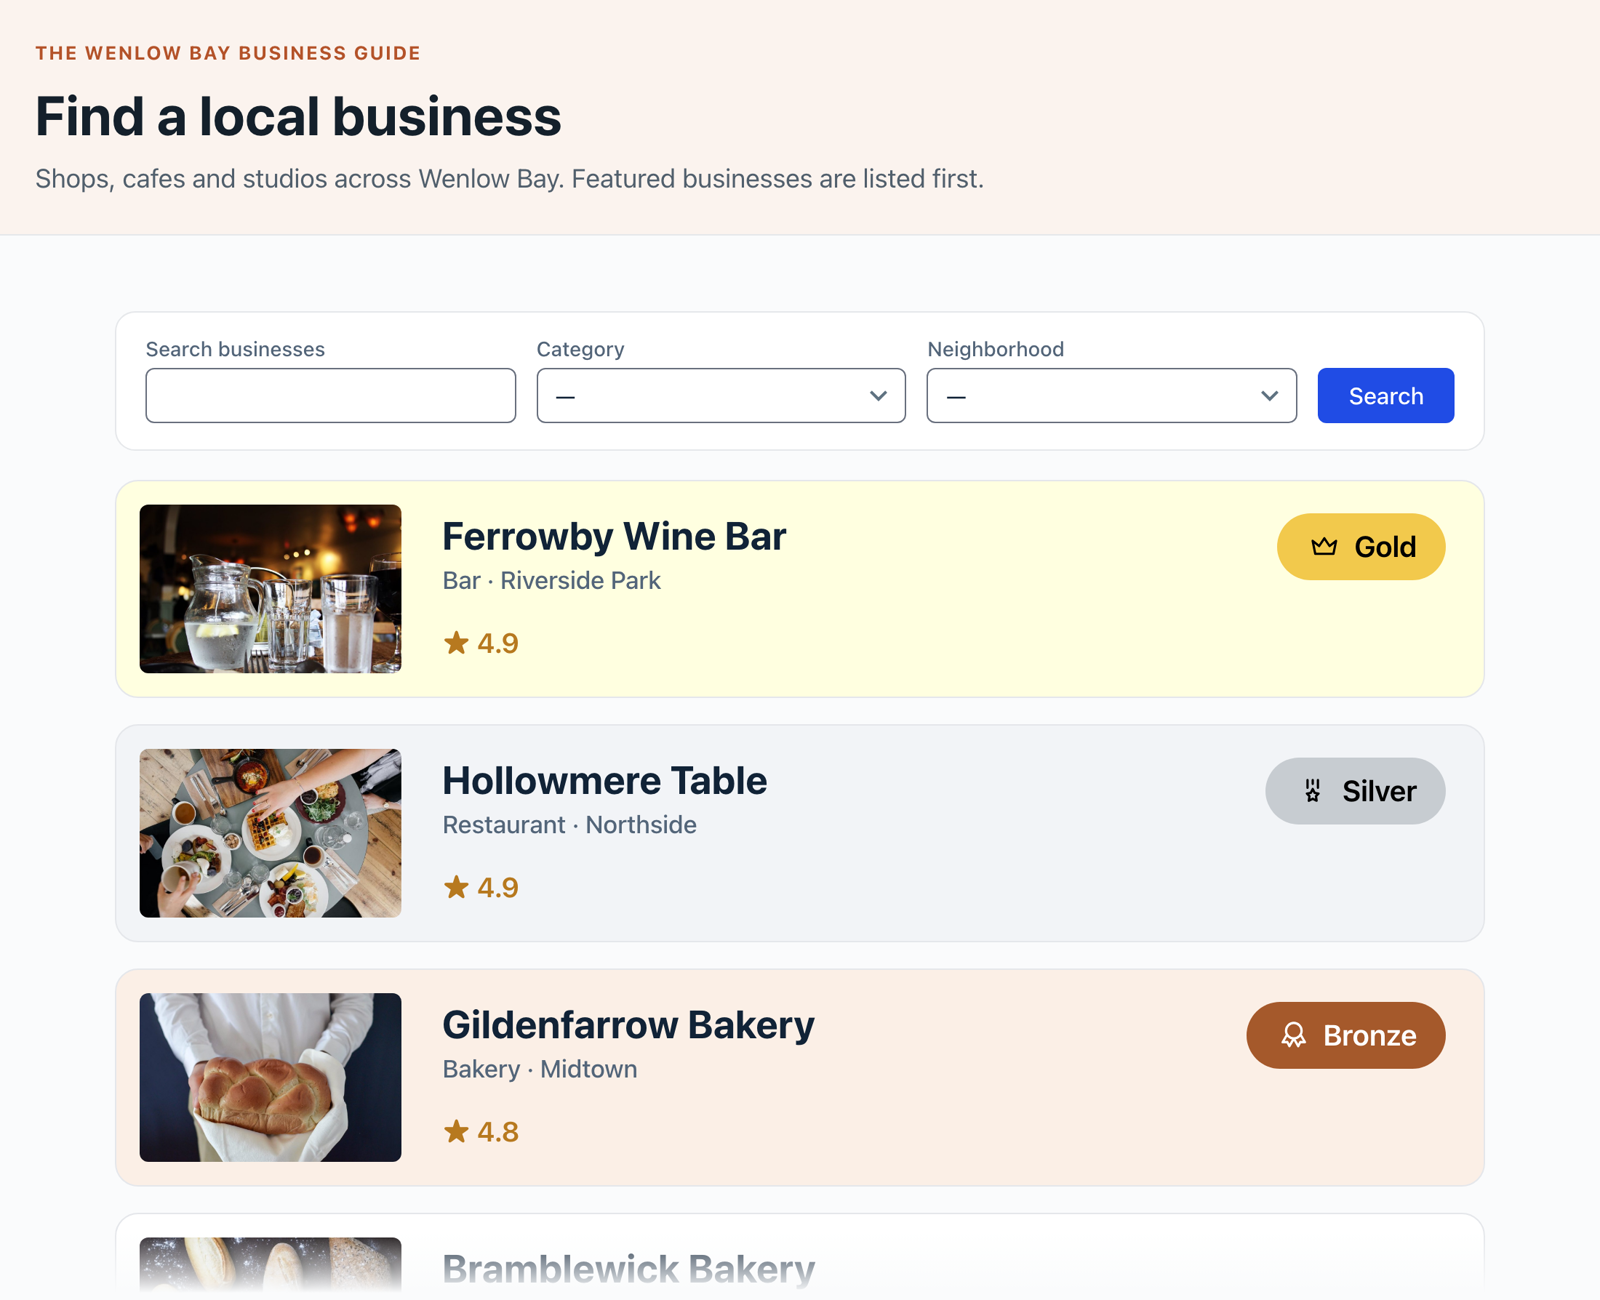
Featured Tiers lets you rank the listings you feature, such as Gold, Silver and Bronze, and give each tier its own badge and row color. A listing gets its tier from a field on the entry, from conditions you set, or from a paid order. A paid spot can end after the number of days you choose, and the listing then goes back to its usual place.
This article uses a business directory as the example. Listings on the Gold plan paid $49 on an order form and stay featured for 28 days. Silver and Bronze come from the directory form's Listing plan field. Free listings have no tier.
*Featured Tiers is part of [Featured Entries](https://www.gravitykit.com/docs/gravityview-pro/featured-entries/how-do-i-feature-an-entry/), which is included in*[GravityView Pro](https://www.gravitykit.com/products/gravityview-pro/). The All Access Pass includes GravityView Pro. To sell featured spots, you also need a Gravity Forms payment add-on, such as Stripe or PayPal.
## How Featured Tiers works
Featured Tiers is set up in two places. You set up the tiers once on the form, then choose in each View which of them to show.
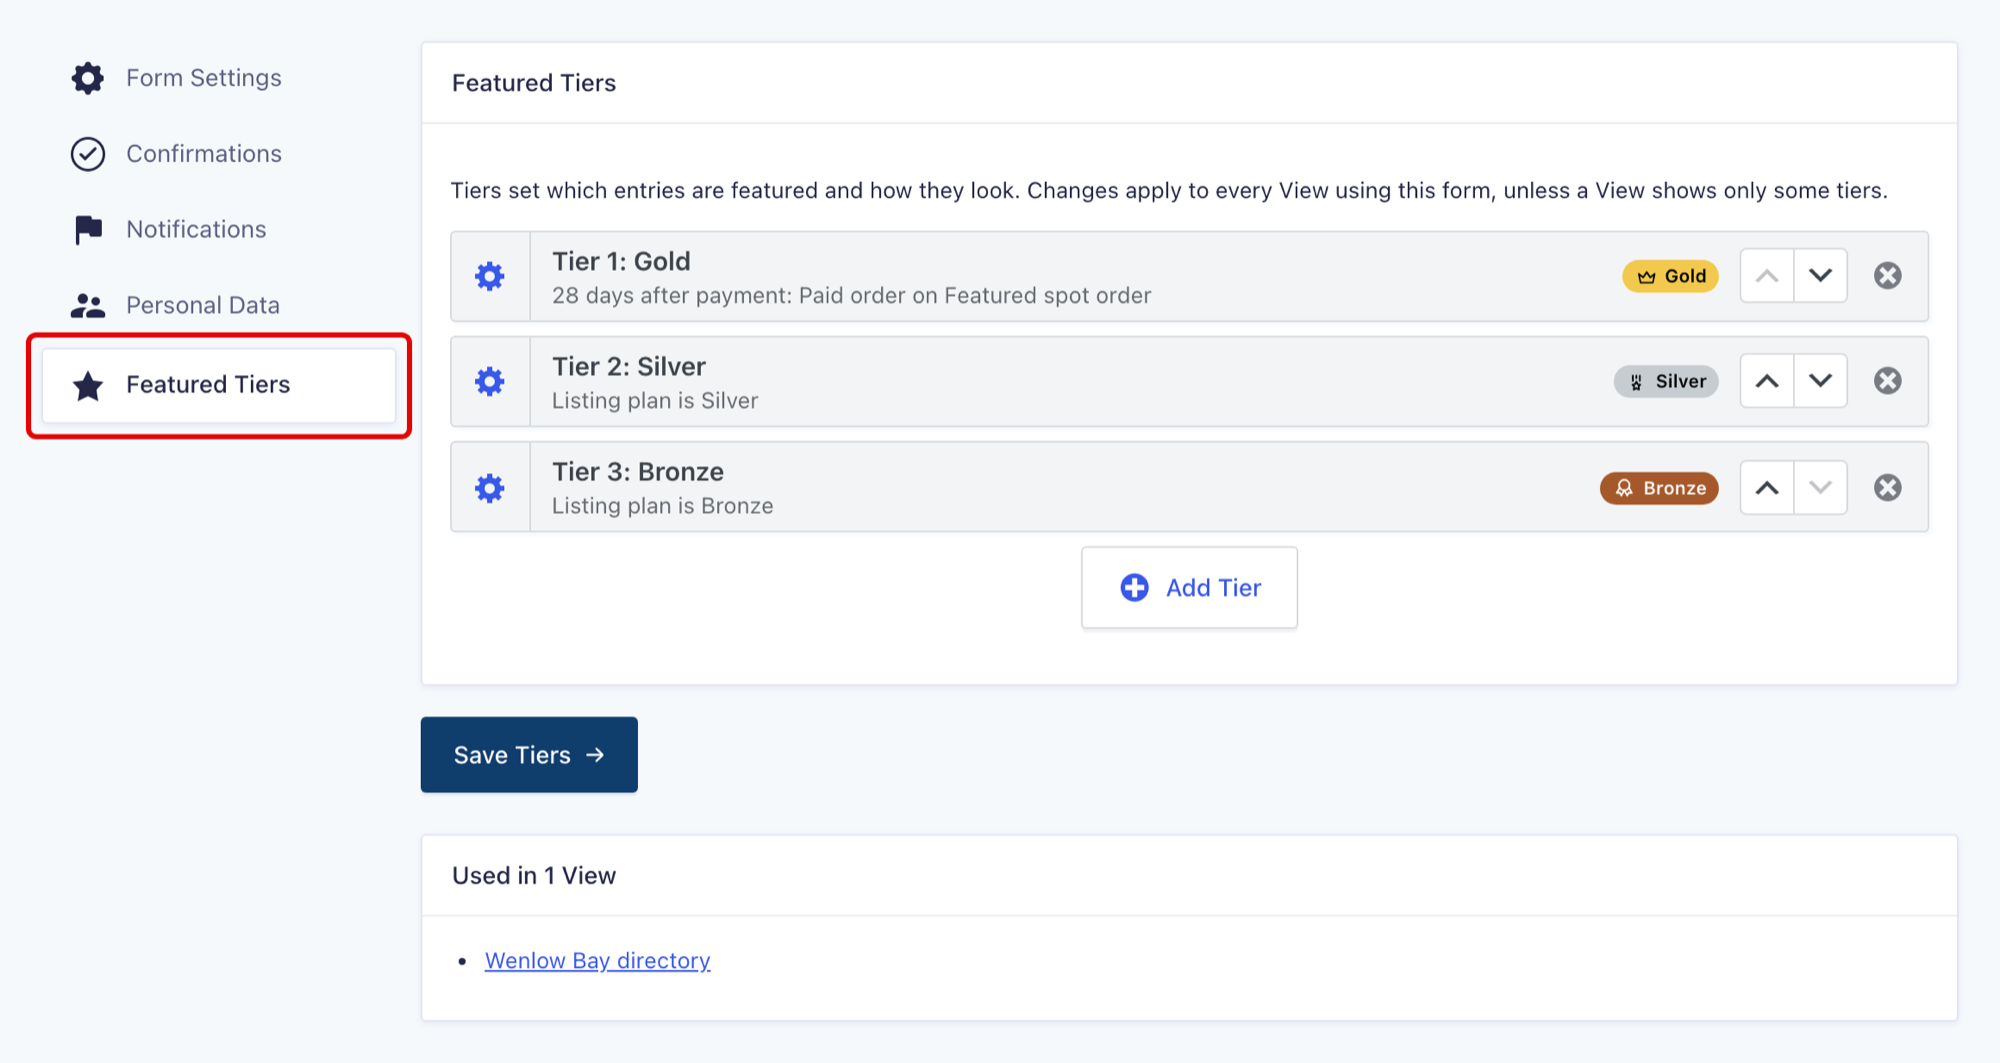
**On the form:** which entries each tier features and how its badge looks. In **Forms**, open your directory form's **Settings**, then click **Featured Tiers**.
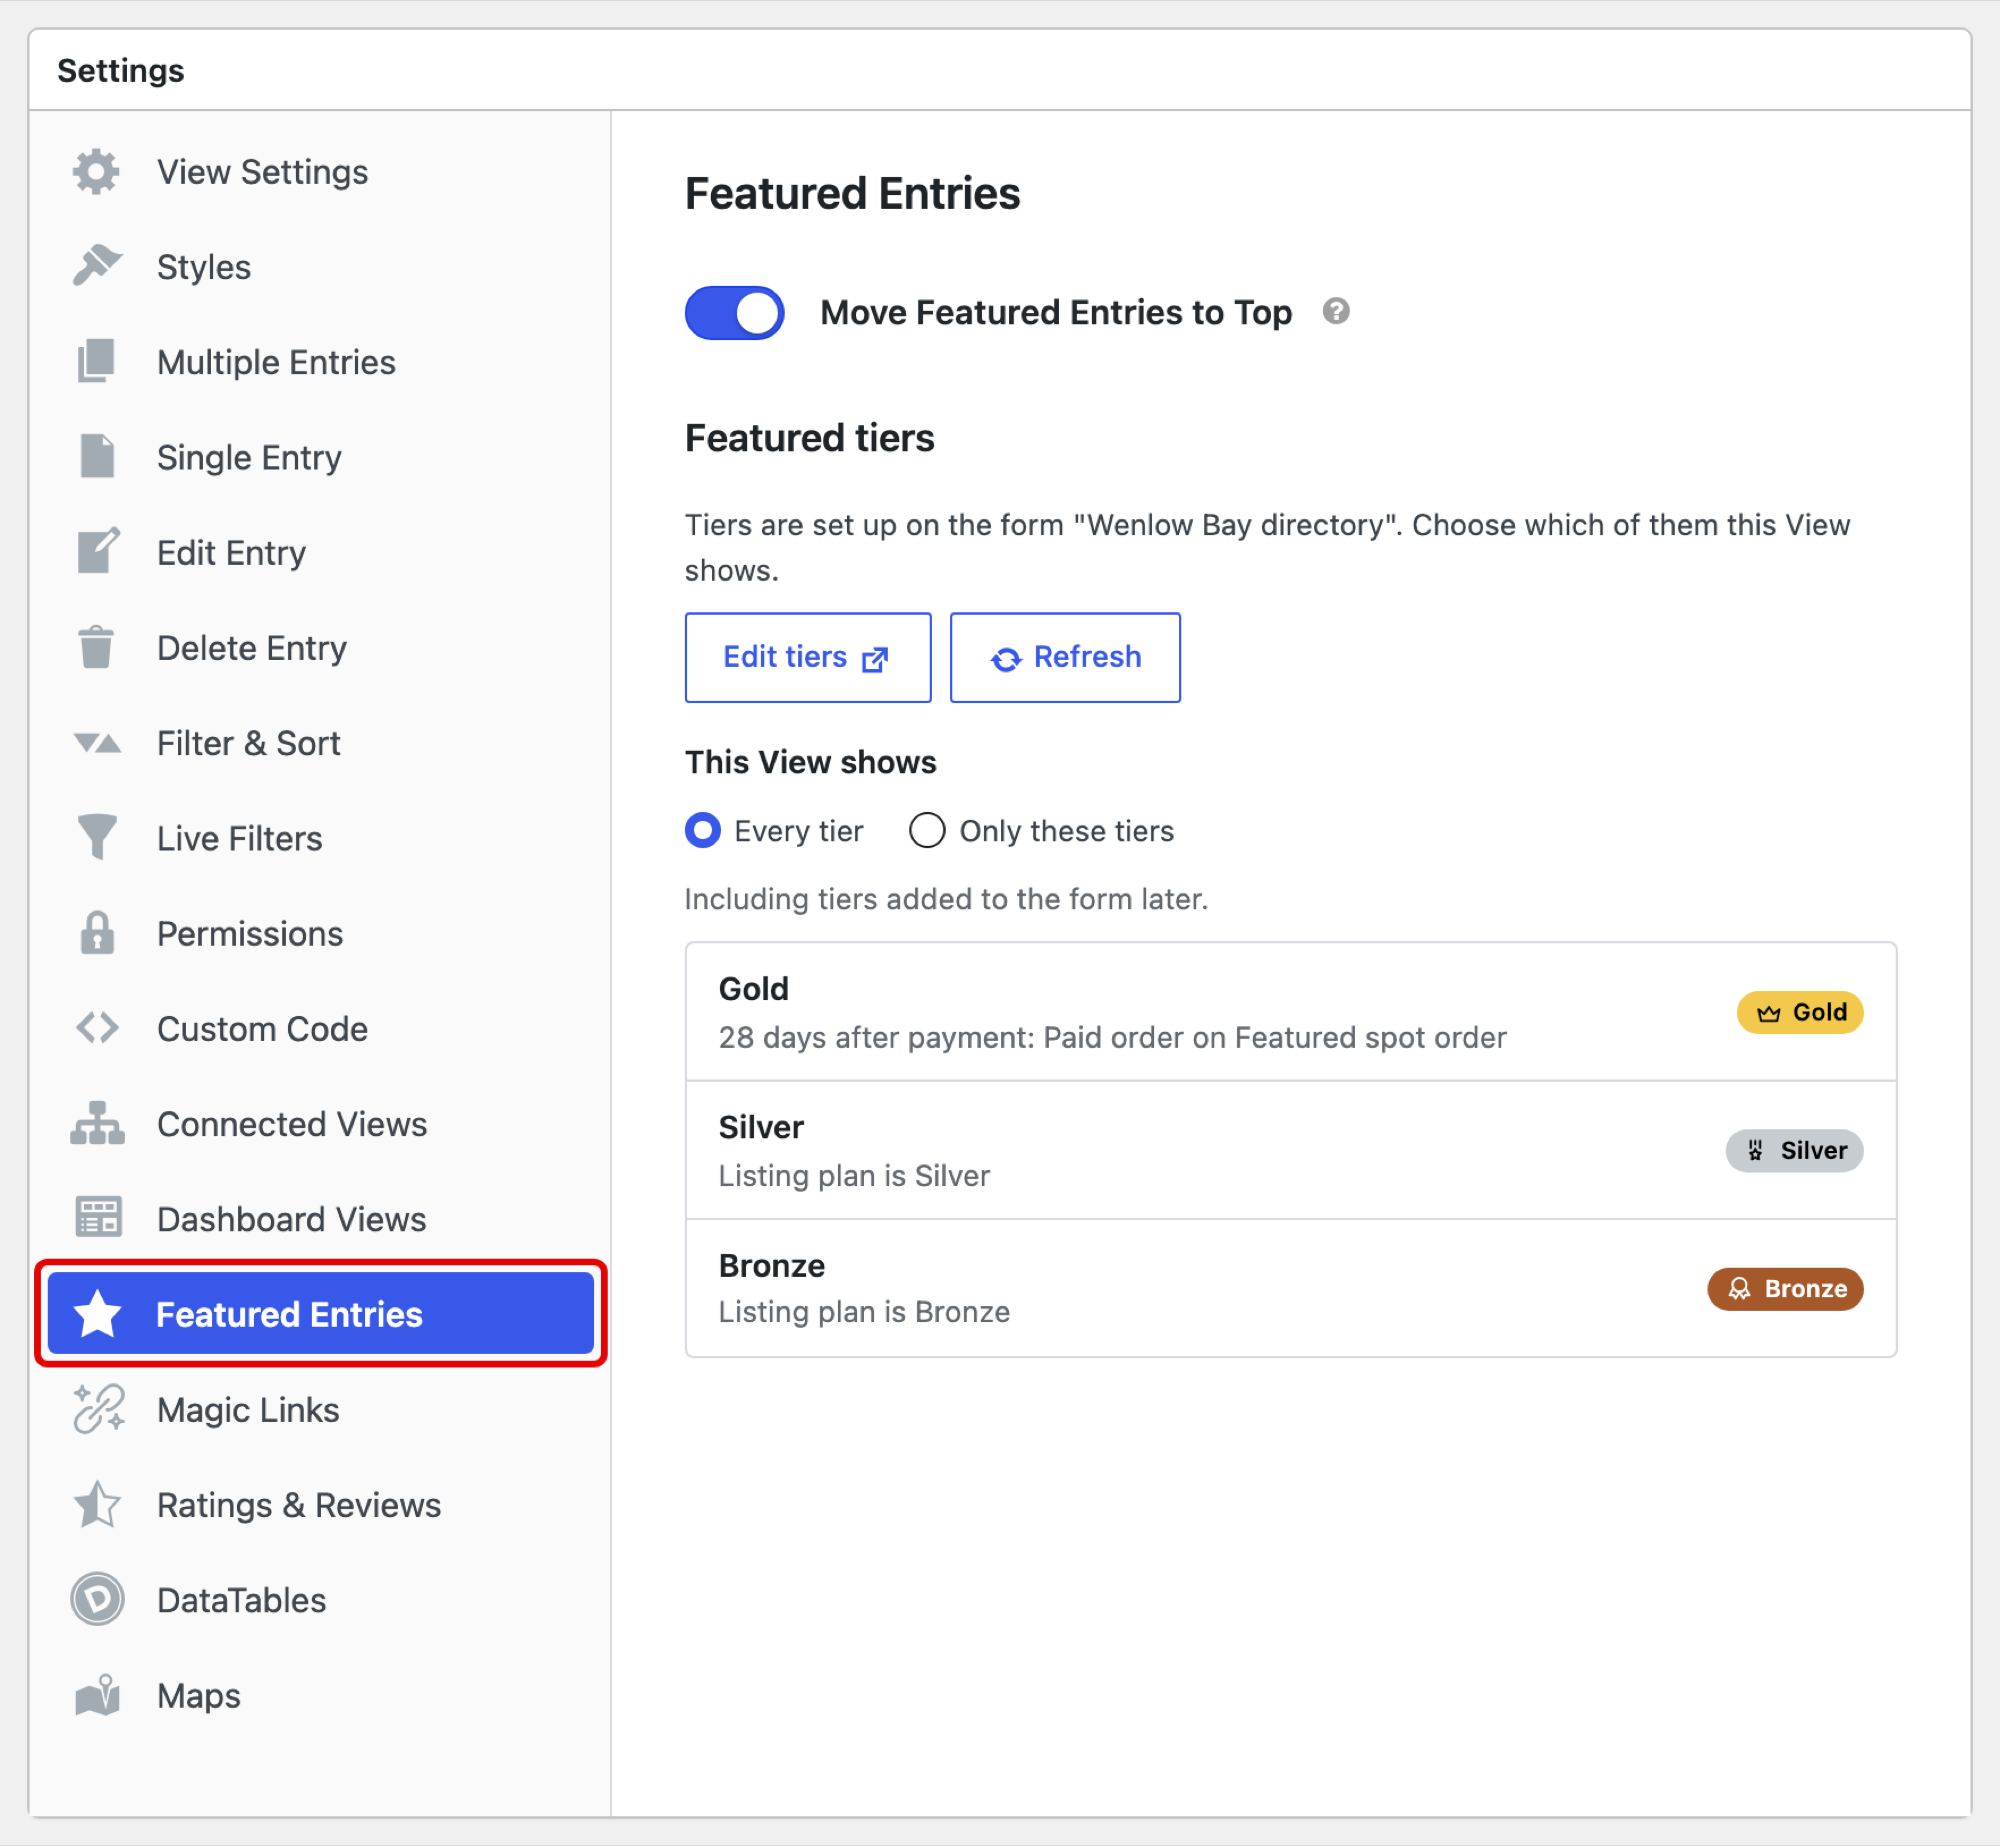
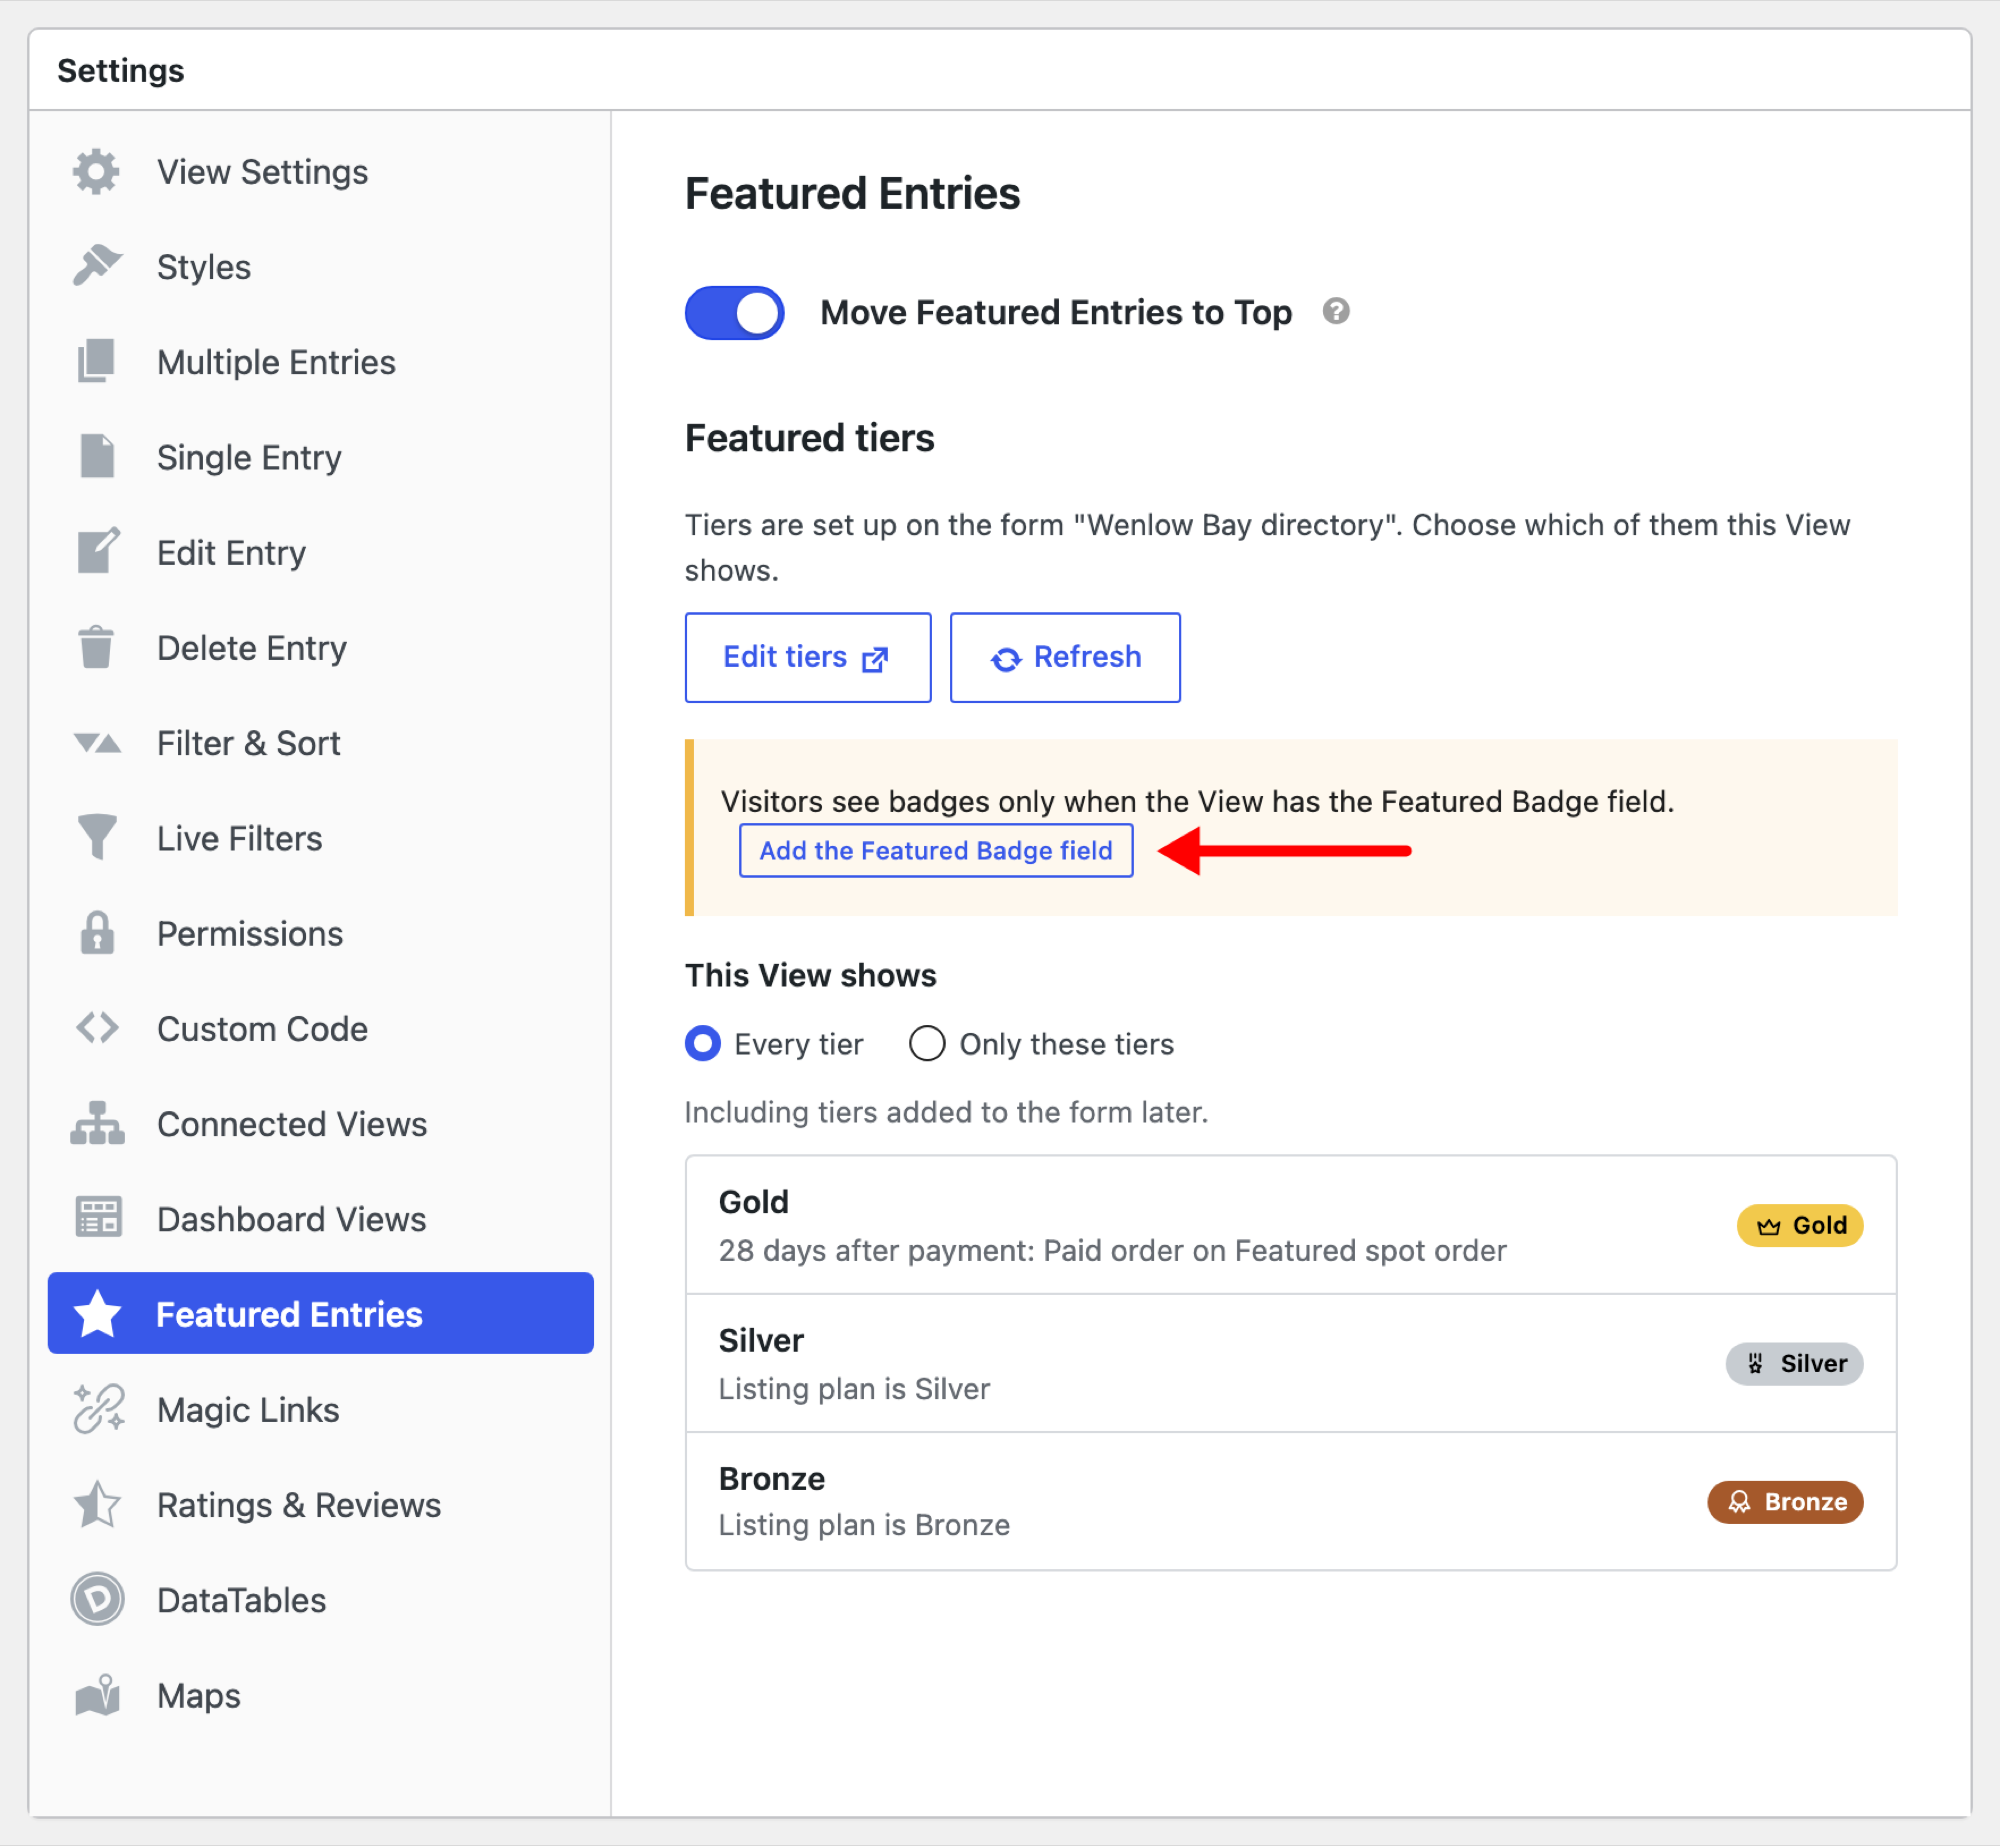
**In each View:** you choose which of the form's tiers to show, and whether featured entries move to the top. Edit the View, and in its **Settings** box, click the **Featured Entries** tab.
*Keep these in mind as you set up tiers:*
- All of the form's tiers appear in every View of it. To show fewer in one View, choose **Only these tiers** under **This View shows**.
- A tier features entries that match conditions, entries with a paid order, or both. When both are checked, an entry must match the conditions and have a paid order.
- An entry goes in the first tier it matches. Use the arrows next to a tier to move it up or down.
- With **Move Featured Entries to Top** turned on, featured entries come first, in tier order.
- Click **Save Tiers** to save your changes. Your changes appear right away wherever the tier is shown.
## Step 1: Choose how businesses pay
Businesses can pay for a featured spot in two ways. Pick one before you set up your tiers, or use both.
| | Pay when adding the listing | Pay on a separate order form |
|---|---|---|
| **Setup** | A Product field with your plans, such as Listing plan, and a payment feed on the directory form | An order form with a Lookup field, a product and a payment feed |
| **Spots that end on their own** | No. A one-time payment keeps the listing featured for good, and a subscription keeps it featured while it's active | Yes, after the number of days you set |
| **Upgrade a listing later** | No. Businesses pay only when they add the listing | Yes, from an email link or a "My Listings" page |
To take payment when a listing is added, follow Step 2 and turn on **Feature entries only while their payment is current (Paid or Active)**. To sell spots on a separate order form, follow Step 3.
## Step 2: Create tiers from a field
If your form already has a field for the listing's plan, you can create one tier for each of its choices. The field must be a Drop Down or Radio Buttons field.
No field like this on your form? You can create tiers from conditions instead, as in [Feature listings with conditions](#feature-listings-with-conditions), or from paid orders, as in [Step 3: Sell featured spots](#step-3-sell-featured-spots).
- In **Forms**, open your directory form's **Settings**, then click **Featured Tiers**.
- Click **Add Tier**, then **Tiers from a field**.
- In **Field**, choose the field.
- Under **Make tiers for**, turn off the choices that shouldn't be featured, such as Free.
- If buyers pay for the plan on the same form, turn on **Feature entries only while their payment is current (Paid or Active)**, so a listing that hasn't paid isn't featured. This option only shows when the form has a product field.
- Click **Create tiers**, then **Save Tiers**.
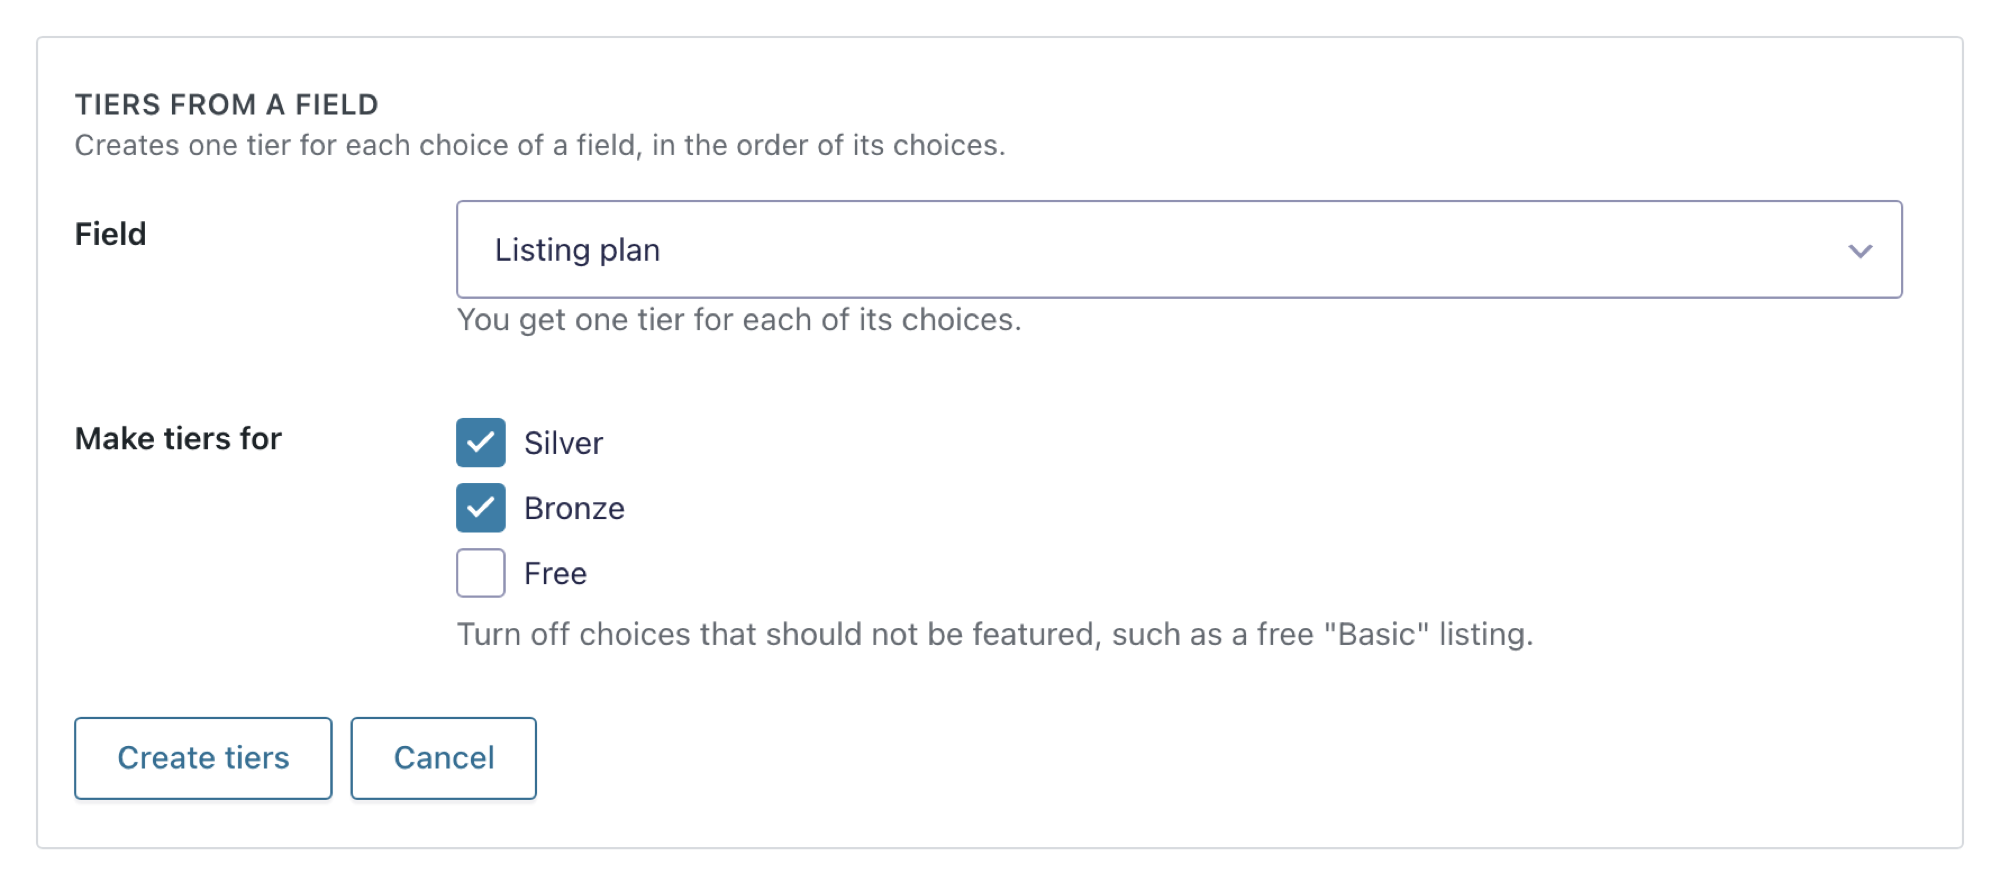You get one tier for each choice, in the order of the field's choices, and each tier is named after its choice. New tiers go below the tiers you already have. To rank them higher, use the arrows next to a tier.
If the form has starred entries, you'll also see **Keep featuring starred entries**. Leave it on to keep them featured in their own tier, above the new tiers, or turn it off to feature only the new tiers. In this example, turn it off: the new tiers replace the listings you starred by hand.
## Step 3: Sell featured spots
A paid tier features a listing when its owner pays on a separate order form. In the example, the Gold tier features a listing for 28 days after payment.
Before you start, install and activate:
- The free [Gravity Forms Dynamic Lookup](https://www.gravitykit.com/products/gravity-forms-dynamic-lookup/) add-on, so buyers can pick their listing on the order form
- A Gravity Forms payment add-on, such as Stripe or PayPal, connected to your payment account (see Take payment below)
### Create the order form
The order form is a separate form where a business picks its listing and pays. Don't add these fields to your directory form.
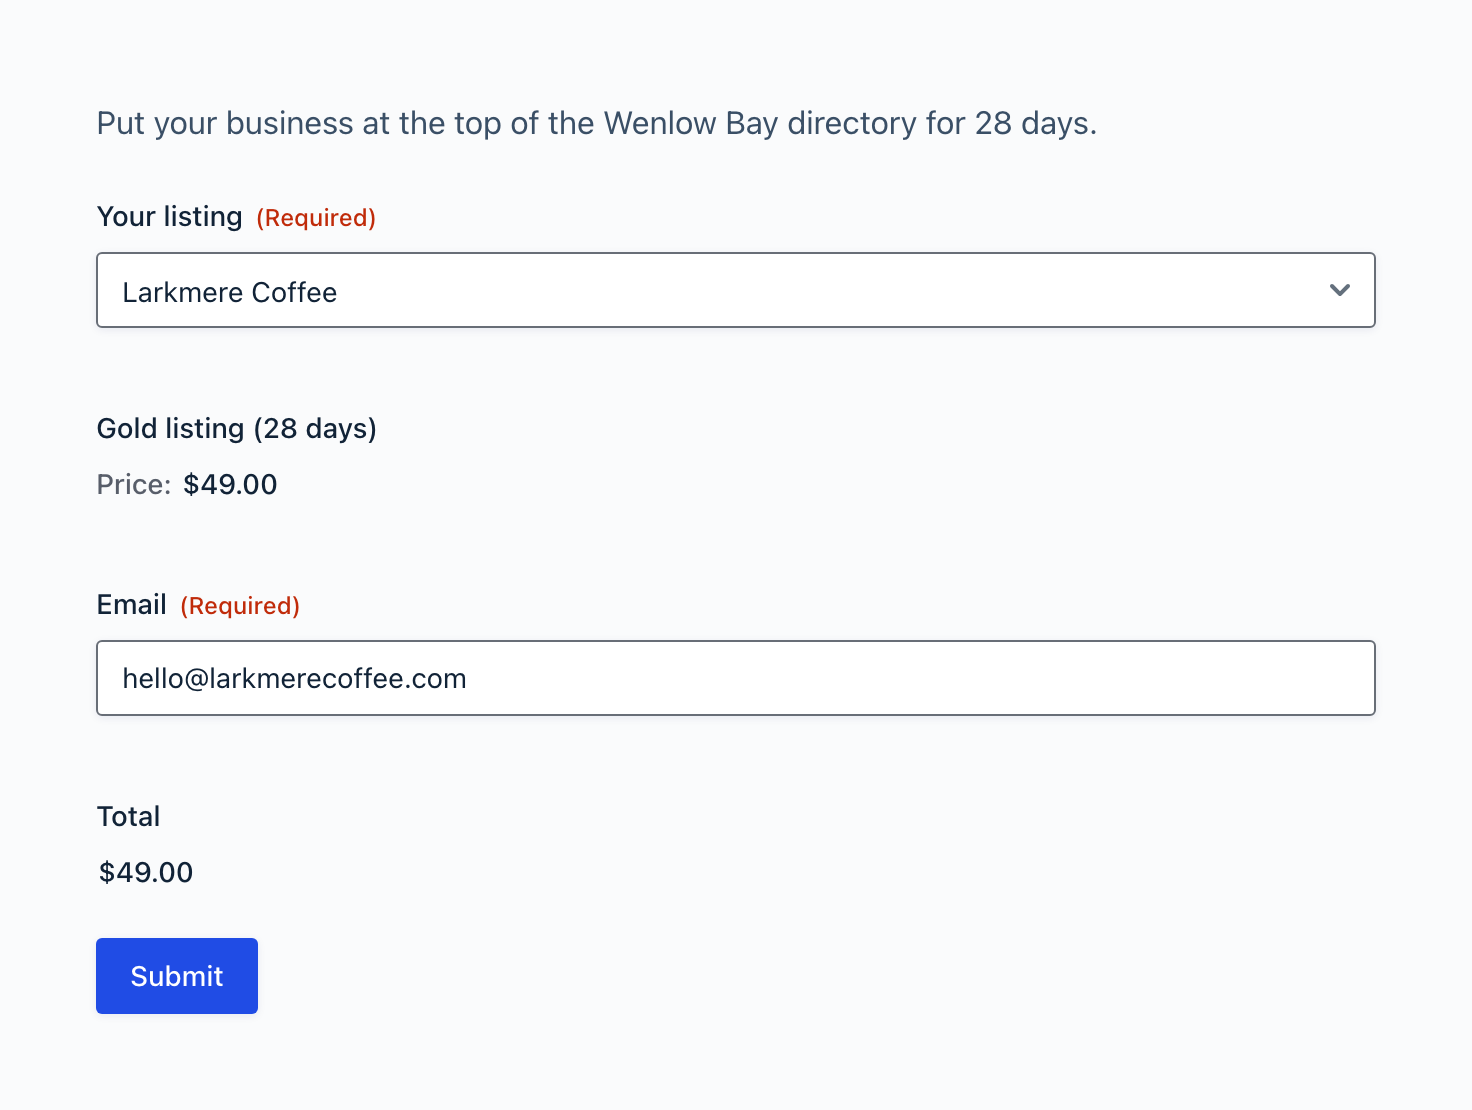
In **Forms**, click **Add New** and create a form, such as "Featured spot order", with a short description of what businesses are buying, such as "Put your business at the top of the directory for 28 days." Add:
- A [**Lookup** field](https://www.gravitykit.com/docs/gravity-forms-dynamic-lookup/getting-started-with-dynamic-lookup/) (under **Advanced Fields**), where buyers pick the listing to feature. Give it a label such as "Your listing".
- A **Product** field with the price, such as a Single Product called "Gold listing (28 days)" for $49. To sell several packages, such as Gold and Silver, set the Product field's Field Type to Drop Down or Radio Buttons and give each package its own choice. Turn on **Disable quantity field** too, or the total stays at $0.00 until the buyer types a quantity.
- An **Email** field, so the buyer gets a receipt.
- A **Total** field.
You set how many days a spot lasts later, in the tier.
### Set up the Lookup field
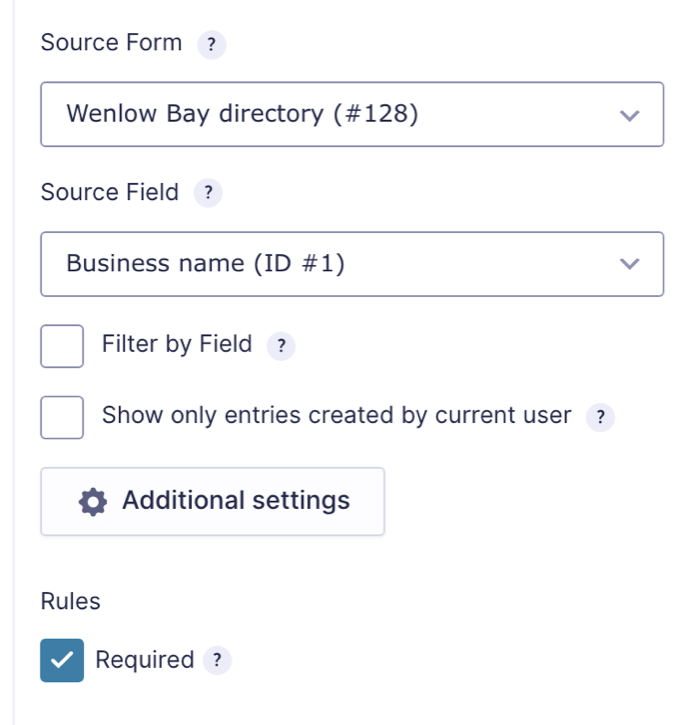
Click the Lookup field to open its settings. Under **General**:
- **Source Form:** your directory form.
- **Source Field:** the field buyers recognize, such as Business name.
- **Required** (under **Rules**): turn it on, so every order names a listing.
- **Show only entries created by current user:** turn it on only if businesses log in to buy, so each one can pay only for its own listings. Leave it off if businesses follow a link from an email: they aren't logged in, so their listing wouldn't be in the list.
Under **Appearance**, type `Choose your listing` in **Placeholder**. Without a placeholder, the list starts on the first listing, and a buyer who doesn't check could pay for the wrong one
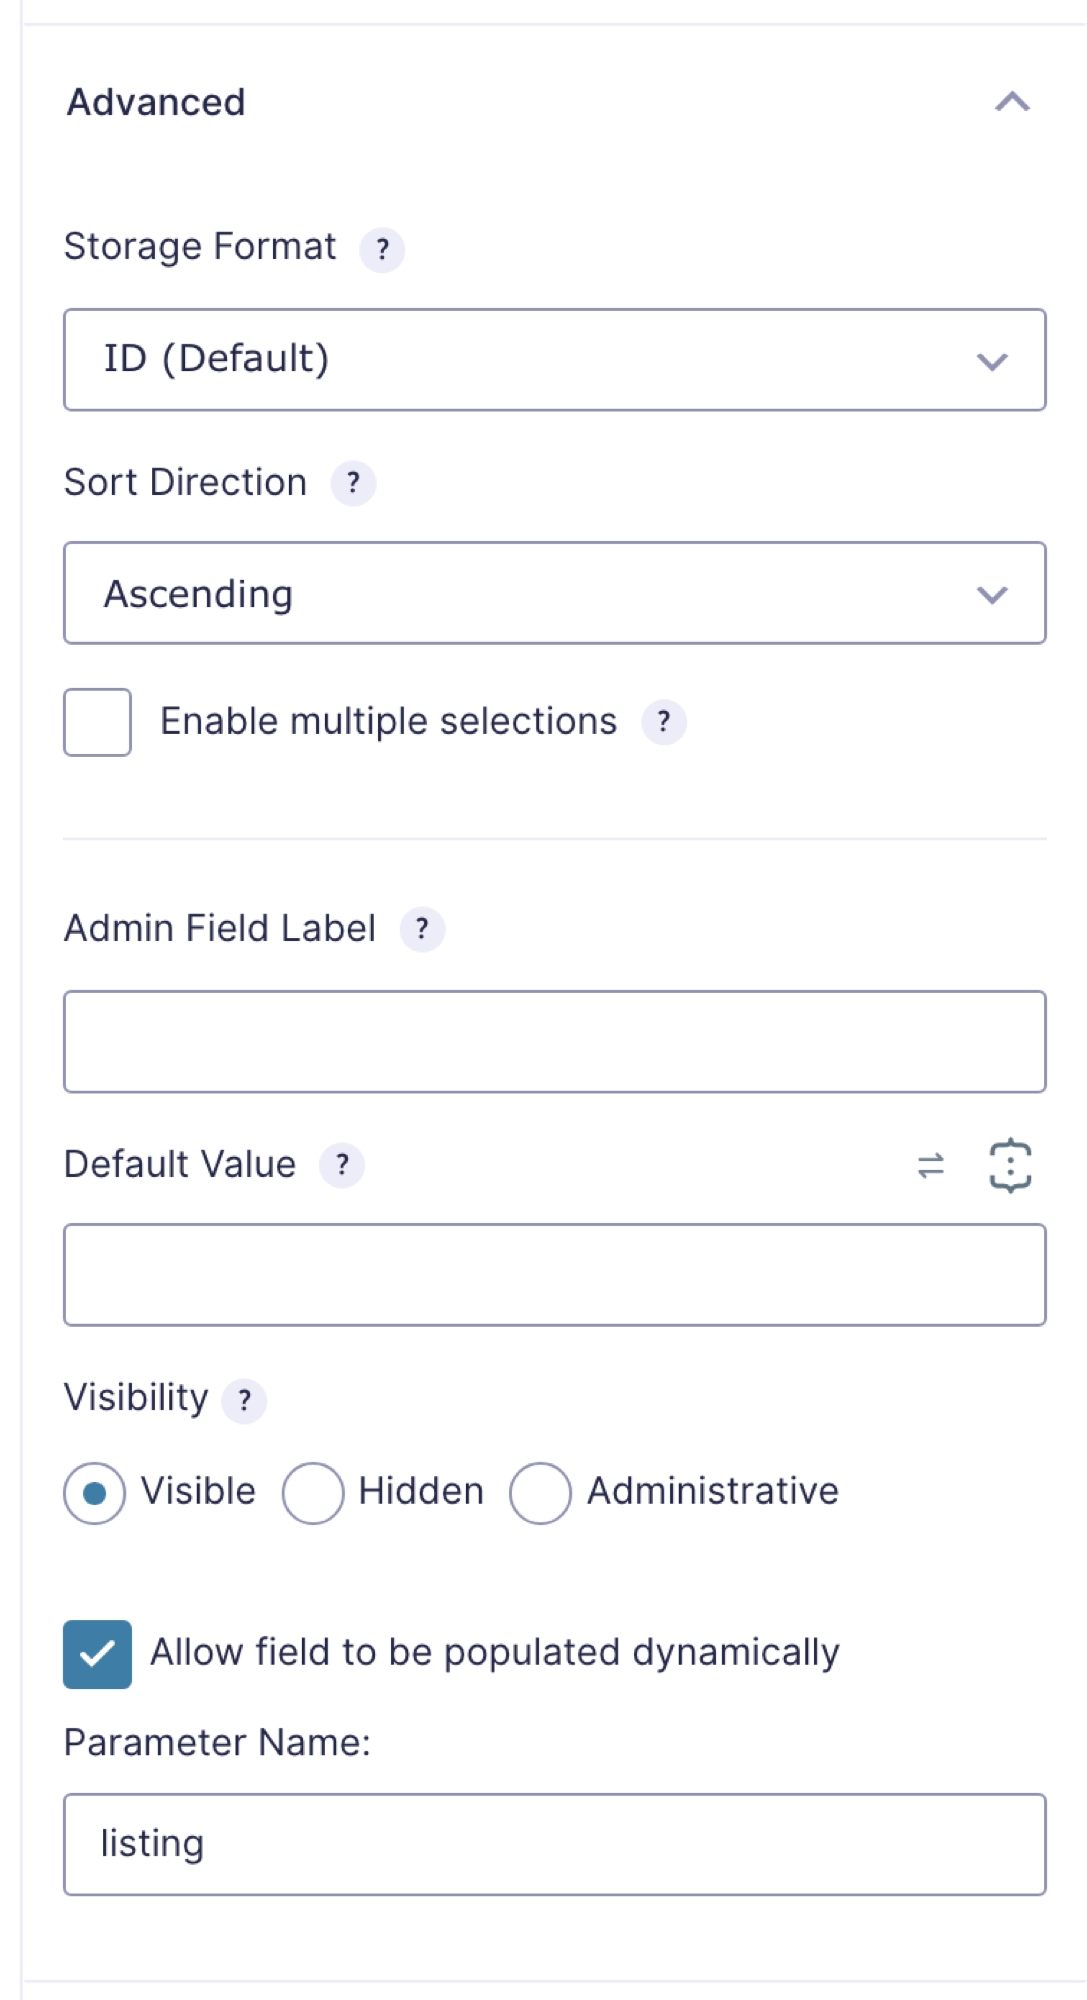
Under **Advanced**:
- Leave **Storage Format** on **ID (Default)** and **Enable multiple selections** off, so each order names one listing by its ID.
- Make sure **Allow field to be populated dynamically** is on, and type `listing` in **Parameter Name**. A link that ends in `?listing=` and a listing's entry ID opens the form with that listing already chosen.
Click **Save Form**. If the Lookup field is missing a setting, the tier's settings say so and name the field and the setting to fix
### Take payment
A spot is featured once its order is marked Paid, or Active for a subscription. Your payment add-on does that when the buyer pays.
Connect your payment add-on before you add a feed. Stripe, for example, needs an SSL certificate (an `https://` site), your Stripe account connected under **Forms**, then **Settings**, then **Stripe**, and a **Stripe** field (under **Pricing Fields**) on the order form. See [Setting up the Stripe add-on](https://docs.gravityforms.com/setting-up-the-stripe-add-on/).
Open the order form's **Settings**, then your payment add-on, such as Stripe, and add a feed. For a one-time payment, choose **Products and Services** as the **Transaction Type**. For a monthly spot, choose **Subscription**: the listing stays featured while the subscription is active.
If a listing doesn't move up after its owner pays, open the order in **Forms**, then **Entries**, and check that its payment status is Paid. An order taken without a payment feed is never marked Paid, so it doesn't feature a listing.
### Put the order form on a page
Add the order form to a page, such as "Feature your business", with the Gravity Forms **Form** block, and publish the page. A link to that page with `?listing=` and a listing's entry ID, such as `/feature-your-business/?listing=7998`, opens the form with that listing chosen.
### Create the paid tier
Next, create the tier that features a listing once its order is paid.
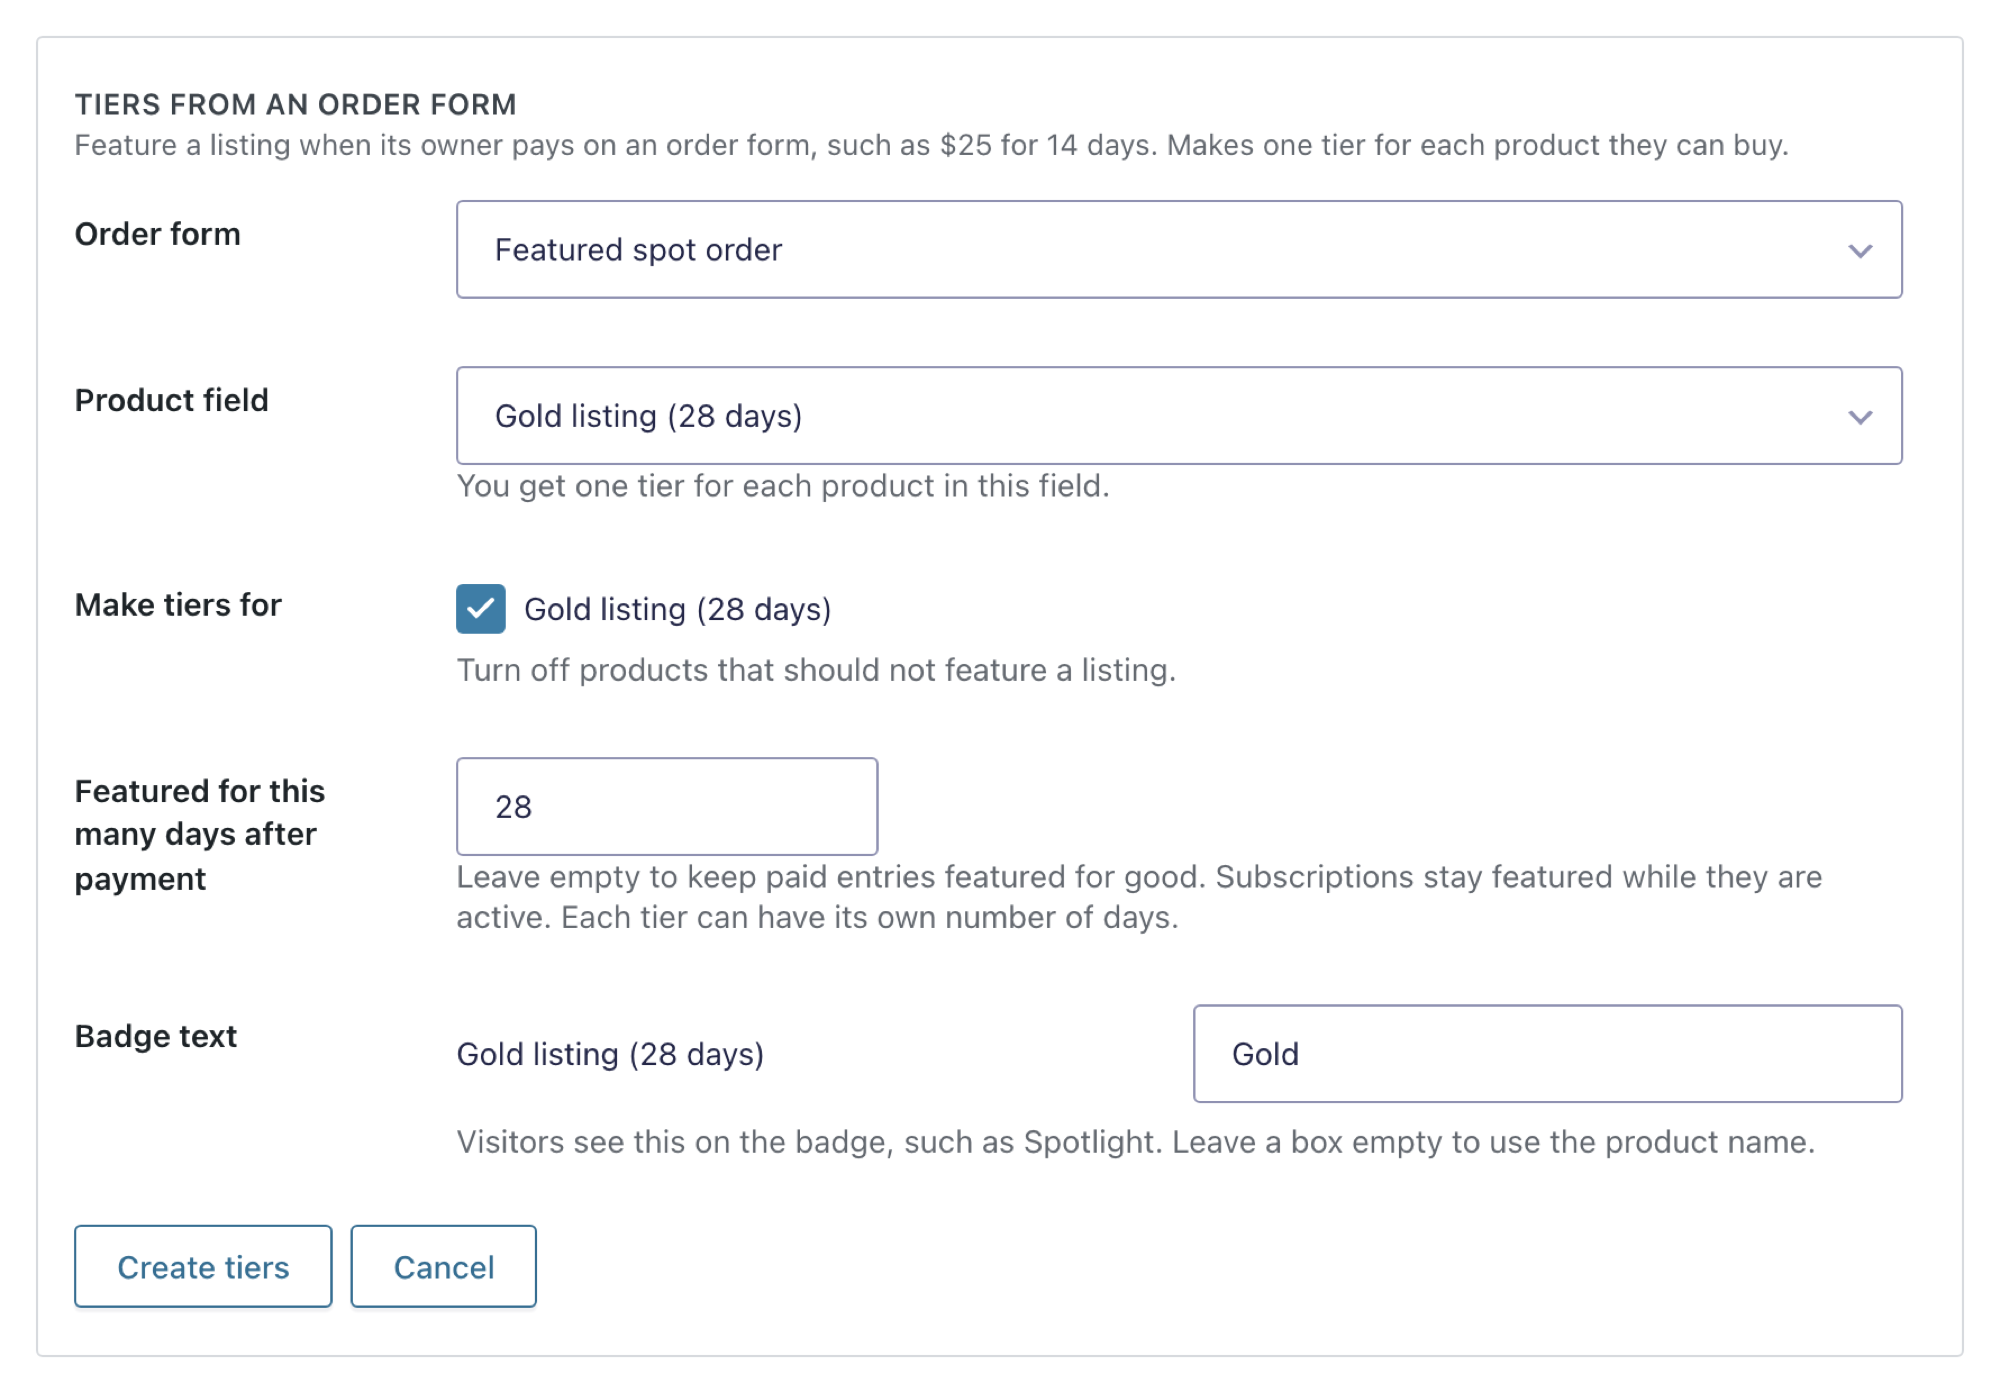
- On your directory form's **Featured Tiers** page, click **Add Tier**, then **Tiers from an order form**.
- Choose the order form and its **Product field**. You get one tier for each of its products. Turn off any product that shouldn't feature a listing.
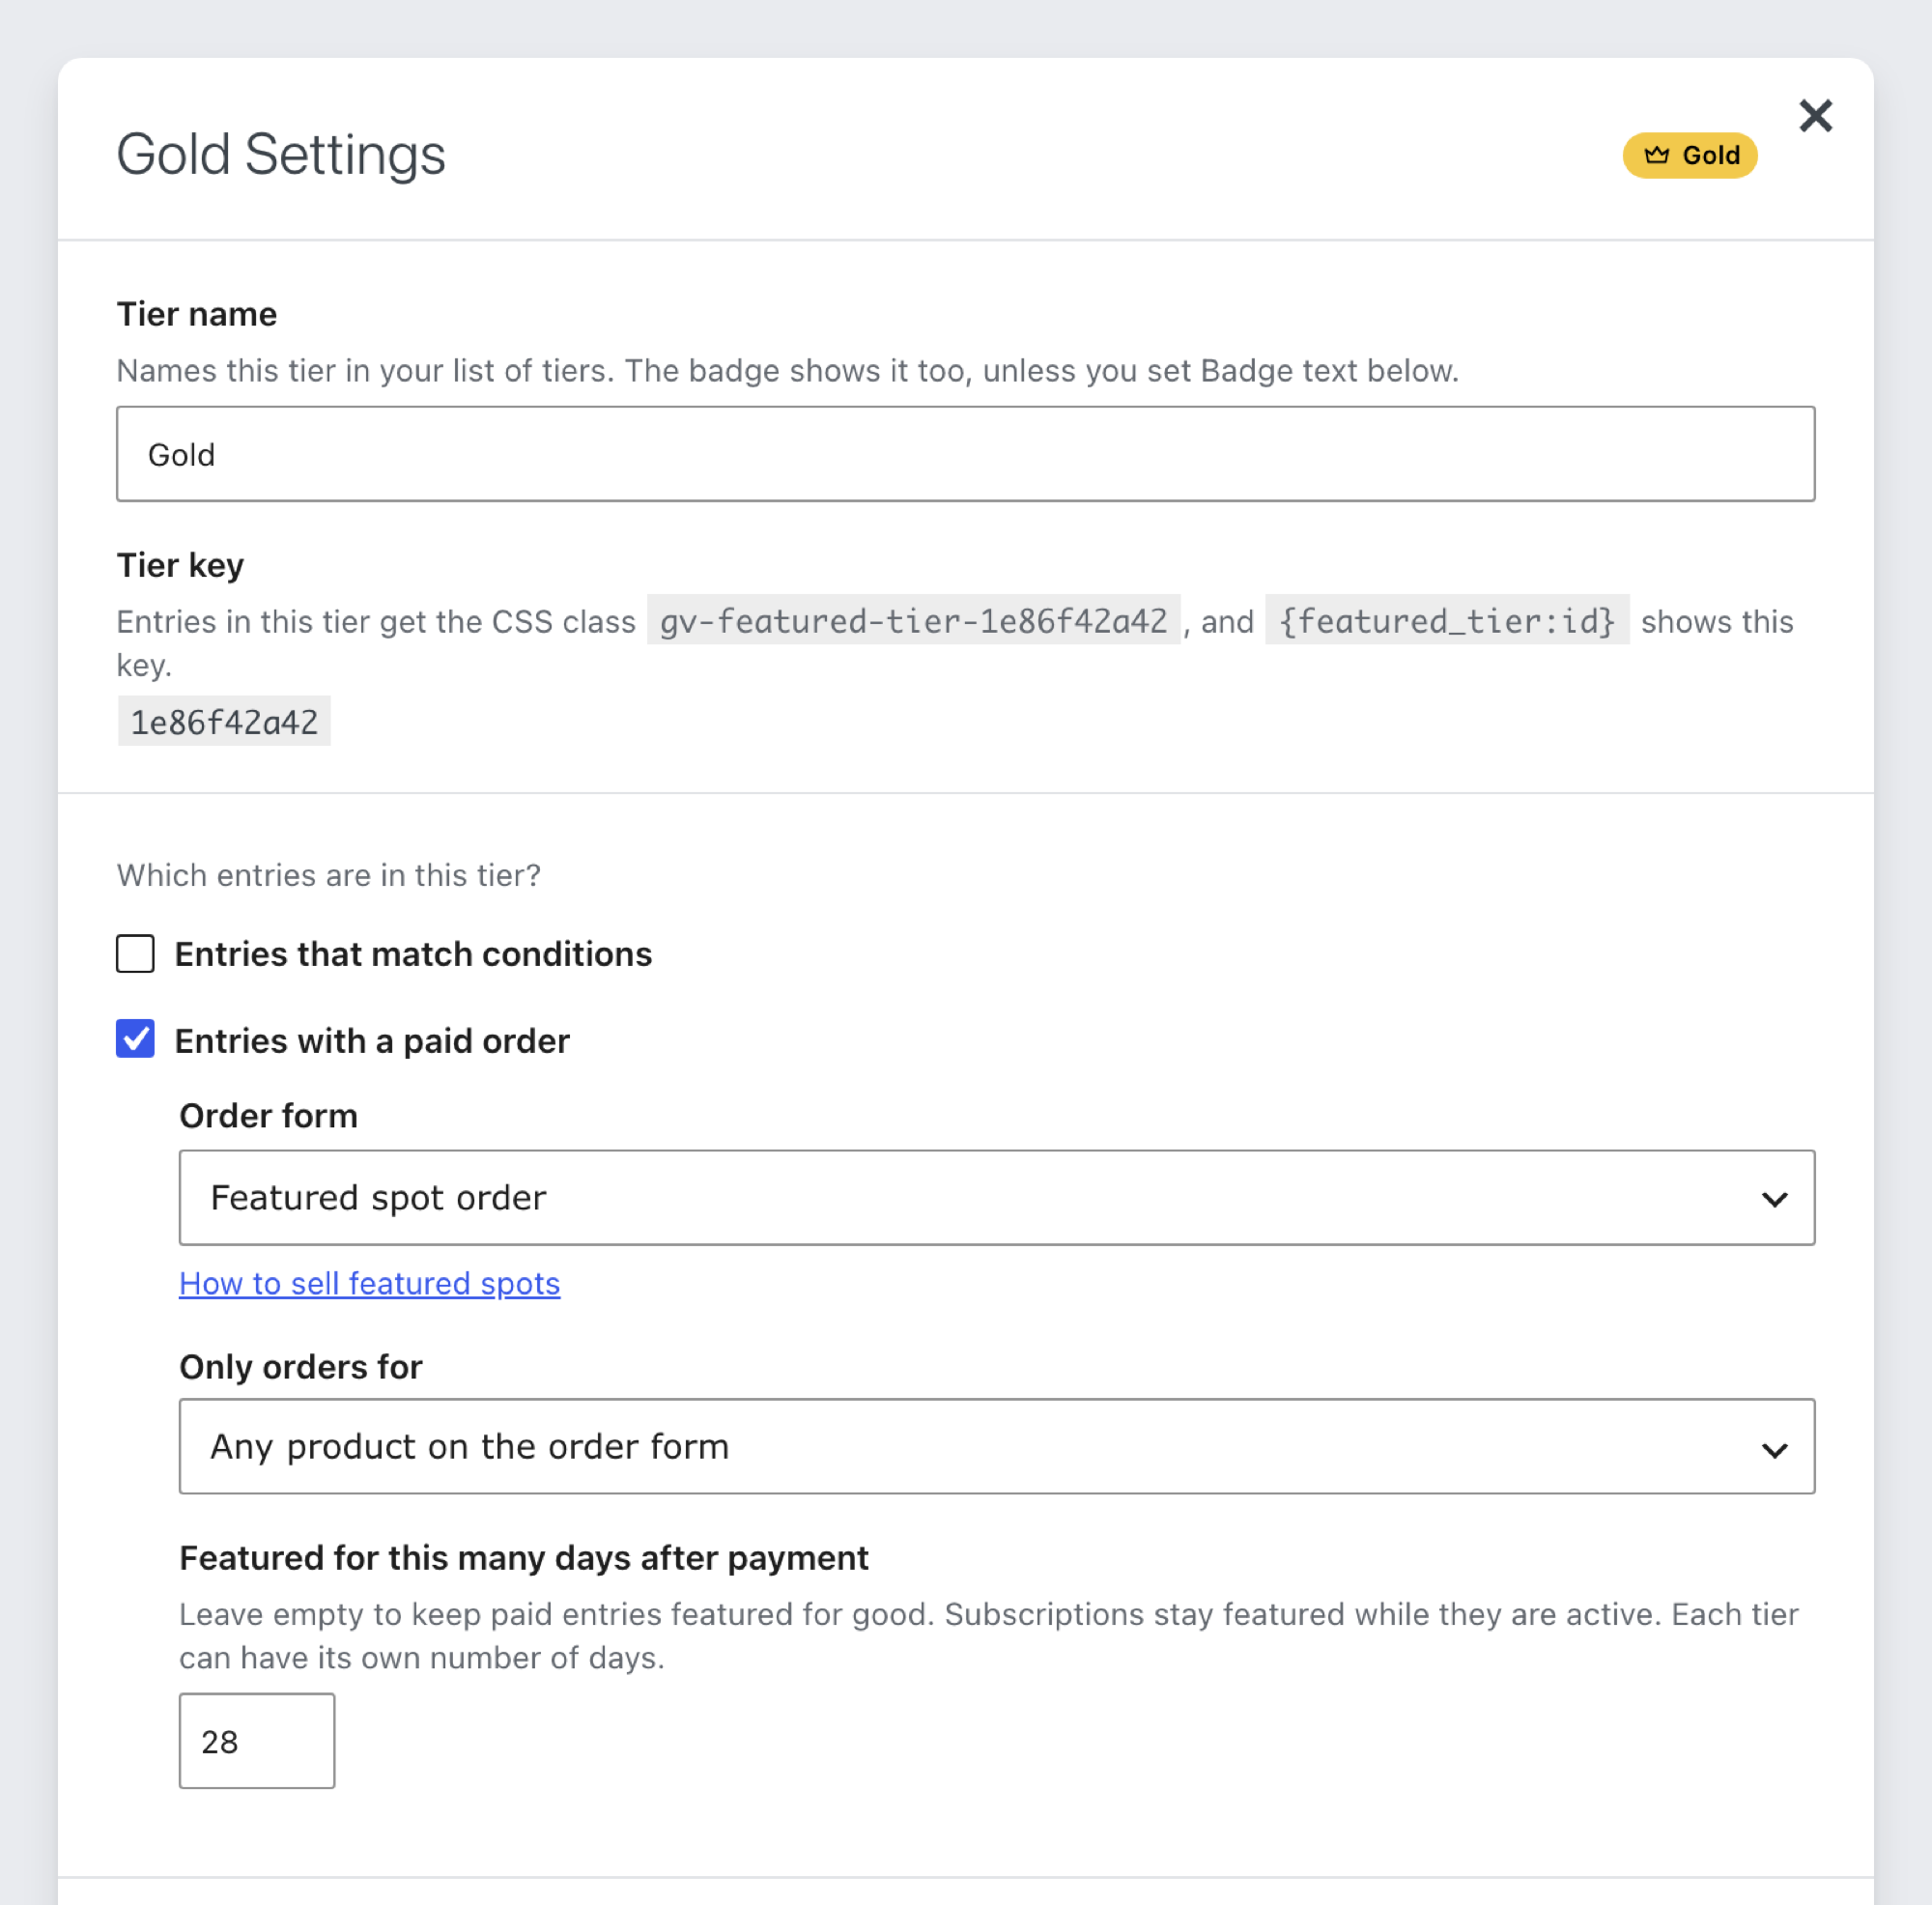
- In **Featured for this many days after payment**, type the number of days, such as `28`. Leave it empty to keep paid listings featured for good.
- In **Badge text**, type the words for the badge, such as `Gold`. Leave it empty to use the product name.
- Click **Create tiers**. The new tier's settings open, and the tier is named after the product. In **Tier name**, type a shorter name such as `Gold`, then click **Done**.
- Use the arrows to put the paid tier where you want it. In the example, Gold is first.
- Click **Save Tiers**.
To connect an order form to a tier you already have, open the tier's settings, check **Entries with a paid order** and choose the **Order form**. **Only orders for** limits the tier to one product, or leave it on **Any product on the order form**.
*How paid spots count:*
- A spot lasts the tier's number of days from the payment date. Then the listing leaves the tier, with nothing for you to remove.
- A subscription keeps its spot while it's Active. A refunded or canceled order stops counting.
- When a listing has several paid orders, the one that lasts longest counts.
- The order form only accepts listings that exist in your directory. With **Show only entries created by current user** on, it also refuses listings the buyer didn't create.
## Step 4: Send businesses to the order form
Businesses can reach the order form in two ways. You can offer both.
### From an email
Add the order link to the email a business gets when it adds a listing:
- In **Forms**, edit the directory form, then open **Settings** and **Notifications**.
- Click **Add New**, or edit a notification that already goes to the business. Set **Send To** to **Select a Field**, then choose the listing's Email field.
- In **Message**, click the **Code** tab and add a link to the order page. Gravity Forms replaces `{entry_id}` with the listing's entry ID:
```
Feature my listing
```
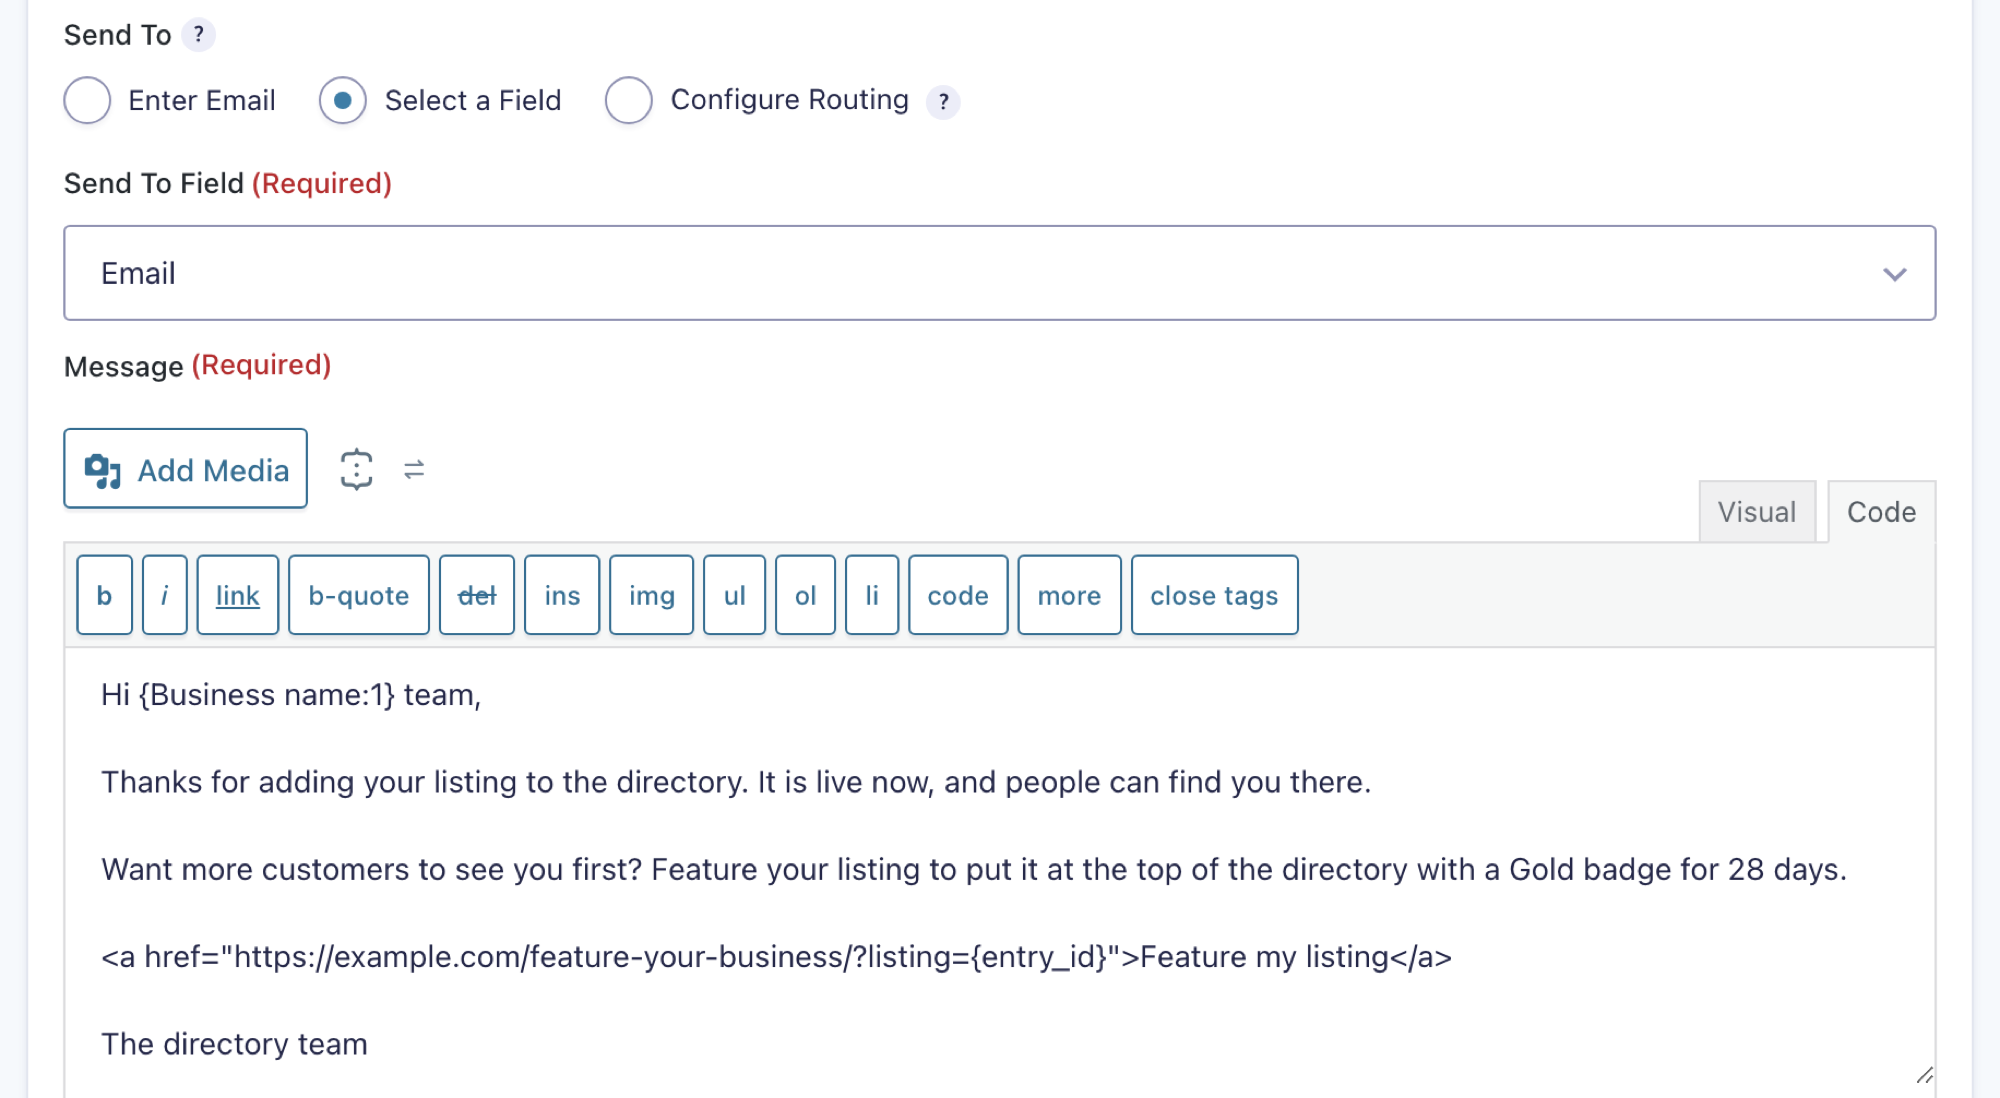
After you paste the link, check that the editor didn't add a second ``
The link keeps working, so a business can come back to it later. With [Magic Links](https://www.gravitykit.com/products/gravityview-pro/features/magic-links/), the same email can also let the business update its listing without an account. See [The {gv\_magic\_link} merge tag](https://www.gravitykit.com/docs/gravityview-pro/magic-links/the-gvmagiclinks-merge-tag/).
### From a "My Listings" page
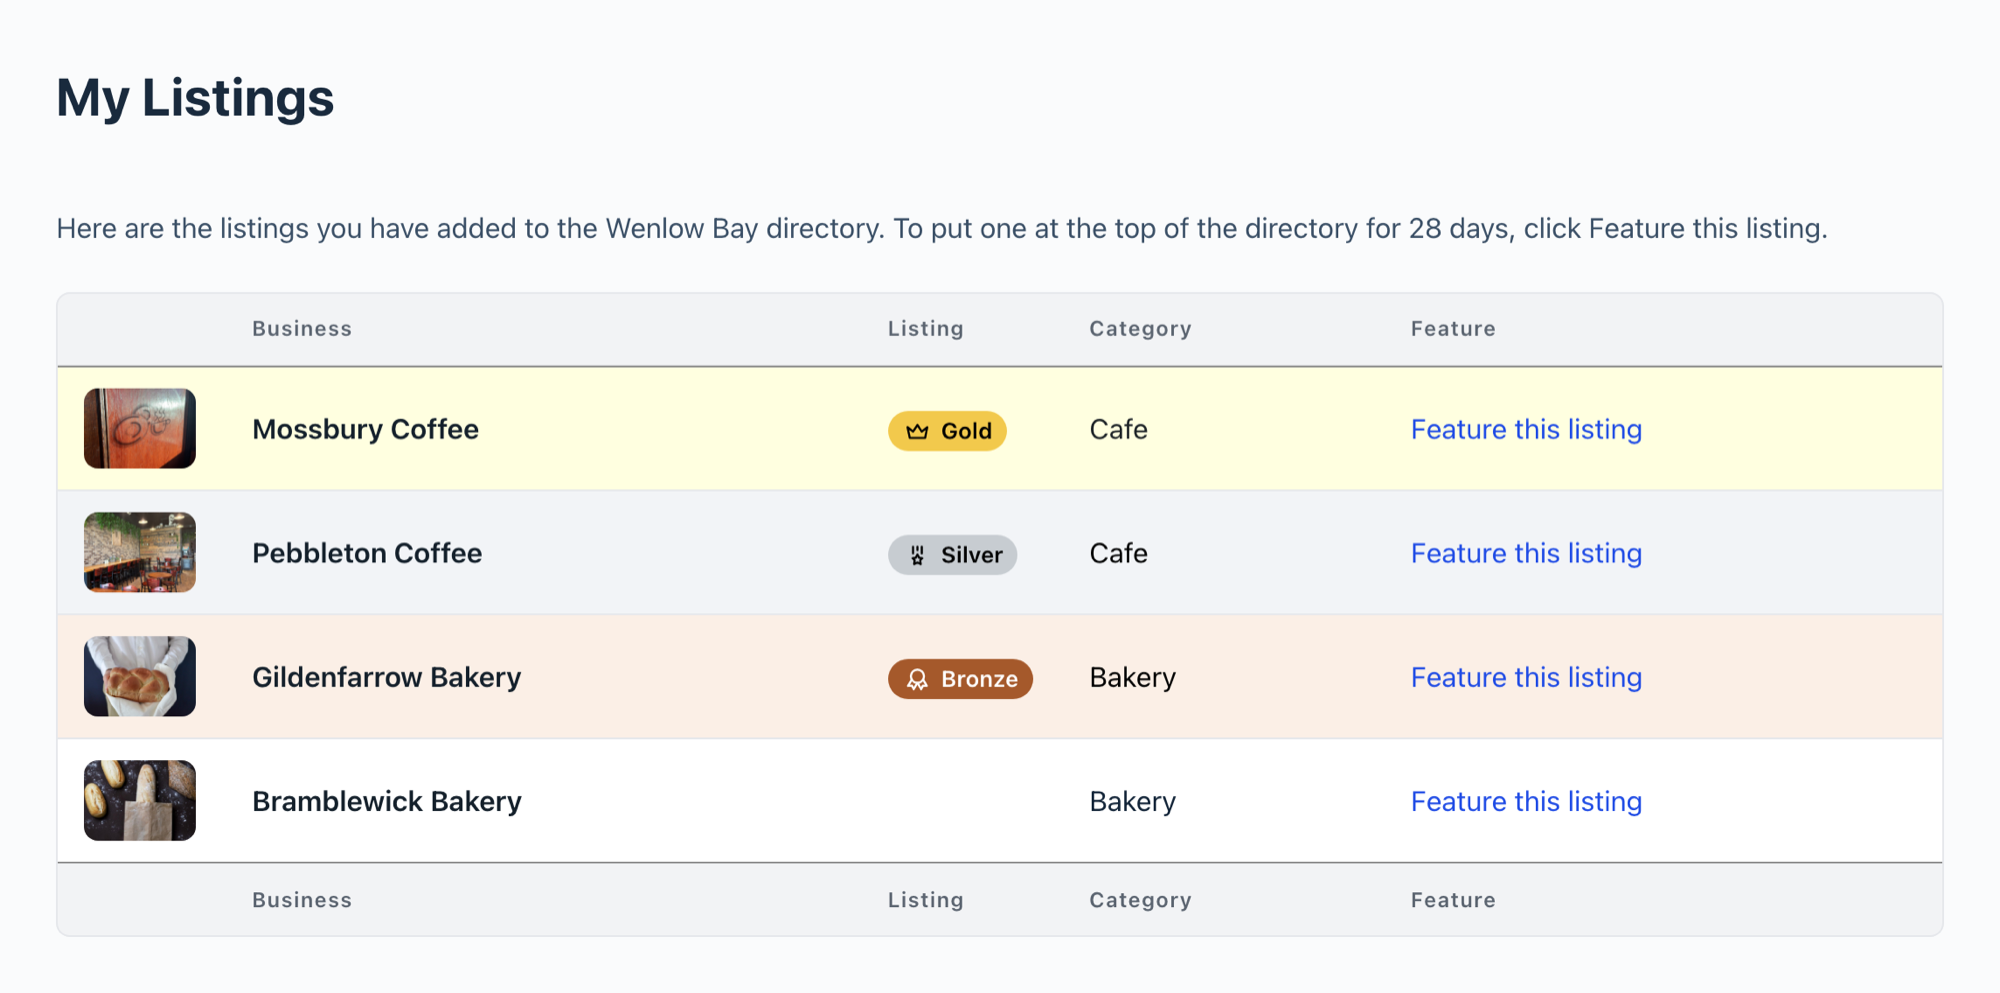
Show each logged-in business its own listings, with a link for each to feature it:
- [Create a second View](https://www.gravitykit.com/docs/gravityview/getting-started/how-to-setup-your-first-view/) of the directory form, such as "My Listings", using [the same layout](https://www.gravitykit.com/docs/gravityview/customizing-your-views/what-are-the-existing-layout-options-to-create-a-view/) as your directory, with the fields a business needs to tell its listings apart, and the Featured Badge field.
- Add a Custom Content field with the link below, and give it a **Custom Label** such as `Feature`.
```
Feature this listing
```
Then, in the View's **View Settings** tab, turn on [**Show only entries created by the currently logged-in user**](https://www.gravitykit.com/docs/gravityview-pro/advanced-filter/how-to-show-only-results-submitted-by-the-current-user/), click **Update**, and [add the View to a page with the GravityView block](https://www.gravitykit.com/docs/gravityview/getting-started/embedding-a-view-on-a-page-or-post/).
[If the page shows no listings](https://www.gravitykit.com/docs/gravityview/common-problems/why-are-my-entries-not-visible/)
, check **Show only approved entries** in the View's **View Settings** tab. New Views have it turned on, so[listings you haven't approved](https://www.gravitykit.com/docs/gravityview/entry-approval/approving-or-rejecting-entries-in-gravityview/) don't show.
Visitors who aren't logged in see no listings. A listing belongs to the user who was logged in when it was added. See [How an entry gets associated with a user](https://www.gravitykit.com/docs/gravityview/advanced/understanding-how-an-entry-gets-associated-with-a-user/).
## Step 5: Style each tier's badge
On your form's **Featured Tiers** page, click the gear next to a tier to open its settings. The **Preview** shows the badge as you change it.
- **Badge icon:** click it to search the icons, or click **Upload** to use your own image.
- **Badge text:** the words on the badge. Leave it empty to use the tier name.
- **Badge color:** pick a swatch, or click **Custom** for any color. If your theme has a color palette, the swatches come from it, so their names depend on your theme.
- **Row or card color:** the background of the tier's rows or cards. Choose the default pale yellow, no color, or **Custom**. Every new tier starts on pale yellow, so give each tier its own color if you want visitors to tell them apart.
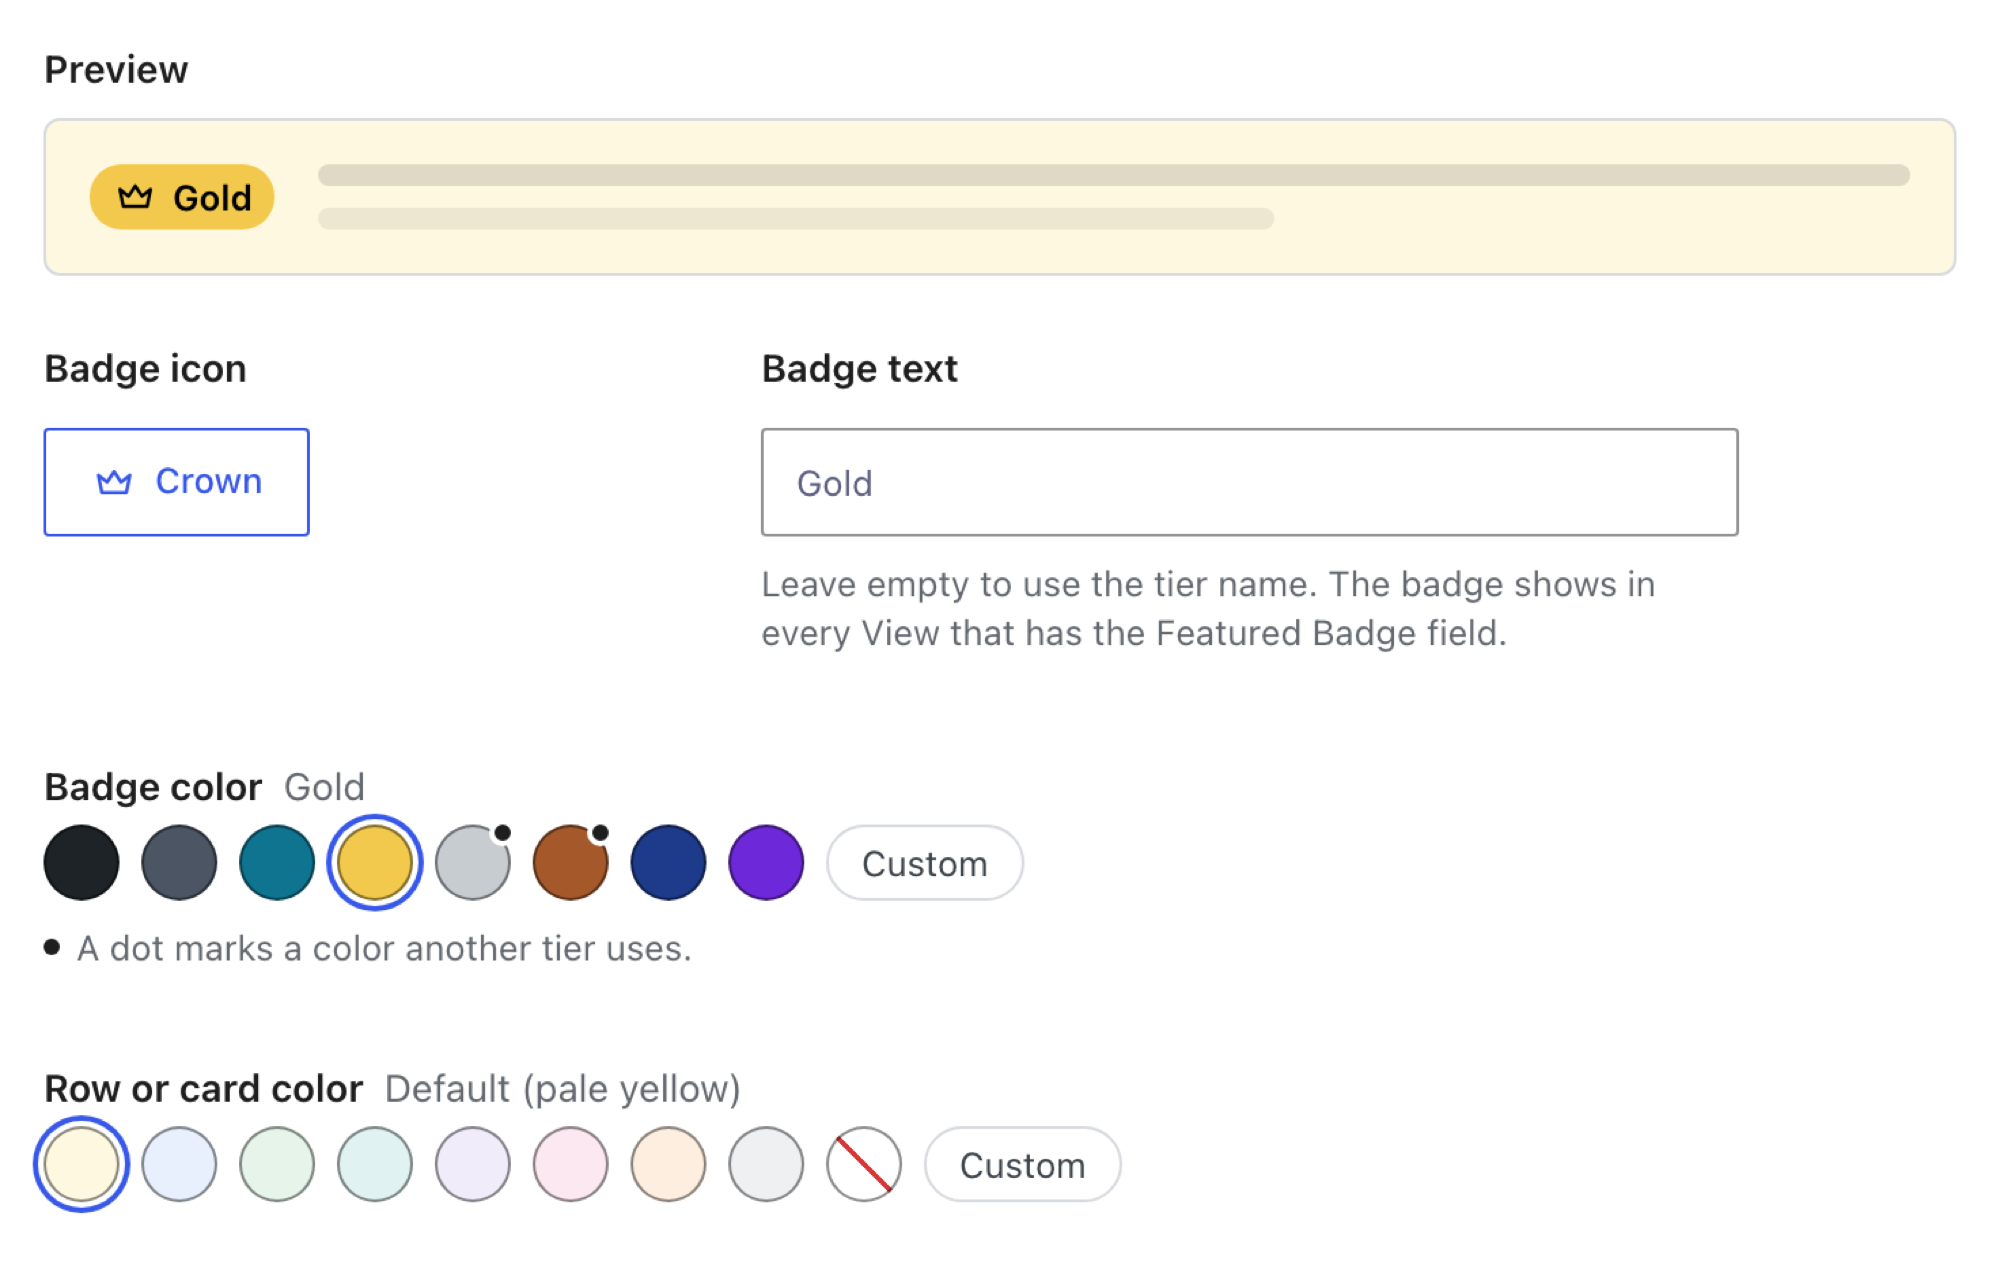
Click **Done**, then **Save Tiers**. The new badge appears wherever the tier is shown
## Step 6: Show the badges and move featured listings to the top
This step happens in the View, not on the form. You turn on Move Featured Entries to Top and add the badge field in the View editor.
- Edit your View, and in the **Settings** box, click the **Featured Entries** tab. Turn on [**Move Featured Entries to Top**](https://www.gravitykit.com/docs/gravityview-pro/featured-entries/how-to-always-display-featured-entries-regardless-of-search-results/). It's off by default. Without it, featured listings get their badge and color but stay in place.
- Add the **Featured Badge** field to your layout, so each featured listing shows its badge. If the View doesn't have it yet, the **Featured Entries** tab has an **Add the Featured Badge field** button that adds it for you. In the field's settings, **Show as** can be **Badge** or **Text**. Without the field, featured listings stand out by color alone, which some visitors can't see and screen readers don't announce.
- Click **Update**.
## Check that it works
Before you tell businesses about featured spots, check each part the way a visitor or a business would see it.
- Open your directory. Featured listings show their badges and, with **Move Featured Entries to Top** on, sit above the rest in tier order.
- Open your order page with `?listing=` and a listing's entry ID. The order form opens with that listing chosen.
- Place a test order, for example in your payment add-on's test mode. Once the order is marked Paid, the listing moves into the paid tier. If it doesn't, see [Take payment](#take-payment).
- Log in as a business and open your My Listings page. You see only that business's listings, each with a link to feature it.
## Feature listings with conditions
A tier can also feature entries that match conditions, with no payment:
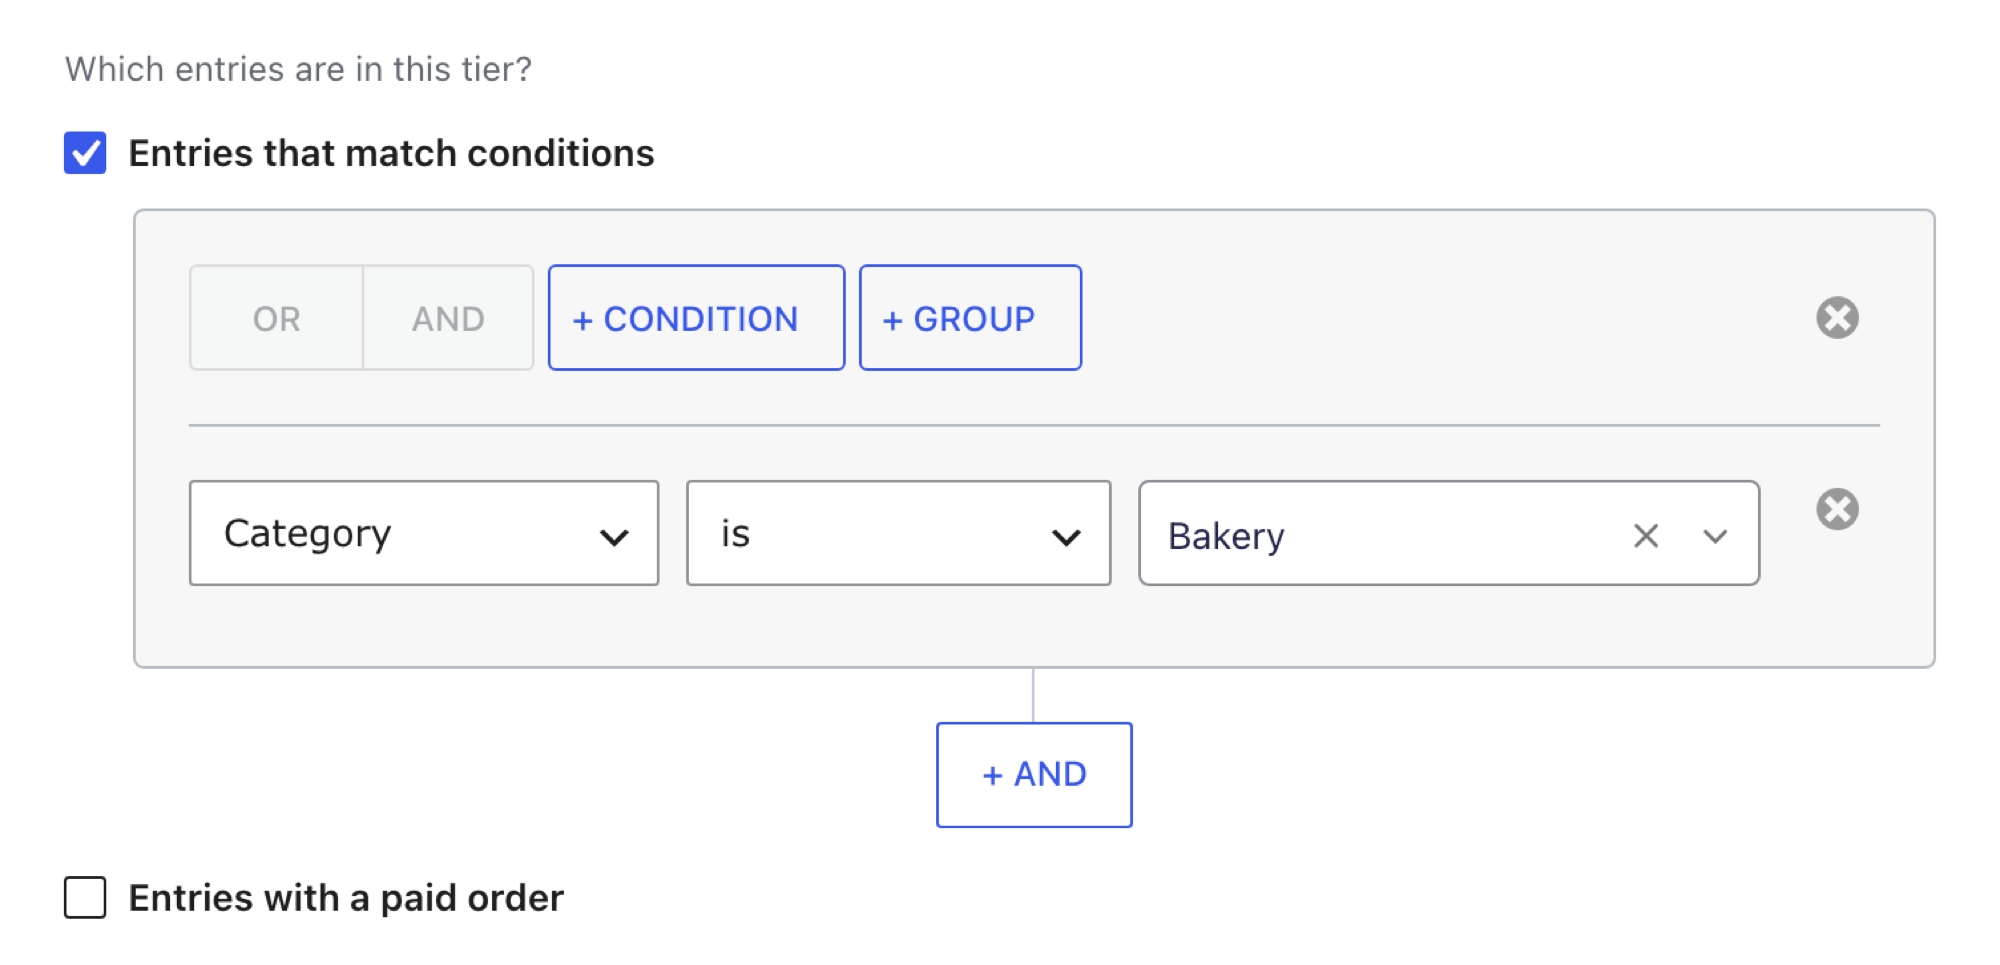
- On your form's **Featured Tiers** page, click **Add Tier**, then **Blank tier**, and open its settings.
- Check **Entries that match conditions** and add your conditions, such as Category is Bakery.
- Click **Done**, then **Save Tiers**.
The **Starred** `is` **Yes** condition features the entries you star in Gravity Forms. Every form starts with a tier named Featured that uses it. To star an entry, click the star next to it in **Forms**, then **Entries**.
## Show the tier in your own content
The `{featured_tier}` [merge tag](https://www.gravitykit.com/docs/gravityview/merge-tags/gravityview-merge-tags/) shows the entry's badge text, or the tier name when the badge has no text. It shows nothing when the entry isn't featured. Add a detail after a colon to show something else:
| Merge tag | Shows |
|---|---|
| `{featured_tier:id}` | The tier key, for comparing in [`[gvlogic]`](https://www.gravitykit.com/docs/gravityview/shortcodes/gvlogic-shortcode/) |
| `{featured_tier:rank}` | The tier's rank, 1 for the top tier |
| `{featured_tier:until}` | The date a paid spot ends. Empty for spots that don't end, subscriptions, and tiers that use only conditions |
| `{featured_tier:badge}` | The badge |
| `{featured_tier:color}` | The badge color |
| `{featured_tier:class}` | The tier's CSS class |
Each featured entry also gets the [CSS class](https://www.gravitykit.com/docs/gravityview-pro/featured-entries/how-do-i-feature-an-entry/#style-featured-entries-with-css) `gv-featured-tier-` followed by its tier key, which you'll find in the tier's settings. In a CSV export, the Featured Badge field shows the tier name.
## Good to know
These details cover who can change tiers, Views you already have, and Views that use more than one form.
- **Who can change tiers:** only people who can edit forms. Anyone who can edit a View can choose which tiers appear in it.
- **Updating from starred entries:** a form keeps featuring its starred entries until you save tiers on its **Featured Tiers** page. The page starts with one tier, Featured, for starred entries, so they stay featured unless you remove that tier.
- **Joined forms:** in a View that [joins forms](https://www.gravitykit.com/docs/gravityview-pro/multiple-forms/getting-started-with-multiple-forms/), tiers give entries their badges and colors but don't move them. **Move Featured Entries to Top** moves starred entries, as before.
- **Combined forms:** in a View that [combines forms](https://www.gravitykit.com/docs/gravityview-pro/multiple-forms/using-unions-in-multiple-forms/), each entry uses the tiers of its own form. **Move Featured Entries to Top** puts the first tier of every form on top, then the second tier of every form, and so on.
- **Two tiers with the same conditions:** the lower one features no entries, and its settings say so.
- **Exporting forms:** Gravity Forms exports and imports a form's tiers with the form.
## Questions
### What happens when a paid spot runs out?
The listing leaves the tier and goes back to its usual place in the View. You don't need to remove anything.
### Can I charge a monthly fee instead?
Yes. In the order form's payment feed, choose **Subscription** as the **Transaction Type**, and leave **Featured for this many days after payment** empty in the tier. The listing stays featured while the subscription is active.
### Can I sell 1-month, 3-month and 6-month spots?
Yes. Give the order form's Product field one choice per offer, then click **Add Tier** and **Tiers from an order form**. You get one tier for each choice. Open each tier's settings to set its days, such as 30, 90 and 180, and its badge.
### What happens if I refund a payment?
The listing stops being featured. Only orders marked Paid, or Active for a subscription, feature a listing.
### Can a listing be in two tiers?
A listing shows in the first tier it matches. A Silver listing with a paid Gold order shows as Gold, because Gold comes first.
### Can I still pick listings to feature myself?
Yes. Star the entries you want in Gravity Forms. Every form starts with a Featured tier for starred entries, and you can keep it alongside your other tiers, so free and paid tiers sit in the same View.
## Related articles
These articles cover the rest of Featured Entries and the Dynamic Lookup add-on.
- [Getting started with the Featured Entries Extension](https://www.gravitykit.com/docs/gravityview-pro/featured-entries/how-do-i-feature-an-entry/)
- [How to always display featured entries, regardless of search results](https://www.gravitykit.com/docs/gravityview-pro/featured-entries/how-to-always-display-featured-entries-regardless-of-search-results/)
- [Getting Started with Dynamic Lookup](https://www.gravitykit.com/docs/gravity-forms-dynamic-lookup/getting-started-with-dynamic-lookup/)